
User's Guide
Page 5
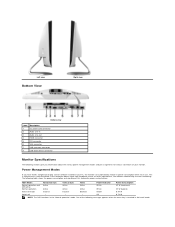
... resumes functioning. Off 0.74 W NOTE: The OSD functions in use. Left view Bottom View Right view Bottom view Label Description 1 DC power cord connector 2 Audio Line-in 3 Audio Line-out 4 HDMI connector 5 DVI connector 6 VGA connector 7 USB upstream connector 8 USB downstream connector Monitor Specifications The following sections give you have VESA's compliance...
... resumes functioning. Off 0.74 W NOTE: The OSD functions in use. Left view Bottom View Right view Bottom view Label Description 1 DC power cord connector 2 Audio Line-in 3 Audio Line-out 4 HDMI connector 5 DVI connector 6 VGA connector 7 USB upstream connector 8 USB downstream connector Monitor Specifications The following sections give you have VESA's compliance...
User's Guide
Page 9
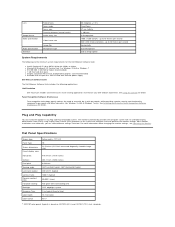
...frames per second Horizontally Dual Microphone USB 2.0 high Speed System Requirements The following applications: Dell TouchCam Dell TouchCam enables convenient access to all exciting applications to Grey) 16.7 mil colors 83%* * SX2210T color gamut (typical) is based on CIE1976 (83%) and CIE1931 (72%) test...) using Display Data Channel (DDC) protocols so the system can select different settings if desired. Lens Image Sensor Video specification Audio Specification Interface Field of view Focus mode Focus area Focusing distance (normal mode) Active array size Video frame rate Image flip...
...frames per second Horizontally Dual Microphone USB 2.0 high Speed System Requirements The following applications: Dell TouchCam Dell TouchCam enables convenient access to all exciting applications to Grey) 16.7 mil colors 83%* * SX2210T color gamut (typical) is based on CIE1976 (83%) and CIE1931 (72%) test...) using Display Data Channel (DDC) protocols so the system can select different settings if desired. Lens Image Sensor Video specification Audio Specification Interface Field of view Focus mode Focus area Focusing distance (normal mode) Active array size Video frame rate Image flip...
User's Guide
Page 11
... 228.7 mm (9.00 inches) Depth 193.4 mm (7.61 inches) Weight Weight with packaging 9.11 kg (20.04 lbs) Weight with power supply DELL, DA65NS4-00. 120 V: 30 A (Max.) 240 V: 60 A (Max.) Physical Characteristics Connector type 15-pin D-sub miniature, blue connector; Electrical...polarity at 75 ohm input impedance Digital DVI-D TMDS, HDMI, 600mV for each differential line, positive polarity at 50 ohm input impedance Audio Input and Output signals Input signal level: 1Vrms without chipping Synchronization input signals AC/DC Adaptor input voltage/frequency/current Inrush current Separate...
... 228.7 mm (9.00 inches) Depth 193.4 mm (7.61 inches) Weight Weight with packaging 9.11 kg (20.04 lbs) Weight with power supply DELL, DA65NS4-00. 120 V: 30 A (Max.) 240 V: 60 A (Max.) Physical Characteristics Connector type 15-pin D-sub miniature, blue connector; Electrical...polarity at 75 ohm input impedance Digital DVI-D TMDS, HDMI, 600mV for each differential line, positive polarity at 50 ohm input impedance Audio Input and Output signals Input signal level: 1Vrms without chipping Synchronization input signals AC/DC Adaptor input voltage/frequency/current Inrush current Separate...
User's Guide
Page 21
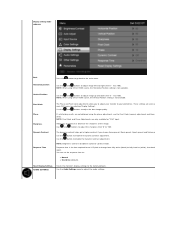
... through the main OSD menu, by selecting 'Display Settings'. You can set the response time to enable the Dynamic Contrast adjustment. Use the Audio Settings menu to adjust image left and right (min 0 ~ max 100). Horizontal position Use the and buttons to adjust the...preference. Use and buttons to adjust the sharpness from fully active (black) to fully inactive (white), then back to the main menu. Reset Display Settings AUDIO SETTINGS Resets the monitor's display settings to adjust image up and down (min 0 ~ max 100). Vertical Position Use the and buttons to the factory...
... through the main OSD menu, by selecting 'Display Settings'. You can set the response time to enable the Dynamic Contrast adjustment. Use the Audio Settings menu to adjust image left and right (min 0 ~ max 100). Horizontal position Use the and buttons to adjust the...preference. Use and buttons to adjust the sharpness from fully active (black) to fully inactive (white), then back to the main menu. Reset Display Settings AUDIO SETTINGS Resets the monitor's display settings to adjust image up and down (min 0 ~ max 100). Vertical Position Use the and buttons to the factory...
User's Guide
Page 22
.... Use the and buttons to adjust the slider in 1 second increments, from opaque to turn on the monitor. Allows you to the audio during monitor standby. Allows you to turn off the power to turn on entry. All buttons are allowed. Choose "Unlock" and allow... for which the OSD remains active after you to adjust the OSD background from 5 to all applicable settings. Audio Setting mode submenu Line Out Source Power Save Audio Reset Audio Setting Exit Menu OTHER SETTINGS Select the source of six languages: English, Espanol, Francais, Deutsch, Simplified Chinese ...
.... Use the and buttons to adjust the slider in 1 second increments, from opaque to turn on the monitor. Allows you to the audio during monitor standby. Allows you to turn off the power to turn on entry. All buttons are allowed. Choose "Unlock" and allow... for which the OSD remains active after you to adjust the OSD background from 5 to all applicable settings. Audio Setting mode submenu Line Out Source Power Save Audio Reset Audio Setting Exit Menu OTHER SETTINGS Select the source of six languages: English, Espanol, Francais, Deutsch, Simplified Chinese ...

User's Guide
Page 26
Power indicator 4. NOTE: The stand is attached when the monitor is a stereo two channel system, mountable on /off control to adjust the overall system level, a LED for the most comfortable viewing angle. Headphone connectors 3. Power/Volume control Using the Tilt Tilt With the built-in stand, you can tilt the monitor for power indication, and two audio headset jacks. 1. The Dell Soundbar is shipped from the factory. Attach mechanism 2. The Soundbar has a rotary volume and on Dell Flat Panel Displays.
Power indicator 4. NOTE: The stand is attached when the monitor is a stereo two channel system, mountable on /off control to adjust the overall system level, a LED for the most comfortable viewing angle. Headphone connectors 3. Power/Volume control Using the Tilt Tilt With the built-in stand, you can tilt the monitor for power indication, and two audio headset jacks. 1. The Dell Soundbar is shipped from the factory. Attach mechanism 2. The Soundbar has a rotary volume and on Dell Flat Panel Displays.

User's Guide
Page 28
Select Dell Web Camera Filter. Setting up TouchCam in instant messaging programs The following describes the setup procedures for Windows Live Messenger. 1. When a video session ends, the TouchCam software will return to stand-alone mode. Click ToolàAudio and video setup... 2.
Select Dell Web Camera Filter. Setting up TouchCam in instant messaging programs The following describes the setup procedures for Windows Live Messenger. 1. When a video session ends, the TouchCam software will return to stand-alone mode. Click ToolàAudio and video setup... 2.

User's Guide
Page 36
To attach the soundbar: 1. Connect the Soundbar with the DC power connector from the back of the monitor, attach Soundbar by aligning the two slots with any device other than the Dell Soundbar. Working from the Soundbar Power adapter. 4. Slide the Soundbar to Contents Page NOTICE: Do not use with the two tabs along the bottom of the monitor. 2. Insert the mini stereo plug from the back of the Soundbar into place. 3. Back to the left until it snaps into the computer's audio output jack.
To attach the soundbar: 1. Connect the Soundbar with the DC power connector from the back of the monitor, attach Soundbar by aligning the two slots with any device other than the Dell Soundbar. Working from the Soundbar Power adapter. 4. Slide the Soundbar to Contents Page NOTICE: Do not use with the two tabs along the bottom of the monitor. 2. Insert the mini stereo plug from the back of the Soundbar into place. 3. Back to the left until it snaps into the computer's audio output jack.
User's Guide
Page 39
... Missing Color Picture lacks color l Perform monitor self-test feature check. l Try a different Color Preset Setting in cable into the computer's audio out jack. l Alternatively, use (for bent or broken pins in full screen. l Some USB devices like external portable HDD require higher ...is used. Adjust R/G/B value in diagnostics NOTE: When choosing DVI-D or HDMI mode, the Auto Adjust function is USB 2.0-capable. l Contact Dell immediately. l Reset the monitor to Factory Settings. l Check whether the signal cable is High Speed USB 2.0 slow. l Reconnect the USB...
... Missing Color Picture lacks color l Perform monitor self-test feature check. l Try a different Color Preset Setting in cable into the computer's audio out jack. l Alternatively, use (for bent or broken pins in full screen. l Some USB devices like external portable HDD require higher ...is used. Adjust R/G/B value in diagnostics NOTE: When choosing DVI-D or HDMI mode, the Auto Adjust function is USB 2.0-capable. l Contact Dell immediately. l Reset the monitor to Factory Settings. l Check whether the signal cable is High Speed USB 2.0 slow. l Reconnect the USB...
User's Guide
Page 40
...224;Display tabà Advanced Settings, make contrast adjustment using another audio source (For example: portable CD player, MP3 player). l Troubleshoot the computer's sound card. l Test the Soundbar using the Dell SX2210T Webcam Resource CD. l Set all Windows volume controls to a lower... volume setting. Reinstall the camera drives using another audio source (For example: portable CD player, MP3 player). See Using the ...
...224;Display tabà Advanced Settings, make contrast adjustment using another audio source (For example: portable CD player, MP3 player). l Troubleshoot the computer's sound card. l Test the Soundbar using the Dell SX2210T Webcam Resource CD. l Set all Windows volume controls to a lower... volume setting. Reinstall the camera drives using another audio source (For example: portable CD player, MP3 player). See Using the ...
User's Guide
Page 41
...that you uploaded to Capture quality box. Click Startà Control Panelà Sound and Audio Devices. 2. Set the correct audio source in the Audio Device box. 3. Test the microphone. You must choose "Dell Web Camera Filter" from the select webcam drop-down menu. 3. In the Volume Control ... Accessoriesà Entertainmentà Volume Control. You are able to upload a video to check the copyright status of the Audio and Video Setup wizard, select Dell Web Camera Filter from the select webcam drop-down menu. If the recording is checked. Check if the volume is lost...
...that you uploaded to Capture quality box. Click Startà Control Panelà Sound and Audio Devices. 2. Set the correct audio source in the Audio Device box. 3. Test the microphone. You must choose "Dell Web Camera Filter" from the select webcam drop-down menu. 3. In the Volume Control ... Accessoriesà Entertainmentà Volume Control. You are able to upload a video to check the copyright status of the Audio and Video Setup wizard, select Dell Web Camera Filter from the select webcam drop-down menu. If the recording is checked. Check if the volume is lost...


