Setup Guide
Page 7
... or allow dust to the Studio XPS. Restricting the airflow can damage the computer or cause a fire. Do not store your Dell™ computer in an enclosed space, such as a closed briefcase, while it is normal and does not indicate a problem with the fan or the computer. The computer... turns on all other sides. Restricting airflow around your Studio XPS in a low-airflow environment, such ...
... or allow dust to the Studio XPS. Restricting the airflow can damage the computer or cause a fire. Do not store your Dell™ computer in an enclosed space, such as a closed briefcase, while it is normal and does not indicate a problem with the fan or the computer. The computer... turns on all other sides. Restricting airflow around your Studio XPS in a low-airflow environment, such ...

Setup Guide
Page 36
... the message you could see the Dell Technology Guide on your Studio XPS has an issue or error, it may display a System Message that will help in the following examples, see the documentation for assistance). Previous attempts at booting this checkpoint and contact Dell Technical Support - Replace the CPU fan. Keyboard failure or loose cable...
... the message you could see the Dell Technology Guide on your Studio XPS has an issue or error, it may display a System Message that will help in the following examples, see the documentation for assistance). Previous attempts at booting this checkpoint and contact Dell Technical Support - Replace the CPU fan. Keyboard failure or loose cable...
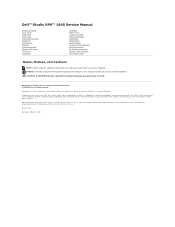
Service Manual
Page 1
...a potential for property damage, personal injury, or death. Dell Inc. Microsoft, Windows, Windows Vista, a n d Windows Vista start button logo are trademarks of Microsoft Corporation in this document is strictly forbidden. A00 Dell™ Studio XPS™ 1640 Service Manual Before You Begin Base Cover Hard... Drive Rear Caps Processor Heat Sink Processor Thermal Fan Memory Coin-Cell Battery Wireless Mini-Card Palm Rest Keyboard ...
...a potential for property damage, personal injury, or death. Dell Inc. Microsoft, Windows, Windows Vista, a n d Windows Vista start button logo are trademarks of Microsoft Corporation in this document is strictly forbidden. A00 Dell™ Studio XPS™ 1640 Service Manual Before You Begin Base Cover Hard... Drive Rear Caps Processor Heat Sink Processor Thermal Fan Memory Coin-Cell Battery Wireless Mini-Card Palm Rest Keyboard ...

Service Manual
Page 16
... processor so that the cam lock is not properly seated can result in the ZIF socket does not require force. NOTE: If the processor, thermal fan, or system board is achieved. Do not reuse the old thermal cooling pads. 4. Align the pin-1 corner of the processor heat sink that thermal conductivity...
... processor so that the cam lock is not properly seated can result in the ZIF socket does not require force. NOTE: If the processor, thermal fan, or system board is achieved. Do not reuse the old thermal cooling pads. 4. Align the pin-1 corner of the processor heat sink that thermal conductivity...
Service Manual
Page 23
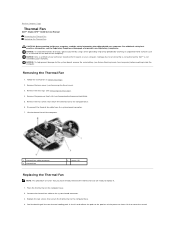
... that cover the central Lift the thermal fan off the new thermal cooling pads in Before You Begin. 2. Back to Contents Page Thermal Fan Dell™ Studio XPS™ 1640 Service Manual Removing the Thermal Fan Replacing the Thermal Fan CAUTION: Before working inside your computer, read... the safety information that is not authorized by Dell™ is not covered by periodically touching ...
... that cover the central Lift the thermal fan off the new thermal cooling pads in Before You Begin. 2. Back to Contents Page Thermal Fan Dell™ Studio XPS™ 1640 Service Manual Removing the Thermal Fan Replacing the Thermal Fan CAUTION: Before working inside your computer, read... the safety information that is not authorized by Dell™ is not covered by periodically touching ...

Service Manual
Page 24
Replace the processor heat sink (see Replacing the Rear Caps). 7. Back to ensure that thermal conductivity is achieved. Replace the rear caps (see Replacing the Processor Heat Sink). 6. Slide the battery into the battery bay until it clicks into place. NOTE: If the processor, thermal fan, or system board is replaced, use the thermal cooling pads provided in the kit on the processor heat sink to Contents Page Do not reuse the old thermal cooling pads. 5. processor unit and the graphic processor unit. Replace the base cover (see Replacing the Base Cover). 8.
Replace the processor heat sink (see Replacing the Rear Caps). 7. Back to ensure that thermal conductivity is achieved. Replace the rear caps (see Replacing the Processor Heat Sink). 6. Slide the battery into the battery bay until it clicks into place. NOTE: If the processor, thermal fan, or system board is replaced, use the thermal cooling pads provided in the kit on the processor heat sink to Contents Page Do not reuse the old thermal cooling pads. 5. processor unit and the graphic processor unit. Replace the base cover (see Replacing the Base Cover). 8.
Service Manual
Page 43
...board. Removing the System Board 1. Remove the hard drive (see Removing the Thermal Fan). 8. Remove the thermal fan (see Removing the Hard Drive). 5. Remove the palm rest (see Removing the ...the respective system board connectors. 18. Remove the audio board (see Removing the Display Assembly). 16. Follow the instructions in Before You Begin. 2. Remove the optical drive (see Removing the ... to servicing that shipped with your computer. Back to Contents Page System Board Dell™ Studio XPS™ 1640 Service Manual Removing the System Board Replacing the System Board CAUTION:...
...board. Removing the System Board 1. Remove the hard drive (see Removing the Thermal Fan). 8. Remove the thermal fan (see Removing the Hard Drive). 5. Remove the palm rest (see Removing the ...the respective system board connectors. 18. Remove the audio board (see Removing the Display Assembly). 16. Follow the instructions in Before You Begin. 2. Remove the optical drive (see Removing the ... to servicing that shipped with your computer. Back to Contents Page System Board Dell™ Studio XPS™ 1640 Service Manual Removing the System Board Replacing the System Board CAUTION:...

Service Manual
Page 44
... the Rear Caps). 18. Replace the memory module(s) (see Replacing the Base Cover). Replace the base cover (see Replacing the Memory Module(s)). 16. Replace the three screws that cover the central processor unit and the graphic processor unit. Replace the audio board (see Replacing the Coin-Cell Battery... replace all screws and ensure that thermal conductivity is achieved. Replace the Mini-Cards, if any (see Replacing the Thermal Fan). 13. NOTE: If the processor, thermal fan, or system board is replaced, use the thermal cooling pads provided in the kit and adhere the pads to ensure that...
... the Rear Caps). 18. Replace the memory module(s) (see Replacing the Base Cover). Replace the base cover (see Replacing the Memory Module(s)). 16. Replace the three screws that cover the central processor unit and the graphic processor unit. Replace the audio board (see Replacing the Coin-Cell Battery... replace all screws and ensure that thermal conductivity is achieved. Replace the Mini-Cards, if any (see Replacing the Thermal Fan). 13. NOTE: If the processor, thermal fan, or system board is replaced, use the thermal cooling pads provided in the kit and adhere the pads to ensure that...


