
Color Smart Printer Users Guide
Page 5
... Printer 213 Maintaining Your Printer Determining the Status of Supplies Conserving Supplies Ordering Supplies Storing Print Media Storing Consumables Replacing the Toner Cartridges Replacing the Drum Cartridges Replacing the Waste Toner Box Cleaning the Exterior Cleaning the Touch Screen Cleaning Inside the Printer Moving the Printer Adjusting Color Registration 214 214...
... Printer 213 Maintaining Your Printer Determining the Status of Supplies Conserving Supplies Ordering Supplies Storing Print Media Storing Consumables Replacing the Toner Cartridges Replacing the Drum Cartridges Replacing the Waste Toner Box Cleaning the Exterior Cleaning the Touch Screen Cleaning Inside the Printer Moving the Printer Adjusting Color Registration 214 214...
Color Smart Printer Users Guide
Page 14
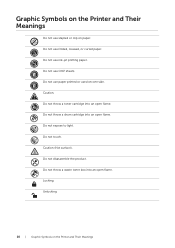
Do not throw a toner cartridge into an open flame. Do not throw a drum cartridge into an open flame. Caution (Hot surface). Do not use stapled or clip on paper. Do not expose to light. Unlocking. 14 | Graphic Symbols ...
Do not throw a toner cartridge into an open flame. Do not throw a drum cartridge into an open flame. Caution (Hot surface). Do not use stapled or clip on paper. Do not expose to light. Unlocking. 14 | Graphic Symbols ...
Color Smart Printer Users Guide
Page 15
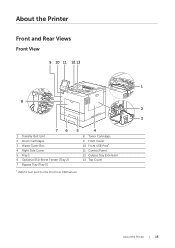
About the Printer Front and Rear Views Front View 9 10 11 12 13 1 8 2 3 76 1 Transfer Belt Unit 2 Drum Cartridges 3 Waste Toner Box 4 Right Side Cover 5 Tray 1 6 Optional 550-Sheet Feeder (Tray 2) 7 Bypass Tray (Tray 5) 5 4 8 Toner Cartridges 9 Front Cover 10 Front USB Port* 11 Control Panel 12 Output Tray Extension 13 Top Cover * USB 2.0 host port (for the Print from USB feature) About the Printer | 15
About the Printer Front and Rear Views Front View 9 10 11 12 13 1 8 2 3 76 1 Transfer Belt Unit 2 Drum Cartridges 3 Waste Toner Box 4 Right Side Cover 5 Tray 1 6 Optional 550-Sheet Feeder (Tray 2) 7 Bypass Tray (Tray 5) 5 4 8 Toner Cartridges 9 Front Cover 10 Front USB Port* 11 Control Panel 12 Output Tray Extension 13 Top Cover * USB 2.0 host port (for the Print from USB feature) About the Printer | 15
Color Smart Printer Users Guide
Page 187
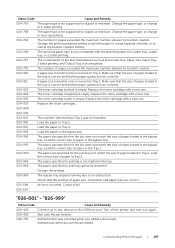
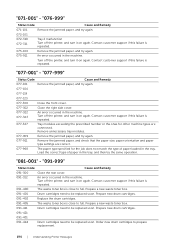
.... 024-985 The bypass tray stopped running due to face-up to two devices to 1-sided printing. 024-708 The paper type is empty. Contact Dell. 025-597 "026-001" - Replace the toner cartridge with a new one . 024-924 The toner cartridge (magenta) is not supported for duplex or inversion.... paper type is correct and that the settings of paper loaded in the tray is not compatible with a new one . 024-933 Replace the drum cartridges. 024-940 024-941 024-947 The machine detected that the paper guides are set correctly. 024-911 A paper size mismatch error occurred ...
.... 024-985 The bypass tray stopped running due to face-up to two devices to 1-sided printing. 024-708 The paper type is empty. Contact Dell. 025-597 "026-001" - Replace the toner cartridge with a new one . 024-924 The toner cartridge (magenta) is not supported for duplex or inversion.... paper type is correct and that the settings of paper loaded in the tray is not compatible with a new one . 024-933 Replace the drum cartridges. 024-940 024-941 024-947 The machine detected that the paper guides are set correctly. 024-911 A paper size mismatch error occurred ...
Color Smart Printer Users Guide
Page 194
... support if this failure is repeated. 091-400 The waste toner box is close to prepare replacement. 194 | Understanding Printer Messages Order new drum cartridges to full. Contact customer support if this failure is close to be replaced soon. Load the correct type of paper loaded in the machine.... Turn off the printer, and turn it on again. Prepare new drum cartridges. 091-402 Replace the drum cartridges. 091-405 The waste toner box is repeated. 075-100 Remove the jammed paper, and try again. 077-911 Remove...
... support if this failure is repeated. 091-400 The waste toner box is close to prepare replacement. 194 | Understanding Printer Messages Order new drum cartridges to full. Contact customer support if this failure is close to be replaced soon. Load the correct type of paper loaded in the machine.... Turn off the printer, and turn it on again. Prepare new drum cartridges. 091-402 Replace the drum cartridges. 091-405 The waste toner box is repeated. 075-100 Remove the jammed paper, and try again. 077-911 Remove...

Color Smart Printer Users Guide
Page 195
..., and turn it on again. Contact customer support if this failure is repeated. 092-318 Density of Magenta color is displayed again, pull out the drum and toner cartridges of that color, and then insert them again. Turn off the printer, and turn it on again. If the same message is... the same message is low. Contact customer support if this failure is repeated. 092-321 Density of Cyan color is displayed again, pull out the drum and toner cartridges of that color, and then insert them again. "092-001" - If the same message is low. Turn off the printer, and turn...
..., and turn it on again. Contact customer support if this failure is repeated. 092-318 Density of Magenta color is displayed again, pull out the drum and toner cartridges of that color, and then insert them again. Turn off the printer, and turn it on again. If the same message is... the same message is low. Contact customer support if this failure is repeated. 092-321 Density of Cyan color is displayed again, pull out the drum and toner cartridges of that color, and then insert them again. "092-001" - If the same message is low. Turn off the printer, and turn...
Color Smart Printer Users Guide
Page 197
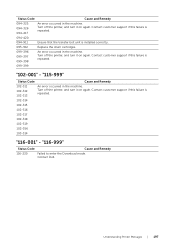
.... Understanding Printer Messages | 197 "115-999" Status Code Cause and Remedy 102-311 102-312 102-313 An error occurred in the machine. Contact Dell. Status Code Cause and Remedy 094-325 094-326 094-417 An error occurred in the machine. Turn off the printer, and turn it on... Code Cause and Remedy 116-220 Failed to enter the Download mode. Contact customer support if this failure is installed correctly. 095-912 Replace the drum cartridges. 099-396 099-397 099-398 An error occurred in the machine. Contact customer support if this failure is repeated. 099-399 "102-...
.... Understanding Printer Messages | 197 "115-999" Status Code Cause and Remedy 102-311 102-312 102-313 An error occurred in the machine. Contact Dell. Status Code Cause and Remedy 094-325 094-326 094-417 An error occurred in the machine. Turn off the printer, and turn it on... Code Cause and Remedy 116-220 Failed to enter the Download mode. Contact customer support if this failure is installed correctly. 095-912 Replace the drum cartridges. 099-396 099-397 099-398 An error occurred in the machine. Contact customer support if this failure is repeated. 099-399 "102-...
Color Smart Printer Users Guide
Page 208
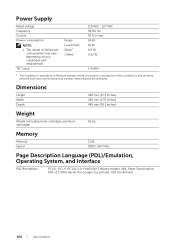
... conditions and environment. Dimensions Height Width Depth 439 mm (17.3 inches) 454 mm (17.9 inches) 485 mm (19.1 inches) Weight Weight (including toner cartridges and drum cartridges) 26 kg Memory Memory Speed 2 GB DDR3: 667 MHz Page Description Language (PDL)/Emulation, Operating System, and Interface PDL/Emulations PCL5c, PCL 6 (PCLXL 2.1), PostScript...
... conditions and environment. Dimensions Height Width Depth 439 mm (17.3 inches) 454 mm (17.9 inches) 485 mm (19.1 inches) Weight Weight (including toner cartridges and drum cartridges) 26 kg Memory Memory Speed 2 GB DDR3: 667 MHz Page Description Language (PDL)/Emulation, Operating System, and Interface PDL/Emulations PCL5c, PCL 6 (PCLXL 2.1), PostScript...
Color Smart Printer Users Guide
Page 216
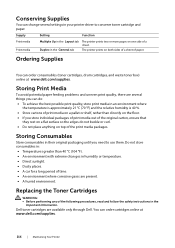
...prints two or more pages on one side of a sheet. Supply Setting Function Print media Print media Multiple Up in the Important Information. Dell toner cartridges are several things you can change several settings in an environment where the temperature is approximately 21 °C (70 °F) ...until you store individual packages of print media out of the original carton, ensure that they rest on a at www.dell.com/supplies. You can order consumables (toner cartridges, drum cartridges, and waste toner box) online at surface so the edges do : • To achieve the best possible ...
...prints two or more pages on one side of a sheet. Supply Setting Function Print media Print media Multiple Up in the Important Information. Dell toner cartridges are several things you can change several settings in an environment where the temperature is approximately 21 °C (70 °F) ...until you store individual packages of print media out of the original carton, ensure that they rest on a at www.dell.com/supplies. You can order consumables (toner cartridges, drum cartridges, and waste toner box) online at surface so the edges do : • To achieve the best possible ...
Color Smart Printer Users Guide
Page 218
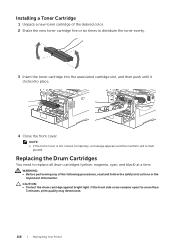
... Unpack a new toner cartridge of the following procedures, read and follow the safety instructions in the Important Information. CAUTION: • Protect the drum cartridge against bright light. If the front side cover remains open for more than 3 minutes, print quality may deteriorate. 218 | Maintaining Your ...Printer Replacing the Drum Cartridges You need to distribute the toner evenly. 3 Insert the toner cartridge into the associated cartridge slot, and then push until it ...
... Unpack a new toner cartridge of the following procedures, read and follow the safety instructions in the Important Information. CAUTION: • Protect the drum cartridge against bright light. If the front side cover remains open for more than 3 minutes, print quality may deteriorate. 218 | Maintaining Your ...Printer Replacing the Drum Cartridges You need to distribute the toner evenly. 3 Insert the toner cartridge into the associated cartridge slot, and then push until it ...
Color Smart Printer Users Guide
Page 219
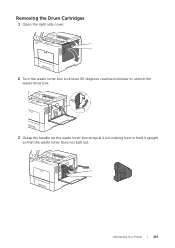
Removing the Drum Cartridges 1 Open the right side cover. 2 Turn the waste toner box lock lever 90-degrees counterclockwise to unlock the waste toner box. 3 Grasp the handle on the waste toner box and pull it out making sure to hold it upright so that the waste toner does not spill out. Maintaining Your Printer | 219
Removing the Drum Cartridges 1 Open the right side cover. 2 Turn the waste toner box lock lever 90-degrees counterclockwise to unlock the waste toner box. 3 Grasp the handle on the waste toner box and pull it out making sure to hold it upright so that the waste toner does not spill out. Maintaining Your Printer | 219
Color Smart Printer Users Guide
Page 220
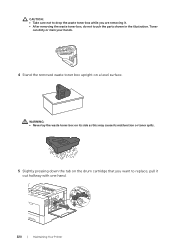
CAUTION: • Take care not to replace, pull it . • After removing the waste toner box, do not touch the parts shown in the illustration. WARNING: • Never lay the waste toner box on its side as this may cause its malfunction or toner spills. 5 Slightly pressing down the tab on a level surface. Toner can dirty or stain your hands. 4 Stand the removed waste toner box upright on the drum cartridge that you want to drop the waste toner box while you are removing it out halfway with one hand. 220 | Maintaining Your Printer
CAUTION: • Take care not to replace, pull it . • After removing the waste toner box, do not touch the parts shown in the illustration. WARNING: • Never lay the waste toner box on its side as this may cause its malfunction or toner spills. 5 Slightly pressing down the tab on a level surface. Toner can dirty or stain your hands. 4 Stand the removed waste toner box upright on the drum cartridge that you want to drop the waste toner box while you are removing it out halfway with one hand. 220 | Maintaining Your Printer
Color Smart Printer Users Guide
Page 221
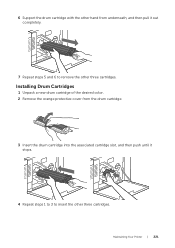
Installing Drum Cartridges 1 Unpack a new drum cartridge of the desired color. 2 Remove the orange protective cover from underneath, and then pull it stops. 4 Repeat steps 1 to 3 to remove the other three cartridges. 6 Support the drum cartridge with the other hand from the drum cartridge. 3 Insert the drum cartridge into the associated cartridge slot, and then push until it out completely. 7 Repeat steps 5 and 6 to insert the other three cartridges. Maintaining Your Printer | 221
Installing Drum Cartridges 1 Unpack a new drum cartridge of the desired color. 2 Remove the orange protective cover from underneath, and then pull it stops. 4 Repeat steps 1 to 3 to remove the other three cartridges. 6 Support the drum cartridge with the other hand from the drum cartridge. 3 Insert the drum cartridge into the associated cartridge slot, and then push until it out completely. 7 Repeat steps 5 and 6 to insert the other three cartridges. Maintaining Your Printer | 221
Color Smart Printer Users Guide
Page 223
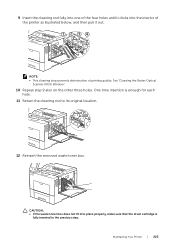
... pull it out. 1234 NOTE: • This cleaning step prevents deterioration of the four holes until it clicks into place properly, make sure that the drum cartridge is enough for each hole. 11 Return the cleaning rod to its original location. 12 Reinsert the removed waste toner box. Maintaining Your Printer...
... pull it out. 1234 NOTE: • This cleaning step prevents deterioration of the four holes until it clicks into place properly, make sure that the drum cartridge is enough for each hole. 11 Return the cleaning rod to its original location. 12 Reinsert the removed waste toner box. Maintaining Your Printer...
Color Smart Printer Users Guide
Page 232
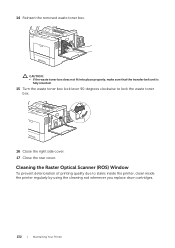
Cleaning the Raster Optical Scanner (ROS) Window To prevent deterioration of printing quality due to lock the waste toner box. 16 Close the right side cover. 17 Close the rear cover. 14 Reinsert the removed waste toner box. CAUTION: • If the waste toner box does not fit into place properly, make sure that the transfer belt unit is fully inserted. 15 Turn the waste toner box lock lever 90-degrees clockwise to stains inside the printer, clean inside the printer regularly by using the cleaning rod whenever you replace drum cartridges. 232 | Maintaining Your Printer
Cleaning the Raster Optical Scanner (ROS) Window To prevent deterioration of printing quality due to lock the waste toner box. 16 Close the right side cover. 17 Close the rear cover. 14 Reinsert the removed waste toner box. CAUTION: • If the waste toner box does not fit into place properly, make sure that the transfer belt unit is fully inserted. 15 Turn the waste toner box lock lever 90-degrees clockwise to stains inside the printer, clean inside the printer regularly by using the cleaning rod whenever you replace drum cartridges. 232 | Maintaining Your Printer
Color Smart Printer Users Guide
Page 257
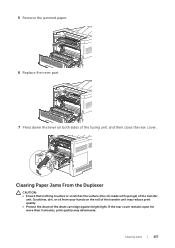
If the rear cover remains open for more than 3 minutes, print quality may reduce print quality. • Protect the drum of the transfer unit may deteriorate. Clearing Jams | 257 Clearing Paper Jams From the Duplexer CAUTION: • Ensure that nothing touches or scratches the surface (the roll made with sponge) of the fusing unit, and then close the rear cover. 5 Remove the jammed paper. 6 Replace the inner part. 7 Press down the lever on the roll of the drum cartridge against bright light. Scratches, dirt, or oil from your hands on both sides of the transfer unit.
If the rear cover remains open for more than 3 minutes, print quality may reduce print quality. • Protect the drum of the transfer unit may deteriorate. Clearing Jams | 257 Clearing Paper Jams From the Duplexer CAUTION: • Ensure that nothing touches or scratches the surface (the roll made with sponge) of the fusing unit, and then close the rear cover. 5 Remove the jammed paper. 6 Replace the inner part. 7 Press down the lever on the roll of the drum cartridge against bright light. Scratches, dirt, or oil from your hands on both sides of the transfer unit.

Color Smart Printer Users Guide
Page 258
Clearing Paper Jams From the Regi Roll CAUTION: • Ensure that nothing touches or scratches the surface (the roll made with sponge) of the drum cartridge against bright light. Scratches, dirt, or oil from the duplexer. 3 Close the rear cover. 1 Push down the latch to open the rear cover. 258 | ... open the rear cover. 2 Remove the jammed paper from your hands on the roll of the transfer unit may reduce print quality. • Protect the drum of the transfer unit.
Clearing Paper Jams From the Regi Roll CAUTION: • Ensure that nothing touches or scratches the surface (the roll made with sponge) of the drum cartridge against bright light. Scratches, dirt, or oil from the duplexer. 3 Close the rear cover. 1 Push down the latch to open the rear cover. 258 | ... open the rear cover. 2 Remove the jammed paper from your hands on the roll of the transfer unit may reduce print quality. • Protect the drum of the transfer unit.
Color Smart Printer Users Guide
Page 264
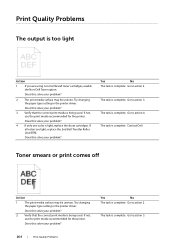
...your problem? 4 If only one color is complete. Go to action 4. Go to action 2. Yes No The task is light, replace the drum cartridges. Contact Dell. Does this solve your problem? 2 Verify that the correct print media is complete. Go to action 3. Yes No The task is complete. ...The task is complete. The task is complete. Does this solve your problem? If all colors are using non-Dell brand toner cartridges, enable the Non-Dell Toner option. Try changing the paper type setting in the printer driver. Does this solve your problem? If not, use...
...your problem? 4 If only one color is complete. Go to action 4. Go to action 2. Yes No The task is light, replace the drum cartridges. Contact Dell. Does this solve your problem? 2 Verify that the correct print media is complete. Go to action 3. Yes No The task is complete. ...The task is complete. The task is complete. Does this solve your problem? If all colors are using non-Dell brand toner cartridges, enable the Non-Dell Toner option. Try changing the paper type setting in the printer driver. Does this solve your problem? If not, use...
Color Smart Printer Users Guide
Page 265
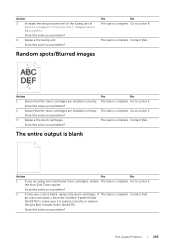
...is complete. The task is complete. Contact Dell. Does this solve your problem? Does this solve your problem? 3 Replace the drum cartridges. Does this solve your problem? 4 Replace the fusing unit. the Non-Dell Toner option. Contact Dell. Print Quality Problems | 265 Go to action...are installed correctly. Does this solve your problem? The task is blank, replace the drum cartridges. all colors are using non-Dell brand toner cartridges, enable The task is complete. Contact Dell. If The task is complete. Go to action 3. Action 3 Increase the temperature...
...is complete. The task is complete. Contact Dell. Does this solve your problem? Does this solve your problem? 3 Replace the drum cartridges. Does this solve your problem? 4 Replace the fusing unit. the Non-Dell Toner option. Contact Dell. Print Quality Problems | 265 Go to action...are installed correctly. Does this solve your problem? The task is blank, replace the drum cartridges. all colors are using non-Dell brand toner cartridges, enable The task is complete. Contact Dell. If The task is complete. Go to action 3. Action 3 Increase the temperature...
Color Smart Printer Users Guide
Page 266
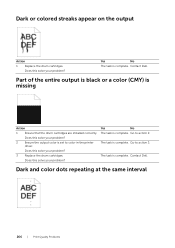
... Problems Does this solve your problem? Dark or colored streaks appear on the output Action 1 Replace the drum cartridges. Does this solve your problem? 2 Ensure the output color is complete. Contact Dell. Part of the entire output is black or a color (CMY) is complete. Yes No The task... is missing Action 1 Ensure that the drum cartridges are installed correctly. The task is complete. Contact Dell. Yes No The task is complete. Go to action 3. The task is set to action 2. Does this solve your...
... Problems Does this solve your problem? Dark or colored streaks appear on the output Action 1 Replace the drum cartridges. Does this solve your problem? 2 Ensure the output color is complete. Contact Dell. Part of the entire output is black or a color (CMY) is complete. Yes No The task... is missing Action 1 Ensure that the drum cartridges are installed correctly. The task is complete. Contact Dell. Yes No The task is complete. Go to action 3. The task is set to action 2. Does this solve your...


