User Guide
Page 36
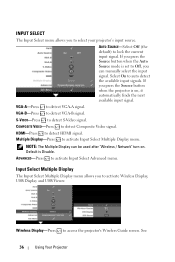
... input signal. COMPOSITE VIDEO-Press to access the projector's Wireless Guide screen. Wireless Display-Press to detect Composite Video signal. NOTE: The Multiple Display can manually select the input signal. Multiple Display-Press to activate Input Select Advanced menu. If you can be used after "Wireless / Network" turn on , it automatically...
... input signal. COMPOSITE VIDEO-Press to access the projector's Wireless Guide screen. Wireless Display-Press to detect Composite Video signal. NOTE: The Multiple Display can manually select the input signal. Multiple Display-Press to activate Input Select Advanced menu. If you can be used after "Wireless / Network" turn on , it automatically...
User Guide
Page 39
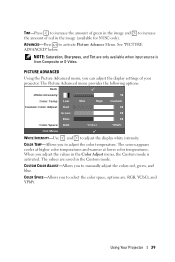
... can adjust the display settings of your projector. Using Your Projector 39 TINT-Press to increase the amount of green in the image and to manually adjust the colors red, green, and blue. The values are : RGB, YCbCr, and YPbPr.
... can adjust the display settings of your projector. Using Your Projector 39 TINT-Press to increase the amount of green in the image and to manually adjust the colors red, green, and blue. The values are : RGB, YCbCr, and YPbPr.

User Guide
Page 44
... VOLUME-Allows you to start the 3D display function. STANDBY VGA OUTPUT-Select On or Off the VGA output function at projector standby status. KEYSTONE-Manually adjust the vertical image distortion caused by tilting the projector. Default is mounted. • Front Projection-Desktop - Default is the default option. • Front Projection...
... VOLUME-Allows you to start the 3D display function. STANDBY VGA OUTPUT-Select On or Off the VGA output function at projector standby status. KEYSTONE-Manually adjust the vertical image distortion caused by tilting the projector. Default is mounted. • Front Projection-Desktop - Default is the default option. • Front Projection...
User Guide
Page 46
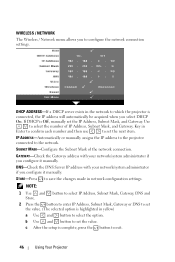
Key in the network to which the projector is complete, press the button to set the value. IP ADDRESS-Automatically or manually assigns the IP address to the projector connected to configure the network connection settings. DHCP ADDRESS-If a DHCP server exists in Enter to confirm each ...-Press to save the changes made in yellow) a Use and button to set the value. (The selected option is Off, manually set the next item. NOTE: 1 Use and button to select IP Address, Subnet Mask, Gateway, DNS and Store. 2 Press the button to enter IP Address, ...
Key in the network to which the projector is complete, press the button to set the value. IP ADDRESS-Automatically or manually assigns the IP address to the projector connected to configure the network connection settings. DHCP ADDRESS-If a DHCP server exists in Enter to confirm each ...-Press to save the changes made in yellow) a Use and button to set the value. (The selected option is Off, manually set the next item. NOTE: 1 Use and button to select IP Address, Subnet Mask, Gateway, DNS and Store. 2 Press the button to enter IP Address, ...
User Guide
Page 63
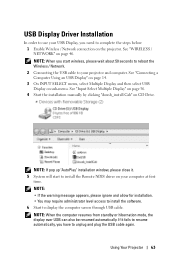
See "WIRELESS / NETWORK" on CD Drive. See "Input Select Multiple Display" on page 36. 4 Start the installation manually by clicking "dousb_install.Cab" on page 46. NOTE: When the computer resumes from standby or hibernation mode, the display over USB can also be resumed ...
See "WIRELESS / NETWORK" on CD Drive. See "Input Select Multiple Display" on page 36. 4 Start the installation manually by clicking "dousb_install.Cab" on page 46. NOTE: When the computer resumes from standby or hibernation mode, the display over USB can also be resumed ...

User Guide
Page 75
... Broadcast, Channel, Encryption, and Key. Using Your Projector 75 Wireless Setup • Choose Enable to disable this function. Choose Disable to assign an IP address manually. Network Status See OSD section on page 46. IP Setup • Choose Obtain an IP address automatically to assign an IP address to the projector...
... Broadcast, Channel, Encryption, and Key. Using Your Projector 75 Wireless Setup • Choose Enable to disable this function. Choose Disable to assign an IP address manually. Network Status See OSD section on page 46. IP Setup • Choose Obtain an IP address automatically to assign an IP address to the projector...


