Users Guide
Page 11
... Your Printer Checking the Status of Supplies Conserving Supplies Ordering Supplies Storing Print Media Storing Consumables Replacing the Toner Cartridges Replacing the Drum Cartridges Replacing the Waste Toner Box Cleaning Inside the Printer Cleaning the Scanner Cleaning the DADF Feed Rollers Moving the Printer Removing Options 7 ...With Installed Optional 550-sheet feeder Wi-Fi Direct Problems Scanner Driver/Printer Utility Problems Other Problems Contacting Service Appendix Appendix Dell™ Technical Support Policy 327 328 329 330 330 330 331 331 332 332 334 340 342 347 349 349 351...
... Your Printer Checking the Status of Supplies Conserving Supplies Ordering Supplies Storing Print Media Storing Consumables Replacing the Toner Cartridges Replacing the Drum Cartridges Replacing the Waste Toner Box Cleaning Inside the Printer Cleaning the Scanner Cleaning the DADF Feed Rollers Moving the Printer Removing Options 7 ...With Installed Optional 550-sheet feeder Wi-Fi Direct Problems Scanner Driver/Printer Utility Problems Other Problems Contacting Service Appendix Appendix Dell™ Technical Support Policy 327 328 329 330 330 330 331 331 332 332 334 340 342 347 349 349 351...
Users Guide
Page 19
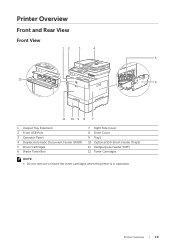
Printer Overview Front and Rear View Front View 12 3 4 5 12 6 11 10 9 8 7 1 Output Tray Extension 2 Front USB Port 3 Operator Panel 4 Duplex Automatic Document Feeder (DADF) 5 Drum Cartridges 6 Waste Toner Box 7 Right Side Cover 8 Front Cover 9 Tray1 10 Optional 550-Sheet Feeder (Tray2) 11 Multipurpose Feeder (MPF) 12 Toner Cartridges NOTE: • Do not remove or insert the toner cartridges when the printer is in operation. Printer Overview | 19
Printer Overview Front and Rear View Front View 12 3 4 5 12 6 11 10 9 8 7 1 Output Tray Extension 2 Front USB Port 3 Operator Panel 4 Duplex Automatic Document Feeder (DADF) 5 Drum Cartridges 6 Waste Toner Box 7 Right Side Cover 8 Front Cover 9 Tray1 10 Optional 550-Sheet Feeder (Tray2) 11 Multipurpose Feeder (MPF) 12 Toner Cartridges NOTE: • Do not remove or insert the toner cartridges when the printer is in operation. Printer Overview | 19
Users Guide
Page 24
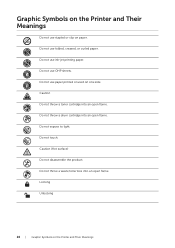
Do not use stapled or clip on paper. Caution (Hot surface) Do not disassemble the product. Locking Unlocking 24 | Graphic Symbols on one side. Caution Do not throw a toner cartridge into an open flame. Do not throw a waste toner box into an open flame. Graphic Symbols on the Printer and Their Meanings Do not use folded, creased, or curled paper. Do not use OHP sheets. Do not use paper printed or used on the Printer and Their Meanings Do not touch. Do not use ink-jet printing paper. Do not throw a drum cartridge into an open flame. Do not expose to light.
Do not use stapled or clip on paper. Caution (Hot surface) Do not disassemble the product. Locking Unlocking 24 | Graphic Symbols on one side. Caution Do not throw a toner cartridge into an open flame. Do not throw a waste toner box into an open flame. Graphic Symbols on the Printer and Their Meanings Do not use folded, creased, or curled paper. Do not use OHP sheets. Do not use paper printed or used on the Printer and Their Meanings Do not touch. Do not use ink-jet printing paper. Do not throw a drum cartridge into an open flame. Do not expose to light.

Users Guide
Page 141
...Printer Information pages. Indicates that there is some paper in the tray but the quantity is displayed. Dell™ Printer Configuration Web Tool | 141 For Dell S2825cdn, USB Direct Print Defaults is closed or open. Displays the size of the paper tray. Displays...Direct is available on Dell H625cdw and Dell H825cdw. *5 Dell Document Hub is available on Dell H625cdw and Dell H825cdw. *6 For Dell H625cdw and Dell H825cdw, Direct Print Defaults is displayed normally. Indicates that there is OK for use, or the toner, drum cartridge and/or waste toner box needs to check the ...
...Printer Information pages. Indicates that there is some paper in the tray but the quantity is displayed. Dell™ Printer Configuration Web Tool | 141 For Dell S2825cdn, USB Direct Print Defaults is closed or open. Displays the size of the paper tray. Displays...Direct is available on Dell H625cdw and Dell H825cdw. *5 Dell Document Hub is available on Dell H625cdw and Dell H825cdw. *6 For Dell H625cdw and Dell H825cdw, Direct Print Defaults is displayed normally. Indicates that there is OK for use, or the toner, drum cartridge and/or waste toner box needs to check the ...
Users Guide
Page 319
... seconds for the printer to recover. Tap Close, or wait for 60 seconds for the printer to recover. Remove the used waste toner box, and then install a new toner box. See "Resolution." Try the following : • If Tone/Pulse setting is full. Check if the telephone cable is repeated...following : • Try the same operation. • Reduce the modem speed. Check the features of the specified color. See "Replacing the Waste Toner Box." If Tone/Pulse setting is correct, check the following : • Remove the received fax, or wait for a while until the printer cools...
... seconds for the printer to recover. Tap Close, or wait for 60 seconds for the printer to recover. Remove the used waste toner box, and then install a new toner box. See "Resolution." Try the following : • If Tone/Pulse setting is full. Check if the telephone cable is repeated...following : • Try the same operation. • Reduce the modem speed. Check the features of the specified color. See "Replacing the Waste Toner Box." If Tone/Pulse setting is correct, check the following : • Remove the received fax, or wait for a while until the printer cools...
Users Guide
Page 331
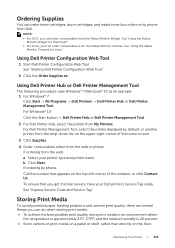
... procedure uses Windows® 7/Windows® 10 as an example. 1 For Windows® 7: Click Start All Programs Dell Printers Dell Printer Hub or Dell Printer Management Tool. Ordering Supplies You can order toner cartridges, drum cartridges, and waste toner box online or by default, or another printer from the drop-down list on the upper-right corner...
... procedure uses Windows® 7/Windows® 10 as an example. 1 For Windows® 7: Click Start All Programs Dell Printers Dell Printer Hub or Dell Printer Management Tool. Ordering Supplies You can order toner cartridges, drum cartridges, and waste toner box online or by default, or another printer from the drop-down list on the upper-right corner...

Users Guide
Page 335
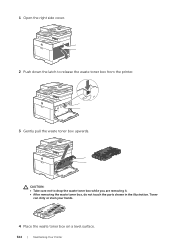
Maintaining Your Printer | 335 Removing the Drum Cartridge 1 Open the right side cover. 2 Push down the latch to release the waste toner box from the printer.
Maintaining Your Printer | 335 Removing the Drum Cartridge 1 Open the right side cover. 2 Push down the latch to release the waste toner box from the printer.

Users Guide
Page 336
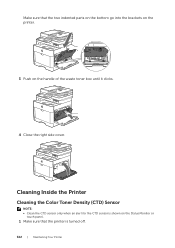
This may get dirty or stained with toner. 4 Place the waste toner box on a level surface. Always keep the side that was attached to spill out. 336 | Maintaining Your Printer CAUTION: • Take care not to the printer face down. Your hands may cause the toner to the printer facing up. CAUTION: • Never let the side that was attached to drop the waste toner box while you are removing it. • After removing the waste toner box, do not touch the parts shown in the illustration. 3 Gently pull the waste toner box upwards.
This may get dirty or stained with toner. 4 Place the waste toner box on a level surface. Always keep the side that was attached to spill out. 336 | Maintaining Your Printer CAUTION: • Take care not to the printer face down. Your hands may cause the toner to the printer facing up. CAUTION: • Never let the side that was attached to drop the waste toner box while you are removing it. • After removing the waste toner box, do not touch the parts shown in the illustration. 3 Gently pull the waste toner box upwards.
Users Guide
Page 339
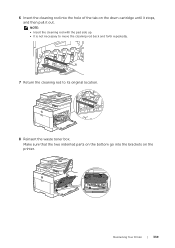
Make sure that the two indented parts on the bottom go into the hole of the tab on the printer. Y M C K Maintaining Your Printer | 339 6 Insert the cleaning rod into the brackets on the drum cartridge until it stops, and then pull it out. NOTE: • Insert the cleaning rod with the pad side up. • It is not necessary to move the cleaning rod back and forth repeatedly. 7 Return the cleaning rod to its original location. 8 Reinsert the waste toner box.
Make sure that the two indented parts on the bottom go into the hole of the tab on the printer. Y M C K Maintaining Your Printer | 339 6 Insert the cleaning rod into the brackets on the drum cartridge until it stops, and then pull it out. NOTE: • Insert the cleaning rod with the pad side up. • It is not necessary to move the cleaning rod back and forth repeatedly. 7 Return the cleaning rod to its original location. 8 Reinsert the waste toner box.
Users Guide
Page 340
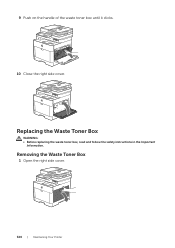
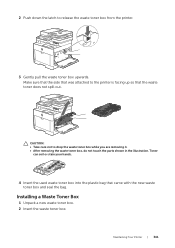
Replacing the Waste Toner Box WARNING: • Before replacing the waste toner box, read and follow the safety instructions in the Important Information. Removing the Waste Toner Box 1 Open the right side cover. 340 | Maintaining Your Printer 9 Push on the handle of the waste toner box until it clicks. 10 Close the right side cover.
Replacing the Waste Toner Box WARNING: • Before replacing the waste toner box, read and follow the safety instructions in the Important Information. Removing the Waste Toner Box 1 Open the right side cover. 340 | Maintaining Your Printer 9 Push on the handle of the waste toner box until it clicks. 10 Close the right side cover.
Users Guide
Page 341
... your hands. 4 Insert the used waste toner box into the plastic bag that the waste toner does not spill out. 2 Push down the latch to drop the waste toner box while you are removing it. • After removing the waste toner box, do not touch the parts shown in the illustration. Installing a Waste Toner Box 1 Unpack a new waste toner box. 2 Insert the waste toner box. Make sure that the side...
... your hands. 4 Insert the used waste toner box into the plastic bag that the waste toner does not spill out. 2 Push down the latch to drop the waste toner box while you are removing it. • After removing the waste toner box, do not touch the parts shown in the illustration. Installing a Waste Toner Box 1 Unpack a new waste toner box. 2 Insert the waste toner box. Make sure that the side...
Users Guide
Page 342
Make sure that the printer is shown on the Status Monitor or touch panel. 1 Make sure that the two indented parts on the bottom go into the brackets on the handle of the waste toner box until it clicks. 4 Close the right side cover. Y M C K 3 Push on the printer. Cleaning Inside the Printer Cleaning the Color Toner Density (CTD) Sensor NOTE: • Clean the CTD sensor only when an alert for the CTD sensor is turned off. 342 | Maintaining Your Printer
Make sure that the printer is shown on the Status Monitor or touch panel. 1 Make sure that the two indented parts on the bottom go into the brackets on the handle of the waste toner box until it clicks. 4 Close the right side cover. Y M C K 3 Push on the printer. Cleaning Inside the Printer Cleaning the Color Toner Density (CTD) Sensor NOTE: • Clean the CTD sensor only when an alert for the CTD sensor is turned off. 342 | Maintaining Your Printer
Users Guide
Page 344
Toner can dirty or stain your hands. 4 Place the waste toner box on a level surface. 344 | Maintaining Your Printer CAUTION: • Take care not to release the waste toner box from the printer. 3 Gently pull the waste toner box upwards. 1 Open the right side cover. 2 Push down the latch to drop the waste toner box while you are removing it. • After removing the waste toner box, do not touch the parts shown in the illustration.
Toner can dirty or stain your hands. 4 Place the waste toner box on a level surface. 344 | Maintaining Your Printer CAUTION: • Take care not to release the waste toner box from the printer. 3 Gently pull the waste toner box upwards. 1 Open the right side cover. 2 Push down the latch to drop the waste toner box while you are removing it. • After removing the waste toner box, do not touch the parts shown in the illustration.

Users Guide
Page 346
Y M C K 10 Push on the printer. Make sure that the two indented parts on the bottom go into the brackets on the handle of the waste toner box until it clicks. 346 | Maintaining Your Printer 7 Repeat step 6 for the other three holes. 8 Return the cleaning rod to its original location. 9 Insert the waste toner box.
Y M C K 10 Push on the printer. Make sure that the two indented parts on the bottom go into the brackets on the handle of the waste toner box until it clicks. 346 | Maintaining Your Printer 7 Repeat step 6 for the other three holes. 8 Return the cleaning rod to its original location. 9 Insert the waste toner box.

Users Guide
Page 385
...Check the media type you are using coated paper, proceed to step 2a. If the problem persists, proceed to step 2. 2 Replace the waste toner box. If the problem persists, proceed to step 4. 4 Wipe the retard roller in tray1 or the optional 550-sheet feeder where the multi-... paper one sheet at a time. If the problem persists, contact Dell. If using other type of the noise, perform the Auto Registration Adjustment. If using . See "Replacing the Waste Toner Box." If the problem persists, contact Dell. Noise Problem The printout has noise. Tray1/Optional 550-Sheet Feeder Multi...
...Check the media type you are using coated paper, proceed to step 2a. If the problem persists, proceed to step 2. 2 Replace the waste toner box. If the problem persists, proceed to step 4. 4 Wipe the retard roller in tray1 or the optional 550-sheet feeder where the multi-... paper one sheet at a time. If the problem persists, contact Dell. If using other type of the noise, perform the Auto Registration Adjustment. If using . See "Replacing the Waste Toner Box." If the problem persists, contact Dell. Noise Problem The printout has noise. Tray1/Optional 550-Sheet Feeder Multi...


