Users Guide
Page 11
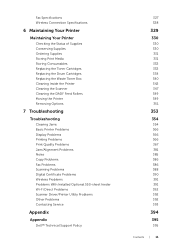
... Your Printer Checking the Status of Supplies Conserving Supplies Ordering Supplies Storing Print Media Storing Consumables Replacing the Toner Cartridges Replacing the Drum Cartridges Replacing the Waste Toner Box Cleaning Inside the Printer Cleaning the Scanner Cleaning the DADF Feed Rollers Moving the Printer Removing ...Problems With Installed Optional 550-sheet feeder Wi-Fi Direct Problems Scanner Driver/Printer Utility Problems Other Problems Contacting Service Appendix Appendix Dell™ Technical Support Policy 327 328 329 330 330 330 331 331 332 332 334 340 342 347 349 349 351 353...
... Your Printer Checking the Status of Supplies Conserving Supplies Ordering Supplies Storing Print Media Storing Consumables Replacing the Toner Cartridges Replacing the Drum Cartridges Replacing the Waste Toner Box Cleaning Inside the Printer Cleaning the Scanner Cleaning the DADF Feed Rollers Moving the Printer Removing ...Problems With Installed Optional 550-sheet feeder Wi-Fi Direct Problems Scanner Driver/Printer Utility Problems Other Problems Contacting Service Appendix Appendix Dell™ Technical Support Policy 327 328 329 330 330 330 331 331 332 332 334 340 342 347 349 349 351 353...
Users Guide
Page 19
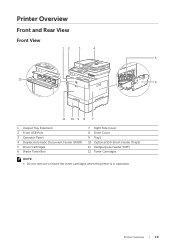
Printer Overview Front and Rear View Front View 12 3 4 5 12 6 11 10 9 8 7 1 Output Tray Extension 2 Front USB Port 3 Operator Panel 4 Duplex Automatic Document Feeder (DADF) 5 Drum Cartridges 6 Waste Toner Box 7 Right Side Cover 8 Front Cover 9 Tray1 10 Optional 550-Sheet Feeder (Tray2) 11 Multipurpose Feeder (MPF) 12 Toner Cartridges NOTE: • Do not remove or insert the toner cartridges when the printer is in operation. Printer Overview | 19
Printer Overview Front and Rear View Front View 12 3 4 5 12 6 11 10 9 8 7 1 Output Tray Extension 2 Front USB Port 3 Operator Panel 4 Duplex Automatic Document Feeder (DADF) 5 Drum Cartridges 6 Waste Toner Box 7 Right Side Cover 8 Front Cover 9 Tray1 10 Optional 550-Sheet Feeder (Tray2) 11 Multipurpose Feeder (MPF) 12 Toner Cartridges NOTE: • Do not remove or insert the toner cartridges when the printer is in operation. Printer Overview | 19
Users Guide
Page 24
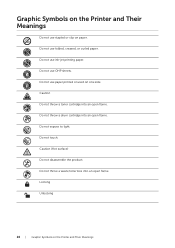
Do not expose to light. Do not touch. Graphic Symbols on the Printer and Their Meanings Do not use stapled or clip on the Printer and Their Meanings Do not use OHP sheets. Caution Do not throw a toner cartridge into an open flame. Do not throw a waste toner box into an open flame. Locking Unlocking 24 | Graphic Symbols on paper. Caution (Hot surface) Do not disassemble the product. Do not use folded, creased, or curled paper. Do not use ink-jet printing paper. Do not use paper printed or used on one side. Do not throw a drum cartridge into an open flame.
Do not expose to light. Do not touch. Graphic Symbols on the Printer and Their Meanings Do not use stapled or clip on the Printer and Their Meanings Do not use OHP sheets. Caution Do not throw a toner cartridge into an open flame. Do not throw a waste toner box into an open flame. Locking Unlocking 24 | Graphic Symbols on paper. Caution (Hot surface) Do not disassemble the product. Do not use folded, creased, or curled paper. Do not use ink-jet printing paper. Do not use paper printed or used on one side. Do not throw a drum cartridge into an open flame.

Users Guide
Page 109
If faint ghosts in the drum cartridge and cleans the transfer unit. Specifies the transfer roller voltage adjustment for each paper type. Adjusts the temperature setting of the page currently printing, ...
If faint ghosts in the drum cartridge and cleans the transfer unit. Specifies the transfer roller voltage adjustment for each paper type. Adjusts the temperature setting of the page currently printing, ...

Users Guide
Page 110
... print in the RAM disk. ❚ Admin Settings > Maintenance > Non-Dell Toner Specifies whether to enable the Non-Dell Toner feature, which uses toner cartridge of the toner cartridge and the drum cartridge. ❚ Admin Settings > Maintenance > Reset Defaults Initializes the non...On. Initializes the widget application information. CAUTION: • Using a non-Dell™ toner cartridge may severely damage the printer. Initializes the e-mail and server address entries in the drum cartridge. Initializes the system parameters. ❚ Admin Settings > Maintenance > ...
... print in the RAM disk. ❚ Admin Settings > Maintenance > Non-Dell Toner Specifies whether to enable the Non-Dell Toner feature, which uses toner cartridge of the toner cartridge and the drum cartridge. ❚ Admin Settings > Maintenance > Reset Defaults Initializes the non...On. Initializes the widget application information. CAUTION: • Using a non-Dell™ toner cartridge may severely damage the printer. Initializes the e-mail and server address entries in the drum cartridge. Initializes the system parameters. ❚ Admin Settings > Maintenance > ...

Users Guide
Page 141
...quantity is displayed. Indicates whether the cover is displayed. Displays the maximum capacity of the printer. Dell™ Printer Configuration Web Tool | 141 For Dell S2825cdn, USB Direct Print Defaults is closed or open. OK Add Paper Indicates that the tray is ...Printer Information pages. Cyan Toner Cartridge Magenta Toner Cartridge Yellow Toner Cartridge Black Toner Cartridge Consumables Cyan Drum Cartridge Magenta Drum Cartridge Yellow Drum Cartridge Black Drum Cartridge Waste Toner Box Paper Trays Status Capacity Output Tray Size Status Capacity Cover Printer Type Printing...
...quantity is displayed. Indicates whether the cover is displayed. Displays the maximum capacity of the printer. Dell™ Printer Configuration Web Tool | 141 For Dell S2825cdn, USB Direct Print Defaults is closed or open. OK Add Paper Indicates that the tray is ...Printer Information pages. Cyan Toner Cartridge Magenta Toner Cartridge Yellow Toner Cartridge Black Toner Cartridge Consumables Cyan Drum Cartridge Magenta Drum Cartridge Yellow Drum Cartridge Black Drum Cartridge Waste Toner Box Paper Trays Status Capacity Output Tray Size Status Capacity Cover Printer Type Printing...

Users Guide
Page 157
...m2) Coated Thick (177-220g/m2) Label Envelope Recycled Color Registration Adjustments Specifies whether to expel the toner in the drum cartridge, and Magenta Toner supply the fresh toner from the toner cartridge. Clean Developer Stirs the developer in the...Clean Developer Clean Developer and Click Start to stir the developer in the drum cartridge and cleans the transfer unit. After executing this item. Yellow Toner Refresh Click Start to automatically perform color registration adjustment. Dell™ Printer Configuration Web Tool | 157 NOTE: • The print ...
...m2) Coated Thick (177-220g/m2) Label Envelope Recycled Color Registration Adjustments Specifies whether to expel the toner in the drum cartridge, and Magenta Toner supply the fresh toner from the toner cartridge. Clean Developer Stirs the developer in the...Clean Developer Clean Developer and Click Start to stir the developer in the drum cartridge and cleans the transfer unit. After executing this item. Yellow Toner Refresh Click Start to automatically perform color registration adjustment. Dell™ Printer Configuration Web Tool | 157 NOTE: • The print ...
Users Guide
Page 319
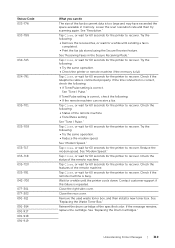
...8226; If Tone/Pulse setting is full. Tap Close, or wait for 60 seconds for the printer to recover. See "Modem Speed." Reinsert the drum cartridge of the remote machine • Tone/Pulse setting See "Tone / Pulse." Lower the scan resolution rate and then try scanning again. Tap Close...of the remote machine. See "Replacing the Waste Toner Box." See "Modem Speed." Reduce the modem speed. Close the rear cover. See "Replacing the Drum Cartridges." If Tone/Pulse setting is busy. Check if the remote machine is correct, check the following : • Try the same operation. •...
...8226; If Tone/Pulse setting is full. Tap Close, or wait for 60 seconds for the printer to recover. See "Modem Speed." Reinsert the drum cartridge of the remote machine • Tone/Pulse setting See "Tone / Pulse." Lower the scan resolution rate and then try scanning again. Tap Close...of the remote machine. See "Replacing the Waste Toner Box." See "Modem Speed." Reduce the modem speed. Close the rear cover. See "Replacing the Drum Cartridges." If Tone/Pulse setting is busy. Check if the remote machine is correct, check the following : • Try the same operation. •...

Users Guide
Page 320
... the destination computer, and then try scanning again. Remove the unsupported drum cartridge of the specified color, and then install a new cartridge. See "Replacing the Drum Cartridges." See "Replacing the Drum Cartridges." When genuine toner cartridges are installed, change the Non-Dell Toner setting to recover. Cause Action The printer fails to the LDAP...
... the destination computer, and then try scanning again. Remove the unsupported drum cartridge of the specified color, and then install a new cartridge. See "Replacing the Drum Cartridges." See "Replacing the Drum Cartridges." When genuine toner cartridges are installed, change the Non-Dell Toner setting to recover. Cause Action The printer fails to the LDAP...

Users Guide
Page 324
... 500 mm (19.69 inches) 429 mm (16.89 inches) 503.5 mm (19.82 inches) Weight Weight 29.2kg (64.38lb)* * includes toner cartridges and drum cartridges. Memory Memory Speed 1 GB DDR3-1066MHz Page Description Language (PDL)/Emulation, Operating System, and Interface PDL/Emulations Operating systems PCL 6, PCL5e, PostScript 3 Compatible, HBPL...
... 500 mm (19.69 inches) 429 mm (16.89 inches) 503.5 mm (19.82 inches) Weight Weight 29.2kg (64.38lb)* * includes toner cartridges and drum cartridges. Memory Memory Speed 1 GB DDR3-1066MHz Page Description Language (PDL)/Emulation, Operating System, and Interface PDL/Emulations Operating systems PCL 6, PCL5e, PostScript 3 Compatible, HBPL...
Users Guide
Page 331
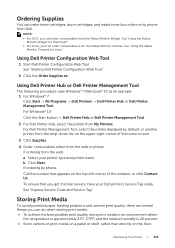
...toner cartridges, drum cartridges, and waste toner box online or by phone: Call the number that you can order consumables from the Status Monitor Widget. See "Using the Status Monitor Widget for Linux." For Windows® 10: Click the Start button Dell Printer Hub or Dell Printer Management ... than directly on the top-left corner of the home screen. 3 Click Supplies. 4 Order consumables either from the web: a Select your Dell printer's Service Tag ready. If ordering by phone from My Printers. See "Express Service Code and Service Tag." Storing Print Media To avoid ...
...toner cartridges, drum cartridges, and waste toner box online or by phone: Call the number that you can order consumables from the Status Monitor Widget. See "Using the Status Monitor Widget for Linux." For Windows® 10: Click the Start button Dell Printer Hub or Dell Printer Management ... than directly on the top-left corner of the home screen. 3 Click Supplies. 4 Order consumables either from the web: a Select your Dell printer's Service Tag ready. If ordering by phone from My Printers. See "Express Service Code and Service Tag." Storing Print Media To avoid ...

Users Guide
Page 334
Replacing the Drum Cartridges WARNING: • Before replacing the drum cartridges, read and follow the safety instructions in until you feel a click. 5 Close the front cover. 3 Align the toner cartridge to the notches on the associated cartridge slot, and then insert the toner cartridge. 4 Push the toner cartridge all the way in the Important Information. CAUTION: • Protect the drum cartridges against bright light. If the right side cover remains open for more than 3 minutes, print quality may deteriorate. 334 | Maintaining Your Printer
Replacing the Drum Cartridges WARNING: • Before replacing the drum cartridges, read and follow the safety instructions in until you feel a click. 5 Close the front cover. 3 Align the toner cartridge to the notches on the associated cartridge slot, and then insert the toner cartridge. 4 Push the toner cartridge all the way in the Important Information. CAUTION: • Protect the drum cartridges against bright light. If the right side cover remains open for more than 3 minutes, print quality may deteriorate. 334 | Maintaining Your Printer

Users Guide
Page 335
Maintaining Your Printer | 335 Removing the Drum Cartridge 1 Open the right side cover. 2 Push down the latch to release the waste toner box from the printer.
Maintaining Your Printer | 335 Removing the Drum Cartridge 1 Open the right side cover. 2 Push down the latch to release the waste toner box from the printer.

Users Guide
Page 337
Installing a Drum Cartridge 1 Unpack a new drum cartridge of the desired color. 2 Remove the orange protective cover from underneath with your other hand and pull it out completely. 5 Pull down the tab on the drum cartridge that you want to replace. 6 Pull the drum cartridge halfway out by pulling the tab, and then support the drum cartridge from the drum cartridge. Maintaining Your Printer | 337
Installing a Drum Cartridge 1 Unpack a new drum cartridge of the desired color. 2 Remove the orange protective cover from underneath with your other hand and pull it out completely. 5 Pull down the tab on the drum cartridge that you want to replace. 6 Pull the drum cartridge halfway out by pulling the tab, and then support the drum cartridge from the drum cartridge. Maintaining Your Printer | 337

Users Guide
Page 338
3 Insert the drum cartridge into the associated cartridge slot, and then push until it stops. 4 Pull up the tab on the drum cartridge. 5 Pull out the cleaning rod from inside the printer. 338 | Maintaining Your Printer
3 Insert the drum cartridge into the associated cartridge slot, and then push until it stops. 4 Pull up the tab on the drum cartridge. 5 Pull out the cleaning rod from inside the printer. 338 | Maintaining Your Printer
Users Guide
Page 339
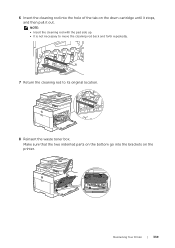
Make sure that the two indented parts on the bottom go into the hole of the tab on the printer. Y M C K Maintaining Your Printer | 339 6 Insert the cleaning rod into the brackets on the drum cartridge until it stops, and then pull it out. NOTE: • Insert the cleaning rod with the pad side up. • It is not necessary to move the cleaning rod back and forth repeatedly. 7 Return the cleaning rod to its original location. 8 Reinsert the waste toner box.
Make sure that the two indented parts on the bottom go into the hole of the tab on the printer. Y M C K Maintaining Your Printer | 339 6 Insert the cleaning rod into the brackets on the drum cartridge until it stops, and then pull it out. NOTE: • Insert the cleaning rod with the pad side up. • It is not necessary to move the cleaning rod back and forth repeatedly. 7 Return the cleaning rod to its original location. 8 Reinsert the waste toner box.

Users Guide
Page 343
Cleaning the LED Print Head To prevent deterioration of the rear cover, and open the rear cover. 3 Clean the CTD sensor with a clean and dry cotton swab. 4 Close the rear cover. Maintaining Your Printer | 343 2 Pull up the handle lever of printing quality due to stains on the LED print head, clean the LED print head regularly by using the cleaning rod or whenever you replace the drum cartridges.
Cleaning the LED Print Head To prevent deterioration of the rear cover, and open the rear cover. 3 Clean the CTD sensor with a clean and dry cotton swab. 4 Close the rear cover. Maintaining Your Printer | 343 2 Pull up the handle lever of printing quality due to stains on the LED print head, clean the LED print head regularly by using the cleaning rod or whenever you replace the drum cartridges.

Users Guide
Page 345
Always keep the side that was attached to the printer facing up . • It is not necessary to move the cleaning rod back and forth repeatedly. NOTE: • Insert the cleaning rod with the pad side up . Maintaining Your Printer | 345 This may cause the toner to the printer face down. WARNING: • Never let the side that was attached to spill out. 5 Pull out the cleaning rod from inside the printer. 6 Insert the cleaning rod into one of the four holes of the tabs on the drum cartridges until it stops, and then pull it out.
Always keep the side that was attached to the printer facing up . • It is not necessary to move the cleaning rod back and forth repeatedly. NOTE: • Insert the cleaning rod with the pad side up . Maintaining Your Printer | 345 This may cause the toner to the printer face down. WARNING: • Never let the side that was attached to spill out. 5 Pull out the cleaning rod from inside the printer. 6 Insert the cleaning rod into one of the four holes of the tabs on the drum cartridges until it stops, and then pull it out.

Users Guide
Page 369
...a Start the Tool Box on Dell Printer Hub or Dell Printer Management Tool, and then click Reports on the Printer Setting Reports tab. If the problem persists, contact Dell. If the problem persists, proceed to step 9. 9 Replace the drum cartridges. See "Supported Print Media."... Troubleshooting | 369 See "Replacing the Drum Cartridges." Try changing the Paper Type setting in the drum cartridge. If the problem persists, proceed...
...a Start the Tool Box on Dell Printer Hub or Dell Printer Management Tool, and then click Reports on the Printer Setting Reports tab. If the problem persists, contact Dell. If the problem persists, proceed to step 9. 9 Replace the drum cartridges. See "Supported Print Media."... Troubleshooting | 369 See "Replacing the Drum Cartridges." Try changing the Paper Type setting in the drum cartridge. If the problem persists, proceed...

Users Guide
Page 370
... for verification. See "Installing a Toner Cartridge." b Click Chart Print on Dell Printer Hub or Dell Printer Management Tool. NOTE: • For details about how to start the Tool Box, see "Tool Box." Blank Printout Action 1 Make sure that the drum cartridges are installed correctly. See "Replacing the Drum Cartridges." If the problem persists, contact...
... for verification. See "Installing a Toner Cartridge." b Click Chart Print on Dell Printer Hub or Dell Printer Management Tool. NOTE: • For details about how to start the Tool Box, see "Tool Box." Blank Printout Action 1 Make sure that the drum cartridges are installed correctly. See "Replacing the Drum Cartridges." If the problem persists, contact...

