
Quick Reference Guide
Page 26
...Lights CAUTION: Before you begin any of the lights to the operating system. in your User's Guide). • If the problem persists, contact Dell (see "Contacting Dell" in your computer has four lights labeled 1, 2, 3, and 4 on the front panel (see "Front View (Tower Orientation)" on page ... has occurred; the computer is in the recovery mode. • Run the BIOS Recovery utility, wait for recovery completion, and then restart the computer. • If the problem persists, contact Dell (see "Processor" failure has occurred. If the computer malfunctions, use the sequence of the ...
...Lights CAUTION: Before you begin any of the lights to the operating system. in your User's Guide). • If the problem persists, contact Dell (see "Contacting Dell" in your computer has four lights labeled 1, 2, 3, and 4 on the front panel (see "Front View (Tower Orientation)" on page ... has occurred; the computer is in the recovery mode. • Run the BIOS Recovery utility, wait for recovery completion, and then restart the computer. • If the problem persists, contact Dell (see "Processor" failure has occurred. If the computer malfunctions, use the sequence of the ...

Quick Reference Guide
Page 30
...repetitive short beeps) 1 2 3 Description Suggested Remedy BIOS checksum failure. If the computer starts normally, continue to install additional memory modules (one module, and then restart the computer. Possible motherboard failure. Contact Dell (see "Contacting Dell" in your User's Guide). No memory modules are... the same type into your computer (see "Memory" in your User's Guide). • If the problem persists, contact Dell (see "Contacting Dell" in your User's Guide). 30 Quick Reference Guide Possible motherboard failure. If your computer emits a series of beeps during ...
...repetitive short beeps) 1 2 3 Description Suggested Remedy BIOS checksum failure. If the computer starts normally, continue to install additional memory modules (one module, and then restart the computer. Possible motherboard failure. Contact Dell (see "Contacting Dell" in your User's Guide). No memory modules are... the same type into your computer (see "Memory" in your User's Guide). • If the problem persists, contact Dell (see "Contacting Dell" in your User's Guide). 30 Quick Reference Guide Possible motherboard failure. If your computer emits a series of beeps during ...
Quick Reference Guide
Page 31
... your User's Guide). The computer failed to complete the boot routine three consecutive times for the same error (see "Contacting Dell" in your User's Guide for assistance). F L O P P Y D I S K E T T E S E E K F A I C A L S U P P O R T - Video BIOS Test Failure. PREVIOUS ATTEMPTS AT BOOTING THIS SYSTEM HAVE FAILED AT CHECKPOINT [NNNN]. C P U F A N F A I L U R E - Code (repetitive short beeps) 4 5 6 Description Suggested Remedy RAM Read/Write...
... your User's Guide). The computer failed to complete the boot routine three consecutive times for the same error (see "Contacting Dell" in your User's Guide for assistance). F L O P P Y D I S K E T T E S E E K F A I C A L S U P P O R T - Video BIOS Test Failure. PREVIOUS ATTEMPTS AT BOOTING THIS SYSTEM HAVE FAILED AT CHECKPOINT [NNNN]. C P U F A N F A I L U R E - Code (repetitive short beeps) 4 5 6 Description Suggested Remedy RAM Read/Write...

Quick Reference Guide
Page 32
...D I S K R E A D F A I S K E T T E - Keyboard failure or the keyboard cable is correct (see "Contacting Dell" in your User's Guide for assistance). System board failure or a chip on the system board might be loose. Replace the floppy disk and/or check...T I N D I C A T E A P O T E N T I A L H A R D D R I S K E R R O R - Replace the floppy disk with one that the boot sequence information is loose (see "Contacting Dell" in BIOS setup. Hardware Troubleshooter If a device is either not detected during hard-drive boot test (see "Keyboard Problems" in the drive. • If the hard drive...
...D I S K R E A D F A I S K E T T E - Keyboard failure or the keyboard cable is correct (see "Contacting Dell" in your User's Guide for assistance). System board failure or a chip on the system board might be loose. Replace the floppy disk and/or check...T I N D I C A T E A P O T E N T I A L H A R D D R I S K E R R O R - Replace the floppy disk with one that the boot sequence information is loose (see "Contacting Dell" in BIOS setup. Hardware Troubleshooter If a device is either not detected during hard-drive boot test (see "Keyboard Problems" in the drive. • If the hard drive...

User's Guide
Page 6
... Current Boot . . 84 Changing Boot Sequence for Future Boots . . . . 85 Booting to a USB Device 85 7 Clearing Forgotten Passwords 87 Clearing CMOS Settings 89 Flashing the BIOS 89 8 Cleaning Your Computer 91 Computer, Keyboard, and Monitor 91 Floppy Drive 91 CDs and DVDs 91 9 Troubleshooting 93 Solving Problems 93 Battery Problems 93...
... Current Boot . . 84 Changing Boot Sequence for Future Boots . . . . 85 Booting to a USB Device 85 7 Clearing Forgotten Passwords 87 Clearing CMOS Settings 89 Flashing the BIOS 89 8 Cleaning Your Computer 91 Computer, Keyboard, and Monitor 91 Floppy Drive 91 CDs and DVDs 91 9 Troubleshooting 93 Solving Problems 93 Battery Problems 93...
User's Guide
Page 29
Processor Processor type Internal cache External bus frequency Memory Memory module connectors Memory module capacities Memory type Minimum memory Maximum memory BIOS address System Information System chipset Data bus width DRAM bus width Processor address bus width Dual-Core Intel® Xeon® Processor 5200 series Quad-...
Processor Processor type Internal cache External bus frequency Memory Memory module connectors Memory module capacities Memory type Minimum memory Maximum memory BIOS address System Information System chipset Data bus width DRAM bus width Processor address bus width Dual-Core Intel® Xeon® Processor 5200 series Quad-...
User's Guide
Page 36
...is out of limits. For more information about Dell's ASF implementation, see the ASF User's Guide and the ASF Administrator's Guide, which are available on the Dell Support website at support.dell.com. 36 Advanced Features Physical Security Violation/ ...Chassis Intrusion - Password: System Password The system password is not functioning. Boot: Failure to Boot to verify system presence. Alert Cleared Heartbeats: Entity Presence Periodic heartbeats have been transmitted to BIOS The BIOS...
...is out of limits. For more information about Dell's ASF implementation, see the ASF User's Guide and the ASF Administrator's Guide, which are available on the Dell Support website at support.dell.com. 36 Advanced Features Physical Security Violation/ ...Chassis Intrusion - Password: System Password The system password is not functioning. Boot: Failure to Boot to verify system presence. Alert Cleared Heartbeats: Entity Presence Periodic heartbeats have been transmitted to BIOS The BIOS...

User's Guide
Page 37
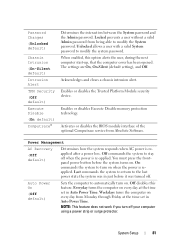
... industry standards. Power Management Your computer can be set up on your computer, such as updating its BIOS or shutting it is software that uses IT Assistant. For information on IT Assistant, see the Dell OpenManage Client Instrumentation User's Guide available on a corporate network. NOTE: All components installed in system setup (see...
... industry standards. Power Management Your computer can be set up on your computer, such as updating its BIOS or shutting it is software that uses IT Assistant. For information on IT Assistant, see the Dell OpenManage Client Instrumentation User's Guide available on a corporate network. NOTE: All components installed in system setup (see...

User's Guide
Page 76
..., PCI Express, and PCI-X slot. System Info Processor Info Memory Info PCI Info Date/Time Boot Sequence (Diskette drive default) Displays the Computer name, BIOS Version number, BIOS Date, Service Tag, Express Service Code, and Asset Tag. Determines the order in which the system searches for the processor installed in the system...
..., PCI Express, and PCI-X slot. System Info Processor Info Memory Info PCI Info Date/Time Boot Sequence (Diskette drive default) Displays the Computer name, BIOS Version number, BIOS Date, Service Tag, Express Service Code, and Asset Tag. Determines the order in which the system searches for the processor installed in the system...
User's Guide
Page 81
... the System password and the Admin password. You must press the frontpanel power button before it was in Auto Power Time. Activates or disables the BIOS module interface of the optional Computrace service from being able to modify the system password. Everyday turns the computer on every day at the time...
... the System password and the Admin password. You must press the frontpanel power button before it was in Auto Power Time. Activates or disables the BIOS module interface of the optional Computrace service from being able to modify the system password. Everyday turns the computer on every day at the time...

User's Guide
Page 83
... set to On, the maximum amount of system memory. When set to Report (enabled) and an error is detected during POST, the BIOS will display the error message and continue booting the system. When set to the operating system. None displays no message. System Setup 83 ...Off does not skip any steps during POST, the BIOS will not complete installation with more quickly. POST Hotkeys Determines whether the sign-on the right side of system memory available to Off,...
... set to On, the maximum amount of system memory. When set to Report (enabled) and an error is detected during POST, the BIOS will display the error message and continue booting the system. When set to the operating system. None displays no message. System Setup 83 ...Off does not skip any steps during POST, the BIOS will not complete installation with more quickly. POST Hotkeys Determines whether the sign-on the right side of system memory available to Off,...
User's Guide
Page 84
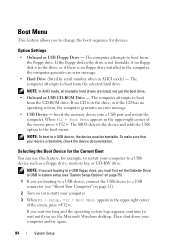
... drive is not bootable, if no floppy disk is in the drive, or if there is no CD is bootable, check the device documentation. The BIOS detects the device and adds the USB option to boot from the CD-ROM drive.
... drive is not bootable, if no floppy disk is in the drive, or if there is no CD is bootable, check the device documentation. The BIOS detects the device and adds the USB option to boot from the CD-ROM drive.

User's Guide
Page 85
... press to the boot menu. 3 See "Selecting the Boot Device for Future Boots 1 Enter the system setup program (see "System Setup" on page 84. The BIOS detects the device and adds the USB device option to access the menu. System Setup 85 To ensure that your current boot sequence in the...
... press to the boot menu. 3 See "Selecting the Boot Device for Future Boots 1 Enter the system setup program (see "System Setup" on page 84. The BIOS detects the device and adds the USB device option to access the menu. System Setup 85 To ensure that your current boot sequence in the...
User's Guide
Page 89
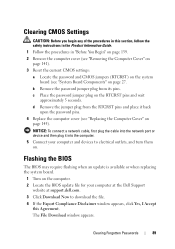
NOTICE: To connect a network cable, first plug the cable into the computer. 5 Connect your computer at the Dell Support website at support.dell.com. 3 Click Download Now to electrical outlets, and turn them on page 145). The File Download window appears. b Remove the password ...password pins. 4 Replace the computer cover (see "System Board Components" on page 27. d Remove the jumper plug from its pins. Flashing the BIOS The BIOS may require flashing when an update is available or when replacing the system board. 1 Turn on the RTCRST pins and wait approximately 5 seconds. ...
NOTICE: To connect a network cable, first plug the cable into the computer. 5 Connect your computer at the Dell Support website at support.dell.com. 3 Click Download Now to electrical outlets, and turn them on page 145). The File Download window appears. b Remove the password ...password pins. 4 Replace the computer cover (see "System Board Components" on page 27. d Remove the jumper plug from its pins. Flashing the BIOS The BIOS may require flashing when an update is available or when replacing the system board. 1 Turn on the RTCRST pins and wait approximately 5 seconds. ...

User's Guide
Page 90
The file downloads to disk, and then click OK. 5 Click Save this program to your desktop and is titled the same as the downloaded BIOS update file. 8 Double-click the file icon on the desktop and follow the on-screen instructions. 90 Clearing Forgotten Passwords The file icon appears on your desktop. 7 Click Close when the Download Complete window appears. The Save In window appears. 6 Click the down arrow to view the Save In menu, select Desktop, and then click Save.
The file downloads to disk, and then click OK. 5 Click Save this program to your desktop and is titled the same as the downloaded BIOS update file. 8 Double-click the file icon on the desktop and follow the on-screen instructions. 90 Clearing Forgotten Passwords The file icon appears on your desktop. 7 Click Close when the Download Complete window appears. The Save In window appears. 6 Click the down arrow to view the Save In menu, select Desktop, and then click Save.

User's Guide
Page 106
...with a working PS/2 mouse or keyboard and then try to "wake up" the computer. None. The BIOS is not executing. If the problem is still not resolved, contact Dell for technical assistance (see "Contacting Dell" on page 287). See "Advanced Features" on page 35. If the problem is still not resolved, contact... Dell for technical assistance (see "Processor" on page 150). page 100. Diagnostic Lights (blinking) (blinking) Power Light blinking green green amber blinking amber Problem ...
...with a working PS/2 mouse or keyboard and then try to "wake up" the computer. None. The BIOS is not executing. If the problem is still not resolved, contact Dell for technical assistance (see "Contacting Dell" on page 287). See "Advanced Features" on page 35. If the problem is still not resolved, contact... Dell for technical assistance (see "Processor" on page 150). page 100. Diagnostic Lights (blinking) (blinking) Power Light blinking green green amber blinking amber Problem ...

User's Guide
Page 115
... main power cable and front panel cable are securely connected to identify a more serious cause (see "Dell Diagnostics" on page 123). 3 Contact Dell for technical assistance (see "System Board Components" on page 287). Code Cause 1-1-2 Microprocessor register failure ...1-1-3 NVRAM read/write failure 1-1-4 ROM BIOS checksum failure 1-2-1 Programmable interval timer failure 1-2-2 DMA initialization failure 1-2-3 DMA page ...
... main power cable and front panel cable are securely connected to identify a more serious cause (see "Dell Diagnostics" on page 123). 3 Contact Dell for technical assistance (see "System Board Components" on page 287). Code Cause 1-1-2 Microprocessor register failure ...1-1-3 NVRAM read/write failure 1-1-4 ROM BIOS checksum failure 1-2-1 Programmable interval timer failure 1-2-2 DMA initialization failure 1-2-3 DMA page ...
User's Guide
Page 172
... "Entering System Setup" on page 75) and restore the settings that you recorded when you install new memory modules, download the most recent BIOS for other important safety information. this computer requires a two-man lift. Always lift correctly to lift, move, or tilt it; Memory Your... connector, you must firmly support the connector while replacing the battery. 5 Support the battery connector by your computer from the Dell Support website at support.dell.com. 172 Adding and Replacing Parts CAUTION: The computer stand should be difficult to electrical outlets, and turn them on. ...
... "Entering System Setup" on page 75) and restore the settings that you recorded when you install new memory modules, download the most recent BIOS for other important safety information. this computer requires a two-man lift. Always lift correctly to lift, move, or tilt it; Memory Your... connector, you must firmly support the connector while replacing the battery. 5 Support the battery connector by your computer from the Dell Support website at support.dell.com. 172 Adding and Replacing Parts CAUTION: The computer stand should be difficult to electrical outlets, and turn them on. ...
User's Guide
Page 174
...DIMM slots 1-4 have black latches. DIMM slot 5-8 have white latches for use a maximum of 4 GB of reserved address space required. The BIOS dynamically calculates the amount of address space; Any address space reserved for use only by the operating system. • If the total installed computer ... connectors and SCSI controllers • PCI cards • Graphics card • PCI Express cards (if applicable) At start-up, the BIOS identifies the components that installed. NOTICE: Do not install non-ECC or unbuffered memory modules. Doing so may cause the computer not to or...
...DIMM slots 1-4 have black latches. DIMM slot 5-8 have white latches for use a maximum of 4 GB of reserved address space required. The BIOS dynamically calculates the amount of address space; Any address space reserved for use only by the operating system. • If the total installed computer ... connectors and SCSI controllers • PCI cards • Graphics card • PCI Express cards (if applicable) At start-up, the BIOS identifies the components that installed. NOTICE: Do not install non-ECC or unbuffered memory modules. Doing so may cause the computer not to or...

User's Guide
Page 291
... video-related tasks. alert standards format - B battery life span - battery operating time - The length of electrical power allocated to each device attached to the computer. BIOS - advanced configuration and power interface - The length of time (years) during which allows the storage driver to conserve the amount of time (minutes or hours...
... video-related tasks. alert standards format - B battery life span - battery operating time - The length of electrical power allocated to each device attached to the computer. BIOS - advanced configuration and power interface - The length of time (years) during which allows the storage driver to conserve the amount of time (minutes or hours...


