
Tower Owners Manual
Page 6
... Hard drive indicator codes...125 9 Contacting Dell...127 6 Contents ePSA Diagnostic 3.0 121 Running the ePSA Diagnostics...121 Testing memory using a USB flash drive 110 Updating the Dell BIOS in Linux and Ubuntu environments 111 Flashing the BIOS from the F12 One-Time boot menu ...111 MegaRAID controller options...114 System and setup password...115 Assigning a system setup password...115 Deleting or changing an existing system setup password 115 7 Software......
... Hard drive indicator codes...125 9 Contacting Dell...127 6 Contents ePSA Diagnostic 3.0 121 Running the ePSA Diagnostics...121 Testing memory using a USB flash drive 110 Updating the Dell BIOS in Linux and Ubuntu environments 111 Flashing the BIOS from the F12 One-Time boot menu ...111 MegaRAID controller options...114 System and setup password...115 Assigning a system setup password...115 Deleting or changing an existing system setup password 115 7 Software......

Tower Owners Manual
Page 102
...Power management • POST behavior • Virtualization support • Maintenance • System logs • Engineering configurations • Updating the BIOS in which the computer attempts to find an operating system. • Diskette Drive • USB Storage Device • CD/DVD/CD-RW...the date and time. General options Option System Information Boot Sequence Boot List Option Advanced Boot Options Date/Time 102 System Setup 6 System Setup Description This section lists the primary hardware features of your computer. • System Information • Memory Configuration •...
...Power management • POST behavior • Virtualization support • Maintenance • System logs • Engineering configurations • Updating the BIOS in which the computer attempts to find an operating system. • Diskette Drive • USB Storage Device • CD/DVD/CD-RW...the date and time. General options Option System Information Boot Sequence Boot List Option Advanced Boot Options Date/Time 102 System Setup 6 System Setup Description This section lists the primary hardware features of your computer. • System Information • Memory Configuration •...

Tower Owners Manual
Page 104
...you enable or disable Memory Map IO above 4GB. • Memory Map IO above 4GB Thunderbolt Miscellaneous devices 104 System Setup Description • SATA-0 • SATA-1 • SATA-2 • SATA-3 • SATA-4 • SATA... USB Ports Allows you to enable or disable the internal USB configuration. Option 7920 Tower PCIe Drives SMART Reporting USB Configuration HDD Fans Audio Memory Map IO above...RAID controller card, the hard drives will display {none} in the RAID controller card BIOS. Allows the enabling of the SMART (Self Monitoring Analysis and Reporting Technology) specification. ...
...you enable or disable Memory Map IO above 4GB. • Memory Map IO above 4GB Thunderbolt Miscellaneous devices 104 System Setup Description • SATA-0 • SATA-1 • SATA-2 • SATA-3 • SATA-4 • SATA... USB Ports Allows you to enable or disable the internal USB configuration. Option 7920 Tower PCIe Drives SMART Reporting USB Configuration HDD Fans Audio Memory Map IO above...RAID controller card, the hard drives will display {none} in the RAID controller card BIOS. Allows the enabling of the SMART (Self Monitoring Analysis and Reporting Technology) specification. ...

Tower Owners Manual
Page 105
... Changes is selected Allows you to bypass the System password, when it is set strong passwords. The options are enabled. System Setup 105 Video Option Primary Video Slot Description Allows you to enable the Trusted Platform Module (TPM) during POST. Allows you to configure...; Disabled Video Table 7. Default Setting: The option is not selected. Allows you to enable or disable the permission to update the system BIOS via UEFI capsule update packages. • Enable UEFI Capsule Firmware Updates This option is set by default. Default Setting: Enable Strong Password ...
... Changes is selected Allows you to bypass the System password, when it is set strong passwords. The options are enabled. System Setup 105 Video Option Primary Video Slot Description Allows you to enable the Trusted Platform Module (TPM) during POST. Allows you to configure...; Disabled Video Table 7. Default Setting: The option is not selected. Allows you to enable or disable the permission to update the system BIOS via UEFI capsule update packages. • Enable UEFI Capsule Firmware Updates This option is set by default. Default Setting: Enable Strong Password ...
Tower Owners Manual
Page 109
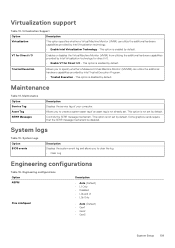
...; Disabled • L0s and L1 • L0s Only • Auto (Default) • Gen1 • Gen2 • Gen3 System Setup 109 Virtualization support Table 13. Some graphics cards require that the SERR message mechanism be disabled. Controls the SERR message mechanism. Maintenance Table 14.... This option is disabled by Intel Trusted Execution Program. • Trusted Execution - System Logs Option BIOS events Description Displays the system event log and allows you to clear the log. • Clear Log Engineering configurations Table ...
...; Disabled • L0s and L1 • L0s Only • Auto (Default) • Gen1 • Gen2 • Gen3 System Setup 109 Virtualization support Table 13. Some graphics cards require that the SERR message mechanism be disabled. Controls the SERR message mechanism. Maintenance Table 14.... This option is disabled by Intel Trusted Execution Program. • Trusted Execution - System Logs Option BIOS events Description Displays the system event log and allows you to clear the log. • Clear Log Engineering configurations Table ...

Tower Owners Manual
Page 110
... preferred download method in the Please select your BIOS (System Setup), when you reboot the system it to a bootable USB Flash Drive. NOTE: You will load. Run the file by typing the full filename, for further details: https:// www.dell.com/support/article/sln143196/ 1. Updating the BIOS in Windows It is recommended to update...
... preferred download method in the Please select your BIOS (System Setup), when you reboot the system it to a bootable USB Flash Drive. NOTE: You will load. Run the file by typing the full filename, for further details: https:// www.dell.com/support/article/sln143196/ 1. Updating the BIOS in Windows It is recommended to update...

Tower Owners Manual
Page 111
...the FAT32 file system (key does not have this capability and you want to boot. 1. Updating from the One-Time Boot Menu To update your BIOS from the Dell Support website and copied to the root of the system . 2. Powering off the system could make the system fail to update the system... confirm by booting your system to the F12 One-Time Boot Menu to execute the BIOS update flash process from the F12 One-Time boot menu Updating your system. System Setup 111 Figure 3. NOTE: Only systems with BIOS Flash Update option in Linux and Ubuntu environments If you can also update the...
...the FAT32 file system (key does not have this capability and you want to boot. 1. Updating from the One-Time Boot Menu To update your BIOS from the Dell Support website and copied to the root of the system . 2. Powering off the system could make the system fail to update the system... confirm by booting your system to the F12 One-Time Boot Menu to execute the BIOS update flash process from the F12 One-Time boot menu Updating your system. System Setup 111 Figure 3. NOTE: Only systems with BIOS Flash Update option in Linux and Ubuntu environments If you can also update the...

Tower Owners Manual
Page 112
Select external USB device 112 System Setup 3. The Bios flash menu will open then click the Flash from file. 4.
Select external USB device 112 System Setup 3. The Bios flash menu will open then click the Flash from file. 4.

Tower Owners Manual
Page 113
System Setup 113 5. Click the Update BIOS then system will reboot to flash the BIOS. Once the file is selected, Double click the flash target file, then press submit . 6.
System Setup 113 5. Click the Update BIOS then system will reboot to flash the BIOS. Once the file is selected, Double click the flash target file, then press submit . 6.
Tower Owners Manual
Page 114
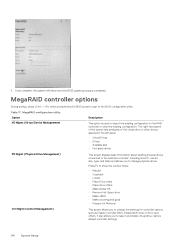
...is completed. It also allows you to the BIOS configuration utility. Table 17. MegaRAID controller options During bootup, press + when prompted by the BIOS screen to get to select a bootable virtual drive, restore default controller settings. 114 System Setup The right-hand panel of the screen lists ..., vendor, size, type, and state and allows you to manage physical drives. 7. Once complete, the system will reboot and the BIOS update process is used to import the existing configuration to the RAID controller or clear the existing configuration. Press F2 to show the context...
...is completed. It also allows you to the BIOS configuration utility. Table 17. MegaRAID controller options During bootup, press + when prompted by the BIOS screen to get to select a bootable virtual drive, restore default controller settings. 114 System Setup The right-hand panel of the screen lists ..., vendor, size, type, and state and allows you to manage physical drives. 7. Once complete, the system will reboot and the BIOS update process is used to import the existing configuration to the RAID controller or clear the existing configuration. Press F2 to show the context...

Tower Owners Manual
Page 115
.... • Only the following special characters are allowed: space 3. To enter the system setup, press F2 immediately after a power-on to secure your computer. In the System BIOS or System Setup screen, select Security and press Enter. The Security screen is disabled. Press Esc and a... basic level of your computer. NOTE: System and setup password feature is displayed. 2. Deleting or changing an existing system setup password Ensure that you entered earlier in the Enter the new password field. In the System BIOS or System Setup screen, select System Security and press Enter. NOTE:...
.... • Only the following special characters are allowed: space 3. To enter the system setup, press F2 immediately after a power-on to secure your computer. In the System BIOS or System Setup screen, select Security and press Enter. The Security screen is disabled. Press Esc and a... basic level of your computer. NOTE: System and setup password feature is displayed. 2. Deleting or changing an existing system setup password Ensure that you entered earlier in the Enter the new password field. In the System BIOS or System Setup screen, select System Security and press Enter. NOTE:...


