Quick Reference Guide
Page 7
... segment to work with programs and files • Documentation for devices (such as memory, the hard drive, and the operating premier.support.dell.com. support.dell.com from technicians, and online courses, frequently asked NOTE: Select your operating system and support for...software automatically detects your computer and operating system and installs the updates appropriate for Dell™ 3.5-inch USB floppy drives, optical drives, and USB devices. Troubleshooting hints and tips, articles Dell Support Website - system • Customer Care - If you reinstall the operating ...
... segment to work with programs and files • Documentation for devices (such as memory, the hard drive, and the operating premier.support.dell.com. support.dell.com from technicians, and online courses, frequently asked NOTE: Select your operating system and support for...software automatically detects your computer and operating system and installs the updates appropriate for Dell™ 3.5-inch USB floppy drives, optical drives, and USB devices. Troubleshooting hints and tips, articles Dell Support Website - system • Customer Care - If you reinstall the operating ...
Quick Reference Guide
Page 16
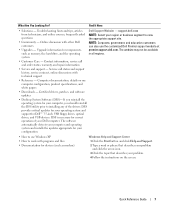
...1394 connector for use in the 5.25-inch drive bays. it can be on when the computer reads data from or writes data to the hard drive. NOTE: The drive carriers are only for high-speed data devices such...drive, or a Media Card Reader, floppy drive, or SATA hard drive in a 5.25-inch drive bay carrier. The floppy drive/ Media Card Reader and hard drive carriers are not interchangeable. 4 5.25-inch drive bay with a floppy drive or Media Card Reader; The floppy-drive/ Media Card Reader and hard-drive carriers are not interchangeable. 5 hard-drive activity light The hard drive...
...1394 connector for use in the 5.25-inch drive bays. it can be on when the computer reads data from or writes data to the hard drive. NOTE: The drive carriers are only for high-speed data devices such...drive, or a Media Card Reader, floppy drive, or SATA hard drive in a 5.25-inch drive bay carrier. The floppy drive/ Media Card Reader and hard drive carriers are not interchangeable. 4 5.25-inch drive bay with a floppy drive or Media Card Reader; The floppy-drive/ Media Card Reader and hard-drive carriers are not interchangeable. 5 hard-drive activity light The hard drive...

Quick Reference Guide
Page 19
... have a USB mouse, plug it into a USB connector. If you have a USB printer, plug it into the green mouse connector. For more information, see your hard drive. 4 USB 2.0 connectors (3) It is running the Microsoft® Windows® XP operating system, the necessary mouse drivers have been installed on the card. 3 mouse connector...
... have a USB mouse, plug it into a USB connector. If you have a USB printer, plug it into the green mouse connector. For more information, see your hard drive. 4 USB 2.0 connectors (3) It is running the Microsoft® Windows® XP operating system, the necessary mouse drivers have been installed on the card. 3 mouse connector...
Quick Reference Guide
Page 21
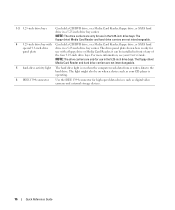
Inside View 1 2 7 6 1 2 3 4 5 6 7 3 5 4 power supply hard drive bay memory shroud NOTICE: The memory shroud holds the (optional) memory riser cards in order to secure the risers and to avoid damage. front fan card fan 5.25-inch drive bay with 3.5-inch drive panel plate 5.25-inch drive bay Quick Reference Guide 21 its thumbscrews must be sufficiently tight in place;
Inside View 1 2 7 6 1 2 3 4 5 6 7 3 5 4 power supply hard drive bay memory shroud NOTICE: The memory shroud holds the (optional) memory riser cards in order to secure the risers and to avoid damage. front fan card fan 5.25-inch drive bay with 3.5-inch drive panel plate 5.25-inch drive bay Quick Reference Guide 21 its thumbscrews must be sufficiently tight in place;

Quick Reference Guide
Page 23
... connectors (SATA_0, SATA_1, SATA_2) 11 RTC reset jumper (RTCRST) 12 main power connector (POWER1) 13 hard drive connector (HDD_3) 14 hard drive connector (HDD_2) 15 hard drive connector (HDD_1) 16 hard drive connector (HDD_0) 17 hard drive fan (FAN_HDD) 18 FlexBay connector (USB) 19 floppy drive (DSKT) 20 front panel connector (FRONTPANEL) 21 front panel 1394 connector (FP1394) 22 chassis intrusion...
... connectors (SATA_0, SATA_1, SATA_2) 11 RTC reset jumper (RTCRST) 12 main power connector (POWER1) 13 hard drive connector (HDD_3) 14 hard drive connector (HDD_2) 15 hard drive connector (HDD_1) 16 hard drive connector (HDD_0) 17 hard drive fan (FAN_HDD) 18 FlexBay connector (USB) 19 floppy drive (DSKT) 20 front panel connector (FRONTPANEL) 21 front panel 1394 connector (FP1394) 22 chassis intrusion...

Quick Reference Guide
Page 24
...potentially resulting in bodily injury or damage to maneuver. Seek assistance before removing the cover. Cable Colors Device Hard drive (with on-board controller) Floppy drive CD/DVD drive Color blue cable black pull-tab orange pull-tab Locating Your User's Guide Your User's Guide contains additional...procedures in this computer requires a two-man lift. CAUTION: To guard against electrical shock, always unplug your computer from your hard drive or the Dell Support website at all of the available connectors • Inside views of your computer, including a detailed graphic of the ...
...potentially resulting in bodily injury or damage to maneuver. Seek assistance before removing the cover. Cable Colors Device Hard drive (with on-board controller) Floppy drive CD/DVD drive Color blue cable black pull-tab orange pull-tab Locating Your User's Guide Your User's Guide contains additional...procedures in this computer requires a two-man lift. CAUTION: To guard against electrical shock, always unplug your computer from your hard drive or the Dell Support website at all of the available connectors • Inside views of your computer, including a detailed graphic of the ...

Quick Reference Guide
Page 29
...: • To avoid losing or corrupting data, never turn off your computer when the hard drive light is on. • Schedule regular virus scans using virus software. • Manage hard drive space by periodically deleting unnecessary files and defragmenting the drive. • Back up files on a regular basis. • Periodically clean your monitor screen, mouse... is free. Removing the Computer Stand CAUTION: Your computer is heavy (it ; this computer requires a two-man lift. See your User's Guide, go to support.dell.com (on the screen, write down towards the ground, to avoid injury;
...: • To avoid losing or corrupting data, never turn off your computer when the hard drive light is on. • Schedule regular virus scans using virus software. • Manage hard drive space by periodically deleting unnecessary files and defragmenting the drive. • Back up files on a regular basis. • Periodically clean your monitor screen, mouse... is free. Removing the Computer Stand CAUTION: Your computer is heavy (it ; this computer requires a two-man lift. See your User's Guide, go to support.dell.com (on the screen, write down towards the ground, to avoid injury;

Quick Reference Guide
Page 32
... tell you whether tests completed successfully • Receive error messages if problems are detected Starting the Dell Diagnostics From Your Hard Drive 1 Turn on (or restart) your computer. 2 When the DELL™ logo appears, press immediately. NOTE: If you see a message stating that no diagnostics ...more information on shutting down your computer and try again. NOTICE: The Dell Diagnostics works only on page 29 and run the Dell Diagnostics before you begin any of the information on your hard drive. • Reinstall your operating system using the Drivers and Utilities CD...
... tell you whether tests completed successfully • Receive error messages if problems are detected Starting the Dell Diagnostics From Your Hard Drive 1 Turn on (or restart) your computer. 2 When the DELL™ logo appears, press immediately. NOTE: If you see a message stating that no diagnostics ...more information on shutting down your computer and try again. NOTICE: The Dell Diagnostics works only on page 29 and run the Dell Diagnostics before you begin any of the information on your hard drive. • Reinstall your operating system using the Drivers and Utilities CD...
Quick Reference Guide
Page 38
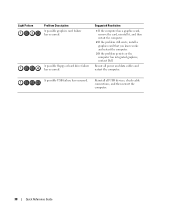
... or hard drive failure has occurred. Suggested Resolution 1 If the computer has a graphics card, remove the card, reinstall it, and then restart the computer. 2 If the problem still exists, install a graphics card that you know works and restart the computer. 3 If the problem persists or the computer has integrated graphics, contact Dell. Reinstall...
... or hard drive failure has occurred. Suggested Resolution 1 If the computer has a graphics card, remove the card, reinstall it, and then restart the computer. 2 If the problem still exists, install a graphics card that you know works and restart the computer. 3 If the problem persists or the computer has integrated graphics, contact Dell. Reinstall...

Quick Reference Guide
Page 43
... Reference, 5 regulatory, 6 safety, 6 User's Guide, 6 warranty, 6 E End User License Agreement, 6 ergonomics information, 6 error messages beep codes, 33 diagnostic lights, 35 H hard drive activity light, 16-17 hardware beep codes, 33 conflicts, 30 Dell Diagnostics, 32-33 Hardware Troubleshooter, 30 headphone connector, 17 Help and Support Center, 7 help file Windows Help and Support Center...
... Reference, 5 regulatory, 6 safety, 6 User's Guide, 6 warranty, 6 E End User License Agreement, 6 ergonomics information, 6 error messages beep codes, 33 diagnostic lights, 35 H hard drive activity light, 16-17 hardware beep codes, 33 conflicts, 30 Dell Diagnostics, 32-33 Hardware Troubleshooter, 30 headphone connector, 17 Help and Support Center, 7 help file Windows Help and Support Center...

Quick Reference Guide
Page 44
K keyboard connector, 20 L labels Microsoft Windows, 6 Service Tag, 6 lights back of computer, 35 diagnostic, 17, 35 hard drive activity, 16-17 link integrity, 20 network, 20 network activity, 20 power, 17 M Microsoft Windows label, 6 mouse connector, 19 N network connector, ..., 6 Service Tag, 6 software conflicts, 30 sound connectors line-in, 20 line-out, 19 support website, 7 System Restore, 30 T troubleshooting conflicts, 30 Dell Diagnostics, 32-33 diagnostic lights, 35 Hardware Troubleshooter, 30 Help and Support Center, 7 restore to previous state, 30 U USB connector, 19-20 connectors, 17...
K keyboard connector, 20 L labels Microsoft Windows, 6 Service Tag, 6 lights back of computer, 35 diagnostic, 17, 35 hard drive activity, 16-17 link integrity, 20 network, 20 network activity, 20 power, 17 M Microsoft Windows label, 6 mouse connector, 19 N network connector, ..., 6 Service Tag, 6 software conflicts, 30 sound connectors line-in, 20 line-out, 19 support website, 7 System Restore, 30 T troubleshooting conflicts, 30 Dell Diagnostics, 32-33 diagnostic lights, 35 Hardware Troubleshooter, 30 Help and Support Center, 7 restore to previous state, 30 U USB connector, 19-20 connectors, 17...
User Guide
Page 2
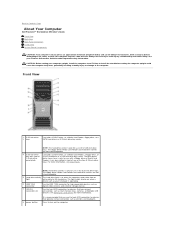
..., a floppy drive, or a SATA hard drive in a 5.25-inch drive bay carrier. For more information). 8 power button It is recommended that typically remain connected, such as flash memory keys, cameras, or bootable USB devices (see Booting to a USB Device for more information, see Drive Panels. Back to Contents Page About Your Computer Dell Precision™ Workstation 690 User...
..., a floppy drive, or a SATA hard drive in a 5.25-inch drive bay carrier. For more information). 8 power button It is recommended that typically remain connected, such as flash memory keys, cameras, or bootable USB devices (see Booting to a USB Device for more information, see Drive Panels. Back to Contents Page About Your Computer Dell Precision™ Workstation 690 User...

User Guide
Page 4
... into a USB connector. 11 line-in connector Use the blue line-in a steady "on the back of a network cable to either a network jack or your hard drive. 4 USB 2.0 It is recommended that you use the front USB connectors for devices connectors (2) that typically remain connected, such as printers and keyboards. 9 IEEE 1394...
... into a USB connector. 11 line-in connector Use the blue line-in a steady "on the back of a network cable to either a network jack or your hard drive. 4 USB 2.0 It is recommended that you use the front USB connectors for devices connectors (2) that typically remain connected, such as printers and keyboards. 9 IEEE 1394...
User Guide
Page 5
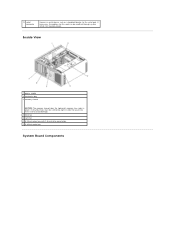
its thumbscrews must be modified through system setup (see System Setup). Inside View 1 power supply 2 hard drive bay 3 memory shroud NOTICE: The memory shroud holds the (optional) memory riser cards in order to secure the risers and to the serial port. If necessary, the address for this port can be sufficiently tight in place; 13 serial connector Connect a serial device, such as a handheld device, to avoid damage. 4 front fan 5 card fan 6 5.25-inch drive bay with 3.5-inch drive panel plate 7 5.25-inch drive bay System Board Components
its thumbscrews must be modified through system setup (see System Setup). Inside View 1 power supply 2 hard drive bay 3 memory shroud NOTICE: The memory shroud holds the (optional) memory riser cards in order to secure the risers and to the serial port. If necessary, the address for this port can be sufficiently tight in place; 13 serial connector Connect a serial device, such as a handheld device, to avoid damage. 4 front fan 5 card fan 6 5.25-inch drive bay with 3.5-inch drive panel plate 7 5.25-inch drive bay System Board Components

User Guide
Page 6
... (IDE) 23 chassis intrusion header (INTRUDER) 7 password jumper (PSWD) 24 PCI-Express x8 card slot, wired as x4 (SLOT7_PCIE) 8 auxiliary hard-drive LED connector (AUX_LED) 25 PCI-X card slot (SLOT6_PCIX) 9 air temperature sensor connector 26 PCI-X card slot (SLOT5_PCIX) 10 battery socket (BATTERY) 27 PCI card slot (...
... (IDE) 23 chassis intrusion header (INTRUDER) 7 password jumper (PSWD) 24 PCI-Express x8 card slot, wired as x4 (SLOT7_PCIE) 8 auxiliary hard-drive LED connector (AUX_LED) 25 PCI-X card slot (SLOT6_PCIX) 9 air temperature sensor connector 26 PCI-X card slot (SLOT5_PCIX) 10 battery socket (BATTERY) 27 PCI card slot (...

User Guide
Page 7
... wired as x4 (SLOT1_PCIE) 14 hard drive connector (HDD_3) 15 hard drive connector (HDD_2) 16 hard drive connector (HDD_1) 17 hard drive connector (HDD_0) NOTE: In the dual-graphics configuration, this slot is replaced by a x16 slot on -board controller) Floppy drive CD/DVD drive Color blue cable black pull-tab orange... pull-tab Back to Contents Page otherwise these must be left empty 34 primary processor connector (CPU_0) Cable Colors Device Hard drive (with on the graphics riser. It holds a graphics card. 31 memory fan connector (FAN_MEM) 32 white memory module connectors (...
... wired as x4 (SLOT1_PCIE) 14 hard drive connector (HDD_3) 15 hard drive connector (HDD_2) 16 hard drive connector (HDD_1) 17 hard drive connector (HDD_0) NOTE: In the dual-graphics configuration, this slot is replaced by a x16 slot on -board controller) Floppy drive CD/DVD drive Color blue cable black pull-tab orange... pull-tab Back to Contents Page otherwise these must be left empty 34 primary processor connector (CPU_0) Cable Colors Device Hard drive (with on the graphics riser. It holds a graphics card. 31 memory fan connector (FAN_MEM) 32 white memory module connectors (...
User Guide
Page 8
... manages, and monitors computers and other devices on common platforms, hard-drive images, and help desk procedures. It supports instrumentation that include serial and USB connectors, a parallel connector, a floppy drive, and a PS/2 mouse. Physical Security Violation/ Chassis Intrusion ... Manageability Alert Standard Format Alert Standard Format (ASF) is disabled. Back to Contents Page Advanced Features Dell Precision™ Workstation 690 User's Guide LegacySelect Technology Control Manageability Security Password Protection System Setup Boot Menu Clearing Forgotten Passwords Clearing ...
... manages, and monitors computers and other devices on common platforms, hard-drive images, and help desk procedures. It supports instrumentation that include serial and USB connectors, a parallel connector, a floppy drive, and a PS/2 mouse. Physical Security Violation/ Chassis Intrusion ... Manageability Alert Standard Format Alert Standard Format (ASF) is disabled. Back to Contents Page Advanced Features Dell Precision™ Workstation 690 User's Guide LegacySelect Technology Control Manageability Security Password Protection System Setup Boot Menu Clearing Forgotten Passwords Clearing ...

User Guide
Page 9
... 6. Press the down -arrow keys to move to implement your computer, such as listening for thermal alerts from temperature probes or hard-drive failure alerts from being opened , the setting changes to the Security option. 3. Restart the computer to the Security option. 3. ...alerts the user if the chassis has been opened , the setting changes to do the following: l Access information about Dell OpenManage Client Instrumentation, see the Dell OpenManage Client Instrumentation User's Guide available on a network that uses IT Assistant. To change the Chassis Intrusion setting: 1....
... 6. Press the down -arrow keys to move to implement your computer, such as listening for thermal alerts from temperature probes or hard-drive failure alerts from being opened , the setting changes to the Security option. 3. Restart the computer to the Security option. 3. ...alerts the user if the chassis has been opened , the setting changes to do the following: l Access information about Dell OpenManage Client Instrumentation, see the Dell OpenManage Client Instrumentation User's Guide available on a network that uses IT Assistant. To change the Chassis Intrusion setting: 1....

User Guide
Page 10
NOTE: Before you complete step 5. 1. If your hard drive. Use the arrow keys to navigate to access the field. Type in the enabled position (the default setting). Type your password, press or the left-...
NOTE: Before you complete step 5. 1. If your hard drive. Use the arrow keys to navigate to access the field. Type in the enabled position (the default setting). Type your password, press or the left-...

User Guide
Page 13
...changing an existing password, follow the instructions in New Password field, leaving the field blank. 6. Entering System Setup 1. When the blue DELL™ logo is recommended that the keyboard has initialized. NOTE: If an administrator password has been set the type of system setup, but... 2. System Setup Overview Use system setup as follows: l To change the system configuration information after you may view the contents of hard drive installed Before you must watch for future reference. NOTE: The F2 prompt indicates that you must watch for the Admin Password setting. Press...
...changing an existing password, follow the instructions in New Password field, leaving the field blank. 6. Entering System Setup 1. When the blue DELL™ logo is recommended that the keyboard has initialized. NOTE: If an administrator password has been set the type of system setup, but... 2. System Setup Overview Use system setup as follows: l To change the system configuration information after you may view the contents of hard drive installed Before you must watch for future reference. NOTE: The F2 prompt indicates that you must watch for the Admin Password setting. Press...


