Solid State Drive Installation Guide
Page 4
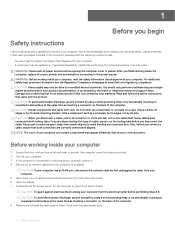
...that both connectors are disconnecting this type of cable, press in this document. if you connect a cable, ensure that is not authorized by Dell is connected to avoid bending any installed ExpressCards or Smart Cards from the computer (if available). As you pull connectors apart, keep them evenly...protect your computer from the electrical outlet before you begin CAUTION: To guard against electrical shock unplug your computer has an RJ45 port, disconnect the network cable by periodically touching an unpainted metal surface at the same time as touching a connector on a card.
...that both connectors are disconnecting this type of cable, press in this document. if you connect a cable, ensure that is not authorized by Dell is connected to avoid bending any installed ExpressCards or Smart Cards from the computer (if available). As you pull connectors apart, keep them evenly...protect your computer from the electrical outlet before you begin CAUTION: To guard against electrical shock unplug your computer has an RJ45 port, disconnect the network cable by periodically touching an unpainted metal surface at the same time as touching a connector on a card.
Solid State Drive Installation Guide
Page 7
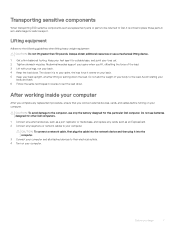
...: CAUTION: Do not lift greater than 50 pounds. Avoid twisting your body and back. 6 Follow the same techniques in anti-static bags for other Dell computers. 1 Connect any external devices, such as a port replicator or media base, and replace any cards, such as replacement parts or parts to be returned to... Dell, it is to your spine, the less force it exerts on your back. 5 Keep your body to the load. Do not use a mechanical lifting device....
...: CAUTION: Do not lift greater than 50 pounds. Avoid twisting your body and back. 6 Follow the same techniques in anti-static bags for other Dell computers. 1 Connect any external devices, such as a port replicator or media base, and replace any cards, such as replacement parts or parts to be returned to... Dell, it is to your spine, the less force it exerts on your back. 5 Keep your body to the load. Do not use a mechanical lifting device....

Service Manual
Page 4
Installing the keyboard trim...26 Heat sink ...26 Removing the heat sink ...26 Installing the heat sink ...27 Power connector port...28 Removing the power connector port...28 Installing the power connector port...28 Chassis frame...29 Removing the chassis frame...29 Installing the chassis frame...30 System board...30 Removing the system board...
Installing the keyboard trim...26 Heat sink ...26 Removing the heat sink ...26 Installing the heat sink ...27 Power connector port...28 Removing the power connector port...28 Installing the power connector port...28 Chassis frame...29 Removing the chassis frame...29 Installing the chassis frame...30 System board...30 Removing the system board...
Service Manual
Page 7
...replacement procedure, ensure that you connect any cards, such as touching a connector on your computer. Connect any external devices, such as a port replicator or media base, and replace any external devices, cards, and cables before performing Step # 8. CAUTION: To connect a network cable...the computer. 3. Press and hold the power button for few seconds, to the computer, use batteries designed for this particular Dell computer. After working inside your computer. 5. Connect any installed ExpressCards or Smart Cards from the appropriate slots. Disconnect your computer....
...replacement procedure, ensure that you connect any cards, such as touching a connector on your computer. Connect any external devices, such as a port replicator or media base, and replace any external devices, cards, and cables before performing Step # 8. CAUTION: To connect a network cable...the computer. 3. Press and hold the power button for few seconds, to the computer, use batteries designed for this particular Dell computer. After working inside your computer. 5. Connect any installed ExpressCards or Smart Cards from the appropriate slots. Disconnect your computer....
Service Manual
Page 12
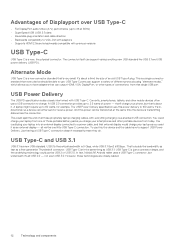
... isn't the same thing as a first-generation Thunderbolt connector. In fact, Nokia's N1 Android tablet uses a USB Type-C connector, but that single USB port USB Power Delivery The USB PD specification is also closely intertwined with previous versions USB Type-C USB Type-C is a new, tiny physical connector. You could... the size of different protocols using "alternate modes," which allows you to have to 60 watts, for example. not even USB 3.0. USB Type-C ports can support a variety of an old USB Type-A plug. USB Type-C and USB 3.1 USB 3.1 is 5 Gbps, while USB 3.1 Gen2 is10Gbps .
... isn't the same thing as a first-generation Thunderbolt connector. In fact, Nokia's N1 Android tablet uses a USB Type-C connector, but that single USB port USB Power Delivery The USB PD specification is also closely intertwined with previous versions USB Type-C USB Type-C is a new, tiny physical connector. You could... the size of different protocols using "alternate modes," which allows you to have to 60 watts, for example. not even USB 3.0. USB Type-C ports can support a variety of an old USB Type-A plug. USB Type-C and USB 3.1 USB 3.1 is 5 Gbps, while USB 3.1 Gen2 is10Gbps .

Service Manual
Page 28
...plastic scribe to release the metal bracket that secures the power connector port [3]. d) Lift the power connector port away from the connector on the system board [1]. Installing the power connector port 1. Insert the power connector port into the slot on the system board. 4. Follow the procedure ...your computer. 2. c) Remove the metal bracket that secures the power connector port [2]. b) Remove the M2x3 screw to release the cable from the connector. Power connector port Removing the power connector port 1. Connect the heat sink assembly to the connector on the laptop. 28...
...plastic scribe to release the metal bracket that secures the power connector port [3]. d) Lift the power connector port away from the connector on the system board [1]. Installing the power connector port 1. Insert the power connector port into the slot on the system board. 4. Follow the procedure ...your computer. 2. c) Remove the metal bracket that secures the power connector port [2]. b) Remove the M2x3 screw to release the cable from the connector. Power connector port Removing the power connector port 1. Connect the heat sink assembly to the connector on the laptop. 28...

Service Manual
Page 29
... to disconnect the backlight cable (optional) [3], touchpad cable [4], pointstick cable [5], and keyboard cable [6] from the connector on the power connector port. 3. To remove the chassis frame: Disassembly and reassembly 29 Chassis frame Removing the chassis frame 1. To release the chassis frame: a) Release the WLAN and WWAN ...
... to disconnect the backlight cable (optional) [3], touchpad cable [4], pointstick cable [5], and keyboard cable [6] from the connector on the power connector port. 3. To remove the chassis frame: Disassembly and reassembly 29 Chassis frame Removing the chassis frame 1. To release the chassis frame: a) Release the WLAN and WWAN ...

Service Manual
Page 31
... to the system board [ 2]. c) battery d) WLAN card e) WWAN card f) SSD card g) memory module h) heat sink i) coin cell battery j) Power connector port k) chassis frame 3. NOTE: The metal bracket referred is the USB-C port bracket. Disassembly and reassembly 31 To remove the system board: a) Lift the latch and disconnect the LED board, mother board...
... to the system board [ 2]. c) battery d) WLAN card e) WWAN card f) SSD card g) memory module h) heat sink i) coin cell battery j) Power connector port k) chassis frame 3. NOTE: The metal bracket referred is the USB-C port bracket. Disassembly and reassembly 31 To remove the system board: a) Lift the latch and disconnect the LED board, mother board...

Service Manual
Page 33
Install the: a) chassis frame b) Power connector port c) coin cell battery d) heat sink e) memory module f) SSD card g) WWAN card h) WLAN card i) battery j) base cover k) SIM card module 8. Place the eDP cable and metal ...
Install the: a) chassis frame b) Power connector port c) coin cell battery d) heat sink e) memory module f) SSD card g) WWAN card h) WLAN card i) battery j) base cover k) SIM card module 8. Place the eDP cable and metal ...
Setup and Specifications Guide
Page 8
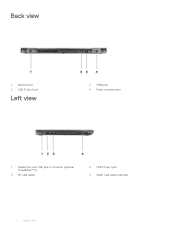
Back view 1 Network port 3 USB 3.1 Gen 1 port Left view 2 HDMI port 4 Power connector port 1 Display Port over USB Type-C connector (optional Thunderbolt™ 3) 3 SD Card reader 2 USB 3.1 Gen 1 port 4 Smart Card reader (optional) 8 Chassis view
Back view 1 Network port 3 USB 3.1 Gen 1 port Left view 2 HDMI port 4 Power connector port 1 Display Port over USB Type-C connector (optional Thunderbolt™ 3) 3 SD Card reader 2 USB 3.1 Gen 1 port 4 Smart Card reader (optional) 8 Chassis view
Setup and Specifications Guide
Page 11
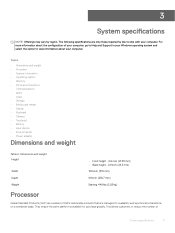
This allows customers to reduce the number of Dell's relationship products that are only those required by region. For more information about the configuration of your computer, go to Help and ... computer. The following specifications are managed for purchase globally. Topics: • Dimensions and weight • Processor • System information • Operating system • Memory • Ports and connectors • Communications • Audio • Video • Storage • Media card-reader • Display • Keyboard • Camera • Touchpad •...
This allows customers to reduce the number of Dell's relationship products that are only those required by region. For more information about the configuration of your computer, go to Help and ... computer. The following specifications are managed for purchase globally. Topics: • Dimensions and weight • Processor • System information • Operating system • Memory • Ports and connectors • Communications • Audio • Video • Storage • Media card-reader • Display • Keyboard • Camera • Touchpad •...
Setup and Specifications Guide
Page 13
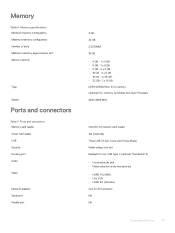
... Maximum memory configuration Number of slots Maximum memory supported per slot Memory options Type Speed Ports and connectors Table 7. Ports and connectors Memory card reader Smart card reader USB Security Docking port Audio Video Network adapter Serial port Parallel port 4 GB 32 GB 2 SODIMM 16 GB • 4 GB - 1 x 4 GB • 8 GB - 1 x 8 GB • 8 GB - 2 x 4 GB...
... Maximum memory configuration Number of slots Maximum memory supported per slot Memory options Type Speed Ports and connectors Table 7. Ports and connectors Memory card reader Smart card reader USB Security Docking port Audio Video Network adapter Serial port Parallel port 4 GB 32 GB 2 SODIMM 16 GB • 4 GB - 1 x 4 GB • 8 GB - 1 x 8 GB • 8 GB - 2 x 4 GB...
Setup and Specifications Guide
Page 15
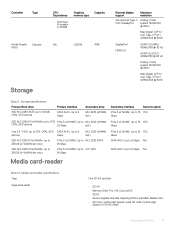
... E-2176M Graphics memory type Capacity NA GDDR5 4GB External display support Maximum resolution Via Optional Type-C Analog: (VGA) Port: DisplayPort system 1920x1200 @ 60Hz Max Digital: (DP 1.2 over Type-C Port) 4096x2304 @ 60Hz DisplayPort HDMI 2.0 HDMI 1.4 (UMA): 4096x2160 @ 30 Hz HDMI 2.0 (DSC): 4096x2160 @... 60 Hz Analog: (VGA) system 1920x1200 @ 60Hz Max Digital: (DP 1.2 over Type-C Port) 4096x2304 @ 60Hz Table 11. Media-card reader specifications Type Supported cards One SD 4.0 card slot • SD 4.0 • Memory Stick, Pro,...
... E-2176M Graphics memory type Capacity NA GDDR5 4GB External display support Maximum resolution Via Optional Type-C Analog: (VGA) Port: DisplayPort system 1920x1200 @ 60Hz Max Digital: (DP 1.2 over Type-C Port) 4096x2304 @ 60Hz DisplayPort HDMI 2.0 HDMI 1.4 (UMA): 4096x2160 @ 30 Hz HDMI 2.0 (DSC): 4096x2160 @... 60 Hz Analog: (VGA) system 1920x1200 @ 60Hz Max Digital: (DP 1.2 over Type-C Port) 4096x2304 @ 60Hz Table 11. Media-card reader specifications Type Supported cards One SD 4.0 card slot • SD 4.0 • Memory Stick, Pro,...

Setup and Specifications Guide
Page 22
...options are : • Disabled • COM1: This option is enabled by default. • PS2 • ECP Allows you to configure the parallel port on the docking station. The options are : • Disabled • Enabled • Enabled w/PXE: This option is enabled by default enabled) ...Date/Time Allows you to configure the integrated serial port. Allows you to change the order in which the computer attempts to find an operating system. • Diskette Drive • Internal HDD •...
...options are : • Disabled • COM1: This option is enabled by default. • PS2 • ECP Allows you to configure the parallel port on the docking station. The options are : • Disabled • Enabled • Enabled w/PXE: This option is enabled by default enabled) ...Date/Time Allows you to configure the integrated serial port. Allows you to change the order in which the computer attempts to find an operating system. • Diskette Drive • Internal HDD •...

Setup and Specifications Guide
Page 23
...; Enable USB Boot Support (by default enable) • Enable External USB Port (by default enable) • Enable Thunderbolt Ports (by default enable) • Enable Thunderbolt Boot Support • Always Allow Dell Docks (by default enable) System setup options 23 Option Description • COM4... SATA Operation Allows you to charge external devices using the stored system battery power through the USB PowerShare port. The options are : • ...
...; Enable USB Boot Support (by default enable) • Enable External USB Port (by default enable) • Enable Thunderbolt Ports (by default enable) • Enable Thunderbolt Boot Support • Always Allow Dell Docks (by default enable) System setup options 23 Option Description • COM4... SATA Operation Allows you to charge external devices using the stored system battery power through the USB PowerShare port. The options are : • ...

Setup and Specifications Guide
Page 28
... screen options Option Description Multi Core Support This field specifies whether the process has one or all the USB ports to conserve battery power. • Enable USB Wake Support • Wake on Dell USB-C Dock (By default enable) 28 System setup options Intel TurboBoost Allows you to set the time at which...
... screen options Option Description Multi Core Support This field specifies whether the process has one or all the USB ports to conserve battery power. • Enable USB Wake Support • Wake on Dell USB-C Dock (By default enable) 28 System setup options Intel TurboBoost Allows you to set the time at which...


