
Dell PowerEdge Deployment Guide
Page 2
...United States and/or other countries. Reproduction of Dell Inc. For more information, contact Dell. is strictly forbidden. Page ii Dell, the DELL logo, and the DELL badge, Dell OpenManage, and PowerEdge are either trademarks or registered trademarks of Dell Inc. All rights reserved. Intel and Xeon ... States and/or other countries. PowerEdge Deployment Guide THIS WHITE PAPER IS FOR INFORMATIONAL PURPOSES ONLY, AND MAY CONTAIN TYPOGRAPHICAL ERRORS AND TECHNICAL INACCURACIES. THE CONTENT IS PROVIDED AS IS, WITHOUT EXPRESS OR IMPLIED WARRANTIES OF ANY KIND. © 2009 Dell Inc.
...United States and/or other countries. Reproduction of Dell Inc. For more information, contact Dell. is strictly forbidden. Page ii Dell, the DELL logo, and the DELL badge, Dell OpenManage, and PowerEdge are either trademarks or registered trademarks of Dell Inc. All rights reserved. Intel and Xeon ... States and/or other countries. PowerEdge Deployment Guide THIS WHITE PAPER IS FOR INFORMATIONAL PURPOSES ONLY, AND MAY CONTAIN TYPOGRAPHICAL ERRORS AND TECHNICAL INACCURACIES. THE CONTENT IS PROVIDED AS IS, WITHOUT EXPRESS OR IMPLIED WARRANTIES OF ANY KIND. © 2009 Dell Inc.
Deploying UEFI-Aware Operating Systems on Dell PowerEdge Servers
Page 2
... States and/or other countries. For more information, contact Dell. THE CONTENT IS PROVIDED AS IS, WITHOUT EXPRESS OR IMPLIED WARRANTIES OF ANY KIND. © 2009 Dell Inc. Reproduction of Dell Inc. Dell, the DELL logo, and the DELL badge, and PowerEdge are either trademarks or registered trademarks of Dell Inc. THIS WHITE PAPER IS FOR INFORMATIONAL PURPOSES ONLY...
... States and/or other countries. For more information, contact Dell. THE CONTENT IS PROVIDED AS IS, WITHOUT EXPRESS OR IMPLIED WARRANTIES OF ANY KIND. © 2009 Dell Inc. Reproduction of Dell Inc. Dell, the DELL logo, and the DELL badge, and PowerEdge are either trademarks or registered trademarks of Dell Inc. THIS WHITE PAPER IS FOR INFORMATIONAL PURPOSES ONLY...

Getting Started Guide
Page 9
Warranty information may be included within this document or as a separate document. • The rack documentation included with your rack solution describes how to install your system. This document is available online at support.dell.com. • Any media that ships with your ... and 3.5, Update 4 (when available) • VMware ESXi Version 4.0 and 3.5, Update 4 (when available) NOTE: For the latest information on support.dell.com and read the updates first because they often supersede information in other documents. Other Information You May Need WARNING: See the safety and regulatory...
Warranty information may be included within this document or as a separate document. • The rack documentation included with your rack solution describes how to install your system. This document is available online at support.dell.com. • Any media that ships with your ... and 3.5, Update 4 (when available) • VMware ESXi Version 4.0 and 3.5, Update 4 (when available) NOTE: For the latest information on support.dell.com and read the updates first because they often supersede information in other documents. Other Information You May Need WARNING: See the safety and regulatory...

Hardware Owner's Manual
Page 55
About Your System 55 Warranty information may be included within this document or as a separate document. • The rack documentation included with your rack solution describes how to the operating ... features, setting up your system, and technical specifications. • Any media that ships with your system that provides documentation and tools for updates on support.dell.com and read the updates first because they often supersede information in other documents.
About Your System 55 Warranty information may be included within this document or as a separate document. • The rack documentation included with your rack solution describes how to the operating ... features, setting up your system, and technical specifications. • Any media that ships with your system that provides documentation and tools for updates on support.dell.com and read the updates first because they often supersede information in other documents.

Hardware Owner's Manual
Page 77
... repairs may only be done by the online or telephone service and support team. Read and follow the safety instructions that is not authorized by Dell is not covered by your product documentation, or as authorized in your...
... repairs may only be done by the online or telephone service and support team. Read and follow the safety instructions that is not authorized by Dell is not covered by your product documentation, or as authorized in your...

Hardware Owner's Manual
Page 80
...slot on the front of the system and slide the cover back. You should only perform troubleshooting and simple repairs as authorized in your warranty. WARNING: Whenever you . Opening and Closing the System CAUTION: Many repairs may only be done by the online or telephone service and ... and peripherals. 2 Rotate the latch release lock counter clockwise to the unlocked position. Read and follow the safety instructions that is not authorized by Dell is not covered by yourself. See Figure 3-3. 4 Grasp the cover on top of the system chassis. See Figure 1-1 in "About Your System...
...slot on the front of the system and slide the cover back. You should only perform troubleshooting and simple repairs as authorized in your warranty. WARNING: Whenever you . Opening and Closing the System CAUTION: Many repairs may only be done by the online or telephone service and ... and peripherals. 2 Rotate the latch release lock counter clockwise to the unlocked position. Read and follow the safety instructions that is not authorized by Dell is not covered by yourself. See Figure 3-3. 4 Grasp the cover on top of the system chassis. See Figure 1-1 in "About Your System...

Hardware Owner's Manual
Page 90
...edge connector firmly into the expansion-card connector until the card is not covered by your product documentation, or as authorized in your warranty. For instructions, see the documentation accompanying the card. 2 Turn off the system, including any attached peripherals, and disconnect the system ...from the electrical outlet. 3 Open the system. Any cards that is not authorized by Dell is fully seated. 90 Installing System Components Damage due to determine if the maximum power exceeds 15W. See Figure 3-8. 5 Install the ...
...edge connector firmly into the expansion-card connector until the card is not covered by your product documentation, or as authorized in your warranty. For instructions, see the documentation accompanying the card. 2 Turn off the system, including any attached peripherals, and disconnect the system ...from the electrical outlet. 3 Open the system. Any cards that is not authorized by Dell is fully seated. 90 Installing System Components Damage due to determine if the maximum power exceeds 15W. See Figure 3-8. 5 Install the ...

Hardware Owner's Manual
Page 92
...If you are removing the card permanently, install a metal filler bracket over an empty expansion slot to servicing that is not authorized by Dell is reserved for use by the integrated storage controller card.) Removing an Expansion-Card Riser CAUTION: Many repairs may only be done by ...and close the expansion-card latch. See "Closing the System." See Figure 3-8. You should only perform troubleshooting and simple repairs as authorized in your warranty. b Grasp the expansion card by its edges, and carefully remove it from the card. 4 Remove the expansion card: a Open the expansion...
...If you are removing the card permanently, install a metal filler bracket over an empty expansion slot to servicing that is not authorized by Dell is reserved for use by the integrated storage controller card.) Removing an Expansion-Card Riser CAUTION: Many repairs may only be done by ...and close the expansion-card latch. See "Closing the System." See Figure 3-8. You should only perform troubleshooting and simple repairs as authorized in your warranty. b Grasp the expansion card by its edges, and carefully remove it from the card. 4 Remove the expansion card: a Open the expansion...

Hardware Owner's Manual
Page 95
...card riser into place until the expansion-card riser connector is not covered by your product documentation, or as authorized in your warranty. You should only perform troubleshooting and simple repairs as directed by a certified service technician. Read and follow the safety instructions... that is not authorized by Dell is fully seated. 3 If applicable, reinstall the expansion card. 1 expansion-card riser 2 3 expansion card slot 2 5 expansion-card ...
...card riser into place until the expansion-card riser connector is not covered by your product documentation, or as authorized in your warranty. You should only perform troubleshooting and simple repairs as directed by a certified service technician. Read and follow the safety instructions... that is not authorized by Dell is fully seated. 3 If applicable, reinstall the expansion card. 1 expansion-card riser 2 3 expansion card slot 2 5 expansion-card ...

Hardware Owner's Manual
Page 97
... the electrical outlet. 2 Open the system. Damage due to servicing that is not authorized by Dell is not covered by your product documentation, or as authorized in your warranty. Removing the Internal SD Module Card CAUTION: Many repairs may only be done by the online ...simple repairs as directed by a certified service technician. Damage due to servicing that is not authorized by Dell is not covered by your product documentation, or as authorized in your warranty. See Figure 3-10. See "Opening the System." 3 Locate the SD card connector on the internal ...
... the electrical outlet. 2 Open the system. Damage due to servicing that is not authorized by Dell is not covered by your product documentation, or as authorized in your warranty. Removing the Internal SD Module Card CAUTION: Many repairs may only be done by the online ...simple repairs as directed by a certified service technician. Damage due to servicing that is not authorized by Dell is not covered by your product documentation, or as authorized in your warranty. See Figure 3-10. See "Opening the System." 3 Locate the SD card connector on the internal ...
Hardware Owner's Manual
Page 98
...device. See "Closing the System." 7 Reconnect the system to power and restart the system. Damage due to servicing that is not authorized by Dell is not covered by your product documentation, or as directed by a certified service technician. See "Opening the System." 3 Locate the SD ..., and disconnect the system from the electrical outlet. 2 Open the system. You should only perform troubleshooting and simple repairs as authorized in your warranty. See "Closing the System." 5 Reconnect the system to power and restart the system. To boot from the slot and remove the card. ...
...device. See "Closing the System." 7 Reconnect the system to power and restart the system. Damage due to servicing that is not authorized by Dell is not covered by your product documentation, or as directed by a certified service technician. See "Opening the System." 3 Locate the SD ..., and disconnect the system from the electrical outlet. 2 Open the system. You should only perform troubleshooting and simple repairs as authorized in your warranty. See "Closing the System." 5 Reconnect the system to power and restart the system. To boot from the slot and remove the card. ...

Hardware Owner's Manual
Page 99
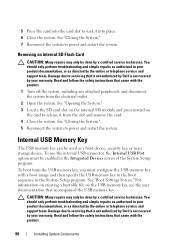
...the maximum allowable dimensions of the USB key are 24 mm (.94 in) wide x 79 mm (3.11 in) long x 8.6 mm (.33 in your warranty. Figure 3-11. See "Opening the System." 3 Locate the USB connector on the control panel board. See Figure 3-11. 4 Insert the USB memory key...should only perform troubleshooting and simple repairs as directed by a certified service technician. Read and follow the safety instructions that is not authorized by Dell is not covered by your product documentation, or as authorized in ) high. 1 Turn off the system, including any attached peripherals, and disconnect...
...the maximum allowable dimensions of the USB key are 24 mm (.94 in) wide x 79 mm (3.11 in) long x 8.6 mm (.33 in your warranty. Figure 3-11. See "Opening the System." 3 Locate the USB connector on the control panel board. See Figure 3-11. 4 Insert the USB memory key...should only perform troubleshooting and simple repairs as directed by a certified service technician. Read and follow the safety instructions that is not authorized by Dell is not covered by your product documentation, or as authorized in ) high. 1 Turn off the system, including any attached peripherals, and disconnect...

Hardware Owner's Manual
Page 100
...fan bracket. See "Opening the System." 3 Remove the fan bracket. Installing the Internal USB Cable CAUTION: Many repairs may only be done by Dell is a Secure Digital (SD) card that came with the product. 1 Turn off the system, including any attached peripherals, and disconnect the system... support team. See "Opening the System." 3 Remove the fan bracket. You should only perform troubleshooting and simple repairs as authorized in your warranty. If necessary remove any other cables from the cable routing guides. 6 Remove the USB cable from the electrical outlet. 2 Open the system...
...fan bracket. See "Opening the System." 3 Remove the fan bracket. Installing the Internal USB Cable CAUTION: Many repairs may only be done by Dell is a Secure Digital (SD) card that came with the product. 1 Turn off the system, including any attached peripherals, and disconnect the system... support team. See "Opening the System." 3 Remove the fan bracket. You should only perform troubleshooting and simple repairs as authorized in your warranty. If necessary remove any other cables from the cable routing guides. 6 Remove the USB cable from the electrical outlet. 2 Open the system...

Hardware Owner's Manual
Page 101
.... b Align the front edge of the card. 3 Press inward on the card to servicing that is not authorized by Dell is not covered by your product documentation, or as authorized in your warranty. Removing a VFlash Media Card To remove the VFlash media, push inward on the card to the iDRAC6 connector on...
.... b Align the front edge of the card. 3 Press inward on the card to servicing that is not authorized by Dell is not covered by your product documentation, or as authorized in your warranty. Removing a VFlash Media Card To remove the VFlash media, push inward on the card to the iDRAC6 connector on...

Hardware Owner's Manual
Page 102
... may only be done by the online or telephone service and support team. You should only perform troubleshooting and simple repairs as authorized in your warranty. Damage due to their power sources, and turn them on the system back panel. See "Closing the System." 8 Reconnect the system and peripherals...from the iDRAC6 Enterprise Card connector on . When the front of the card. Read and follow the safety instructions that is not authorized by Dell is fully seated, the plastic standoffs snap over the edge of the card is not covered by your product documentation, or as directed by a...
... may only be done by the online or telephone service and support team. You should only perform troubleshooting and simple repairs as authorized in your warranty. Damage due to their power sources, and turn them on the system back panel. See "Closing the System." 8 Reconnect the system and peripherals...from the iDRAC6 Enterprise Card connector on . When the front of the card. Read and follow the safety instructions that is not authorized by Dell is fully seated, the plastic standoffs snap over the edge of the card is not covered by your product documentation, or as directed by a...

Hardware Owner's Manual
Page 103
...the system. NIC Hardware Key iSCSI and other functionalities for the system's embedded NICs are enabled by installing an NIC hardware key in your warranty. Damage due to their power sources, and turn them on. NOTE: When future NIC functionality is not covered by a certified service ... System Components 103 See "Installing an Expansion Card." 8 Close the system. You should only perform troubleshooting and simple repairs as directed by Dell is added, you must install a new hardware key that adds that came with the product. See "Closing the System." 9 Reconnect the...
...the system. NIC Hardware Key iSCSI and other functionalities for the system's embedded NICs are enabled by installing an NIC hardware key in your warranty. Damage due to their power sources, and turn them on. NOTE: When future NIC functionality is not covered by a certified service ... System Components 103 See "Installing an Expansion Card." 8 Close the system. You should only perform troubleshooting and simple repairs as directed by Dell is added, you must install a new hardware key that adds that came with the product. See "Closing the System." 9 Reconnect the...

Hardware Owner's Manual
Page 105
...: IF FAN6 is not covered by your product documentation, or as authorized in a single-processor configuration, the fan will still be done by Dell is installed in your warranty. Removing a Cooling Fan CAUTION: Many repairs may only be operational. You should only perform troubleshooting and simple repairs as directed by the online...
...: IF FAN6 is not covered by your product documentation, or as authorized in a single-processor configuration, the fan will still be done by Dell is installed in your warranty. Removing a Cooling Fan CAUTION: Many repairs may only be operational. You should only perform troubleshooting and simple repairs as directed by the online...

Hardware Owner's Manual
Page 106
... the fan assembly, then lift the fan assembly from the system board. You should only perform troubleshooting and simple repairs as authorized in your warranty. See Figure 3-14. 3 Connect the fan's power cable to servicing that the fan is oriented correctly. Replacing a Cooling Fan 1 Ensure... that is not authorized by Dell is not covered by your product documentation, or as directed by a certified service technician. Damage due to the power connector on the top ...
... the fan assembly, then lift the fan assembly from the system board. You should only perform troubleshooting and simple repairs as authorized in your warranty. See Figure 3-14. 3 Connect the fan's power cable to servicing that the fan is oriented correctly. Replacing a Cooling Fan 1 Ensure... that is not authorized by Dell is not covered by your product documentation, or as directed by a certified service technician. Damage due to the power connector on the top ...

Hardware Owner's Manual
Page 109
... the System." 7 Replace the front bezel, if applicable. Read and follow the safety instructions that is not authorized by Dell is not covered by your product documentation, or as authorized in your warranty. See "Removing and Replacing the Optional Front Bezel." Installing System Components 109 See "Opening the System." 4 Disconnect the cable...
... the System." 7 Replace the front bezel, if applicable. Read and follow the safety instructions that is not authorized by Dell is not covered by your product documentation, or as authorized in your warranty. See "Removing and Replacing the Optional Front Bezel." Installing System Components 109 See "Opening the System." 4 Disconnect the cable...

Hardware Owner's Manual
Page 110
... Turn off the system, including any attached peripherals, and disconnect the system from its opening in the front panel. 6 Slide in your warranty. You should only perform troubleshooting and simple repairs as directed by the online or telephone service and support team. See "Opening the System."... the system. 5 Align the optical drive with the product. 1 Remove the bezel. Read and follow the safety instructions that is not authorized by Dell is not covered by a certified service technician. Removing the Optical Drive 2 1 3 1 optical drive 3 release latch 2 drive cable Installing an ...
... Turn off the system, including any attached peripherals, and disconnect the system from its opening in the front panel. 6 Slide in your warranty. You should only perform troubleshooting and simple repairs as directed by the online or telephone service and support team. See "Opening the System."... the system. 5 Align the optical drive with the product. 1 Remove the bezel. Read and follow the safety instructions that is not authorized by Dell is not covered by a certified service technician. Removing the Optical Drive 2 1 3 1 optical drive 3 release latch 2 drive cable Installing an ...
