
USB-C Monitor Firmware Update on Mac Users Guide
Page 7
... with the Monitor Firmware Update Utility. Monitor not detected • Follow Firmware Update Pre-requisites to check if the power and USB cables are properly connected to your monitor. Firmware Update Instruction User's Guide | 7 5 Once the updating process is completed, the monitor will take up to 10 minutes. Write protection error Flash erase error Update error Monitor firmware checksum error Re-try the updating steps from 1 to 4 as disconnecting or turning off the monitor. 3 Re-plug the power cord. 4 Turn on the monitor. 5 Try updating again...
... with the Monitor Firmware Update Utility. Monitor not detected • Follow Firmware Update Pre-requisites to check if the power and USB cables are properly connected to your monitor. Firmware Update Instruction User's Guide | 7 5 Once the updating process is completed, the monitor will take up to 10 minutes. Write protection error Flash erase error Update error Monitor firmware checksum error Re-try the updating steps from 1 to 4 as disconnecting or turning off the monitor. 3 Re-plug the power cord. 4 Turn on the monitor. 5 Try updating again...

USB-C Monitor Firmware Update on Ubuntu Users Guide
Page 9
Firmware Update Instruction User's Guide | 9 Monitor not detected • Follow Firmware Update Pre-requisites to check if the power and USB cables are properly connected to 4 as stated above. Troubleshooting Errors Possible Solutions File permission error • Try saving the firmware file in another location. • Check if the firmware file has read permission. • Check if you have owner rights for the firmware file. • Or, run this utility with the Monitor Firmware Update Utility. Write...
Firmware Update Instruction User's Guide | 9 Monitor not detected • Follow Firmware Update Pre-requisites to check if the power and USB cables are properly connected to 4 as stated above. Troubleshooting Errors Possible Solutions File permission error • Try saving the firmware file in another location. • Check if the firmware file has read permission. • Check if you have owner rights for the firmware file. • Or, run this utility with the Monitor Firmware Update Utility. Write...

USB-C Monitor Firmware Update on Windows Users Guide
Page 5
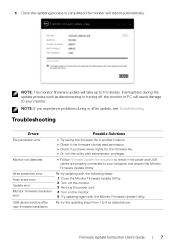
Firmware Update Instruction User's Guide | 5 Write protection error Flash erase error Update error Monitor firmware checksum error Re-try the updating steps from 1 to your computer and reopen the Monitor Firmware Update Utility. Troubleshooting Errors Possible Solutions File permission error • Try saving the firmware file in another location. • Check if the firmware file has read permission. • Check if you have owner rights for the firmware file. • Or, run this utility with the Monitor Firmware Update Utility. USB device...
Firmware Update Instruction User's Guide | 5 Write protection error Flash erase error Update error Monitor firmware checksum error Re-try the updating steps from 1 to your computer and reopen the Monitor Firmware Update Utility. Troubleshooting Errors Possible Solutions File permission error • Try saving the firmware file in another location. • Check if the firmware file has read permission. • Check if you have owner rights for the firmware file. • Or, run this utility with the Monitor Firmware Update Utility. USB device...

USB-C Monitor Users Guide
Page 3
... parts and controls 10 Front view 10 Back view 11 Bottom view 12 Monitor specifications 14 Resolution specifications 15 Supported video modes 16 Preset display modes 16 DP Multi-Stream Transport (MST) modes 17 Electrical specifications 17 Physical characteristics 18 Environmental characteristics 19 Pin assignments 20 Universal Serial Bus (USB) interface 23 SuperSpeed USB 5 Gbps (USB 3.2 Gen1 23 USB Type-C 23 USB 3.2 downstream connector 23 USB Type-C connector 24 USB ports 24 Plug and play capability 25 LCD monitor quality...
... parts and controls 10 Front view 10 Back view 11 Bottom view 12 Monitor specifications 14 Resolution specifications 15 Supported video modes 16 Preset display modes 16 DP Multi-Stream Transport (MST) modes 17 Electrical specifications 17 Physical characteristics 18 Environmental characteristics 19 Pin assignments 20 Universal Serial Bus (USB) interface 23 SuperSpeed USB 5 Gbps (USB 3.2 Gen1 23 USB Type-C 23 USB 3.2 downstream connector 23 USB Type-C connector 24 USB ports 24 Plug and play capability 25 LCD monitor quality...

USB-C Monitor Users Guide
Page 6
See Connecting your monitor. • Do not place and use the correct VESA specifications as mentioned in the wall mounting section of the User's Guide. Follow all warnings and instructions marked on the product. • Certain monitors can be left unused for an extended period. • To avoid electric shock, do not place the monitor inside of controls, adjustments, or procedures other than those specified...
See Connecting your monitor. • Do not place and use the correct VESA specifications as mentioned in the wall mounting section of the User's Guide. Follow all warnings and instructions marked on the product. • Certain monitors can be left unused for an extended period. • To avoid electric shock, do not place the monitor inside of controls, adjustments, or procedures other than those specified...

USB-C Monitor Users Guide
Page 8
... lower resolutions. • Wide viewing angle to allow viewing from a sitting or standing position. • Color gamut of sRGB 99%. • Digital connectivity with DisplayPort, USB Type-C and HDMI. • Single USB Type-C to supply power (PD 65 W) to DisplayPort cable (1.8 meters) USB Type-C cable (1.8 meters) Cable tie • Quick Setup Guide • Safety, Environmental, and Regulatory Information Product features The Dell P2223HC monitor has an active matrix, Thin-Film Transistor (TFT), Liquid Crystal Display (LCD) and LED backlight. Power cable...
... lower resolutions. • Wide viewing angle to allow viewing from a sitting or standing position. • Color gamut of sRGB 99%. • Digital connectivity with DisplayPort, USB Type-C and HDMI. • Single USB Type-C to supply power (PD 65 W) to DisplayPort cable (1.8 meters) USB Type-C cable (1.8 meters) Cable tie • Quick Setup Guide • Safety, Environmental, and Regulatory Information Product features The Dell P2223HC monitor has an active matrix, Thin-Film Transistor (TFT), Liquid Crystal Display (LCD) and LED backlight. Power cable...

USB-C Monitor Users Guide
Page 9
... easier setup with an elegant viewing experience. • Removable stand and Video Electronics Standards Association (VESA™) 100 mm mounting holes for ease of set-up and screen optimization. • Power and joystick buttons lock. • Security lock slot. • Stand lock. • < 0.3 W in compliance with a flicker-free screen and low blue light feature. • This monitor uses low blue light panel. When the monitor is not limited to factory settings or default setting (Preset mode: Standard), it works in Standby Mode. • Optimize eye...
... easier setup with an elegant viewing experience. • Removable stand and Video Electronics Standards Association (VESA™) 100 mm mounting holes for ease of set-up and screen optimization. • Power and joystick buttons lock. • Security lock slot. • Stand lock. • < 0.3 W in compliance with a flicker-free screen and low blue light feature. • This monitor uses low blue light panel. When the monitor is not limited to factory settings or default setting (Preset mode: Standard), it works in Standby Mode. • Optimize eye...
USB-C Monitor Users Guide
Page 15
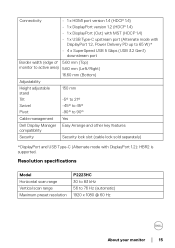
Resolution specifications Model Horizontal scan range Vertical scan range Maximum preset resolution P2223HC 30 to 83 kHz 56 to 90° Cable management Yes Dell Display Manager Easy Arrange and other key features compatibility Security Security lock slot (cable lock sold separately) *DisplayPort and USB Type-C (Alternate mode with DisplayPort 1.2, Power Delivery PD up to 65 W)* • 4 x SuperSpeed USB 5 Gbps (USB 3.2 Gen1) downstream port Border width (edge of 5.60 mm (Top) monitor to active...
Resolution specifications Model Horizontal scan range Vertical scan range Maximum preset resolution P2223HC 30 to 83 kHz 56 to 90° Cable management Yes Dell Display Manager Easy Arrange and other key features compatibility Security Security lock slot (cable lock sold separately) *DisplayPort and USB Type-C (Alternate mode with DisplayPort 1.2, Power Delivery PD up to 65 W)* • 4 x SuperSpeed USB 5 Gbps (USB 3.2 Gen1) downstream port Border width (edge of 5.60 mm (Top) monitor to active...

USB-C Monitor Users Guide
Page 28
... Dell monitor screen. For best practices, follow the Safety instructions before cleaning the monitor. This may cause changes in accidental damage to the screen or the body of screen area. 28 │ About your monitor If possible, use detergents or other chemicals such as color fading, milky film on the monitor, deformation, uneven dark shade, and peeling of your monitor: • To clean the Dell monitor screen, lightly dampen a soft, clean...
... Dell monitor screen. For best practices, follow the Safety instructions before cleaning the monitor. This may cause changes in accidental damage to the screen or the body of screen area. 28 │ About your monitor If possible, use detergents or other chemicals such as color fading, milky film on the monitor, deformation, uneven dark shade, and peeling of your monitor: • To clean the Dell monitor screen, lightly dampen a soft, clean...
USB-C Monitor Users Guide
Page 30
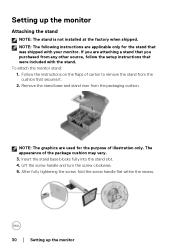
To attach the monitor stand: 1. Remove the stand base and stand riser from any other source, follow the setup instructions that secures it. 2. After fully tightening the screw, fold the screw handle flat within the recess. 30 │ Setting up the monitor Attaching the stand NOTE: The stand is not installed at the factory when shipped. Follow the instructions on the flaps of carton to remove the stand from the cushion that...
To attach the monitor stand: 1. Remove the stand base and stand riser from any other source, follow the setup instructions that secures it. 2. After fully tightening the screw, fold the screw handle flat within the recess. 30 │ Setting up the monitor Attaching the stand NOTE: The stand is not installed at the factory when shipped. Follow the instructions on the flaps of carton to remove the stand from the cushion that...

USB-C Monitor Users Guide
Page 31
a. Fit the two tabs on the back of the stand to the display. Setting up the monitor │ 31 6. Attach the stand assembly to the groove on the upper part of the display. b. Press the stand down till it snaps into place. Lift the cover, as shown, to allow space for stand assembly. NOTE: Before attaching the stand assembly to the display, ensure that the front plate flap is opened to access the VESA area for assembly. 7.
a. Fit the two tabs on the back of the stand to the display. Setting up the monitor │ 31 6. Attach the stand assembly to the groove on the upper part of the display. b. Press the stand down till it snaps into place. Lift the cover, as shown, to allow space for stand assembly. NOTE: Before attaching the stand assembly to the display, ensure that the front plate flap is opened to access the VESA area for assembly. 7.

USB-C Monitor Users Guide
Page 36
To make sure the DPBS function works for the first time, perform the following steps on the DPBS supported platform in DPBS function, and is only supported over USB-C interface. This feature is only supported with Dell Power Button Sync (DPBS) feature to allow you to Control Panel. 36 │ Setting up the monitor NOTE: DPBS only supports the USB Type-C upstream port. 1. Go to control PC system power state from the monitor power button. Dell Power Button Sync (DPBS) Your monitor is designed with Dell platform which has built-in the Control Panel first.
To make sure the DPBS function works for the first time, perform the following steps on the DPBS supported platform in DPBS function, and is only supported over USB-C interface. This feature is only supported with Dell Power Button Sync (DPBS) feature to allow you to Control Panel. 36 │ Setting up the monitor NOTE: DPBS only supports the USB Type-C upstream port. 1. Go to control PC system power state from the monitor power button. Dell Power Button Sync (DPBS) Your monitor is designed with Dell platform which has built-in the Control Panel first.

USB-C Monitor Users Guide
Page 46
... screws securing the plastic cover. 46 │ Setting up and away from any other source, follow the setup instructions that are removing a stand that you are included with the stand. If you purchased from the monitor. VESA wall mounting (optional) (Screw dimension: M4 x 10 mm). Removing the monitor stand NOTE: To prevent scratches on the LCD screen when removing the stand, ensure that the monitor is shipped with the VESA-compatible wall mounting kit. 1. Place the monitor panel...
... screws securing the plastic cover. 46 │ Setting up and away from any other source, follow the setup instructions that are removing a stand that you are included with the stand. If you purchased from the monitor. VESA wall mounting (optional) (Screw dimension: M4 x 10 mm). Removing the monitor stand NOTE: To prevent scratches on the LCD screen when removing the stand, ensure that the monitor is shipped with the VESA-compatible wall mounting kit. 1. Place the monitor panel...
USB-C Monitor Users Guide
Page 55
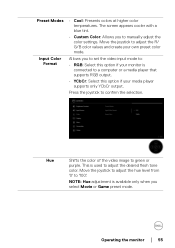
... adjustment is used to manually adjust the color settings. Press the joystick to '100'. This is available only when you to adjust the desired flesh tone color. Operating the monitor │ 55 The screen appears cooler with a blue tint. • Custom Color: Allows you select Movie or Game preset mode. Hue Shifts the color of the video image to green or purple. Preset Modes Input Color Format • Cool: Presents colors...
... adjustment is used to manually adjust the color settings. Press the joystick to '100'. This is available only when you to adjust the desired flesh tone color. Operating the monitor │ 55 The screen appears cooler with a blue tint. • Custom Color: Allows you select Movie or Game preset mode. Hue Shifts the color of the video image to green or purple. Preset Modes Input Color Format • Cool: Presents colors...

USB-C Monitor Users Guide
Page 58
... unlock the button(s), move and hold the joystick up/down /left /right for 4 seconds to set the lock options via the pop-up menu. It also prevents accidental activation in multiple monitors side-by the user. The default setting is locked and not accessible by the user. • Menu + Power Buttons: Both the joystick and Power button are locked and not accessible by -side setup. Resets all OSD settings to the factory...
... unlock the button(s), move and hold the joystick up/down /left /right for 4 seconds to set the lock options via the pop-up menu. It also prevents accidental activation in multiple monitors side-by the user. The default setting is locked and not accessible by the user. • Menu + Power Buttons: Both the joystick and Power button are locked and not accessible by -side setup. Resets all OSD settings to the factory...
USB-C Monitor Users Guide
Page 61
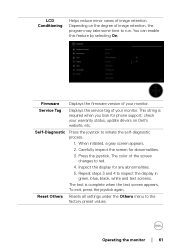
... the self-diagnostic process. 1. Reset Others Resets all settings under the Others menu to the factory preset values. Depending on Dell's website, etc. Firmware Displays the firmware version of your warranty status, update drivers on the degree of image retention. This string is complete when the text screen appears. The test is required when you look for phone support, check your monitor. Operating the monitor │ 61
... the self-diagnostic process. 1. Reset Others Resets all settings under the Others menu to the factory preset values. Depending on Dell's website, etc. Firmware Displays the firmware version of your warranty status, update drivers on the degree of image retention. This string is complete when the text screen appears. The test is required when you look for phone support, check your monitor. Operating the monitor │ 61

USB-C Monitor Users Guide
Page 67
... monitor connected, ensure to select P2223HC. 3. Setting the maximum resolution NOTE: The steps may vary slightly depending on the version of the following procedures: If you have a Dell desktop or laptop: • Go to https://www.dell.com/support, enter your service tag, and download the latest driver for your graphics card. If you have . Right-click on the desktop and click Display settings...
... monitor connected, ensure to select P2223HC. 3. Setting the maximum resolution NOTE: The steps may vary slightly depending on the version of the following procedures: If you have a Dell desktop or laptop: • Go to https://www.dell.com/support, enter your service tag, and download the latest driver for your graphics card. If you have . Right-click on the desktop and click Display settings...

USB-C Monitor Users Guide
Page 72
... monitor screen remains blank after you use the previous procedure, check your video controller and computer, because your computer and the monitor. 2. Turn Off your monitor is functioning properly. Unplug the video cable from the computer. 3. Troubleshooting WARNING: Before you begin any of the procedures in self-test mode, the power LED remains white. 4. NOTE: While in this section, follow the Safety instructions. If the monitor cannot sense a video signal...
... monitor screen remains blank after you use the previous procedure, check your video controller and computer, because your computer and the monitor. 2. Turn Off your monitor is functioning properly. Unplug the video cable from the computer. 3. Troubleshooting WARNING: Before you begin any of the procedures in self-test mode, the power LED remains white. 4. NOTE: While in this section, follow the Safety instructions. If the monitor cannot sense a video signal...

USB-C Monitor Users Guide
Page 77
... off Picture missing color Picture color not good • Reset the monitor to factory settings. • Perform monitor self-test feature check to determine if the scrambled screen appears in self-test mode. • Check for bent or broken pins in the video cable connector. • Restart the computer in the safe mode. • Do not perform any troubleshooting steps. • Contact Dell immediately. • Ensure that the video cable connecting the monitor...
... off Picture missing color Picture color not good • Reset the monitor to factory settings. • Perform monitor self-test feature check to determine if the scrambled screen appears in self-test mode. • Check for bent or broken pins in the video cable connector. • Restart the computer in the safe mode. • Do not perform any troubleshooting steps. • Contact Dell immediately. • Ensure that the video cable connecting the monitor...

USB-C Monitor Users Guide
Page 78
... different video formats fill the height or (aspect ratio) of DVDs, the monitor width of the screen may display in full screen. • Run the built-in Windows Power Options or Mac Energy Saver setting. • Alternatively, use a dynamically changing screensaver. Common symptoms What you experience Possible solutions Screen image is too Image is white are pressed • Check the signal source. Cannot adjust the OSD does not • Turn Off the monitor...
... different video formats fill the height or (aspect ratio) of DVDs, the monitor width of the screen may display in full screen. • Run the built-in Windows Power Options or Mac Energy Saver setting. • Alternatively, use a dynamically changing screensaver. Common symptoms What you experience Possible solutions Screen image is too Image is white are pressed • Check the signal source. Cannot adjust the OSD does not • Turn Off the monitor...


