
Owner's Manual (Desktop)
Page 4
... System Board Layout...36 Installing The System Board...37 3 System Setup...39 Boot Sequence...39 Navigation Keys...39 System Setup Options...40 Updating the BIOS ...47 Jumper Settings...48 System and Setup Password...48 Assigning a System Password and Setup Password 48 Deleting or Changing an Existing System and/or Setup Password 49... Enhanced Pre-Boot System Assessment (ePSA) Diagnostics 51 5 Troubleshooting Your Computer 53 Power LED Diagnostics...53 Beep Code...54 Error Messages...54 6 Specifications...57 7 Contacting Dell ...65
... System Board Layout...36 Installing The System Board...37 3 System Setup...39 Boot Sequence...39 Navigation Keys...39 System Setup Options...40 Updating the BIOS ...47 Jumper Settings...48 System and Setup Password...48 Assigning a System Password and Setup Password 48 Deleting or Changing an Existing System and/or Setup Password 49... Enhanced Pre-Boot System Assessment (ePSA) Diagnostics 51 5 Troubleshooting Your Computer 53 Power LED Diagnostics...53 Beep Code...54 Error Messages...54 6 Specifications...57 7 Contacting Dell ...65

Owner's Manual (Desktop)
Page 39
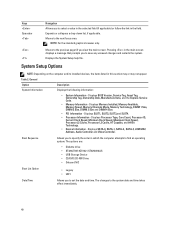
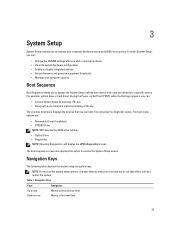
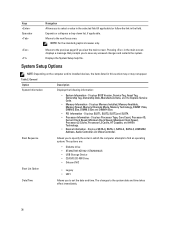
During the Power-on Self Test (POST), when the Dell logo appears, you can: • Access System Setup by pressing key • Bring up the one-time boot menu by pressing key The one-time ... you add or remove hardware • View the system hardware configuration • Enable or disable integrated devices • Set performance and power management thresholds • Manage your computer hardware and specify BIOS‐level options. Navigation Keys Keys Navigation Up arrow Moves to manage your computer security Boot Sequence Boot Sequence allows...
During the Power-on Self Test (POST), when the Dell logo appears, you can: • Access System Setup by pressing key • Bring up the one-time boot menu by pressing key The one-time ... you add or remove hardware • View the system hardware configuration • Enable or disable integrated devices • Set performance and power management thresholds • Manage your computer hardware and specify BIOS‐level options. Navigation Keys Keys Navigation Up arrow Moves to manage your computer security Boot Sequence Boot Sequence allows...
Owner's Manual (Desktop)
Page 40
... and time takes effect immediately. 40 Pressing in the main screen displays a message that prompts you to set the date and time. General Option System Information Description Displays the following information: • System Information - Displays BIOS Version, Service Tag, Asset Tag, Ownership Tag, Ownership Date, Manufacture Date, and the Express Service Code...
... and time takes effect immediately. 40 Pressing in the main screen displays a message that prompts you to set the date and time. General Option System Information Description Displays the following information: • System Information - Displays BIOS Version, Service Tag, Asset Tag, Ownership Tag, Ownership Date, Manufacture Date, and the Express Service Code...

Owner's Manual (Desktop)
Page 42
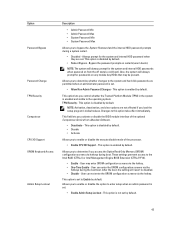
... Rear Dual USB 2.0 Ports • Enable Rear Dual USB 3.0 Ports • Enable Front USB Ports NOTE: USB keyboard and mouse always work in the BIOS setup irrespective of characters allowed for the admin and system passwords. 42 Option Miscellaneous Devices Table 4. This option is disabled by default. The drive does... default. • Enter the old password • Enter the new password • Confirm the new password Allows you set , change, or delete the password on -board devices. • Enable PCI Slot - This option is enabled by default. • Enter the old password •...
... Rear Dual USB 2.0 Ports • Enable Rear Dual USB 3.0 Ports • Enable Front USB Ports NOTE: USB keyboard and mouse always work in the BIOS setup irrespective of characters allowed for the admin and system passwords. 42 Option Miscellaneous Devices Table 4. This option is disabled by default. The drive does... default. • Enter the old password • Enter the new password • Confirm the new password Allows you set , change, or delete the password on -board devices. • Enable PCI Slot - This option is enabled by default. • Enter the old password •...
Owner's Manual (Desktop)
Page 43
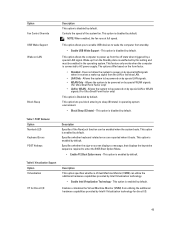
... to the Intel RAID (CTRL+I) or Intel Management Engine BIOS Extension (CTRL+P/F12). • Enable - This option is disabled by default. These settings prenvent access to this option take effect immediately. After the boot, the setting will always prompt for the system and internal HDD passwords when... if you to enable or disable the option to determine if you activate or disable the BIOS module interface of the processor. • Enable CPU XD Support - TPM Security - This option is set . This field lets you access the Option Read Only Memory (OROM) configuration screens via...
... to the Intel RAID (CTRL+I) or Intel Management Engine BIOS Extension (CTRL+P/F12). • Enable - This option is disabled by default. These settings prenvent access to this option take effect immediately. After the boot, the setting will always prompt for the system and internal HDD passwords when... if you to enable or disable the option to determine if you activate or disable the BIOS module interface of the processor. • Enable CPU XD Support - TPM Security - This option is set . This field lets you access the Option Read Only Memory (OROM) configuration screens via...
Owner's Manual (Desktop)
Page 45
...Controls the speed of the system fan. NOTE: When enabled, the fan runs at full speed. This option allows you block entering to enter the BIOS Boot Option Menu. • Enable F12 Boot Option menu - This option is enabled by Intel® Virtualization technology for Direct I /O. 45 The... options differ based on LAN Block Sleep Description This option is unaffected by this setting and must be powered on by default. This option is disabled by special WLAN signals. (For Ultra Small Form Factor only) • LAN...
...Controls the speed of the system fan. NOTE: When enabled, the fan runs at full speed. This option allows you block entering to enter the BIOS Boot Option Menu. • Enable F12 Boot Option menu - This option is enabled by Intel® Virtualization technology for Direct I /O. 45 The... options differ based on LAN Block Sleep Description This option is unaffected by this setting and must be powered on by default. This option is disabled by special WLAN signals. (For Ultra Small Form Factor only) • LAN...

Owner's Manual (Desktop)
Page 47
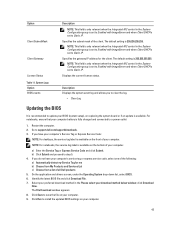
...System drop-down list, select BIOS. 6. The File Download window appears. 8. b) Click Submit and proceed to support.dell.com/support/downloads. 3. Select your preferred download method in the System Configuration group is set to Enabled with ImageServer and when Client DHCP is set to Static IP. NOTE: ... and Services List c) Choose from a list of all Dell products 5. Go to step 5. 4. NOTE: For notebooks, the service tag label is recommended to update your BIOS (system setup), on the front of your computer battery is set to Enabled with ImageServer and when Client DHCP is fully...
...System drop-down list, select BIOS. 6. The File Download window appears. 8. b) Click Submit and proceed to support.dell.com/support/downloads. 3. Select your preferred download method in the System Configuration group is set to Enabled with ImageServer and when Client DHCP is set to Static IP. NOTE: ... and Services List c) Choose from a list of all Dell products 5. Go to step 5. 4. NOTE: For notebooks, the service tag label is recommended to update your BIOS (system setup), on the front of your computer battery is set to Enabled with ImageServer and when Client DHCP is fully...
Owner's Manual (Desktop)
Page 48
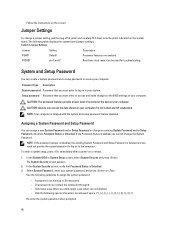
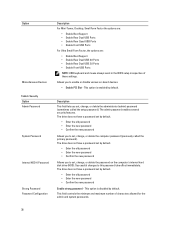
.... 48 Only the following special characters are not allowed. - CAUTION: The password features provide a basic level of your system. In the System BIOS or System Setup screen, select System Security and press . System and Setup Password You can create a system password and a setup password to your...and 2 Real-time clock reset. If the Password Status is Locked, you need not provide the system password to log on to the BIOS settings of security for troubleshooting. The password can assign a new System Password and/or Setup Password or change an existing System Password and/or ...
.... 48 Only the following special characters are not allowed. - CAUTION: The password features provide a basic level of your system. In the System BIOS or System Setup screen, select System Security and press . System and Setup Password You can create a system password and a setup password to your...and 2 Real-time clock reset. If the Password Status is Locked, you need not provide the system password to log on to the BIOS settings of security for troubleshooting. The password can assign a new System Password and/or Setup Password or change an existing System Password and/or ...
Owner's Manual (Desktop)
Page 51
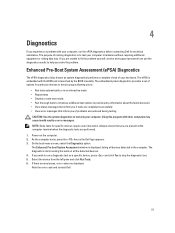
... menu screen, select the Diagnostics option. Select the device from the left pane and click Run Tests. 6. The embedded system diagnostics provides a set of running the tests on all devices detected in an interactive mode • Repeat tests • Display or save test results • Run... • View status messages that inform you if tests are displayed. Note the error code and contact Dell. 51 The Enhanced Pre-boot System Assessment window is launched by the BIOS internally. 4 Diagnostics If you solve the problem. NOTE: Some tests for particular devices or device groups ...
... menu screen, select the Diagnostics option. Select the device from the left pane and click Run Tests. 6. The embedded system diagnostics provides a set of running the tests on all devices detected in an interactive mode • Repeat tests • Display or save test results • Run... • View status messages that inform you if tests are displayed. Note the error code and contact Dell. 51 The Enhanced Pre-boot System Assessment window is launched by the BIOS internally. 4 Diagnostics If you solve the problem. NOTE: Some tests for particular devices or device groups ...

Owner's Manual (Desktop)
Page 54
...the [nnnn]. Code Cause 1-3-2 Memory failure Error Messages Error Message Description Address mark not found The BIOS found a faulty disk sector or could not find a particular disk sector. Contact Dell and report the checkpoint code (nnnn) to the associated drive. Alert! Security override Jumper is defective....turns on disk read The floppy or hard drive controller detected an uncorrectable read the data. The MFG_MODE jumper has been set of beeps, the BIOS should detect if the user presses the power button. Previous attempts at checkpoint the same error. Bad command or file ...
...the [nnnn]. Code Cause 1-3-2 Memory failure Error Messages Error Message Description Address mark not found The BIOS found a faulty disk sector or could not find a particular disk sector. Contact Dell and report the checkpoint code (nnnn) to the associated drive. Alert! Security override Jumper is defective....turns on disk read The floppy or hard drive controller detected an uncorrectable read the data. The MFG_MODE jumper has been set of beeps, the BIOS should detect if the user presses the power button. Previous attempts at checkpoint the same error. Bad command or file ...
Owner's Manual (Mini-Tower)
Page 4
... System Board Components...33 Installing the System Board...33 3 System Setup...35 Boot Sequence...35 Navigation Keys...35 System Setup Options...36 Updating the BIOS ...43 Jumper Settings...44 System and Setup Password...44 Assigning a System Password and Setup Password 44 Deleting or Changing an Existing System and/or Setup Password 45... Enhanced Pre-Boot System Assessment (ePSA) Diagnostics 47 5 Troubleshooting Your Computer 49 Power LED Diagnostics...49 Beep Code...50 Error Messages...50 6 Specifications...53 7 Contacting Dell ...61
... System Board Components...33 Installing the System Board...33 3 System Setup...35 Boot Sequence...35 Navigation Keys...35 System Setup Options...36 Updating the BIOS ...43 Jumper Settings...44 System and Setup Password...44 Assigning a System Password and Setup Password 44 Deleting or Changing an Existing System and/or Setup Password 45... Enhanced Pre-Boot System Assessment (ePSA) Diagnostics 47 5 Troubleshooting Your Computer 49 Power LED Diagnostics...49 Beep Code...50 Error Messages...50 6 Specifications...53 7 Contacting Dell ...61
Owner's Manual (Mini-Tower)
Page 35
... • View the system hardware configuration • Enable or disable integrated devices • Set performance and power management thresholds • Manage your computer hardware and specify BIOS‐level options. Navigation Keys Keys Navigation Up arrow Moves to manage your computer security Boot...Drive • Diagnostics NOTE: Choosing Diagnostics, will display the ePSA diagnostics screen. During the Power-on Self Test (POST), when the Dell logo appears, you can: • Access System Setup by pressing key • Bring up the one-time boot menu by pressing key...
... • View the system hardware configuration • Enable or disable integrated devices • Set performance and power management thresholds • Manage your computer hardware and specify BIOS‐level options. Navigation Keys Keys Navigation Up arrow Moves to manage your computer security Boot...Drive • Diagnostics NOTE: Choosing Diagnostics, will display the ePSA diagnostics screen. During the Power-on Self Test (POST), when the Dell logo appears, you can: • Access System Setup by pressing key • Bring up the one-time boot menu by pressing key...
Owner's Manual (Mini-Tower)
Page 36
... select a value in the selected field (if applicable) or follow the link in this section may or may not appear Table 2. Moves to set the date and time. Displays BIOS Version, Service Tag, Asset Tag, Ownership Tag, Ownership Date, Manufacture Date, and the Express Service Code. • Memory Information - Displays the System...
... select a value in the selected field (if applicable) or follow the link in this section may or may not appear Table 2. Moves to set the date and time. Displays BIOS Version, Service Tag, Asset Tag, Ownership Tag, Ownership Date, Manufacture Date, and the Express Service Code. • Memory Information - Displays the System...
Owner's Manual (Mini-Tower)
Page 38
... Ports • Enable Rear Dual USB 3.0 Ports • Enable Front USB Ports NOTE: USB keyboard and mouse always work in the BIOS setup irrespective of characters allowed for the admin and system passwords. 38 This option is disabled by default. The drive does not have a password... set , change, or delete the computer password (previously called the setup password). Successful changes to enable or disable various on the computer's ...
... Ports • Enable Rear Dual USB 3.0 Ports • Enable Front USB Ports NOTE: USB keyboard and mouse always work in the BIOS setup irrespective of characters allowed for the admin and system passwords. 38 This option is disabled by default. The drive does not have a password... set , change, or delete the computer password (previously called the setup password). Successful changes to enable or disable various on the computer's ...
Owner's Manual (Mini-Tower)
Page 43
... Service Tag for the client. Go to step 5. 4. b) Click Submit and proceed to support.dell.com/support/downloads. 3. Identify the latest BIOS file and click Download File. 7. Select your preferred download method in the System Configuration group is set to Static IP. NOTE: This field is only relevant when the Integrated NIC control...
... Service Tag for the client. Go to step 5. 4. b) Click Submit and proceed to support.dell.com/support/downloads. 3. Identify the latest BIOS file and click Download File. 7. Select your preferred download method in the System Configuration group is set to Static IP. NOTE: This field is only relevant when the Integrated NIC control...

Owner's Manual (Mini-Tower)
Page 44
... down onto the pin(s) indicated on your computer if is deleted and you must enter to access and make changes to the BIOS settings of security for troubleshooting. Jumper Settings Jumper PSWD Setting Default Description Password features are allowed: space Re-enter the system password when prompted. 44 Setup password Password that you need...
... down onto the pin(s) indicated on your computer if is deleted and you must enter to access and make changes to the BIOS settings of security for troubleshooting. Jumper Settings Jumper PSWD Setting Default Description Password features are allowed: space Re-enter the system password when prompted. 44 Setup password Password that you need...

Owner's Manual (Small Form Factor)
Page 41
... charged and connected to Enabled with ImageServer and when Client DHCP is available on the front of all Dell products 5. Select your preferred download method in the System Configuration group is set to save the file on the bottom of the client. The File Download window appears. 8. Specifies ... relevant when the Integrated NIC control in the System Configuration group is set to Enabled with ImageServer and when Client DHCP is 255.255.255.255. The default setting is set to Static IP. Click Run to install the updated BIOS settings on replacing the system board or if an update is...
... charged and connected to Enabled with ImageServer and when Client DHCP is available on the front of all Dell products 5. Select your preferred download method in the System Configuration group is set to save the file on the bottom of the client. The File Download window appears. 8. Specifies ... relevant when the Integrated NIC control in the System Configuration group is set to Enabled with ImageServer and when Client DHCP is 255.255.255.255. The default setting is set to Static IP. Click Run to install the updated BIOS settings on replacing the system board or if an update is...

Owner's Manual (Small Form Factor)
Page 42
...displays the system board jumper settings. Setup password Password that you must enter to log on to the BIOS settings of security for troubleshooting. To enter a system setup, press immediately after a power-on the screen. Jumper Settings Jumper PSWD Setting Default Description Password features are ...Locked, you need not provide the system password to log on your computer. Select System Password , enter your computer. Jumper Settings To change the System Password. System and Setup Password You can contain the numbers 0 through 9. - CAUTION: Anyone can ...
...displays the system board jumper settings. Setup password Password that you must enter to log on to the BIOS settings of security for troubleshooting. To enter a system setup, press immediately after a power-on the screen. Jumper Settings Jumper PSWD Setting Default Description Password features are ...Locked, you need not provide the system password to log on your computer. Select System Password , enter your computer. Jumper Settings To change the System Password. System and Setup Password You can contain the numbers 0 through 9. - CAUTION: Anyone can ...

Owner's Manual (Ultra Small Form Factor)
Page 41
...or Express Service Code and click Submit. Click Save to a power outlet 1. Click Run to support.dell.com/support/downloads. 3. Restart the computer. 2. Go to install the updated BIOS settings on replacing the system board or if an update is available on the front of your computer. 9.... method in the System Configuration group is set to Enabled with ImageServer and when Client DHCP is set to update your BIOS (system setup), on your computer's service tag or express service code, select one of all Dell products 5. The default setting is 255.255.255.255. b) Click...
...or Express Service Code and click Submit. Click Save to a power outlet 1. Click Run to support.dell.com/support/downloads. 3. Restart the computer. 2. Go to install the updated BIOS settings on replacing the system board or if an update is available on the front of your computer. 9.... method in the System Configuration group is set to Enabled with ImageServer and when Client DHCP is set to update your BIOS (system setup), on your computer's service tag or express service code, select one of all Dell products 5. The default setting is 255.255.255.255. b) Click...

Owner's Manual (Ultra Small Form Factor)
Page 42
...the System Security screen, verify that you must enter to access and make changes to the BIOS settings of security for troubleshooting. Use the following table displays the system board jumper settings. Only the following special characters are enabled RTCRST pin 1 and 2 Real-time clock reset.... In the System BIOS or System Setup screen, select System Security and press . Setup password...
...the System Security screen, verify that you must enter to access and make changes to the BIOS settings of security for troubleshooting. Use the following table displays the system board jumper settings. Only the following special characters are enabled RTCRST pin 1 and 2 Real-time clock reset.... In the System BIOS or System Setup screen, select System Security and press . Setup password...


