
Owner's Manual
Page 3
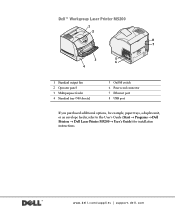
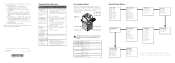
Dell™ Workgroup Laser Printer M5200 1 2 8 7 3 5 6 4 1 Standard output bin 2 Operator panel 3 Multipurpose feeder 4 Standard tray (500 sheets) 5 On/Off switch 6 Power cord connector 7 Ethernet port 8 USB port If you purchased additional options, for example, paper trays, a duplex unit, or an envelope feeder, refer to the User's Guide (Start → Programs → Dell Printers → Dell Laser Printer M5200 → User's Guide) for installation instructions. www.dell.com/supplies | support.dell.com
Dell™ Workgroup Laser Printer M5200 1 2 8 7 3 5 6 4 1 Standard output bin 2 Operator panel 3 Multipurpose feeder 4 Standard tray (500 sheets) 5 On/Off switch 6 Power cord connector 7 Ethernet port 8 USB port If you purchased additional options, for example, paper trays, a duplex unit, or an envelope feeder, refer to the User's Guide (Start → Programs → Dell Printers → Dell Laser Printer M5200 → User's Guide) for installation instructions. www.dell.com/supplies | support.dell.com
Owner's Manual
Page 6
3 Set up for local printing Installing printer drivers 36 4 Load paper Loading paper and transparencies 46 In the standard tray 46 In the multipurpose feeder 49 Loading envelopes 53 In the multipurpose feeder 53 5 Use your printer Changing the language on the ... from the printer operator panel 60 Utilizing additional software tools 61 Status Monitor 61 Status Monitor Center 61 Printing Status window 62 Dell Toner Reorder Window 62 Dell Printer Software Uninstall 62 Driver Profiler 63 Replacing the toner cartridge 64 Removing the used toner cartridge 64 Cleaning the printer 65...
3 Set up for local printing Installing printer drivers 36 4 Load paper Loading paper and transparencies 46 In the standard tray 46 In the multipurpose feeder 49 Loading envelopes 53 In the multipurpose feeder 53 5 Use your printer Changing the language on the ... from the printer operator panel 60 Utilizing additional software tools 61 Status Monitor 61 Status Monitor Center 61 Printing Status window 62 Dell Toner Reorder Window 62 Dell Printer Software Uninstall 62 Driver Profiler 63 Replacing the toner cartridge 64 Removing the used toner cartridge 64 Cleaning the printer 65...

Owner's Manual
Page 46
Slide the width guide to the far right side of the guide as shown. www.dell.com/supplies | support.dell.com Loading paper and transparencies In the standard tray Load the print media you use for the majority of your print jobs in the standard tray. 1 Remove the tray. 2 Squeeze the width guide tab and the side of the tray. 46 Load paper
Slide the width guide to the far right side of the guide as shown. www.dell.com/supplies | support.dell.com Loading paper and transparencies In the standard tray Load the print media you use for the majority of your print jobs in the standard tray. 1 Remove the tray. 2 Squeeze the width guide tab and the side of the tray. 46 Load paper

Owner's Manual
Page 47
... length guide to loosen them, and then fan them. Do not exceed the maximum stack height indicated by the label in the tray. Overfilling the tray may cause jams. Load paper 47 Do not fold or crease the print media. Before loading print media, flex the sheets back and forth to the correct... position for the size of the stack on a level surface. 4 Place the print media into the tray with the recommended print side face down for single...
... length guide to loosen them, and then fan them. Do not exceed the maximum stack height indicated by the label in the tray. Overfilling the tray may cause jams. Load paper 47 Do not fold or crease the print media. Before loading print media, flex the sheets back and forth to the correct... position for the size of the stack on a level surface. 4 Place the print media into the tray with the recommended print side face down for single...

Owner's Manual
Page 48
www.dell.com/supplies | support.dell.com 5 Squeeze the width guide tab and the side of the print media stack. 6 Insert the tray. NOTE: If you load any print media other than plain letter or A4 paper into the tray, make sure you change the Paper Type and Paper Size settings for that tray from your software application. 48 Load paper Slide the width guide to the left until it lightly rests against the edge of the guide together.
www.dell.com/supplies | support.dell.com 5 Squeeze the width guide tab and the side of the print media stack. 6 Insert the tray. NOTE: If you load any print media other than plain letter or A4 paper into the tray, make sure you change the Paper Type and Paper Size settings for that tray from your software application. 48 Load paper Slide the width guide to the left until it lightly rests against the edge of the guide together.

Owner's Manual
Page 59
... Custom Types Universal Setup Substitute Size Configure MP Envelope Enhance Paper Texture Paper Weight Paper Loading* Finishing Menu Duplex* Duplex Bind* Copies Blank Pages Collation Separator Sheets Separator Source Multipage Print Multipage Order Multipage View Multipage Border Utilities Menu Print ... Buffer MAC Binary PS STD Net Setup PCL Emul Menu Font Source Font Name Point Size Pitch Symbol Set Orientation Lines per Page A4 Width Tray Renumber Auto CR after LF Auto LF after CR USB Menu Standard USB PCL SmartSwitch PS SmartSwitch NPA Mode USB Buffer MAC Binary PS Setup...
... Custom Types Universal Setup Substitute Size Configure MP Envelope Enhance Paper Texture Paper Weight Paper Loading* Finishing Menu Duplex* Duplex Bind* Copies Blank Pages Collation Separator Sheets Separator Source Multipage Print Multipage Order Multipage View Multipage Border Utilities Menu Print ... Buffer MAC Binary PS STD Net Setup PCL Emul Menu Font Source Font Name Point Size Pitch Symbol Set Orientation Lines per Page A4 Width Tray Renumber Auto CR after LF Auto LF after CR USB Menu Standard USB PCL SmartSwitch PS SmartSwitch NPA Mode USB Buffer MAC Binary PS Setup...

Owner's Manual
Page 63
...Dell Printer Software Uninstall. Driver Profiler Use the Driver Profiler to uninstall, and then click Next. A driver profile can contain a group of saved printer driver settings and other data for things such as: • Print orientation and N-Up (document settings) • Installation status of an output tray (printer options) • User-defined paper... sizes (custom papers) • Simple text and watermarks • Overlay references • Font ...
...Dell Printer Software Uninstall. Driver Profiler Use the Driver Profiler to uninstall, and then click Next. A driver profile can contain a group of saved printer driver settings and other data for things such as: • Print orientation and N-Up (document settings) • Installation status of an output tray (printer options) • User-defined paper... sizes (custom papers) • Simple text and watermarks • Overlay references • Font ...
Owner's Manual
Page 97
...13 C canceling a job, 60 changing printer settings from the operator panel, 56 changing the language from the operator panel, 56 D Dell Printer Software Uninstall, 62 Dell Toner Re-Order Window, 62 disable menus from the operator panel, 58 driver profiler, using, 63 drivers, installing, 36 F factory... 40 using Windows XP, 13, 37 IP address, locating, 20, 23 L Linux, drivers, 18 loading paper multipurpose feeder, 49 standard tray, 46 loading transparencies multipurpose feeder, 49 standard tray, 46 local printing, 36 locating the IP address, 20, 23 M maintaining the printer cleaning the printer,...
...13 C canceling a job, 60 changing printer settings from the operator panel, 56 changing the language from the operator panel, 56 D Dell Printer Software Uninstall, 62 Dell Toner Re-Order Window, 62 disable menus from the operator panel, 58 driver profiler, using, 63 drivers, installing, 36 F factory... 40 using Windows XP, 13, 37 IP address, locating, 20, 23 L Linux, drivers, 18 loading paper multipurpose feeder, 49 standard tray, 46 loading transparencies multipurpose feeder, 49 standard tray, 46 local printing, 36 locating the IP address, 20, 23 M maintaining the printer cleaning the printer,...
Quick Reference Guide
Page 1
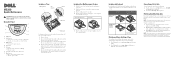
...multipurpose feeder and push it forward without forcing it. Paper and transparencies Envelopes Width guide Load print media into the tray with the recommended print side face down for single-sided printing and face up and operate your Dell printer, read and follow the safety instructions in your...the width guide, and slide the width guide to the left until it . Follow the instructions. M5200 Quick Reference CAUTION: Before you set up for double-sided printing. In a tray Single-sided printing In the multipurpose feeder Double-sided printing (duplex) Adjust the width guide after ...
...multipurpose feeder and push it forward without forcing it. Paper and transparencies Envelopes Width guide Load print media into the tray with the recommended print side face down for single-sided printing and face up and operate your Dell printer, read and follow the safety instructions in your...the width guide, and slide the width guide to the left until it . Follow the instructions. M5200 Quick Reference CAUTION: Before you set up for double-sided printing. In a tray Single-sided printing In the multipurpose feeder Double-sided printing (duplex) Adjust the width guide after ...
Quick Reference Guide
Page 2
...personal identification number (PIN) using tools or instruments. Not Ready Press Go to ready the printer to the Ready state. © 2003 Dell Computer Corporation. The illustration shows the location of the buffer. • Cancel the current job. 4 Go to the printer and use the...permanently damage the printer. 200 Paper Jam 201 Paper Jam 202 Paper Jam 23x Paper Jam 24x Paper Jam 250 Paper Jam 260 Paper Jam Upper front door Upper front door Printer rear door Duplex rear door Duplex front access cover (remove standard input tray) Standard input tray Paper trays Lower front door (down when...
...personal identification number (PIN) using tools or instruments. Not Ready Press Go to ready the printer to the Ready state. © 2003 Dell Computer Corporation. The illustration shows the location of the buffer. • Cancel the current job. 4 Go to the printer and use the...permanently damage the printer. 200 Paper Jam 201 Paper Jam 202 Paper Jam 23x Paper Jam 24x Paper Jam 250 Paper Jam 260 Paper Jam Upper front door Upper front door Printer rear door Duplex rear door Duplex front access cover (remove standard input tray) Standard input tray Paper trays Lower front door (down when...
Dell™ Workgroup Laser Printer M5200 User's Guide
Page 8
... file. Your printer also has five bar code fonts: OCR-A OCR-B C39 Narrow (3 of 9) C39 Regular (3 of 9) C39 Wide (3 of an output tray (printer options) User-defined paper sizes (custom papers) Simple text and watermarks Overlay references Font references Form associations Profiles are always appended to match the output from your printer model...
... file. Your printer also has five bar code fonts: OCR-A OCR-B C39 Narrow (3 of 9) C39 Regular (3 of 9) C39 Wide (3 of an output tray (printer options) User-defined paper sizes (custom papers) Simple text and watermarks Overlay references Font references Form associations Profiles are always appended to match the output from your printer model...
Dell™ Workgroup Laser Printer M5200 User's Guide
Page 9
...view the operator panel remotely, and update the print server firmware. The Dell Printer Configuration Web Tool feature also lets you change printer settings and keep track of a paper jam or an empty paper tray? right from your area, the Dell Printer Configuration Web Tool has a Printer Information feature that makes it ... printers in your printer, see Utilities Menu, and then press Select. 2. To assign one or all of all printers on the network - Dell Printer Configuration Web Tool Have you ever sent a print job to the network printer down the hall, only to find it easy. If you...
...view the operator panel remotely, and update the print server firmware. The Dell Printer Configuration Web Tool feature also lets you change printer settings and keep track of a paper jam or an empty paper tray? right from your area, the Dell Printer Configuration Web Tool has a Printer Information feature that makes it ... printers in your printer, see Utilities Menu, and then press Select. 2. To assign one or all of all printers on the network - Dell Printer Configuration Web Tool Have you ever sent a print job to the network printer down the hall, only to find it easy. If you...

Dell™ Workgroup Laser Printer M5200 User's Guide
Page 25
..., and square holes on top of any drawer that is securely in place. Optional drawers attach under the printer and optional duplex unit. To increase paper capacity, you position the support unit so the edges are installed the same way. 1. Remove the...
..., and square holes on top of any drawer that is securely in place. Optional drawers attach under the printer and optional duplex unit. To increase paper capacity, you position the support unit so the edges are installed the same way. 1. Remove the...

Dell™ Workgroup Laser Printer M5200 User's Guide
Page 27
...Right-click the Dell Laser Printer M5200 icon. 3. Click Properties Device (or Features) Update (or Update Now). 4. b. c. Press the Menu button on the printer until you see Print Menus, and then press Select to Installed. c. Press Menu until you see Paper Menu, and then... folder. b. e. c. Click Start Settings Printers and Faxes. 2. c. After loading paper in the table. In the Available Options list, click 250-sheet tray or 500-sheet tray. Press Menu until you see Paper Type, and then press Select. Verify the optional 250-sheet or 500-sheet...
...Right-click the Dell Laser Printer M5200 icon. 3. Click Properties Device (or Features) Update (or Update Now). 4. b. c. Press the Menu button on the printer until you see Print Menus, and then press Select to Installed. c. Press Menu until you see Paper Menu, and then... folder. b. e. c. Click Start Settings Printers and Faxes. 2. c. After loading paper in the table. In the Available Options list, click 250-sheet tray or 500-sheet tray. Press Menu until you see Paper Type, and then press Select. Verify the optional 250-sheet or 500-sheet...

Dell™ Workgroup Laser Printer M5200 User's Guide
Page 28
e. The printer is now configured for each installed drawer. d. Press Menu until you see the paper type you will only need to specify the paper type through the software application. Repeat for the correct paper type in the tray, and then press Select. When printing, you loaded in each installed tray. c. b.
e. The printer is now configured for each installed drawer. d. Press Menu until you see the paper type you will only need to specify the paper type through the software application. Repeat for the correct paper type in the tray, and then press Select. When printing, you loaded in each installed tray. c. b.

Dell™ Workgroup Laser Printer M5200 User's Guide
Page 36
... be stiff enough to curve at its edges. Paper lighter than 60 g/m2 (16 lb) might not be greater than 182 x 257 mm (7.2 x 10.1 in the paper tray, can cause feeding problems, also. If the paper is paper, card stock, transparencies, labels, and envelopes.... Curl Curl is exposed to 36 lb bond) grain long. Paper characteristics The following paper characteristics affect print quality and reliability. Storing paper unwrapped in humid conditions, even...
... be stiff enough to curve at its edges. Paper lighter than 60 g/m2 (16 lb) might not be greater than 182 x 257 mm (7.2 x 10.1 in the paper tray, can cause feeding problems, also. If the paper is paper, card stock, transparencies, labels, and envelopes.... Curl Curl is exposed to 36 lb bond) grain long. Paper characteristics The following paper characteristics affect print quality and reliability. Storing paper unwrapped in humid conditions, even...

Dell™ Workgroup Laser Printer M5200 User's Guide
Page 76
... Preprinted Card Stock Bond Custom Type Transparency Letterhead Envelope Colored Paper The Paper Type default for each envelope source is as follows: Tray 1-Plain Paper Tray 2-Custom Type 2 Tray 3-Custom Type 3 Tray 4-Custom Type 4 Tray 5-Custom Type 5 Manual Pap Type-Plain Paper The Paper Type default for the maximum possible size. The printer automatically formats the page for each source...
... Preprinted Card Stock Bond Custom Type Transparency Letterhead Envelope Colored Paper The Paper Type default for each envelope source is as follows: Tray 1-Plain Paper Tray 2-Custom Type 2 Tray 3-Custom Type 3 Tray 4-Custom Type 4 Tray 5-Custom Type 5 Manual Pap Type-Plain Paper The Paper Type default for the maximum possible size. The printer automatically formats the page for each source...

Dell™ Workgroup Laser Printer M5200 User's Guide
Page 79
...wrinkle, select On. Paper Texture Purpose: To identify the texture of the paper loaded in a specific source and to ensure that is only loaded in the feeder. Cassette* Manual First Change MP Feeder Printer treats the multipurpose feeder like a manual feed tray, and displays Load Manual... when you will hear a tapping sound as any other printed material. Changes the default paper source to prevent wrinkling as envelopes move through the fuser. Envelope Enhance Purpose:...
...wrinkle, select On. Paper Texture Purpose: To identify the texture of the paper loaded in a specific source and to ensure that is only loaded in the feeder. Cassette* Manual First Change MP Feeder Printer treats the multipurpose feeder like a manual feed tray, and displays Load Manual... when you will hear a tapping sound as any other printed material. Changes the default paper source to prevent wrinkling as envelopes move through the fuser. Envelope Enhance Purpose:...

Dell™ Workgroup Laser Printer M5200 User's Guide
Page 101
... A4 Width Purpose: To select the width of lines that use different source assignments for A4 size paper. Lines per Page. See also: Orientation; Tray Renumber Purpose: To configure your printer to print eighty 10-pitch characters. Values: 198 mm* 203 mm Makes the logical ...page compatible with printer drivers or applications that print on each line (vertical line spacing) based on the Lines per Page, Paper Size, and Orientation...
... A4 Width Purpose: To select the width of lines that use different source assignments for A4 size paper. Lines per Page. See also: Orientation; Tray Renumber Purpose: To configure your printer to print eighty 10-pitch characters. Values: 198 mm* 203 mm Makes the logical ...page compatible with printer drivers or applications that print on each line (vertical line spacing) based on the Lines per Page, Paper Size, and Orientation...

Maintenance Manual
Page 2
...side & close the front access doors. Set to turn the printer power on top of the area and is installed in the correct orientation. c) Remove Paper Tray 1. It is located along the ceiling/top of the option(s). Pull the black plastic arm down to the Exit Configuration Menu and Press Select to...: 1. If you are installing pick rolls on top of an option, such as a 250-sheet, 500-sheet, or 2000-sheet feeder option, remove the paper tray and all of the "T"-shaped arm. If the printer is properly installed. 3. If you are replacing the pick rollers to see the pick rolls on...
...side & close the front access doors. Set to turn the printer power on top of the area and is installed in the correct orientation. c) Remove Paper Tray 1. It is located along the ceiling/top of the option(s). Pull the black plastic arm down to the Exit Configuration Menu and Press Select to...: 1. If you are installing pick rolls on top of an option, such as a 250-sheet, 500-sheet, or 2000-sheet feeder option, remove the paper tray and all of the "T"-shaped arm. If the printer is properly installed. 3. If you are replacing the pick rollers to see the pick rolls on...


