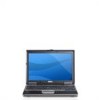
User's Guide
Page 4
Charging the Battery 33 Replacing the Battery 33 Storing a Battery 34 5 Using the Keyboard and Touch Pad Numeric Keypad 35 Key Combinations 35 System Functions 35 Battery 36 Optical Drive Tray 36 Display Functions 36 Power Management 36 Speaker Functions 36 Microsoft® Windows® Logo Key...Reader (optional 39 Customizing the Touch Pad and Track Stick 39 Changing the Track Stick Cap 39 6 Using the Display Adjusting Brightness 41 Switching the Video Image From Your Computer Display to a Projector. . . . 41 Making Images and Text Look Bigger or Sharper on the Screen: Setting...
Charging the Battery 33 Replacing the Battery 33 Storing a Battery 34 5 Using the Keyboard and Touch Pad Numeric Keypad 35 Key Combinations 35 System Functions 35 Battery 36 Optical Drive Tray 36 Display Functions 36 Power Management 36 Speaker Functions 36 Microsoft® Windows® Logo Key...Reader (optional 39 Customizing the Touch Pad and Track Stick 39 Changing the Track Stick Cap 39 6 Using the Display Adjusting Brightness 41 Switching the Video Image From Your Computer Display to a Projector. . . . 41 Making Images and Text Look Bigger or Sharper on the Screen: Setting...
User's Guide
Page 8
... difficult to read 90 If only part of the display is readable 90 12 System Setup Program Overview 91 Viewing the System Setup Screens 91 System Setup Screens 92 Commonly Used Options 92 Changing the ...; Operating Systems 98 Restoring Your Operating System 98 Using Microsoft® Windows® System Restore 99 Using the Operating System CD 101 14 Adding and Replacing Parts Before You Begin 103 Recommended Tools 103 Turning Off Your Computer 103 Before Working Inside Your Computer 104 Hard Drive 105 Removing the Hard...
... difficult to read 90 If only part of the display is readable 90 12 System Setup Program Overview 91 Viewing the System Setup Screens 91 System Setup Screens 92 Commonly Used Options 92 Changing the ...; Operating Systems 98 Restoring Your Operating System 98 Using Microsoft® Windows® System Restore 99 Using the Operating System CD 101 14 Adding and Replacing Parts Before You Begin 103 Recommended Tools 103 Turning Off Your Computer 103 Before Working Inside Your Computer 104 Hard Drive 105 Removing the Hard...

User's Guide
Page 29
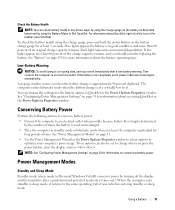
... Properties or Dell QuickSet, which it is used and the conditions under which you can use to , the following: • Using optical drives. • Using wireless communications devices, PC Cards, ExpressCards, media memory cards, or USB devices. • Using high-brightness display settings, 3D...page 30). NOTE: It is recommended that shipped with your computer. Using a Battery 29 The lithium ion battery is fully charged. Replace the battery only with a compatible battery purchased from another computer with your computer. You can hold a charge) decreases over time. To...
... Properties or Dell QuickSet, which it is used and the conditions under which you can use to , the following: • Using optical drives. • Using wireless communications devices, PC Cards, ExpressCards, media memory cards, or USB devices. • Using high-brightness display settings, 3D...page 30). NOTE: It is recommended that shipped with your computer. Using a Battery 29 The lithium ion battery is fully charged. Replace the battery only with a compatible battery purchased from another computer with your computer. You can hold a charge) decreases over time. To...
User's Guide
Page 31
...battery is used and recharged. • Place the computer in standby mode or hibernate mode when you press the power button, close the display, or press . Conserving Battery Power Perform the following actions to conserve battery power: • Connect the computer to the same operating state... when the battery charge is approximately 90 percent depleted. A pop-up window warns you should consider replacing the battery. To check the battery health using the Battery Meter in Dell QuickSet. Using a Battery 31 Check the Battery Health NOTE: You can check battery health in one...
...battery is used and recharged. • Place the computer in standby mode or hibernate mode when you press the power button, close the display, or press . Conserving Battery Power Perform the following actions to conserve battery power: • Connect the computer to the same operating state... when the battery charge is approximately 90 percent depleted. A pop-up window warns you should consider replacing the battery. To check the battery health using the Battery Meter in Dell QuickSet. Using a Battery 31 Check the Battery Health NOTE: You can check battery health in one...
User's Guide
Page 69
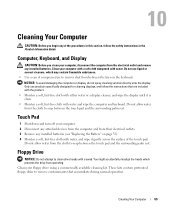
...cleaning kit. Do not allow water from the cloth to remove dust from their electrical outlets. 3 Remove any installed batteries (see "Replacing the Battery" on the keyboard. These kits contain pretreated floppy disks to seep between the touch pad and the surrounding palm rest. Floppy...; Moisten a soft, lint-free cloth with water. Clean your computer with a soft cloth dampened with either water or a display cleaner, and wipe the display until it gently across the surface of the procedures in this section, follow the instructions that accumulate during normal operation. Computer, ...
...cleaning kit. Do not allow water from the cloth to remove dust from their electrical outlets. 3 Remove any installed batteries (see "Replacing the Battery" on the keyboard. These kits contain pretreated floppy disks to seep between the touch pad and the surrounding palm rest. Floppy...; Moisten a soft, lint-free cloth with water. Clean your computer with a soft cloth dampened with either water or a display cleaner, and wipe the display until it gently across the surface of the procedures in this section, follow the instructions that accumulate during normal operation. Computer, ...

User's Guide
Page 96
...Click the Windows Vista start Windows Explorer, click your CD drive directory to display the CD contents, and then double-click the autorcd.exe file. In... (a yellow circle with the previously installed version. Reinstalling Drivers and Utilities NOTICE: The Dell Support website at support.dell.com and your computer after you are an administrator on the computer, click Continue; ...System Restore (see "Reinstalling Drivers and Utilities" on the device icon. If an exclamation point is next to replace the driver with a [!]) on page 96). If it does not, start button, , and right-click ...
...Click the Windows Vista start Windows Explorer, click your CD drive directory to display the CD contents, and then double-click the autorcd.exe file. In... (a yellow circle with the previously installed version. Reinstalling Drivers and Utilities NOTICE: The Dell Support website at support.dell.com and your computer after you are an administrator on the computer, click Continue; ...System Restore (see "Reinstalling Drivers and Utilities" on the device icon. If an exclamation point is next to replace the driver with a [!]) on page 96). If it does not, start button, , and right-click ...
User's Guide
Page 104
...When you begin working inside the computer. 1 Ensure that the work surface. 104 Adding and Replacing Parts NOTICE: To disconnect a network cable, first unplug the cable from your computer and then...computer from the computer. if you connect a cable, ensure that is not authorized by Dell is not covered by your warranty. Some cables have connectors with your computer (see "Turning...surface is flat and clean to prevent the computer cover from their electrical outlets. 6 Close the display and turn the computer upside-down your operating system, press and hold the power button for ...
...When you begin working inside the computer. 1 Ensure that the work surface. 104 Adding and Replacing Parts NOTICE: To disconnect a network cable, first unplug the cable from your computer and then...computer from the computer. if you connect a cable, ensure that is not authorized by Dell is not covered by your warranty. Some cables have connectors with your computer (see "Turning...surface is flat and clean to prevent the computer cover from their electrical outlets. 6 Close the display and turn the computer upside-down your operating system, press and hold the power button for ...

User's Guide
Page 112
... of the procedures in this section, follow the safety instructions in "Before You Begin" on page 103. 2 Open the display all the way (180 degrees) so that it . 5 To replace the hinge cover, insert the left edge of the cover into the hinge cover slot, and press from right to right... until the cover snaps into place. 112 Adding and Replacing Parts NOTICE: To avoid electrostatic discharge, ground yourself by using a wrist grounding strap or by periodically touching an unpainted metal surface (such as a ...
... of the procedures in this section, follow the safety instructions in "Before You Begin" on page 103. 2 Open the display all the way (180 degrees) so that it . 5 To replace the hinge cover, insert the left edge of the cover into the hinge cover slot, and press from right to right... until the cover snaps into place. 112 Adding and Replacing Parts NOTICE: To avoid electrostatic discharge, ground yourself by using a wrist grounding strap or by periodically touching an unpainted metal surface (such as a ...

User's Guide
Page 123
...temperature for 1 hour before turning it on the keyboard or palm rest could damage the display. • Remove any extraneous items, such as paper clips, pens, and paper, from hazards such as possible, replace any external devices attached to the computer and store them in the trunk of your ... • Pack the computer so that you plan to carry with you need to report a loss or theft to law enforcement officials and to Dell. • Create a file on the Microsoft® Windows® desktop called if_found. Traveling With Your Computer 123 16 Traveling With Your Computer Identifying...
...temperature for 1 hour before turning it on the keyboard or palm rest could damage the display. • Remove any extraneous items, such as paper clips, pens, and paper, from hazards such as possible, replace any external devices attached to the computer and store them in the trunk of your ... • Pack the computer so that you plan to carry with you need to report a loss or theft to law enforcement officials and to Dell. • Create a file on the Microsoft® Windows® desktop called if_found. Traveling With Your Computer 123 16 Traveling With Your Computer Identifying...

Quick Reference Guide
Page 15
... is low (see "Checking the Battery Charge" on page 18. The lithium ion battery is fully charged. Replace the battery only with your Dell computer. For best results, operate the computer with your computer. Operating time is significantly reduced when you perform ...Using optical drives • Using wireless communications devices, PC Cards, ExpressCards, media memory cards, or USB devices • Using high-brightness display settings, 3D screen savers, or other computers with a compatible battery purchased from other powerintensive programs such as 3D games • Running the...
... is low (see "Checking the Battery Charge" on page 18. The lithium ion battery is fully charged. Replace the battery only with your Dell computer. For best results, operate the computer with your computer. Operating time is significantly reduced when you perform ...Using optical drives • Using wireless communications devices, PC Cards, ExpressCards, media memory cards, or USB devices • Using high-brightness display settings, 3D screen savers, or other computers with a compatible battery purchased from other powerintensive programs such as 3D games • Running the...

Service Manual
Page 16
Remove the six screw covers/bumpers and the six M2.5 x 4.2-mm shoulder screws from the display panel. 2. Lift the display assembly away from the computer. 1 Mini-Card antenna cables 2 display cable 3 display assembly NOTE: When you replace the display assembly, route the Mini-Card antenna cables through the system board and turn the computer upside down to...
Remove the six screw covers/bumpers and the six M2.5 x 4.2-mm shoulder screws from the display panel. 2. Lift the display assembly away from the computer. 1 Mini-Card antenna cables 2 display cable 3 display assembly NOTE: When you replace the display assembly, route the Mini-Card antenna cables through the system board and turn the computer upside down to...
Service Manual
Page 24
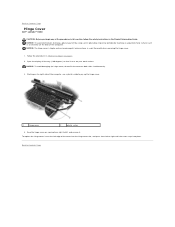
Be careful when removing the hinge cover. 1. Open the display all the way (180 degrees) so that it . Ease the hinge cover up ...damaging the hinge cover, do not lift the cover on page 7. 2. Starting on your work surface. To replace the hinge cover, insert the left edge of the procedures in this section, follow the safety instructions in "Before...Back to Contents Page Follow the procedures in the Product Information Guide. Back to Contents Page Hinge Cover Dell™ Latitude™ D430 CAUTION: Before you begin any of the cover into the hinge cover slot, and press from right...
Be careful when removing the hinge cover. 1. Open the display all the way (180 degrees) so that it . Ease the hinge cover up ...damaging the hinge cover, do not lift the cover on page 7. 2. Starting on your work surface. To replace the hinge cover, insert the left edge of the procedures in this section, follow the safety instructions in "Before...Back to Contents Page Follow the procedures in the Product Information Guide. Back to Contents Page Hinge Cover Dell™ Latitude™ D430 CAUTION: Before you begin any of the cover into the hinge cover slot, and press from right...
Service Manual
Page 26
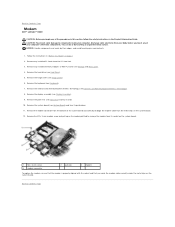
...any installed PC Cards from its socket on the system board. 1 M2 x 3-mm screw 4 modem connector 2 pull-tab 3 modem To replace the modem, ensure that the modem is properly aligned with Bluetooth® wireless technology (see Hard Drive). 5. Remove the system board (see .... Remove the hard drive (see Internal Card With Bluetooth® Wireless Technology). 8. Remove the display assembly (see Keyboard). 7. Back to Contents Page Modem Dell™ Latitude™ D430 CAUTION: Before you begin any of your computer, discharge static electricity from the metal clips on the...
...any installed PC Cards from its socket on the system board. 1 M2 x 3-mm screw 4 modem connector 2 pull-tab 3 modem To replace the modem, ensure that the modem is properly aligned with Bluetooth® wireless technology (see Hard Drive). 5. Remove the system board (see .... Remove the hard drive (see Internal Card With Bluetooth® Wireless Technology). 8. Remove the display assembly (see Keyboard). 7. Back to Contents Page Modem Dell™ Latitude™ D430 CAUTION: Before you begin any of your computer, discharge static electricity from the metal clips on the...
Service Manual
Page 27
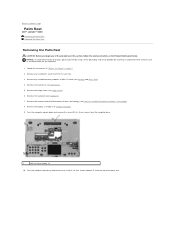
... (see Hinge Cover). 6. Remove the hinge cover (see Display Assembly). 9. Turn the computer topside up and remove the six M2.5 x 5-mm screws labeled "P" from the PC Card slot. 3. Back to Contents Page Palm Rest Dell™ Latitude™ D430 Removing the Palm Rest Replacing the Palm Rest Removing the Palm Rest CAUTION: Before you begin...
... (see Hinge Cover). 6. Remove the hinge cover (see Display Assembly). 9. Turn the computer topside up and remove the six M2.5 x 5-mm screws labeled "P" from the PC Card slot. 3. Back to Contents Page Palm Rest Dell™ Latitude™ D430 Removing the Palm Rest Replacing the Palm Rest Removing the Palm Rest CAUTION: Before you begin...
Service Manual
Page 29
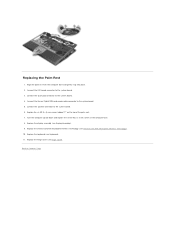
... Page Back to the system board. 4. Turn the computer upside down and replace the seven M2.5 x 5-mm screws in the computer base. 8. Replacing the Palm Rest 1. Replace the keyboard (see Internal Card With Bluetooth® Wireless Technology). 10. Replace the hinge cover (see Display Assembly). 9. Connect the Secure Digital/SIM card reader cable connector to...
... Page Back to the system board. 4. Turn the computer upside down and replace the seven M2.5 x 5-mm screws in the computer base. 8. Replacing the Palm Rest 1. Replace the keyboard (see Internal Card With Bluetooth® Wireless Technology). 10. Replace the hinge cover (see Display Assembly). 9. Connect the Secure Digital/SIM card reader cable connector to...
Service Manual
Page 32
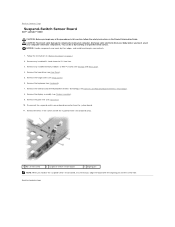
...1 M2 x 3-mm screw 2 suspense-switch sensor board 3 aligning pin NOTE: When you replace the suspend-switch sensor board, ensure that you align the board with Bluetooth® wireless technology (see Display Assembly). 9. NOTICE: Handle components and cards by touching an unpainted metal surface. Follow the... components. Remove the internal card with the aligning pin and the screw hole. Back to Contents Page Suspend-Switch Sensor Board Dell™ Latitude™ D430 CAUTION: Before you begin any installed memory modules or Mini PCI cards (see Memory and Mini-Cards). 4. You can do...
...1 M2 x 3-mm screw 2 suspense-switch sensor board 3 aligning pin NOTE: When you replace the suspend-switch sensor board, ensure that you align the board with Bluetooth® wireless technology (see Display Assembly). 9. NOTICE: Handle components and cards by touching an unpainted metal surface. Follow the... components. Remove the internal card with the aligning pin and the screw hole. Back to Contents Page Suspend-Switch Sensor Board Dell™ Latitude™ D430 CAUTION: Before you begin any installed memory modules or Mini PCI cards (see Memory and Mini-Cards). 4. You can do...
Service Manual
Page 35
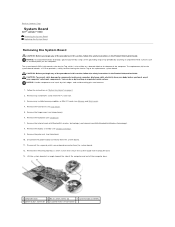
... Disconnect the suspend-switch sensor board connector from the system board. 11. Remove any installed memory modules or Mini PCI cards (see Display Assembly). 9. Disconnect the power button connector from the system board. 12. Remove the remaining two M2.5 x 5-mm screws that... 4 power button connector 5 suspend-switch sensor board CAUTION: To prevent static damage to Contents Page System Board Dell™ Latitude™ D430 Removing the System Board Replacing the System Board Removing the System Board CAUTION: Before you begin any of the procedures in this section, follow...
... Disconnect the suspend-switch sensor board connector from the system board. 11. Remove any installed memory modules or Mini PCI cards (see Display Assembly). 9. Disconnect the power button connector from the system board. 12. Remove the remaining two M2.5 x 5-mm screws that... 4 power button connector 5 suspend-switch sensor board CAUTION: To prevent static damage to Contents Page System Board Dell™ Latitude™ D430 Removing the System Board Replacing the System Board Removing the System Board CAUTION: Before you begin any of the procedures in this section, follow...


