
User's Guide
Page 9
... Media 112 14 Adding and Replacing Parts Before You Begin 115 Recommended Tools 115 Turning Off Your Computer 115 Before Working Inside Your Computer 116 Hinge Cover 118 Keyboard 119 Internal Card With Bluetooth® Wireless Technology 120 Coin-Cell Battery 122 Memory 122 Wireless Local Area Network (WLAN) Card 127... Mobile Broadband Card 129 Subscriber Identity Module (SIM) Card 132 Hard Drive 132 Returning a Hard Drive to Dell 134 Media Bay 135 Removing Media Bay Devices 135 FCM (Flash Cache Module) Card 135 15...
... Media 112 14 Adding and Replacing Parts Before You Begin 115 Recommended Tools 115 Turning Off Your Computer 115 Before Working Inside Your Computer 116 Hinge Cover 118 Keyboard 119 Internal Card With Bluetooth® Wireless Technology 120 Coin-Cell Battery 122 Memory 122 Wireless Local Area Network (WLAN) Card 127... Mobile Broadband Card 129 Subscriber Identity Module (SIM) Card 132 Hard Drive 132 Returning a Hard Drive to Dell 134 Media Bay 135 Removing Media Bay Devices 135 FCM (Flash Cache Module) Card 135 15...

User's Guide
Page 118
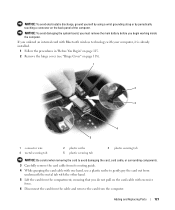
... toward the left, and lay the cover aside. 4 To replace the hinge cover, insert the left edge of the procedures in this section, follow the safety instructions in the Product... Information Guide. Hinge Cover CAUTION: Before you begin any of the cover into place. 118 Adding and Replacing...periodically touching an unpainted metal surface (such as a connector on your work surface. Be careful when removing the hinge cover. 1 Follow the procedures in a different way than described may cause the plastic to pry up , ...
... toward the left, and lay the cover aside. 4 To replace the hinge cover, insert the left edge of the procedures in this section, follow the safety instructions in the Product... Information Guide. Hinge Cover CAUTION: Before you begin any of the cover into place. 118 Adding and Replacing...periodically touching an unpainted metal surface (such as a connector on your work surface. Be careful when removing the hinge cover. 1 Follow the procedures in a different way than described may cause the plastic to pry up , ...

User's Guide
Page 119
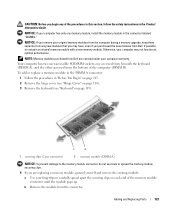
Keyboard CAUTION: Before performing the following procedures, follow the safety instructions in "Before You Begin" on page 115. 1 2 1 hinge cover 2 keyboard 2 Remove the hinge cover (see "Hinge Cover" on the computer. 1 Follow the instructions in your Product Information Guide. NOTICE: To avoid electrostatic discharge, ground yourself by using a wrist grounding strap or by periodically touching an unpainted metal surface (such as the back panel) on page 118). Adding and Replacing Parts 119
Keyboard CAUTION: Before performing the following procedures, follow the safety instructions in "Before You Begin" on page 115. 1 2 1 hinge cover 2 keyboard 2 Remove the hinge cover (see "Hinge Cover" on the computer. 1 Follow the instructions in your Product Information Guide. NOTICE: To avoid electrostatic discharge, ground yourself by using a wrist grounding strap or by periodically touching an unpainted metal surface (such as the back panel) on page 118). Adding and Replacing Parts 119
User's Guide
Page 121
... card with Bluetooth wireless technology with your computer, it is already installed. 1 Follow the procedures in "Before You Begin" on page 115. 2 Remove the hinge cover (see "Hinge Cover" on page 118). 1 2 3 4 5 1 connector wire 4 metal securing tab 2 plastic scribe 5 plastic securing tab 3 plastic securing tab NOTICE: Be careful when removing the card...
... card with Bluetooth wireless technology with your computer, it is already installed. 1 Follow the procedures in "Before You Begin" on page 115. 2 Remove the hinge cover (see "Hinge Cover" on page 118). 1 2 3 4 5 1 connector wire 4 metal securing tab 2 plastic scribe 5 plastic securing tab 3 plastic securing tab NOTICE: Be careful when removing the card...

User's Guide
Page 122
... the computer. Coin-Cell Battery CAUTION: Before performing the following procedures, follow the safety instructions in "Before You Begin" on page 115. 2 Remove the hinge cover (see "Hinge Cover" on page 118). 3 Remove the keyboard (see "Keyboard" on page 119). 1 2 3 1 coin-cell battery connector 2 coin-cell battery 3 plastic arm 4 Remove the coin...
... the computer. Coin-Cell Battery CAUTION: Before performing the following procedures, follow the safety instructions in "Before You Begin" on page 115. 2 Remove the hinge cover (see "Hinge Cover" on page 118). 3 Remove the keyboard (see "Keyboard" on page 119). 1 2 3 1 coin-cell battery connector 2 coin-cell battery 3 plastic arm 4 Remove the coin...
User's Guide
Page 123
.... Your computer has two user-accessible SODIMM sockets, one memory module, install the memory module in "Before You Begin" on page 115. 2 Remove the hinge cover (see "Hinge Cover" on page 118). 3 Remove the keyboard (see "Keyboard" on page 119). 1 2 1 securing clips (2 per connector) 2 memory module (DIMM...the computer (DIMM B). Otherwise, your computer has only one accessed from beneath the keyboard (DIMM A), and the other accessed from Dell. To add or replace a memory module in the DIMM A connector: 1 Follow the procedures in the connector labeled "DIMMA." b Remove the ...
.... Your computer has two user-accessible SODIMM sockets, one memory module, install the memory module in "Before You Begin" on page 115. 2 Remove the hinge cover (see "Hinge Cover" on page 118). 3 Remove the keyboard (see "Keyboard" on page 119). 1 2 1 securing clips (2 per connector) 2 memory module (DIMM...the computer (DIMM B). Otherwise, your computer has only one accessed from beneath the keyboard (DIMM A), and the other accessed from Dell. To add or replace a memory module in the DIMM A connector: 1 Follow the procedures in the connector labeled "DIMMA." b Remove the ...

User's Guide
Page 127
Adding and Replacing Parts 127 CAUTION: Before you ordered a WLAN card with your computer, the card is already installed. Wireless Local Area Network (WLAN) Card If you begin any of the procedures in this section, follow the safety instructions in the Product Information Guide. 1 Follow the procedures in "Before You Begin" on page 115. 2 Remove the hinge cover (see "Hinge Cover" on page 118). 3 Remove the keyboard (see "Keyboard" on page 119).
Adding and Replacing Parts 127 CAUTION: Before you ordered a WLAN card with your computer, the card is already installed. Wireless Local Area Network (WLAN) Card If you begin any of the procedures in this section, follow the safety instructions in the Product Information Guide. 1 Follow the procedures in "Before You Begin" on page 115. 2 Remove the hinge cover (see "Hinge Cover" on page 118). 3 Remove the keyboard (see "Keyboard" on page 119).

User's Guide
Page 129
NOTE: For more specific information about which cable to connect to which connector, see "Hinge Cover" on page 118). Adding and Replacing Parts 129 b Align the WLAN card with your computer, the card is already installed. Mobile Broadband Card NOTE: ... the card. If you route the cables correctly. NOTE: Your WLAN card may not be available in "Before You Begin" on page 115. 2 Remove the hinge cover (see the documentation that you ordered a Mobile Broadband card with your WLAN card. NOTICE: To avoid damaging the WLAN card, never place cables on...
NOTE: For more specific information about which cable to connect to which connector, see "Hinge Cover" on page 118). Adding and Replacing Parts 129 b Align the WLAN card with your computer, the card is already installed. Mobile Broadband Card NOTE: ... the card. If you route the cables correctly. NOTE: Your WLAN card may not be available in "Before You Begin" on page 115. 2 Remove the hinge cover (see the documentation that you ordered a Mobile Broadband card with your WLAN card. NOTICE: To avoid damaging the WLAN card, never place cables on...

User's Guide
Page 136
... cables may cause damage to your computer. 136 Adding and Replacing Parts 1 Follow the procedures in "Before You Begin" on page 115. 2 Remove the hinge cover (see "Hinge Cover" on page 118). 3 Remove the keyboard (see "Keyboard" on page 119). 4 Ground yourself by pushing the metal securing brackets away from the area...
... cables may cause damage to your computer. 136 Adding and Replacing Parts 1 Follow the procedures in "Before You Begin" on page 115. 2 Remove the hinge cover (see "Hinge Cover" on page 118). 3 Remove the keyboard (see "Keyboard" on page 119). 4 Ground yourself by pushing the metal securing brackets away from the area...


