
Quick Reference Guide
Page 2
... is strictly forbidden. is subject to Microsoft® Windows® operating systems are trademarks of Dell Inc.; Other trademarks and trade names may not be used in this text: Dell, the DELL logo, Wi-Fi Catcher, ExpressCharge, Dell MediaDirect, and Latitude are not applicable. Trademarks used in this document to refer to avoid the problem...
... is strictly forbidden. is subject to Microsoft® Windows® operating systems are trademarks of Dell Inc.; Other trademarks and trade names may not be used in this text: Dell, the DELL logo, Wi-Fi Catcher, ExpressCharge, Dell MediaDirect, and Latitude are not applicable. Trademarks used in this document to refer to avoid the problem...

Quick Reference Guide
Page 3
Contents Finding Information 5 Setting Up Your Computer 9 About Your Computer 10 Front View 10 Left Side View 11 Right Side View 11 Back View 12 Bottom View 13 Using a Battery 13 Battery Performance 13 Checking the Battery Charge 14 Charging the Battery 16 Replacing the Battery 17 Storing a Battery 18 Troubleshooting 18 Lockups and Software Problems 18 Other Software Problems 19 Dell Diagnostics 19 Index 23 Contents 3
Contents Finding Information 5 Setting Up Your Computer 9 About Your Computer 10 Front View 10 Left Side View 11 Right Side View 11 Back View 12 Bottom View 13 Using a Battery 13 Battery Performance 13 Checking the Battery Charge 14 Charging the Battery 16 Replacing the Battery 17 Storing a Battery 18 Troubleshooting 18 Lockups and Software Problems 18 Other Software Problems 19 Dell Diagnostics 19 Index 23 Contents 3
Quick Reference Guide
Page 5
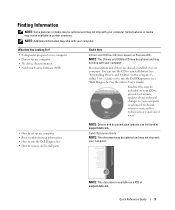
...for technicians or experienced users. • How to set up my computer • Basic troubleshooting information • How to run the Dell Diagnostics • How to remove and install parts NOTE: Drivers and documentation updates can use the CD to reinstall drivers (see "...computer. Documentation and drivers are already installed on your CD to provide last-minute updates about technical changes to run the Dell Diagnostics (see "Dell Diagnostics" in certain countries. Readme files may be included on your computer or advanced technicalreference material for my computer &#...
...for technicians or experienced users. • How to set up my computer • Basic troubleshooting information • How to run the Dell Diagnostics • How to remove and install parts NOTE: Drivers and documentation updates can use the CD to reinstall drivers (see "...computer. Documentation and drivers are already installed on your CD to provide last-minute updates about technical changes to run the Dell Diagnostics (see "Dell Diagnostics" in certain countries. Readme files may be included on your computer or advanced technicalreference material for my computer &#...

Quick Reference Guide
Page 6
... How to configure system settings • How to direct your computer. It is recommended that you use support.dell.com or contact Dell for your call when contacting Dell. 6 Quick Reference Guide Service Tag and Microsoft® Windows® License These labels are located on the bottom...troubleshoot and solve problems • Service Tag and Express Service Code • Microsoft Windows License Label Find It Here Dell™ Product Information Guide Dell Latitude™ User's Guide Microsoft Windows XP Help and Support Center 1 Click the Start button and click Help and Support. 2...
... How to configure system settings • How to direct your computer. It is recommended that you use support.dell.com or contact Dell for your call when contacting Dell. 6 Quick Reference Guide Service Tag and Microsoft® Windows® License These labels are located on the bottom...troubleshoot and solve problems • Service Tag and Express Service Code • Microsoft Windows License Label Find It Here Dell™ Product Information Guide Dell Latitude™ User's Guide Microsoft Windows XP Help and Support Center 1 Click the Start button and click Help and Support. 2...

Quick Reference Guide
Page 7
... status, warranty, and repair information • Service and support - If you should also reinstall the NSS utility. Access the Dell Support Utility from technicians, and online courses, frequently asked questions, hot topics, and general health of software and hardware updates for... your computer • Downloads - For more information, see "Accessing the Dell Support Utility" in the taskbar. Find It Here • Solutions - Certified drivers, patches, and software updates • Notebook System Software ...
... status, warranty, and repair information • Service and support - If you should also reinstall the NSS utility. Access the Dell Support Utility from technicians, and online courses, frequently asked questions, hot topics, and general health of software and hardware updates for... your computer • Downloads - For more information, see "Accessing the Dell Support Utility" in the taskbar. Find It Here • Solutions - Certified drivers, patches, and software updates • Notebook System Software ...

Quick Reference Guide
Page 8
...problem. 4 Follow the instructions on the screen. • Information on network activity, the Power Management Dell QuickSet Help Wizard, hotkeys, and other items controlled by Dell QuickSet To view Dell QuickSet Help, right-click the Microsoft® Windows® taskbar. What Are You Looking For? NOTE:... The color of your computer. icon in the For more information on Dell QuickSet, see "Reinstalling Microsoft® Windows® XP" in your computer's online User's Guide. • How to reinstall my operating ...
...problem. 4 Follow the instructions on the screen. • Information on network activity, the Power Management Dell QuickSet Help Wizard, hotkeys, and other items controlled by Dell QuickSet To view Dell QuickSet Help, right-click the Microsoft® Windows® taskbar. What Are You Looking For? NOTE:... The color of your computer. icon in the For more information on Dell QuickSet, see "Reinstalling Microsoft® Windows® XP" in your computer's online User's Guide. • How to reinstall my operating ...

Quick Reference Guide
Page 9
Quick Reference Guide 9 The accessories box also contains user documentation and any of the procedures in this section, follow the safety instructions in the Product Information Guide. 1 Unpack the accessories box. 2 Set aside the contents of the accessories box, which you will need to complete the setup of the computer and to the electrical outlet. Setting Up Your Computer CAUTION: Before you begin any software or additional hardware (such as a printer. NOTE: You can connect the AC adapter without rotating the port cover downward. 1 2 1 AC adapter 2 port cover 4 Open the ...
Quick Reference Guide 9 The accessories box also contains user documentation and any of the procedures in this section, follow the safety instructions in the Product Information Guide. 1 Unpack the accessories box. 2 Set aside the contents of the accessories box, which you will need to complete the setup of the computer and to the electrical outlet. Setting Up Your Computer CAUTION: Before you begin any software or additional hardware (such as a printer. NOTE: You can connect the AC adapter without rotating the port cover downward. 1 2 1 AC adapter 2 port cover 4 Open the ...

Quick Reference Guide
Page 10
About Your Computer NOTE: For additional information about the functions and use of the features identified in this section, see the online User's Guide for your computer. arrow key to activate the sensor. 10 Quick Reference Guide 6 3 power button 6 touch pad 9 touch pad/track stick buttons 12 volume control buttons 15 keyboard illumination lights NOTE: Press and the right-arrow key to enable/disable the lights. Front View 1 2 15 14 3 13 12 4 11 5 10 9 8 7 1 display latch 2 display 4 device status lights 5 keyboard 7 fingerprint reader (optional) 8 speaker 10 track...
About Your Computer NOTE: For additional information about the functions and use of the features identified in this section, see the online User's Guide for your computer. arrow key to activate the sensor. 10 Quick Reference Guide 6 3 power button 6 touch pad 9 touch pad/track stick buttons 12 volume control buttons 15 keyboard illumination lights NOTE: Press and the right-arrow key to enable/disable the lights. Front View 1 2 15 14 3 13 12 4 11 5 10 9 8 7 1 display latch 2 display 4 device status lights 5 keyboard 7 fingerprint reader (optional) 8 speaker 10 track...

Quick Reference Guide
Page 11
Left Side View 1 2 3 4 5 6 7 8 9 10 1 air vents 2 security cable slot 3 audio connectors (2) 4 infrared sensor 5 smart card slot (with blank) 6 wireless switch 7 Wi-Fi Catcher™ light 8 PC Card or ExpressCard slot 9 hard drive 10 PC Card/ExpressCard latch release Right Side View 1 optical drive in media bay 4 USB port cover 1 2 3 4 2 media-bay device latch 3 USB connectors (2) release Quick Reference Guide 11
Left Side View 1 2 3 4 5 6 7 8 9 10 1 air vents 2 security cable slot 3 audio connectors (2) 4 infrared sensor 5 smart card slot (with blank) 6 wireless switch 7 Wi-Fi Catcher™ light 8 PC Card or ExpressCard slot 9 hard drive 10 PC Card/ExpressCard latch release Right Side View 1 optical drive in media bay 4 USB port cover 1 2 3 4 2 media-bay device latch 3 USB connectors (2) release Quick Reference Guide 11

Quick Reference Guide
Page 12
Do not store your computer in the air vents. Restricting the airflow can damage the computer or cause a fire. 12 3 4 5 6 7 8 1 network connector (RJ-45) 2 4 serial connector 5 7 air vents 8 modem connector (RJ-11) 3 video connector 6 port cover USB connectors (2) AC adapter connector 12 Quick Reference Guide Back View CAUTION: Do not block, push objects into, or allow dust to accumulate in a low-airflow environment, such as a closed briefcase, while it is running.
Do not store your computer in the air vents. Restricting the airflow can damage the computer or cause a fire. 12 3 4 5 6 7 8 1 network connector (RJ-45) 2 4 serial connector 5 7 air vents 8 modem connector (RJ-11) 3 video connector 6 port cover USB connectors (2) AC adapter connector 12 Quick Reference Guide Back View CAUTION: Do not block, push objects into, or allow dust to accumulate in a low-airflow environment, such as a closed briefcase, while it is running.

Quick Reference Guide
Page 13
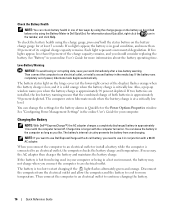
..., operate the computer with the main battery installed at all times. For optimal computer performance and to help preserve BIOS settings, operate your Dell portable computer with the AC adapter until the battery is supplied as standard equipment in the battery bay. Bottom View 1 23 7 4 ...battery charge gauge/health gauge docking-device connector Using a Battery 3 battery 6 air vents Battery Performance NOTE: For information about the Dell™ warranty for your computer, see the Product Information Guide or separate paper warranty document that shipped with your new computer to an...
..., operate the computer with the main battery installed at all times. For optimal computer performance and to help preserve BIOS settings, operate your Dell portable computer with the AC adapter until the battery is supplied as standard equipment in the battery bay. Bottom View 1 23 7 4 ...battery charge gauge/health gauge docking-device connector Using a Battery 3 battery 6 air vents Battery Performance NOTE: For information about the Dell™ warranty for your computer, see the Product Information Guide or separate paper warranty document that shipped with your new computer to an...

Quick Reference Guide
Page 14
...computer in maximum performance mode (See "Configuring Power Management Settings" in your computer to an electrical outlet when writing to work with your Dell computer. For more information about using a second battery, see "Configuring Power Management Settings" in the taskbar, and click Help. 14 ...the battery can hold a charge) decreases over time. Operating time is used, you connect your computer. Checking the Battery Charge The Dell QuickSet Battery Meter, the Microsoft Windows Power Meter window and icon, the battery charge gauge and health gauge, and the low-battery ...
...computer in maximum performance mode (See "Configuring Power Management Settings" in your computer to an electrical outlet when writing to work with your Dell computer. For more information about using a second battery, see "Configuring Power Management Settings" in the taskbar, and click Help. 14 ...the battery can hold a charge) decreases over time. Operating time is used, you connect your computer. Checking the Battery Charge The Dell QuickSet Battery Meter, the Microsoft Windows Power Meter window and icon, the battery charge gauge and health gauge, and the low-battery ...

Quick Reference Guide
Page 15
That is, a battery can check: • Battery charge (check by pressing and releasing the status button) • Battery health (check by pressing and holding the status button on the charge gauge on the battery charge gauge to an electrical outlet, a icon appears. For example, if the battery has 80 percent of its charge remaining, four of the lights are on the taskbar. After hundreds of the total battery charge. If no lights appear, the battery has no charge. To check the Power Meter, doubleclick the icon on . If the computer is charged. Check the Battery Charge To check ...
That is, a battery can check: • Battery charge (check by pressing and releasing the status button) • Battery health (check by pressing and holding the status button on the charge gauge on the battery charge gauge to an electrical outlet, a icon appears. For example, if the battery has 80 percent of its charge remaining, four of the lights are on the taskbar. After hundreds of the total battery charge. If no lights appear, the battery has no charge. To check the Power Meter, doubleclick the icon on . If the computer is charged. Check the Battery Charge To check ...
Quick Reference Guide
Page 16
...or install a battery while the computer is approximately 90 percent depleted. Also, a pop-up window warns you connect the computer to use Dell ExpressCharge with a 90-W AC adapter. You can change the settings for more than 60 percent of the charge capacity remains, and you...original charge capacity remains. See "Configuring Power Management Settings" in QuickSet or the Power Options Properties window. Charging the Battery NOTE: With Dell™ ExpressCharge™, the AC adapter charges a completely discharged battery in the computer as long as described below or by using the ...
...or install a battery while the computer is approximately 90 percent depleted. Also, a pop-up window warns you connect the computer to use Dell ExpressCharge with a 90-W AC adapter. You can change the settings for more than 60 percent of the charge capacity remains, and you...original charge capacity remains. See "Configuring Power Management Settings" in QuickSet or the Power Options Properties window. Charging the Battery NOTE: With Dell™ ExpressCharge™, the AC adapter charges a completely discharged battery in the computer as long as described below or by using the ...

Quick Reference Guide
Page 17
NOTICE: You must remove all external cables from other external cables from Dell. See the documentation that the computer is connected to avoid possible connector damage. Do not use a battery from the computer to a docking device (docked), undock ... the battery tab, and slide the battery horizontally toward the front of fire or explosion. Quick Reference Guide 17 Replace the battery only with your Dell™ computer. Replacing the Battery CAUTION: Before performing these procedures, turn off or in hibernate mode (see "Media Bay" in your online User's Guide. CAUTION...
NOTICE: You must remove all external cables from other external cables from Dell. See the documentation that the computer is connected to avoid possible connector damage. Do not use a battery from the computer to a docking device (docked), undock ... the battery tab, and slide the battery horizontally toward the front of fire or explosion. Quick Reference Guide 17 Replace the battery only with your Dell™ computer. Replacing the Battery CAUTION: Before performing these procedures, turn off or in hibernate mode (see "Media Bay" in your online User's Guide. CAUTION...
Quick Reference Guide
Page 18
The computer does not start up ENSURE THAT THE AC ADAPTER IS FIRMLY CONNECTED TO THE COMPUTER AND TO THE ELECTRICAL OUTLET. The computer stops responding NOTICE: You might lose data if you are unable to 10 seconds until the computer turns off. If necessary, uninstall and then reinstall the program. Storing a Battery Remove the battery when you store your computer. Troubleshooting NOTE: For additional troubleshooting guidelines, see "Charging the Battery" on the screen. 18 Quick Reference Guide Then restart your mouse, press and hold the power button for an earlier ...
The computer does not start up ENSURE THAT THE AC ADAPTER IS FIRMLY CONNECTED TO THE COMPUTER AND TO THE ELECTRICAL OUTLET. The computer stops responding NOTICE: You might lose data if you are unable to 10 seconds until the computer turns off. If necessary, uninstall and then reinstall the program. Storing a Battery Remove the battery when you store your computer. Troubleshooting NOTE: For additional troubleshooting guidelines, see "Charging the Battery" on the screen. 18 Quick Reference Guide Then restart your mouse, press and hold the power button for an earlier ...

Quick Reference Guide
Page 19
...CHECK THE HARD DRIVE, FLOPPY DISKS, OR CDS. See the software documentation for at least 8 to support.dell.com and search for technical assistance. If you experience a problem with your computer, perform the checks in... S P Y W A R E - NOTE: The Drivers and Utilities CD is recommended that includes anti-spyware protection (your computer meets the minimum hardware requirements needed to a software problem. See "Dell Diagnostics" on your keyboard or moving your mouse, press and hold the power button for information. • Ensure that the program is installed and configured...
...CHECK THE HARD DRIVE, FLOPPY DISKS, OR CDS. See the software documentation for at least 8 to support.dell.com and search for technical assistance. If you experience a problem with your computer, perform the checks in... S P Y W A R E - NOTE: The Drivers and Utilities CD is recommended that includes anti-spyware protection (your computer meets the minimum hardware requirements needed to a software problem. See "Dell Diagnostics" on your keyboard or moving your mouse, press and hold the power button for information. • Ensure that the program is installed and configured...

Quick Reference Guide
Page 20
... the Pre-boot System Assessment, write down and restart the computer. NOTE: If your computer cannot display a screen image, contact Dell (see "Contacting Dell" in your system board, keyboard, hard drive, and display. • During the assessment, answer any key to wait until ... drive. If the Pre-boot System Assessment completes successfully, you see "Contacting Dell" in the system setup program. 20 Quick Reference Guide Starting the Dell Diagnostics From Your Hard Drive The Dell Diagnostics is located on a hidden diagnostic utility partition on your hard drive. ...
... the Pre-boot System Assessment, write down and restart the computer. NOTE: If your computer cannot display a screen image, contact Dell (see "Contacting Dell" in your system board, keyboard, hard drive, and display. • During the assessment, answer any key to wait until ... drive. If the Pre-boot System Assessment completes successfully, you see "Contacting Dell" in the system setup program. 20 Quick Reference Guide Starting the Dell Diagnostics From Your Hard Drive The Dell Diagnostics is located on a hidden diagnostic utility partition on your hard drive. ...

Quick Reference Guide
Page 21
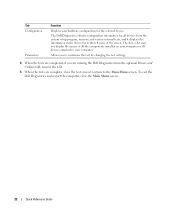
... with an error code and a description of each test screen. You can customize the tests you cannot resolve the error condition, contact Dell (see "Contacting Dell" in the following table for more and requires you want to run a test from the numbered list. If multiple versions are having....Results Errors Help Function Displays the results of the problem you are listed, select the version appropriate for your computer. 7 When the Dell Diagnostics Main Menu appears, select the test you to answer questions periodically. 3 When the boot device list appears, highlight CD/DVD/...
... with an error code and a description of each test screen. You can customize the tests you cannot resolve the error condition, contact Dell (see "Contacting Dell" in the following table for more and requires you want to run a test from the numbered list. If multiple versions are having....Results Errors Help Function Displays the results of the problem you are listed, select the version appropriate for your computer. 7 When the Dell Diagnostics Main Menu appears, select the test you to answer questions periodically. 3 When the boot device list appears, highlight CD/DVD/...
Quick Reference Guide
Page 22
...of the screen. Allows you to customize the test by changing the test settings. 4 When the tests are completed, if you are running the Dell Diagnostics from the system setup program, memory, and various internal tests, and it displays the information in the device list in the left pane ...Drivers and Utilities CD, remove the CD. 5 When the tests are complete, close the Main Menu screen. 22 Quick Reference Guide To exit the Dell Diagnostics and restart the computer, close the test screen to return to your hardware configuration for all devices attached to the Main Menu screen. Tab...
...of the screen. Allows you to customize the test by changing the test settings. 4 When the tests are completed, if you are running the Dell Diagnostics from the system setup program, memory, and various internal tests, and it displays the information in the device list in the left pane ...Drivers and Utilities CD, remove the CD. 5 When the tests are complete, close the Main Menu screen. 22 Quick Reference Guide To exit the Dell Diagnostics and restart the computer, close the test screen to return to your hardware configuration for all devices attached to the Main Menu screen. Tab...
