Owner's Manual (PDF)
Page 3
Contents 1 Before You Begin 11 Turn Off Your Computer and Connected Devices . . . . 11 Safety Instructions 12 Recommended Tools 12 2 After Working Inside Your Computer . . . . 13 3 Technical Overview 15 Inside View of Your Computer 16 System Board Components 17 4 Stand 19 Removing the Stand 19 Replacing the Stand 21 5 Back Cover 23 Removing the Back Cover 23 Replacing the Back Cover 24 Contents 3
Contents 1 Before You Begin 11 Turn Off Your Computer and Connected Devices . . . . 11 Safety Instructions 12 Recommended Tools 12 2 After Working Inside Your Computer . . . . 13 3 Technical Overview 15 Inside View of Your Computer 16 System Board Components 17 4 Stand 19 Removing the Stand 19 Replacing the Stand 21 5 Back Cover 23 Removing the Back Cover 23 Replacing the Back Cover 24 Contents 3
Owner's Manual (PDF)
Page 11
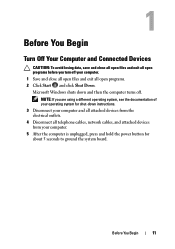
...To avoid losing data, save and close all open files and exit all open programs. 2 Click Start and click Shut Down. NOTE: If you turn off . Microsoft Windows shuts down instructions. 3 Disconnect your computer and all attached devices from the electrical outlets. 4 Disconnect all telephone cables, network cables...before you are using a different operating system, see the documentation of your operating system for shut-down and then the computer turns off your computer. 5 After the computer is unplugged, press and hold the power button for about 5 seconds to ground the system board.
...To avoid losing data, save and close all open files and exit all open programs. 2 Click Start and click Shut Down. NOTE: If you turn off . Microsoft Windows shuts down instructions. 3 Disconnect your computer and all attached devices from the electrical outlets. 4 Disconnect all telephone cables, network cables...before you are using a different operating system, see the documentation of your operating system for shut-down and then the computer turns off your computer. 5 After the computer is unplugged, press and hold the power button for about 5 seconds to ground the system board.
Owner's Manual (PDF)
Page 13
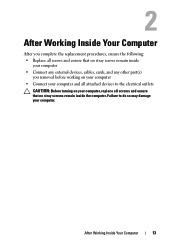
... Inside Your Computer After you removed before working on your computer • Connect your computer and all attached devices to the electrical outlets CAUTION: Before turning on your computer. Failure to do so may damage your computer, replace all screws and ensure that no stray screws remain inside your computer •...
... Inside Your Computer After you removed before working on your computer • Connect your computer and all attached devices to the electrical outlets CAUTION: Before turning on your computer. Failure to do so may damage your computer, replace all screws and ensure that no stray screws remain inside your computer •...
Owner's Manual (PDF)
Page 50
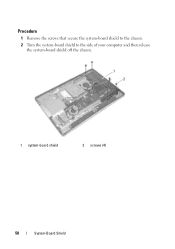
Procedure 1 Remove the screws that secure the system-board shield to the chassis. 2 Turn the system-board shield to the side of your computer and then release the system-board shield off the chassis. 1 2 1 system-board shield 2 screws (4) 50 System-Board Shield
Procedure 1 Remove the screws that secure the system-board shield to the chassis. 2 Turn the system-board shield to the side of your computer and then release the system-board shield off the chassis. 1 2 1 system-board shield 2 screws (4) 50 System-Board Shield
Owner's Manual (PDF)
Page 86
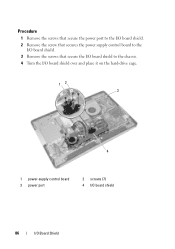
Procedure 1 Remove the screws that secure the power port to the I/O board shield. 2 Remove the screw that secures the power supply control board to the I/O board shield. 3 Remove the screws that secure the I/O board shield to the chassis. 4 Turn the I/O board shield over and place it on the hard-drive cage. 12 3 4 1 power-supply control board 3 power port 2 screws (7) 4 I/O board shield 86 I/O Board Shield
Procedure 1 Remove the screws that secure the power port to the I/O board shield. 2 Remove the screw that secures the power supply control board to the I/O board shield. 3 Remove the screws that secure the I/O board shield to the chassis. 4 Turn the I/O board shield over and place it on the hard-drive cage. 12 3 4 1 power-supply control board 3 power port 2 screws (7) 4 I/O board shield 86 I/O Board Shield
Owner's Manual (PDF)
Page 116
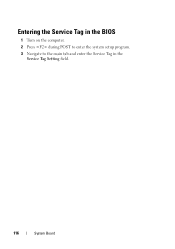
Entering the Service Tag in the BIOS 1 Turn on the computer. 2 Press during POST to enter the system setup program. 3 Navigate to the main tab and enter the Service Tag in the Service Tag Setting field. 116 System Board
Entering the Service Tag in the BIOS 1 Turn on the computer. 2 Press during POST to enter the system setup program. 3 Navigate to the main tab and enter the Service Tag in the Service Tag Setting field. 116 System Board
Owner's Manual (PDF)
Page 143
Then, turn off your computer. 2 During POST, when the DELL logo is lost. System Setup Overview Use the system setup to appear and then press immediately. If you write down the system setup screen information ... password, type of hard drive installed, enabling or disabling base devices, and so on NOTE: Before you change system setup, it , and then press . See "Turn Off Your Computer and Connected Devices" on (or restart) your computer and try again. NOTE: The F2 prompt indicates that you press before the F2...
Then, turn off your computer. 2 During POST, when the DELL logo is lost. System Setup Overview Use the system setup to appear and then press immediately. If you write down the system setup screen information ... password, type of hard drive installed, enabling or disabling base devices, and so on NOTE: Before you change system setup, it , and then press . See "Turn Off Your Computer and Connected Devices" on (or restart) your computer and try again. NOTE: The F2 prompt indicates that you press before the F2...
Owner's Manual (PDF)
Page 147
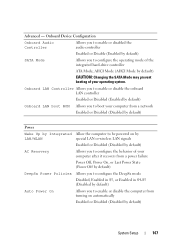
... mode Disabled, Enabled in S5, or Enabled in S4-S5 (Disabled by default) Auto Power On Allows you to enable or disable the computer from turning on automatically Enabled or Disabled (Disabled by default) System Setup 147 Onboard Device Configuration Onboard Audio Controller Allows you to enable or disabled the audio...
... mode Disabled, Enabled in S5, or Enabled in S4-S5 (Disabled by default) Auto Power On Allows you to enable or disable the computer from turning on automatically Enabled or Disabled (Disabled by default) System Setup 147 Onboard Device Configuration Onboard Audio Controller Allows you to enable or disabled the audio...

Owner's Manual (PDF)
Page 148
... On Mode Auto Power On Date Auto Power On Time Allows you to set the computer to set the date on which the computer must turn on automatically; This option can be configured only if the Auto Power On mode is set to Enabled hh:mm:ss (12:30:30 by...: Allows users to edit certain system setup options • Full Access: Allows users to set to Enabled 1 to 31 (15 by default) Allows you to turn on automatically; This option can be configured only if the Auto Power On mode is set the time at which the computer must...
... On Mode Auto Power On Date Auto Power On Time Allows you to set the computer to set the date on which the computer must turn on automatically; This option can be configured only if the Auto Power On mode is set to Enabled hh:mm:ss (12:30:30 by...: Allows users to edit certain system setup options • Full Access: Allows users to set to Enabled 1 to 31 (15 by default) Allows you to turn on automatically; This option can be configured only if the Auto Power On mode is set the time at which the computer must...
Owner's Manual (PDF)
Page 151
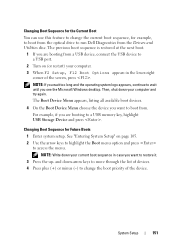
... boot sequence is restored at the next boot. 1 If you are booting from a USB device, connect the USB device to run Dell Diagnostics from the optical drive to a USB port. 2 Turn on page 105. 2 Use the arrow keys to highlight the Boot menu option and press to a USB memory key, highlight USB...
... boot sequence is restored at the next boot. 1 If you are booting from a USB device, connect the USB device to run Dell Diagnostics from the optical drive to a USB port. 2 Turn on page 105. 2 Use the arrow keys to highlight the Boot menu option and press to a USB memory key, highlight USB...
Owner's Manual (PDF)
Page 157
... Guide that shipped with your computer. If you have your computer's Service Tag or Express Service Code: a Select one of the following options: • Automatically detect my Service Tag for your computer is available or when replacing the ...system board. Flashing the BIOS 157 b Click Submit and proceed to support.dell.com/support/downloads. 3 Locate the BIOS update file for your computer: NOTE: The Service Tag for me &#...Download File to download the file on the screen. To flash the BIOS: 1 Turn on the computer. 2 Go to step 4.
... Guide that shipped with your computer. If you have your computer's Service Tag or Express Service Code: a Select one of the following options: • Automatically detect my Service Tag for your computer is available or when replacing the ...system board. Flashing the BIOS 157 b Click Submit and proceed to support.dell.com/support/downloads. 3 Locate the BIOS update file for your computer: NOTE: The Service Tag for me &#...Download File to download the file on the screen. To flash the BIOS: 1 Turn on the computer. 2 Go to step 4.


