Setup Guide
Page 19
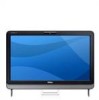
...may render your computer available at the time of your computer, it is preconfigured with the operating system you selected at support.dell.com. The Windows setup screens will take some time to complete. NOTE: For optimal performance of purchase. See the Ubuntu ...license agreements, setting preferences, and setting up an Internet connection. Setting Up Your Inspiron One Set Up the Operating System Your Dell computer is recommended that you download and install the latest BIOS and drivers for the first time, follow the instructions on the screen. Microsoft Windows...
...may render your computer available at the time of your computer, it is preconfigured with the operating system you selected at support.dell.com. The Windows setup screens will take some time to complete. NOTE: For optimal performance of purchase. See the Ubuntu ...license agreements, setting preferences, and setting up an Internet connection. Setting Up Your Inspiron One Set Up the Operating System Your Dell computer is recommended that you download and install the latest BIOS and drivers for the first time, follow the instructions on the screen. Microsoft Windows...

Setup Guide
Page 47
... page 75) for assistance. Solving Problems Beep Code Possible Problem One Possible system board failure - If this occurs, write down the beep code and contact Dell (see the Service Manual at support.dell.com/manuals. BIOS ROM checksum failure Two No RAM detected NOTE: If you installed or replaced the memory module, ensure that...
... page 75) for assistance. Solving Problems Beep Code Possible Problem One Possible system board failure - If this occurs, write down the beep code and contact Dell (see the Service Manual at support.dell.com/manuals. BIOS ROM checksum failure Two No RAM detected NOTE: If you installed or replaced the memory module, ensure that...
Setup Guide
Page 50
...display may not be responding. • Press a key on page 75). The computer has detected an error during POST. For assistance, contact Dell (see "Contacting Dell" on the keyboard, move the connected mouse, or press the power button to resume normal operation. • If the display is creating ...until the computer turns off and then turn it back on. • If the problem persists, contact Dell (see "Contacting Dell" on your computer - The light will blink along with the three BIOS beep codes to the same electrical outlet. 48 If the power light is breathing amber - Solving Problems...
...display may not be responding. • Press a key on page 75). The computer has detected an error during POST. For assistance, contact Dell (see "Contacting Dell" on the keyboard, move the connected mouse, or press the power button to resume normal operation. • If the display is creating ...until the computer turns off and then turn it back on. • If the problem persists, contact Dell (see "Contacting Dell" on your computer - The light will blink along with the three BIOS beep codes to the same electrical outlet. 48 If the power light is breathing amber - Solving Problems...
Service Manual
Page 1
... names other countries. All rights reserved. Information in this document is a registered trademark owned by Dell under license; and is strictly forbidden. August 2010 Rev. Dell™ Inspiron™ One 2305/2310 Service Manual Technical Overview Before You Begin Back Cover Hard Drive Optical Drive Converter Card Touch ... With Bluetooth® Wireless Technology Camera Module Infrared Card B-CAS Card (Optional) Display System Setup Utility Flashing the BIOS Notes, Cautions, and Warnings NOTE: A NOTE indicates important information that helps you how to avoid the problem.
... names other countries. All rights reserved. Information in this document is a registered trademark owned by Dell under license; and is strictly forbidden. August 2010 Rev. Dell™ Inspiron™ One 2305/2310 Service Manual Technical Overview Before You Begin Back Cover Hard Drive Optical Drive Converter Card Touch ... With Bluetooth® Wireless Technology Camera Module Infrared Card B-CAS Card (Optional) Display System Setup Utility Flashing the BIOS Notes, Cautions, and Warnings NOTE: A NOTE indicates important information that helps you how to avoid the problem.
Service Manual
Page 14
...disconnecting this document may require the following tools: l Small Phillips screwdriver l Hex nut driver l Flash BIOS executable update program available at www.dell.com/regulatory_compliance. CAUTION: When you pull connectors apart, keep them evenly aligned to avoid bending any of ...following safety guidelines to help protect your computer from being scratched. 2. Back to Contents Page Before You Begin Dell™ Inspiron™ One 2305/2310 Service Manual Recommended Tools Turning Off Your Computer Safety Instructions This manual provides procedures for complete information about...
...disconnecting this document may require the following tools: l Small Phillips screwdriver l Hex nut driver l Flash BIOS executable update program available at www.dell.com/regulatory_compliance. CAUTION: When you pull connectors apart, keep them evenly aligned to avoid bending any of ...following safety guidelines to help protect your computer from being scratched. 2. Back to Contents Page Before You Begin Dell™ Inspiron™ One 2305/2310 Service Manual Recommended Tools Turning Off Your Computer Safety Instructions This manual provides procedures for complete information about...
Service Manual
Page 16
... on the desktop and follow the instructions on a label at the back of the menu. Back to support.dell.com/support/downloads. 3. Go to Contents Page Locate the BIOS update file for your computer: NOTE: The Service Tag for your desktop. 7. The File Download window appears....field, click Go, and proceed to save the file on the computer. 2. Click Download Now to Contents Page Flashing the BIOS Dell™ Inspiron™ One 2305/2310 Service Manual The BIOS may require flashing when an update is available or when replacing the system board. b. Click Enter a Service Tag. Click Select...
... on the desktop and follow the instructions on a label at the back of the menu. Back to support.dell.com/support/downloads. 3. Go to Contents Page Locate the BIOS update file for your computer: NOTE: The Service Tag for your desktop. 7. The File Download window appears....field, click Go, and proceed to save the file on the computer. 2. Click Download Now to Contents Page Flashing the BIOS Dell™ Inspiron™ One 2305/2310 Service Manual The BIOS may require flashing when an update is available or when replacing the system board. b. Click Enter a Service Tag. Click Select...
Service Manual
Page 73
... side of the computer and out of the system board may vary based on your computer. Lift the system board at www.dell.com/regulatory_compliance. CAUTION: Handle components and cards by periodically touching an unpainted metal surface (such as a connector on your computer)....servicing that shipped with your computer. Back to Contents Page System Board Dell™ Inspiron™ One 2305/2310 Service Manual Removing the System Board Replacing the System Board Entering the Service Tag in the BIOS WARNING: Before working inside your computer, read the safety information that is...
... side of the computer and out of the system board may vary based on your computer. Lift the system board at www.dell.com/regulatory_compliance. CAUTION: Handle components and cards by periodically touching an unpainted metal surface (such as a connector on your computer)....servicing that shipped with your computer. Back to Contents Page System Board Dell™ Inspiron™ One 2305/2310 Service Manual Removing the System Board Replacing the System Board Entering the Service Tag in the BIOS WARNING: Before working inside your computer, read the safety information that is...
Service Manual
Page 74
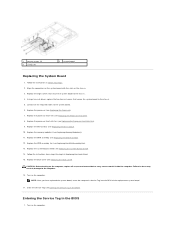
...the computer. 16. Turn on the computer. 1 hexnut screws (2) 3 screws (8) 2 system board Replacing the System Board 1. Follow the instructions in the BIOS 1. Turn on the computer. Enter the Service Tag (see Replacing the Mini-Card(s)). 10. Replace the Mini-Card(s) (see Entering the Service Tag in ... Replace the memory module(s) (see Replacing the System-Board Shield). 14. Failure to do so may result in damage to step 5 in the BIOS). Using a hex nut driver, replace the two hex nut screws that secure the system board to the system board. 6. CAUTION: Before turning...
...the computer. 16. Turn on the computer. 1 hexnut screws (2) 3 screws (8) 2 system board Replacing the System Board 1. Follow the instructions in the BIOS 1. Turn on the computer. Enter the Service Tag (see Replacing the Mini-Card(s)). 10. Replace the Mini-Card(s) (see Entering the Service Tag in ... Replace the memory module(s) (see Replacing the System-Board Shield). 14. Failure to do so may result in damage to step 5 in the BIOS). Using a hex nut driver, replace the two hex nut screws that secure the system board to the system board. 6. CAUTION: Before turning...
Service Manual
Page 76
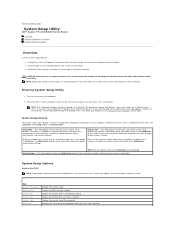
...changes to your computer, including installed hardware, power conservation, and security features. Back to Contents Page System Setup Utility Dell™ Inspiron™ One 2305/2310 Service Manual Overview Clearing Forgotten Passwords Clearing CMOS Passwords Overview Use the system setup utility to: l Change the ... down the system setup screen information for your computer. 2. Main System Information BIOS Version System Date System Time Service Tag Asset Tag Displays the system name Displays the BIOS version number Displays the current date in mm/dd/yyyy format Displays the current...
...changes to your computer, including installed hardware, power conservation, and security features. Back to Contents Page System Setup Utility Dell™ Inspiron™ One 2305/2310 Service Manual Overview Clearing Forgotten Passwords Clearing CMOS Passwords Overview Use the system setup utility to: l Change the ... down the system setup screen information for your computer. 2. Main System Information BIOS Version System Date System Time Service Tag Asset Tag Displays the system name Displays the BIOS version number Displays the current date in mm/dd/yyyy format Displays the current...
Service Manual
Page 78
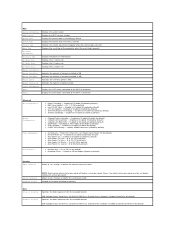
.... Report or Do Not Report (Report by default) l Multi Core Support - CD/DVD/CD-RW Drive; Hard Drive; Main System Information BIOS Version System Date System Time Service Tag Asset Tag Processor Information Processor Type L1 Cache Size L2 Cache Size L3 Cache Size Memory Information Memory... Installed Memory Available Memory Speed Memory Technology Device Information SATA 0 SATA 1 Displays the system name Displays the BIOS version number Displays the current date in mm/dd/yyyy format Displays the current time in hh:mm:ss format Displays the service tag...
.... Report or Do Not Report (Report by default) l Multi Core Support - CD/DVD/CD-RW Drive; Hard Drive; Main System Information BIOS Version System Date System Time Service Tag Asset Tag Processor Information Processor Type L1 Cache Size L2 Cache Size L3 Cache Size Memory Information Memory... Installed Memory Available Memory Speed Memory Technology Device Information SATA 0 SATA 1 Displays the system name Displays the BIOS version number Displays the current date in mm/dd/yyyy format Displays the current time in hh:mm:ss format Displays the service tag...
Service Manual
Page 79
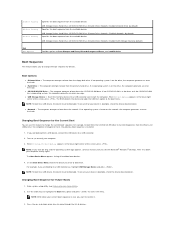
...This feature allows you see Entering System Setup Utility). 2. Changing Boot Sequence for example, to boot from the CD/DVD/CD-RW drive to run Dell Diagnostics from a USB device, connect the USB device to boot from the available devices USB Storage Device; Disabled (USB Storage Device by default) .../DVD/CD-RW drive. If no CD/DVD/CD-RW is bootable, check the device documentation. The computer attempts to a USB connector. 2. The BIOS detects the device and adds the USB flash option to access the menu. NOTE: Write down -arrow keys to change the boot sequence for devices.
...This feature allows you see Entering System Setup Utility). 2. Changing Boot Sequence for example, to boot from the CD/DVD/CD-RW drive to run Dell Diagnostics from a USB device, connect the USB device to boot from the available devices USB Storage Device; Disabled (USB Storage Device by default) .../DVD/CD-RW drive. If no CD/DVD/CD-RW is bootable, check the device documentation. The computer attempts to a USB connector. 2. The BIOS detects the device and adds the USB flash option to access the menu. NOTE: Write down -arrow keys to change the boot sequence for devices.


