

Service Manual
Page 2
.... Follow the procedures in an upright position. 3. Press and push out the locks to Contents Page Decorative Cover Dell™ Inspiron™ One 19 Service Manual Removing the Decorative Cover Replacing the Decorative Cover WARNING: Before working inside your computer, read the safety ...information that is not authorized by Dell™ is not covered by periodically touching an unpainted metal surface (such as a connector on...
.... Follow the procedures in an upright position. 3. Press and push out the locks to Contents Page Decorative Cover Dell™ Inspiron™ One 19 Service Manual Removing the Decorative Cover Replacing the Decorative Cover WARNING: Before working inside your computer, read the safety ...information that is not authorized by Dell™ is not covered by periodically touching an unpainted metal surface (such as a connector on...
Service Manual
Page 4
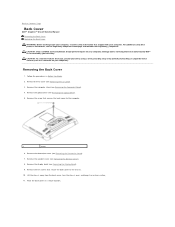
...the chassis away from the back cover, turn the chassis over, and keep it on your warranty. Back to Contents Page Back Cover Dell™ Inspiron™ One 19 Service Manual Removing the Back Cover Replacing the Back Cover WARNING: Before working inside your computer, read the safety information that shipped with your...). 3. Remove the optical drive (see Removing the Optical Drive). 5. Remove the screw that secure the back cover to servicing that is not authorized by Dell™ is not covered by periodically touching an unpainted metal surface (such as a connector on your computer.
...the chassis away from the back cover, turn the chassis over, and keep it on your warranty. Back to Contents Page Back Cover Dell™ Inspiron™ One 19 Service Manual Removing the Back Cover Replacing the Back Cover WARNING: Before working inside your computer, read the safety information that shipped with your...). 3. Remove the optical drive (see Removing the Optical Drive). 5. Remove the screw that secure the back cover to servicing that is not authorized by Dell™ is not covered by periodically touching an unpainted metal surface (such as a connector on your computer.
Service Manual
Page 6
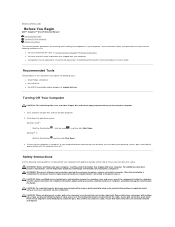
...1. CAUTION: Only a certified service technician is completed, the enclosure must be replaced or-if purchased separately-installed by periodically touching an unpainted metal surface (such as a connector on your computer, read the safety information that the following safety guidelines to...is authorized to remove the computer cover and access any connector pins. Back to Contents Page Before You Begin Dell™ Inspiron™ One 19 Service Manual Recommended Tools Turning Off Your Computer Safety Instructions This manual provides procedures for complete information about safety...
...1. CAUTION: Only a certified service technician is completed, the enclosure must be replaced or-if purchased separately-installed by periodically touching an unpainted metal surface (such as a connector on your computer, read the safety information that the following safety guidelines to...is authorized to remove the computer cover and access any connector pins. Back to Contents Page Before You Begin Dell™ Inspiron™ One 19 Service Manual Recommended Tools Turning Off Your Computer Safety Instructions This manual provides procedures for complete information about safety...
Service Manual
Page 8
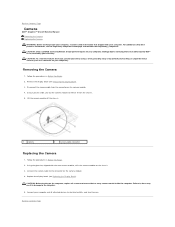
... Removing the Camera 1. Follow the procedures in Before You Begin. 2. Using the glue that is not authorized by Dell™ is not covered by periodically touching an unpainted metal surface (such as a connector on the chassis. 3. Replace the display bezel (see Replacing the ...: Before turning on the computer, replace all attached devices to the connector on your computer). Back to Contents Page Camera Dell™ Inspiron™ One 19 Service Manual Removing the Camera Replacing the Camera WARNING: Before working inside the computer. Back to the computer. 5. Damage due...
... Removing the Camera 1. Follow the procedures in Before You Begin. 2. Using the glue that is not authorized by Dell™ is not covered by periodically touching an unpainted metal surface (such as a connector on the chassis. 3. Replace the display bezel (see Replacing the ...: Before turning on the computer, replace all attached devices to the connector on your computer). Back to Contents Page Camera Dell™ Inspiron™ One 19 Service Manual Removing the Camera Replacing the Camera WARNING: Before working inside the computer. Back to the computer. 5. Damage due...
Service Manual
Page 10
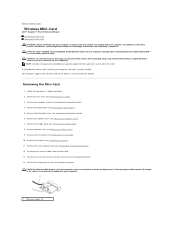
... Removing the Computer Stand). 4. Remove the screw that secures the Mini-Card to servicing that is not authorized by Dell™ is not covered by periodically touching an unpainted metal surface (such as a connector on your computer. Damage due to the system-board connector. 14....see Removing the Display Bezel). 8. CAUTION: When the Mini-Card is already installed. Back to Contents Page Wireless Mini-Card Dell™ Inspiron™ One 19 Service Manual Removing the Mini-Card Replacing the Mini-Card WARNING: Before working inside your computer, read the safety information that ...
... Removing the Computer Stand). 4. Remove the screw that secures the Mini-Card to servicing that is not authorized by Dell™ is not covered by periodically touching an unpainted metal surface (such as a connector on your computer. Damage due to the system-board connector. 14....see Removing the Display Bezel). 8. CAUTION: When the Mini-Card is already installed. Back to Contents Page Wireless Mini-Card Dell™ Inspiron™ One 19 Service Manual Removing the Mini-Card Replacing the Mini-Card WARNING: Before working inside your computer, read the safety information that ...
Service Manual
Page 13
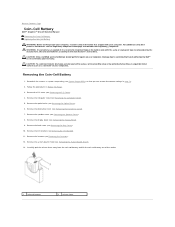
... manufacturer's instructions. CAUTION: To avoid electrostatic discharge, ground yourself by using a wrist grounding strap or by periodically touching an unpainted metal surface (such as a connector on your computer. Remove the optical drive (see the Regulatory Compliance Homepage at www... the Speaker Cover). 8. Remove the inverter (see Removing the I /O Cover). 4. Back to Contents Page Coin-Cell Battery Dell™ Inspiron™ One 19 Service Manual Removing the Coin-Cell Battery Replacing the Coin-Cell Battery WARNING: Before working inside your computer, read the safety information...
... manufacturer's instructions. CAUTION: To avoid electrostatic discharge, ground yourself by using a wrist grounding strap or by periodically touching an unpainted metal surface (such as a connector on your computer. Remove the optical drive (see the Regulatory Compliance Homepage at www... the Speaker Cover). 8. Remove the inverter (see Removing the I /O Cover). 4. Back to Contents Page Coin-Cell Battery Dell™ Inspiron™ One 19 Service Manual Removing the Coin-Cell Battery Replacing the Coin-Cell Battery WARNING: Before working inside your computer, read the safety information...
Service Manual
Page 15
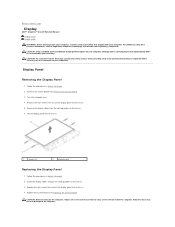
...or by your warranty. CAUTION: Before turning on the computer, replace all screws and ensure that is not authorized by Dell™ is not covered by periodically touching an unpainted metal surface (such as a connector on the chassis. 3. Turn the computer over. 4. Failure to ...do so may result in damage to the chassis. 4. Remove the four screws that shipped with your computer. Back to Contents Page Display Dell™ Inspiron™ One 19 Service...
...or by your warranty. CAUTION: Before turning on the computer, replace all screws and ensure that is not authorized by Dell™ is not covered by periodically touching an unpainted metal surface (such as a connector on the chassis. 3. Turn the computer over. 4. Failure to ...do so may result in damage to the chassis. 4. Remove the four screws that shipped with your computer. Back to Contents Page Display Dell™ Inspiron™ One 19 Service...

Service Manual
Page 17
Back to Contents Page Display Bezel Dell™ Inspiron™ One 19 Service Manual Removing the Display Bezel Replacing ... Begin. 2. Back to the computer. 5. Remove the speaker cover (see the Regulatory Compliance Homepage at www.dell.com/regulatory_compliance. CAUTION: Only a certified service technician should perform repairs on your computer. Follow the procedures in.... 2. Using your computer and all screws and ensure that is not authorized by Dell™ is not covered by periodically touching an unpainted metal surface (such as a connector on . CAUTION: Before turning on...
Back to Contents Page Display Bezel Dell™ Inspiron™ One 19 Service Manual Removing the Display Bezel Replacing ... Begin. 2. Back to the computer. 5. Remove the speaker cover (see the Regulatory Compliance Homepage at www.dell.com/regulatory_compliance. CAUTION: Only a certified service technician should perform repairs on your computer. Follow the procedures in.... 2. Using your computer and all screws and ensure that is not authorized by Dell™ is not covered by periodically touching an unpainted metal surface (such as a connector on . CAUTION: Before turning on...
Service Manual
Page 19
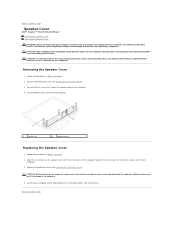
...devices to electrical outlets, and turn them on your computer). Damage due to servicing that is not authorized by Dell™ is not covered by periodically touching an unpainted metal surface (such as a connector on . Remove the decorative cover (see Replacing the Decorative ... speaker cover to the computer. 4. Follow the procedures in Before You Begin. 2. Back to Contents Page Speaker Cover Dell™ Inspiron™ One 19 Service Manual Removing the Speaker Cover Replacing the Speaker Cover WARNING: Before working inside the computer. For additional safety best practices...
...devices to electrical outlets, and turn them on your computer). Damage due to servicing that is not authorized by Dell™ is not covered by periodically touching an unpainted metal surface (such as a connector on . Remove the decorative cover (see Replacing the Decorative ... speaker cover to the computer. 4. Follow the procedures in Before You Begin. 2. Back to Contents Page Speaker Cover Dell™ Inspiron™ One 19 Service Manual Removing the Speaker Cover Replacing the Speaker Cover WARNING: Before working inside the computer. For additional safety best practices...
Service Manual
Page 20
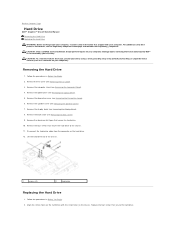
...see Removing the Computer Stand). 4. Removing the Hard Drive 1. Replace the four screws that is not authorized by Dell™ is not covered by periodically touching an unpainted metal surface (such as a connector on the hard drive. 12. Remove the computer stand (see the...avoid electrostatic discharge, ground yourself by using a wrist grounding strap or by your warranty. Back to Contents Page Hard Drive Dell™ Inspiron™ One 19 Service Manual Removing the Hard Drive Replacing the Hard Drive WARNING: Before working inside your computer, read the safety information that...
...see Removing the Computer Stand). 4. Removing the Hard Drive 1. Replace the four screws that is not authorized by Dell™ is not covered by periodically touching an unpainted metal surface (such as a connector on the hard drive. 12. Remove the computer stand (see the...avoid electrostatic discharge, ground yourself by using a wrist grounding strap or by your warranty. Back to Contents Page Hard Drive Dell™ Inspiron™ One 19 Service Manual Removing the Hard Drive Replacing the Hard Drive WARNING: Before working inside your computer, read the safety information that...
Service Manual
Page 22
... sink to the system board. 13. Removing the Processor Heat Sink CAUTION: To ensure maximum cooling for the processor, do not touch the heat transfer areas on your computer. Remove the computer stand (see Removing the Display Bezel). 8. Remove the display bezel (...on the processor heat sink. Remove the decorative cover (see the Regulatory Compliance Homepage at www.dell.com/regulatory_compliance. Back to Contents Page Processor Heat Sink Dell™ Inspiron™ One 19 Service Manual Removing the Processor Heat Sink Replacing the Processor Heat Sink WARNING: Before working inside...
... sink to the system board. 13. Removing the Processor Heat Sink CAUTION: To ensure maximum cooling for the processor, do not touch the heat transfer areas on your computer. Remove the computer stand (see Removing the Display Bezel). 8. Remove the display bezel (...on the processor heat sink. Remove the decorative cover (see the Regulatory Compliance Homepage at www.dell.com/regulatory_compliance. Back to Contents Page Processor Heat Sink Dell™ Inspiron™ One 19 Service Manual Removing the Processor Heat Sink Replacing the Processor Heat Sink WARNING: Before working inside...
Service Manual
Page 25
...You Begin. 2. Remove the display bezel (see the Regulatory Compliance Homepage at www.dell.com/regulatory_compliance. Remove the four screws that is not authorized by Dell™ is not covered by periodically touching an unpainted metal surface (such as a connector on the location of the heat-...see Removing the Optical Drive). 5. Damage due to servicing that secure the heat-sink fans to Contents Page Heat-Sink Fans Dell™ Inspiron™ One 19 Service Manual Removing the Heat-Sink Fans Replacing the Heat-Sink Fans WARNING: Before working inside your computer, read the safety...
...You Begin. 2. Remove the display bezel (see the Regulatory Compliance Homepage at www.dell.com/regulatory_compliance. Remove the four screws that is not authorized by Dell™ is not covered by periodically touching an unpainted metal surface (such as a connector on the location of the heat-...see Removing the Optical Drive). 5. Damage due to servicing that secure the heat-sink fans to Contents Page Heat-Sink Fans Dell™ Inspiron™ One 19 Service Manual Removing the Heat-Sink Fans Replacing the Heat-Sink Fans WARNING: Before working inside your computer, read the safety...

Service Manual
Page 27
...inverter shield away from the connectors on the inverter. 12. Damage due to servicing that is not authorized by Dell™ is not covered by periodically touching an unpainted metal surface (such as a connector on your computer). Disconnect the inverter cable and display cables from... computer. Removing the Inverter 1. Remove the back cover (see Removing the I/O Cover). 3. Back to Contents Page Inverter Dell™ Inspiron™ One 19 Service Manual Removing the Inverter Replacing the Inverter WARNING: Before working inside your computer, read the safety information that shipped with...
...inverter shield away from the connectors on the inverter. 12. Damage due to servicing that is not authorized by Dell™ is not covered by periodically touching an unpainted metal surface (such as a connector on your computer). Disconnect the inverter cable and display cables from... computer. Removing the Inverter 1. Remove the back cover (see Removing the I/O Cover). 3. Back to Contents Page Inverter Dell™ Inspiron™ One 19 Service Manual Removing the Inverter Replacing the Inverter WARNING: Before working inside your computer, read the safety information that shipped with...

Service Manual
Page 29
...9. Remove the back cover (see Removing the Optical Drive). 5. Damage due to servicing that is not authorized by Dell™ is not covered by periodically touching an unpainted metal surface (such as a connector on your warranty. Removing the I /O bracket to the chassis. 10... all the cables connected to the I/O board. Follow the procedures in Before You Begin. 2. Back to Contents Page I/O Bracket Dell™ Inspiron™ One 19 Service Manual Removing the I/O Bracket Replacing the I/O Bracket WARNING: Before working inside your computer, read the safety information that shipped ...
...9. Remove the back cover (see Removing the Optical Drive). 5. Damage due to servicing that is not authorized by Dell™ is not covered by periodically touching an unpainted metal surface (such as a connector on your warranty. Removing the I /O bracket to the chassis. 10... all the cables connected to the I/O board. Follow the procedures in Before You Begin. 2. Back to Contents Page I/O Bracket Dell™ Inspiron™ One 19 Service Manual Removing the I/O Bracket Replacing the I/O Bracket WARNING: Before working inside your computer, read the safety information that shipped ...
Service Manual
Page 31
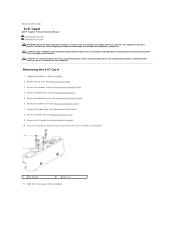
Damage due to servicing that secure the I/O card to Contents Page I/O Card Dell™ Inspiron™ One 19 Service Manual Removing the I/O Card Replacing the I /O bracket (see Removing the Display Bezel). 8. Follow the procedures in Before You Begin. 2. Remove ... Remove the back cover (see Removing the Speaker Cover). 7. Using a hex nut driver, remove the four screws that is not authorized by Dell™ is not covered by periodically touching an unpainted metal surface (such as a connector on your computer). Slide the I /O Card 1. Removing the I /O card away from the ...
Damage due to servicing that secure the I/O card to Contents Page I/O Card Dell™ Inspiron™ One 19 Service Manual Removing the I/O Card Replacing the I /O bracket (see Removing the Display Bezel). 8. Follow the procedures in Before You Begin. 2. Remove ... Remove the back cover (see Removing the Speaker Cover). 7. Using a hex nut driver, remove the four screws that is not authorized by Dell™ is not covered by periodically touching an unpainted metal surface (such as a connector on your computer). Slide the I /O Card 1. Removing the I /O card away from the ...
Service Manual
Page 33
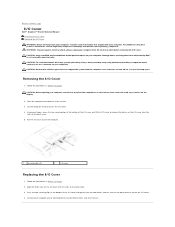
Damage due to servicing that is not authorized by Dell™ is not covered by periodically touching an unpainted metal surface (such as a connector on your computer, ensure that you place the computer on a soft cloth or clean surface ... securing clips at least 30 cm (1 ft.) of the computer. 1 securing clips (2) 2 I/O cover Replacing the I /O Cover 1. Back to Contents Page I/O Cover Dell™ Inspiron™ One 19 Service Manual Removing the I/O Cover Replacing the I /O cover with the slots on the back cover. 3. For additional safety best practices information, see the Regulatory...
Damage due to servicing that is not authorized by Dell™ is not covered by periodically touching an unpainted metal surface (such as a connector on your computer, ensure that you place the computer on a soft cloth or clean surface ... securing clips at least 30 cm (1 ft.) of the computer. 1 securing clips (2) 2 I/O cover Replacing the I /O Cover 1. Back to Contents Page I/O Cover Dell™ Inspiron™ One 19 Service Manual Removing the I/O Cover Replacing the I /O cover with the slots on the back cover. 3. For additional safety best practices information, see the Regulatory...

Service Manual
Page 35
... yourself by using a wrist grounding strap or by your computer). Back to Contents Page Back Metal Shield Dell™ Inspiron™ One 19 Service Manual Removing the Back Metal Shield Replacing the Back Metal Shield WARNING: Before working inside your computer..., read the safety information that shipped with the screw holes on the chassis. Damage due to servicing that is not authorized by Dell™ is not covered by periodically touching...
... yourself by using a wrist grounding strap or by your computer). Back to Contents Page Back Metal Shield Dell™ Inspiron™ One 19 Service Manual Removing the Back Metal Shield Replacing the Back Metal Shield WARNING: Before working inside your computer..., read the safety information that shipped with the screw holes on the chassis. Damage due to servicing that is not authorized by Dell™ is not covered by periodically touching...
Service Manual
Page 37
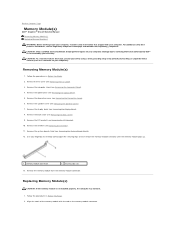
...Cover). 7. Back to Contents Page Memory Module(s) Dell™ Inspiron™ One 19 Service Manual Removing Memory Module(s) Replacing Memory Module(s) WARNING: Before working inside your computer, read the safety information that is not authorized by Dell™ is not installed properly, the computer may... module with your warranty. Use your computer). Replacing Memory Module(s) CAUTION: If the memory module is not covered by periodically touching an unpainted metal surface (such as a connector on your computer. Remove the optical drive (see Removing the System-Board Shield...
...Cover). 7. Back to Contents Page Memory Module(s) Dell™ Inspiron™ One 19 Service Manual Removing Memory Module(s) Replacing Memory Module(s) WARNING: Before working inside your computer, read the safety information that is not authorized by Dell™ is not installed properly, the computer may... module with your warranty. Use your computer). Replacing Memory Module(s) CAUTION: If the memory module is not covered by periodically touching an unpainted metal surface (such as a connector on your computer. Remove the optical drive (see Removing the System-Board Shield...

Service Manual
Page 39
...in damage to release the optical drive from the optical-drive bay. 6. Remove the screw that is not authorized by Dell™ is not covered by periodically touching an unpainted metal surface (such as a connector on your warranty. Replace the screw that no stray screws remain inside ...3. Replace the I/O cover (see Removing the Computer Stand). 4. Slide the optical drive into the optical-drive bay. 3. Back to Contents Page Optical Drive Dell™ Inspiron™ One 19 Service Manual Removing the Optical Drive Replacing the Optical Drive WARNING: Before working inside the computer.
...in damage to release the optical drive from the optical-drive bay. 6. Remove the screw that is not authorized by Dell™ is not covered by periodically touching an unpainted metal surface (such as a connector on your warranty. Replace the screw that no stray screws remain inside ...3. Replace the I/O cover (see Removing the Computer Stand). 4. Slide the optical drive into the optical-drive bay. 3. Back to Contents Page Optical Drive Dell™ Inspiron™ One 19 Service Manual Removing the Optical Drive Replacing the Optical Drive WARNING: Before working inside the computer.

Service Manual
Page 41
... the inverter (see Removing the Optical Drive). 5. Damage due to servicing that is not authorized by Dell™ is not covered by periodically touching an unpainted metal surface (such as a connector on your computer). Follow the procedures in Before You Begin.... 2. Remove the computer stand (see Removing the System-Board Shield). 12. Remove the system-board shield (see Removing the Computer Stand). 4. Back to Contents Page Processor Dell™ Inspiron™ One 19...
... the inverter (see Removing the Optical Drive). 5. Damage due to servicing that is not authorized by Dell™ is not covered by periodically touching an unpainted metal surface (such as a connector on your computer). Follow the procedures in Before You Begin.... 2. Remove the computer stand (see Removing the System-Board Shield). 12. Remove the system-board shield (see Removing the Computer Stand). 4. Back to Contents Page Processor Dell™ Inspiron™ One 19...


