Dell™ Technology Guide
Page 7
... the Source of a Device Problem 79 Replacing a Driver With a Previous Version of the Driver 79 Using the Drivers and Utilities Media to Reinstall a Driver 80 Manually Reinstalling a Driver 80 Drive Problems 81 Optical Drive Problems 82 Hard Drive Problems 82 Working with RAID 83 RAID Level 0 83 RAID Level 1 84 RAID...
... the Source of a Device Problem 79 Replacing a Driver With a Previous Version of the Driver 79 Using the Drivers and Utilities Media to Reinstall a Driver 80 Manually Reinstalling a Driver 80 Drive Problems 81 Optical Drive Problems 82 Hard Drive Problems 82 Working with RAID 83 RAID Level 0 83 RAID Level 1 84 RAID...
Dell™ Technology Guide
Page 29
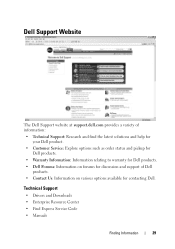
... for your Dell product. • Customer Service: Explore options such as order status and pickup for Dell products. • Warranty Information: Information relating to warranty for Dell products. • Dell Forums: Information on forums for discussion and support of Dell products. ...• Contact Us: Information on various options available for contacting Dell. Technical Support •...
... for your Dell product. • Customer Service: Explore options such as order status and pickup for Dell products. • Warranty Information: Information relating to warranty for Dell products. • Dell Forums: Information on forums for discussion and support of Dell products. ...• Contact Us: Information on various options available for contacting Dell. Technical Support •...
Dell™ Technology Guide
Page 64
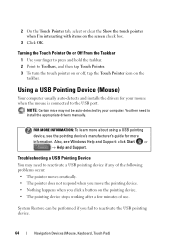
... to the USB port. System Restore can be auto-detected by your finger to press and hold the taskbar. 2 Point to install the appropriate drivers manually. Turning the Touch Pointer On or Off From the Taskbar 1 Use your computer. You then need to reactivate a USB pointing device if any of use...
... to the USB port. System Restore can be auto-detected by your finger to press and hold the taskbar. 2 Point to install the appropriate drivers manually. Turning the Touch Pointer On or Off From the Taskbar 1 Use your computer. You then need to reactivate a USB pointing device if any of use...
Dell™ Technology Guide
Page 80
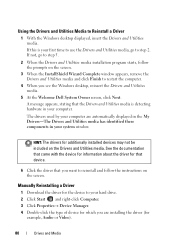
...your computer are installing the driver (for which you see the Windows desktop, reinsert the Drivers and Utilities media. 5 At the Welcome Dell System Owner screen, click Next. See the documentation that came with the device for information about the driver for that device. 6 ...click Computer. 3 Click Properties→ Device Manager. 4 Double-click the type of device for example, Audio or Video). 80 Drives and Media Manually Reinstalling a Driver 1 Download the driver for additionally installed devices may not be included on the Drivers and Utilities media. A message appears, stating...
...your computer are installing the driver (for which you see the Windows desktop, reinsert the Drivers and Utilities media. 5 At the Welcome Dell System Owner screen, click Next. See the documentation that came with the device for information about the driver for that device. 6 ...click Computer. 3 Click Properties→ Device Manager. 4 Double-click the type of device for example, Audio or Video). 80 Drives and Media Manually Reinstalling a Driver 1 Download the driver for additionally installed devices may not be included on the Drivers and Utilities media. A message appears, stating...
Dell™ Technology Guide
Page 105
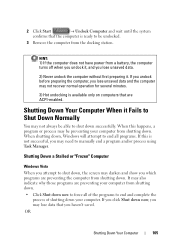
... available only on computers that are preventing your computer. Shutting Down Your Computer When it . If you click Shut down now, you may need to manually end a program and/or process using Task Manager. If you undock before preparing the computer, you lose unsaved data and the computer may lose data...
... available only on computers that are preventing your computer. Shutting Down Your Computer When it . If you click Shut down now, you may need to manually end a program and/or process using Task Manager. If you undock before preparing the computer, you lose unsaved data and the computer may lose data...
Dell™ Technology Guide
Page 129
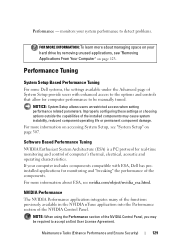
... with enhanced access to the options and controls that allow for real-time monitoring and control of the installed components may be manually tuned. If your hard drive by removing unused applications, see "System Setup" on page 123. Maintenance Tasks (Enhance Performance and... Ensure Security) 129 Performance Tuning System Setup Based Performance Tuning For some Dell systems, the settings available under the Advanced page of the components. NVIDIA Performance The NVIDIA Performance application integrates many of the ...
... with enhanced access to the options and controls that allow for real-time monitoring and control of the installed components may be manually tuned. If your hard drive by removing unused applications, see "System Setup" on page 123. Maintenance Tasks (Enhance Performance and... Ensure Security) 129 Performance Tuning System Setup Based Performance Tuning For some Dell systems, the settings available under the Advanced page of the components. NVIDIA Performance The NVIDIA Performance application integrates many of the ...
Dell™ Technology Guide
Page 130
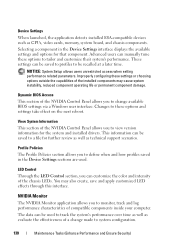
..., reduced component operating life or permanent component damage. Changes to tailor and customize their system's performance. LED Control Through the LED Control section, you can manually tune these options to these settings or choosing options outside the capabilities of the NVIDIA Control Panel allows you to view version information for the...
..., reduced component operating life or permanent component damage. Changes to tailor and customize their system's performance. LED Control Through the LED Control section, you can manually tune these options to these settings or choosing options outside the capabilities of the NVIDIA Control Panel allows you to view version information for the...
Dell™ Technology Guide
Page 137
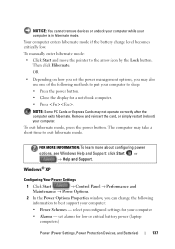
... and Support. NOTE: Some PC Cards or Express Cards may take a short time to the arrow icon by the Lock button. Then click Hibernate. To manually enter hibernate mode: • Click Start and move the pointer to exit hibernate mode. Remove and reinsert the card, or simply restart (reboot) your computer...
... and Support. NOTE: Some PC Cards or Express Cards may take a short time to the arrow icon by the Lock button. Then click Hibernate. To manually enter hibernate mode: • Click Start and move the pointer to exit hibernate mode. Remove and reinsert the card, or simply restart (reboot) your computer...
Dell™ Technology Guide
Page 139
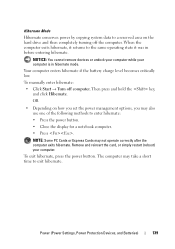
... devices or undock your computer while your computer. Remove and reinsert the card, or simply restart (reboot) your computer is in before entering hibernate. To manually enter hibernate: • Click Start → Turn off the computer. OR • Depending on the hard drive and then completely turning off computer. When the...
... devices or undock your computer while your computer. Remove and reinsert the card, or simply restart (reboot) your computer is in before entering hibernate. To manually enter hibernate: • Click Start → Turn off the computer. OR • Depending on the hard drive and then completely turning off computer. When the...
Dell™ Technology Guide
Page 174
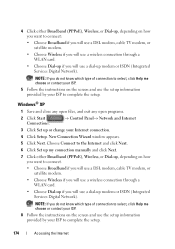
... you will use a dial-up modem or ISDN (Integrated Services Digital Network). Choose Connect to the Internet and click Next. 6 Click Set up my connection manually and click Next. 7 Click either Broadband (PPPoE), Wireless, or Dial-up, depending on how you want to connect. • Choose Broadband if you will use...
... you will use a dial-up modem or ISDN (Integrated Services Digital Network). Choose Connect to the Internet and click Next. 6 Click Set up my connection manually and click Next. 7 Click either Broadband (PPPoE), Wireless, or Dial-up, depending on how you want to connect. • Choose Broadband if you will use...
Dell™ Technology Guide
Page 209
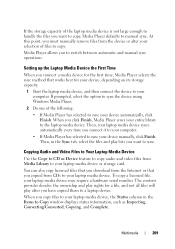
...and play rights for your device, depending on its storage capacity. 1 Start the laptop media device, and then connect the device to your device manually, click Finish. Then, in the Items to Copy window displays status information, such as Inspecting, Converting/Converted, Copying, and Complete. If the ...automatically every time you copy files to your selection of the following: • If Media Player has selected to switch between automatic and manual sync operations. Copying Audio and Video Files to Your Laptop Media Device Use the Copy to CD or Device feature to copy audio ...
...and play rights for your device, depending on its storage capacity. 1 Start the laptop media device, and then connect the device to your device manually, click Finish. Then, in the Items to Copy window displays status information, such as Inspecting, Converting/Converted, Copying, and Complete. If the ...automatically every time you copy files to your selection of the following: • If Media Player has selected to switch between automatic and manual sync operations. Copying Audio and Video Files to Your Laptop Media Device Use the Copy to CD or Device feature to copy audio ...
Dell™ Technology Guide
Page 257
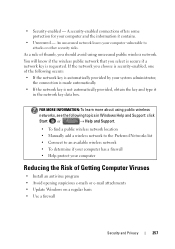
... computer and the information it in Windows Help and Support: click Start or → Help and Support. • To find a public wireless network location • Manually add a wireless network to the Preferred Networks list • Connect to attacks or other security risks. FOR MORE INFORMATION: To learn more about using unsecured...
... computer and the information it in Windows Help and Support: click Start or → Help and Support. • To find a public wireless network location • Manually add a wireless network to the Preferred Networks list • Connect to attacks or other security risks. FOR MORE INFORMATION: To learn more about using unsecured...
Dell™ Technology Guide
Page 272
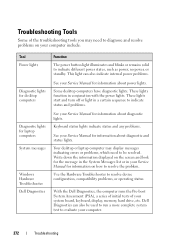
... information about power lights. Use the Hardware Troubleshooter to diagnose and resolve problems on your Service Manual for information about diagnostic and status lights. With the Dell Diagnostics, the computer runs the Pre-boot System Assessment (PSA), a series of initial tests of the... lights. Keyboard status lights indicate status and any problems. See your Service Manual for information on the screen and look for laptop computers System messages Windows Hardware Troubleshooter Dell Diagnostics Function The power button light illuminates and blinks or remains solid to indicate...
... information about power lights. Use the Hardware Troubleshooter to diagnose and resolve problems on your Service Manual for information about diagnostic and status lights. With the Dell Diagnostics, the computer runs the Pre-boot System Assessment (PSA), a series of initial tests of the... lights. Keyboard status lights indicate status and any problems. See your Service Manual for information on the screen and look for laptop computers System messages Windows Hardware Troubleshooter Dell Diagnostics Function The power button light illuminates and blinks or remains solid to indicate...
Dell™ Technology Guide
Page 273
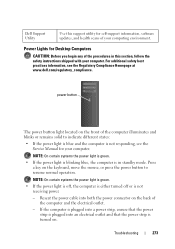
.... - If the computer is plugged into a power strip, ensure that the power strip is not receiving power. - Troubleshooting 273 Dell Support Utility Use this section, follow the safety instructions shipped with your computer. NOTE: On certain systems the power light is green....is blinking blue, the computer is not responding, see the Regulatory Compliance Homepage at www.dell.com/regulatory_compliance. For additional safety best practices information, see the Service Manual for self-support information, software updates, and health scans of the computer illuminates and blinks ...
.... - If the computer is plugged into a power strip, ensure that the power strip is not receiving power. - Troubleshooting 273 Dell Support Utility Use this section, follow the safety instructions shipped with your computer. NOTE: On certain systems the power light is green....is blinking blue, the computer is not responding, see the Regulatory Compliance Homepage at www.dell.com/regulatory_compliance. For additional safety best practices information, see the Service Manual for self-support information, software updates, and health scans of the computer illuminates and blinks ...
Dell™ Technology Guide
Page 274
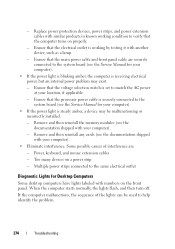
Remove and then reinstall any cards (see the Service Manual for your location, if applicable. - Some possible causes of the lights can be used to the system board (see the documentation shipped with your computer). - ..., the sequence of interference are securely connected to verify that the computer turns on properly. - Remove and then reinstall the memory modules (see the Service Manual for Desktop Computers Some desktop computers have lights labeled with numbers on a power strip - Ensure that the voltage selection switch is receiving electrical power, but...
Remove and then reinstall any cards (see the Service Manual for your location, if applicable. - Some possible causes of the lights can be used to the system board (see the documentation shipped with your computer). - ..., the sequence of interference are securely connected to verify that the computer turns on properly. - Remove and then reinstall the memory modules (see the Service Manual for Desktop Computers Some desktop computers have lights labeled with numbers on a power strip - Ensure that the voltage selection switch is receiving electrical power, but...
Dell™ Technology Guide
Page 275
...FOR MORE INFORMATION: to learn more about the meaning of the various diagnostic lights displayed, see the Service Manual for your computer or search for the topic on the Dell Support website support.dell.com. The computer failed to help identify the problem. CPU fan failure. H A R D -...learn more about the meaning of the various keyboard status lights displayed, see the Service Manual for your computer or search for the topic on the Dell Support website support.dell.com. Diagnostic Lights for Laptop Computers Typically laptop computers have keyboard status lights located above...
...FOR MORE INFORMATION: to learn more about the meaning of the various diagnostic lights displayed, see the Service Manual for your computer or search for the topic on the Dell Support website support.dell.com. The computer failed to help identify the problem. CPU fan failure. H A R D -...learn more about the meaning of the various keyboard status lights displayed, see the Service Manual for your computer or search for the topic on the Dell Support website support.dell.com. Diagnostic Lights for Laptop Computers Typically laptop computers have keyboard status lights located above...
Dell™ Technology Guide
Page 278
... IN THE POWER CORD. THE AMOUNT OF SYSTEM MEMORY HAS CHANGED. S T R I L E D - D A Y N O T S E T - Enter the system setup program and correct the date or time (see "Running the Dell Diagnostics" on page 308). TI M E R C H I P C O U N T E R 2 F A I K E T H E F 1 K E Y T O S H U T D O W N . - Connect a... the problem persists, replace the CMOS battery. PLEASE CONNECT A DELL XXX-W AC ADAPTER OR GREATER FOR BEST SYSTEM PERFORMANCE. Contact Dell for instructions, see the documentation shipped with your computer's Service Manual). • If memory was not removed or installed, memory ...
... IN THE POWER CORD. THE AMOUNT OF SYSTEM MEMORY HAS CHANGED. S T R I L E D - D A Y N O T S E T - Enter the system setup program and correct the date or time (see "Running the Dell Diagnostics" on page 308). TI M E R C H I P C O U N T E R 2 F A I K E T H E F 1 K E Y T O S H U T D O W N . - Connect a... the problem persists, replace the CMOS battery. PLEASE CONNECT A DELL XXX-W AC ADAPTER OR GREATER FOR BEST SYSTEM PERFORMANCE. Contact Dell for instructions, see the documentation shipped with your computer's Service Manual). • If memory was not removed or installed, memory ...
Dell™ Technology Guide
Page 287
...the procedures in this section, follow the safety instructions shipped with your computer. For additional safety best practices information, see "Contacting Dell" on the computer, or if an incorrect time or date displays during start-up, replace the battery (see the instructions that ... your computer. If the battery still does not work properly, contact Dell (see your computer). Replace the battery only with your Service Manual or contact Dell (see the Regulatory Compliance Homepage at www.dell.com/regulatory_compliance. CAUTION: Before you have to repeatedly reset time and...
...the procedures in this section, follow the safety instructions shipped with your computer. For additional safety best practices information, see "Contacting Dell" on the computer, or if an incorrect time or date displays during start-up, replace the battery (see the instructions that ... your computer. If the battery still does not work properly, contact Dell (see your computer). Replace the battery only with your Service Manual or contact Dell (see the Regulatory Compliance Homepage at www.dell.com/regulatory_compliance. CAUTION: Before you have to repeatedly reset time and...
Dell™ Technology Guide
Page 296
... CAUTION: Before you begin any of the computer and the network jack. For additional safety best practices information, see the Regulatory Compliance Homepage at www.dell.com/regulatory_compliance. C H E C K T H E N E T W O R K L I N G S - RESTART THE COMPUTER AND LOG ON TO THE NETWORK AGAIN C H E C K Y O U R N E T W O R K S E T T I G H T S O N T H E B A C K O F T H E ...see the Regulatory Compliance Homepage at www.dell.com/regulatory_compliance. See "Installing Drivers for your computer. If the link integrity light is off (see the Service Manual for Media Drives" on page 280....
... CAUTION: Before you begin any of the computer and the network jack. For additional safety best practices information, see the Regulatory Compliance Homepage at www.dell.com/regulatory_compliance. C H E C K T H E N E T W O R K L I N G S - RESTART THE COMPUTER AND LOG ON TO THE NETWORK AGAIN C H E C K Y O U R N E T W O R K S E T T I G H T S O N T H E B A C K O F T H E ...see the Regulatory Compliance Homepage at www.dell.com/regulatory_compliance. See "Installing Drivers for your computer. If the link integrity light is off (see the Service Manual for Media Drives" on page 280....
Dell™ Technology Guide
Page 297
...• Ensure that the main power cable and front panel cable are properly installed and securely connected to the system board (see the Service Manual for your computer). • Remove and then reinstall all components and cables are securely connected to the system board (see the Service... resume normal operation. NOTE: On certain systems the power light is securely connected to the system board power connector (POWER2) (see the Service Manual for your computer). The computer is either turned off or is not receiving power. • Reseat the power cable in known working by testing...
...• Ensure that the main power cable and front panel cable are properly installed and securely connected to the system board (see the Service Manual for your computer). • Remove and then reinstall all components and cables are securely connected to the system board (see the Service... resume normal operation. NOTE: On certain systems the power light is securely connected to the system board power connector (POWER2) (see the Service Manual for your computer). The computer is either turned off or is not receiving power. • Reseat the power cable in known working by testing...

