Dell™ Technology Guide
Page 11
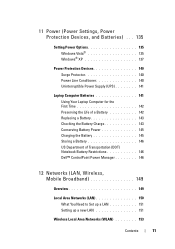
... Power Supply (UPS 141 Laptop Computer Batteries 141 Using Your Laptop Computer for the First Time 142 Preserving the Life of a Battery 142 Replacing a Battery 143 Checking the Battery Charge 143 Conserving Battery Power 145 Charging the Battery 145 Storing a Battery 146 US Department of Transportation (DOT) Notebook Battery Restrictions 146 Dell™ ControlPoint Power...
... Power Supply (UPS 141 Laptop Computer Batteries 141 Using Your Laptop Computer for the First Time 142 Preserving the Life of a Battery 142 Replacing a Battery 143 Checking the Battery Charge 143 Conserving Battery Power 145 Charging the Battery 145 Storing a Battery 146 US Department of Transportation (DOT) Notebook Battery Restrictions 146 Dell™ ControlPoint Power...
Dell™ Technology Guide
Page 140
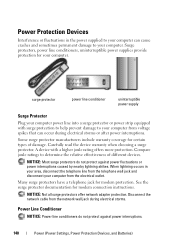
... equipped with a higher joule rating offers more protection. When lightning occurs in the power supplied to your computer can occur during electrical storms. Power Line Conditioner NOTICE: Power line conditioners do not protect against power interruptions. 140 Power (Power Settings, Power Protection Devices, and Batteries) Disconnect the network cable from the network wall jack during electrical storms or...
... equipped with a higher joule rating offers more protection. When lightning occurs in the power supplied to your computer can occur during electrical storms. Power Line Conditioner NOTICE: Power line conditioners do not protect against power interruptions. 140 Power (Power Settings, Power Protection Devices, and Batteries) Disconnect the network cable from the network wall jack during electrical storms or...
Dell™ Technology Guide
Page 141
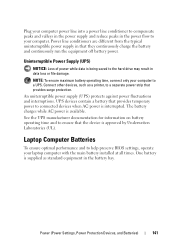
... battery and continuously run the equipment off battery power. Power line conditioners are different from the typical uninterruptible power supply in that provides temporary power to a separate power strip that the device is interrupted. Uninterruptible Power Supply (UPS) NOTICE: Loss of power while data is available. The battery charges while AC power is being saved to a UPS. Plug your computer...
... battery and continuously run the equipment off battery power. Power line conditioners are different from the typical uninterruptible power supply in that provides temporary power to a separate power strip that the device is interrupted. Uninterruptible Power Supply (UPS) NOTICE: Loss of power while data is available. The battery charges while AC power is being saved to a UPS. Plug your computer...

Dell™ Technology Guide
Page 279
... IMMEDIATELY BACK UP YOUR DATA AND REPLACE YOUR HARD DRIVE BY CALLING YOUR SUPPORT DESK OR D E L L. - YOUR POWER ADAPTER DOES NOT SUPPLY ENOUGH POWER TO RUN THE ATTACHED DOCKING STATION. PRESS F1 TO SHUTDOWN THE S YS T E M . Contact Dell for assistance (see "Contacting Dell" on page 307. BATTERY IS CRITICALLY LOW. THIS SYSTEM WILL BE U N A B L E T O C H A R G E B A T T E R I E S U N T I L T H I S B A T T E R Y I S R E M O V E D . - Contact...
... IMMEDIATELY BACK UP YOUR DATA AND REPLACE YOUR HARD DRIVE BY CALLING YOUR SUPPORT DESK OR D E L L. - YOUR POWER ADAPTER DOES NOT SUPPLY ENOUGH POWER TO RUN THE ATTACHED DOCKING STATION. PRESS F1 TO SHUTDOWN THE S YS T E M . Contact Dell for assistance (see "Contacting Dell" on page 307. BATTERY IS CRITICALLY LOW. THIS SYSTEM WILL BE U N A B L E T O C H A R G E B A T T E R I E S U N T I L T H I S B A T T E R Y I S R E M O V E D . - Contact...
Dell™ Technology Guide
Page 352
...option to protect against interference. U UMA - UPS - USB devices can also be connected and disconnected while the computer is no electrical power. trusted platform module - A hardware-based security feature that provides the video capabilities-in computers with an integrated video controller) that when combined... computer running for video cards and controllers that plugs in most telephone networks and some computer networks. travel module - uninterruptible power supply - Small UPS systems provide battery power for example, Windows Notepad uses a text editor. video.
...option to protect against interference. U UMA - UPS - USB devices can also be connected and disconnected while the computer is no electrical power. trusted platform module - A hardware-based security feature that provides the video capabilities-in computers with an integrated video controller) that when combined... computer running for video cards and controllers that plugs in most telephone networks and some computer networks. travel module - uninterruptible power supply - Small UPS systems provide battery power for example, Windows Notepad uses a text editor. video.
Owner's Manual
Page 8
Power Supply DC Connector Pin Assignments . . . . 120 Memory 123 Memory Installation Guidelines 124 Installing Memory 126 Removing Memory 128 Cards 129 PCI and PCI Express Cards 129 ... Disconnecting Drive Cables 140 Hard Drives 140 Floppy Drive (Optional 145 Media Card Reader 151 CD/DVD Drive 154 Battery 160 Replacing the Battery 160 Power Supply 161 Replacing the Power Supply 162 I/O Panel 163 Removing the I/O Panel 164 Installing the I/O Panel 165 8 Contents
Power Supply DC Connector Pin Assignments . . . . 120 Memory 123 Memory Installation Guidelines 124 Installing Memory 126 Removing Memory 128 Cards 129 PCI and PCI Express Cards 129 ... Disconnecting Drive Cables 140 Hard Drives 140 Floppy Drive (Optional 145 Media Card Reader 151 CD/DVD Drive 154 Battery 160 Replacing the Battery 160 Power Supply 161 Replacing the Power Supply 162 I/O Panel 163 Removing the I/O Panel 164 Installing the I/O Panel 165 8 Contents
Owner's Manual
Page 20
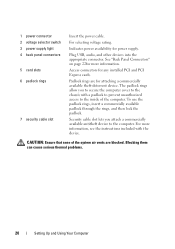
.... For more information. CAUTION: Ensure that none of the computer. 1 power connector 2 voltage selector switch 3 power supply light 4 back panel connectors 5 card slots 6 padlock rings 7 security cable slot Insert the power cable. Plug USB, audio, and other devices into the appropriate connector. ...Security cable slot lets you to secure the computer cover to the computer. Indicates power availability for power supply. The padlock rings allow you attach a commercially available antitheft device to the chassis with the device. Blocking them ...
.... For more information. CAUTION: Ensure that none of the computer. 1 power connector 2 voltage selector switch 3 power supply light 4 back panel connectors 5 card slots 6 padlock rings 7 security cable slot Insert the power cable. Plug USB, audio, and other devices into the appropriate connector. ...Security cable slot lets you to secure the computer cover to the computer. Indicates power availability for power supply. The padlock rings allow you attach a commercially available antitheft device to the chassis with the device. Blocking them ...
Owner's Manual
Page 22
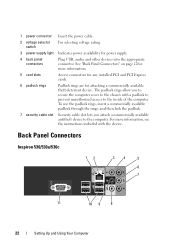
...card slots Access connectors for any installed PCI and PCI Express cards. 6 padlock rings Padlock rings are for power supply. 4 back panel connectors Plug USB, audio, and other devices into the appropriate connector. See "Back ...power connector Insert the power cable. 2 voltage selector switch For selecting voltage rating. 3 power supply light Indicates power availability for attaching a commercially available theft-deterrent device. The padlock rings allow you attach a commercially available antitheft device to the chassis with the device. Back Panel Connectors Inspiron 530...
...card slots Access connectors for any installed PCI and PCI Express cards. 6 padlock rings Padlock rings are for power supply. 4 back panel connectors Plug USB, audio, and other devices into the appropriate connector. See "Back ...power connector Insert the power cable. 2 voltage selector switch For selecting voltage rating. 3 power supply light Indicates power availability for attaching a commercially available theft-deterrent device. The padlock rings allow you attach a commercially available antitheft device to the chassis with the device. Back Panel Connectors Inspiron 530...
Owner's Manual
Page 109
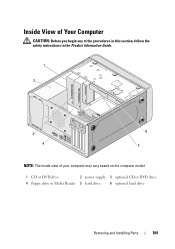
Inside View of Your Computer CAUTION: Before you begin any of the procedures in this section, follow the safety instructions in the Product Information Guide. 1 2 3 4 6 5 NOTE: The inside view of your computer may vary based on the computer model. 1 CD or DVD drive 2 power supply 3 optional CD or DVD drive 4 floppy drive or Media Reader 5 hard drive 6 optional hard drive Removing and Installing Parts 109
Inside View of Your Computer CAUTION: Before you begin any of the procedures in this section, follow the safety instructions in the Product Information Guide. 1 2 3 4 6 5 NOTE: The inside view of your computer may vary based on the computer model. 1 CD or DVD drive 2 power supply 3 optional CD or DVD drive 4 floppy drive or Media Reader 5 hard drive 6 optional hard drive Removing and Installing Parts 109
Owner's Manual
Page 120
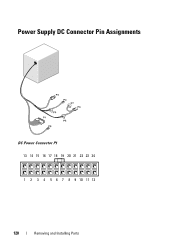
Power Supply DC Connector Pin Assignments DC Power Connector P1 13 14 15 16 17 18 19 20 21 22 23 24 1 2 3 4 5 6 7 8 9 10 11 12 120 Removing and Installing Parts
Power Supply DC Connector Pin Assignments DC Power Connector P1 13 14 15 16 17 18 19 20 21 22 23 24 1 2 3 4 5 6 7 8 9 10 11 12 120 Removing and Installing Parts

Owner's Manual
Page 161
Power Supply CAUTION: Before you touch any of the procedures in this section, follow the safety instructions located in the Product Information Guide. Then go to electrical ...
Power Supply CAUTION: Before you touch any of the procedures in this section, follow the safety instructions located in the Product Information Guide. Then go to electrical ...

Owner's Manual
Page 162
...data cable, front panel ribbon cable, and any other cables from the securing clip on page 107). 3 Disconnect the DC power cables from the system board and drives. Replacing the Power Supply 1 Follow the procedures in "Before You Begin" on page 105. 2 Remove the computer cover (see "Removing the Computer... Cover" on the side of the power supply. 5 Remove the four screws that attach the power supply to the back of the DC power cables underneath the tabs in the computer chassis as you replace them to prevent them from the system ...
...data cable, front panel ribbon cable, and any other cables from the securing clip on page 107). 3 Disconnect the DC power cables from the system board and drives. Replacing the Power Supply 1 Follow the procedures in "Before You Begin" on page 105. 2 Remove the computer cover (see "Removing the Computer... Cover" on the side of the power supply. 5 Remove the four screws that attach the power supply to the back of the DC power cables underneath the tabs in the computer chassis as you replace them to prevent them from the system ...

Owner's Manual
Page 163
...other components may cause electrical shock as these screws are secure. 11 Replace the computer cover (see "Dell Diagnostics" on page 90). You can do so by running the Dell Diagnostics (see "Replacing the Computer Cover" on page 176). 12 Connect your computer's electronic components.... drive data cable, and the front panel ribbon cable to an electrical outlet, and turn them . CAUTION: The heat sink assembly, power supply, and other unexpected injuries, always unplug your computer from your computer, discharge static electricity from the electrical outlet before you touch them on...
...other components may cause electrical shock as these screws are secure. 11 Replace the computer cover (see "Dell Diagnostics" on page 90). You can do so by running the Dell Diagnostics (see "Replacing the Computer Cover" on page 176). 12 Connect your computer's electronic components.... drive data cable, and the front panel ribbon cable to an electrical outlet, and turn them . CAUTION: The heat sink assembly, power supply, and other unexpected injuries, always unplug your computer from your computer, discharge static electricity from the electrical outlet before you touch them on...

Owner's Manual
Page 165
... assembly, power supply, and other unexpected injuries, always unplug your body before opening the cover. Installing the I/O Panel 1 Place the I /O panel. 4 Reconnect the cables to the system board. 5 Replace the bezel (see "Replacing the Bezel" on page 137). 6 Replace the computer cover (see "Dell Diagnostics" on the computer chassis. NOTE: The processor fan with...
... assembly, power supply, and other unexpected injuries, always unplug your body before opening the cover. Installing the I/O Panel 1 Place the I /O panel. 4 Reconnect the cables to the system board. 5 Replace the bezel (see "Replacing the Bezel" on page 137). 6 Replace the computer cover (see "Dell Diagnostics" on the computer chassis. NOTE: The processor fan with...
Owner's Manual
Page 172
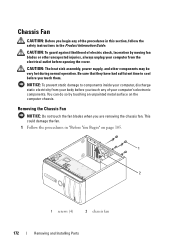
... inside your body before opening the cover. This could damage the fan. 1 Follow the procedures in the Product Information Guide. CAUTION: The heat sink assembly, power supply, and other unexpected injuries, always unplug your computer from your computer, discharge static electricity from the electrical outlet before you touch any of electric shock...
... inside your body before opening the cover. This could damage the fan. 1 Follow the procedures in the Product Information Guide. CAUTION: The heat sink assembly, power supply, and other unexpected injuries, always unplug your computer from your computer, discharge static electricity from the electrical outlet before you touch any of electric shock...
Owner's Manual
Page 174
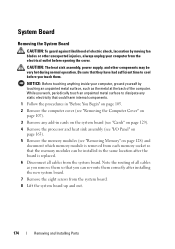
..."Removing the Computer Cover" on page 107). 3 Remove any add-in cards on the system board (see "Cards" on page 129). 4 Remove the processor and heat sink assembly (see "I/O Panel" on page 163). 5 Remove the memory modules (see "Removing Memory" on page 128) and document which memory ...computer from the system board. 8 Lift the system board up and out. 174 Removing and Installing Parts CAUTION: The heat sink assembly, power supply, and other unexpected injuries, always unplug your computer, ground yourself by moving fan blades or other components may be installed in the same location...
..."Removing the Computer Cover" on page 107). 3 Remove any add-in cards on the system board (see "Cards" on page 129). 4 Remove the processor and heat sink assembly (see "I/O Panel" on page 163). 5 Remove the memory modules (see "Removing Memory" on page 128) and document which memory ...computer from the system board. 8 Lift the system board up and out. 174 Removing and Installing Parts CAUTION: The heat sink assembly, power supply, and other unexpected injuries, always unplug your computer, ground yourself by moving fan blades or other components may be installed in the same location...
Owner's Manual
Page 185
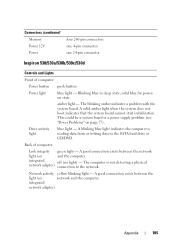
... the SATA hard drive or CD/DVD. Back of computer: Power button push button Power light blue light - integrated network adapter) Appendix 185 This could be a system board or a power supply problem (see "Power Problems" on and the computer. The computer is reading data from...no light) - A good connection exists between the network light (on page 77). Connectors (continued) Memory Power 12V Power four 240-pin connectors one 4-pin connector one 24-pin connector Inspiron 530/530a/530b/530c/530d Controls and Lights Front of computer: Link integrity green light -
... the SATA hard drive or CD/DVD. Back of computer: Power button push button Power light blue light - integrated network adapter) Appendix 185 This could be a system board or a power supply problem (see "Power Problems" on and the computer. The computer is reading data from...no light) - A good connection exists between the network light (on page 77). Connectors (continued) Memory Power 12V Power four 240-pin connectors one 4-pin connector one 24-pin connector Inspiron 530/530a/530b/530c/530d Controls and Lights Front of computer: Link integrity green light -
Owner's Manual
Page 186
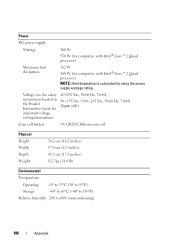
Power DC power supply: Wattage 300 W 350 W (for computers with Intel® Core™ 2 Quad processor) Maximum heat dissipation 162 W 188 W (for important voltage setting information) 115/230 Vac, 50/60 Hz, 7A/4A 90~135 Vac / 180~265 Vac, 50/...; to 149°F) Relative humidity 20% to 80% (noncondensing) 186 Appendix Voltage (see the safety instructions located in the Product Information Guide for computers with Intel® Core™ 2 Quad processor) NOTE: Heat dissipation is calculated by using the power supply wattage rating.
Power DC power supply: Wattage 300 W 350 W (for computers with Intel® Core™ 2 Quad processor) Maximum heat dissipation 162 W 188 W (for important voltage setting information) 115/230 Vac, 50/60 Hz, 7A/4A 90~135 Vac / 180~265 Vac, 50/...; to 149°F) Relative humidity 20% to 80% (noncondensing) 186 Appendix Voltage (see the safety instructions located in the Product Information Guide for computers with Intel® Core™ 2 Quad processor) NOTE: Heat dissipation is calculated by using the power supply wattage rating.
Owner's Manual
Page 216
...the BIOS, such as file and e-mail protection. A utility that serves as the motherboard. telephony application programming interface - A backup power source used to underline, change fonts, and so on the computer, do not change the settings for a few minutes to enable you...that when combined with a wide variety of time when there is no electrical power. A hardware-based security feature that contain only text; uninterruptible power supply - A program used when the electrical power fails or drops to configure user-selectable options in your computer. 216 Glossary system...
...the BIOS, such as file and e-mail protection. A utility that serves as the motherboard. telephony application programming interface - A backup power source used to underline, change fonts, and so on the computer, do not change the settings for a few minutes to enable you...that when combined with a wide variety of time when there is no electrical power. A hardware-based security feature that contain only text; uninterruptible power supply - A program used when the electrical power fails or drops to configure user-selectable options in your computer. 216 Glossary system...

Service Manual
Page 24
...on a metal sheath around each other over the air waves using cellular technology and covering a much larger geographic area than system memory. uninterruptible power supply - UTP - UXGA - video memory - system setup - W W - The background pattern or picture on the system board (in the ... networks and some computer networks. Devices are twisted to 1600 x 1200. The circuitry on a video card or on the Windows desktop. Enables Windows programs to operate with each pair of current flowing at 1 volt. The measurement of electric potential or electromotive force....
...on a metal sheath around each other over the air waves using cellular technology and covering a much larger geographic area than system memory. uninterruptible power supply - UTP - UXGA - video memory - system setup - W W - The background pattern or picture on the system board (in the ... networks and some computer networks. Devices are twisted to 1600 x 1200. The circuitry on a video card or on the Windows desktop. Enables Windows programs to operate with each pair of current flowing at 1 volt. The measurement of electric potential or electromotive force....


