Owners Manual
Page 7
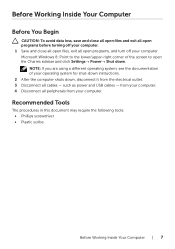
.... Before Working Inside Your Computer Before You Begin CAUTION: To avoid data loss, save and close all open files and exit all open programs before turning off your computer. 1 Save and close all open files, exit all peripherals from your computer. such as power and USB cables - Microsoft Windows 8: Point to...
.... Before Working Inside Your Computer Before You Begin CAUTION: To avoid data loss, save and close all open files and exit all open programs before turning off your computer. 1 Save and close all open files, exit all peripherals from your computer. such as power and USB cables - Microsoft Windows 8: Point to...
Owners Manual
Page 9
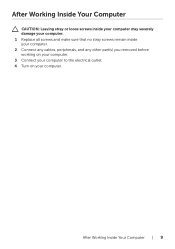
After Working Inside Your Computer | 9 After Working Inside Your Computer CAUTION: Leaving stray or loose screws inside your computer may severely damage your computer. 1 Replace all screws and make sure that no stray screws remain inside your computer. 2 Connect any cables, peripherals, and any other part(s) you removed before working on your computer. 3 Connect your computer to the electrical outlet. 4 Turn on your computer.
After Working Inside Your Computer | 9 After Working Inside Your Computer CAUTION: Leaving stray or loose screws inside your computer may severely damage your computer. 1 Replace all screws and make sure that no stray screws remain inside your computer. 2 Connect any cables, peripherals, and any other part(s) you removed before working on your computer. 3 Connect your computer to the electrical outlet. 4 Turn on your computer.
Owners Manual
Page 10
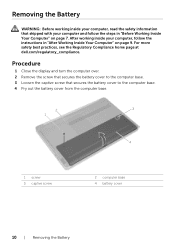
Procedure 1 Close the display and turn the computer over. 2 Remove the screw that secures the battery cover to the computer base. 3 Loosen the captive screw that shipped with your computer and .... 12 32 1 4 1 screw 3 captive screw 2 computer base 4 battery cover 10 | Removing the Battery For more safety best practices, see the Regulatory Compliance home page at dell.com/regulatory_compliance.
Procedure 1 Close the display and turn the computer over. 2 Remove the screw that secures the battery cover to the computer base. 3 Loosen the captive screw that shipped with your computer and .... 12 32 1 4 1 screw 3 captive screw 2 computer base 4 battery cover 10 | Removing the Battery For more safety best practices, see the Regulatory Compliance home page at dell.com/regulatory_compliance.

Owners Manual
Page 24
3 Turn the computer over. 4 Using a plastic scribe, gently release the keyboard from the tabs on the palm-rest assembly. 1 2 3 4 1 tabs (5) 3 palm rest 2 plastic scribe 4 keyboard 24 | Removing the Keyboard
3 Turn the computer over. 4 Using a plastic scribe, gently release the keyboard from the tabs on the palm-rest assembly. 1 2 3 4 1 tabs (5) 3 palm rest 2 plastic scribe 4 keyboard 24 | Removing the Keyboard

Owners Manual
Page 25
5 Carefully turn the keyboard over and place it on the palm rest. 6 Lift the latch and disconnect the keyboard cable from the system board. 7 Lift the latch and disconnect the keyboard-backlight cable from the system board. 8 Lift the keyboard off the palm rest. 1 2 3 4 1 keyboard cable 3 keyboard-backlight cable 5 keyboard 5 2 latches (2) 4 palm rest Removing the Keyboard | 25
5 Carefully turn the keyboard over and place it on the palm rest. 6 Lift the latch and disconnect the keyboard cable from the system board. 7 Lift the latch and disconnect the keyboard-backlight cable from the system board. 8 Lift the keyboard off the palm rest. 1 2 3 4 1 keyboard cable 3 keyboard-backlight cable 5 keyboard 5 2 latches (2) 4 palm rest Removing the Keyboard | 25
Owners Manual
Page 26
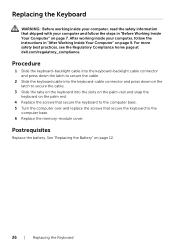
See "Replacing the Battery" on the palm rest. 4 Replace the screws that secure the keyboard to the computer base. 5 Turn the computer over and replace the screws that shipped with your computer and follow the instructions in "Before Working Inside Your Computer" ...on page 9. For more safety best practices, see the Regulatory Compliance home page at dell.com/regulatory_compliance. Procedure 1 Slide the keyboard-backlight cable into the keyboard-backlight cable connector and press down the latch to secure the cable. 2...
See "Replacing the Battery" on the palm rest. 4 Replace the screws that secure the keyboard to the computer base. 5 Turn the computer over and replace the screws that shipped with your computer and follow the instructions in "Before Working Inside Your Computer" ...on page 9. For more safety best practices, see the Regulatory Compliance home page at dell.com/regulatory_compliance. Procedure 1 Slide the keyboard-backlight cable into the keyboard-backlight cable connector and press down the latch to secure the cable. 2...

Owners Manual
Page 28
2 Turn the computer over and remove the screws that secure the base cover to the computer base. 1 2 1 screws (8) 2 base cover 3 Pry the base cover away from the computer base. 1 2 1 base cover 2 plastic scribe 28 | Removing the Base Cover
2 Turn the computer over and remove the screws that secure the base cover to the computer base. 1 2 1 screws (8) 2 base cover 3 Pry the base cover away from the computer base. 1 2 1 base cover 2 plastic scribe 28 | Removing the Base Cover
Owners Manual
Page 37
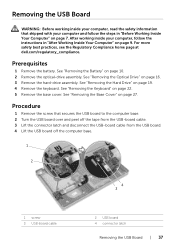
...assembly. Procedure 1 Remove the screw that shipped with your computer, read the safety information that secures the USB board to the computer base. 2 Turn the USB board over and peel off the tape from the USB-board cable. 3 Lift the connector latch and disconnect the USB-board cable from... USB Board | 37 See "Removing the Hard Drive" on page 9. For more safety best practices, see the Regulatory Compliance home page at dell.com/regulatory_compliance. After working inside your computer, follow the steps in "After Working Inside Your Computer" on page 19. 4 Remove the keyboard.
...assembly. Procedure 1 Remove the screw that shipped with your computer, read the safety information that secures the USB board to the computer base. 2 Turn the USB board over and peel off the tape from the USB-board cable. 3 Lift the connector latch and disconnect the USB-board cable from... USB Board | 37 See "Removing the Hard Drive" on page 9. For more safety best practices, see the Regulatory Compliance home page at dell.com/regulatory_compliance. After working inside your computer, follow the steps in "After Working Inside Your Computer" on page 19. 4 Remove the keyboard.

Owners Manual
Page 42
Procedure 1 Turn the computer over, and open the display . 2 Lift the latch and disconnect the status-light cable.. 3 Lift the latch and disconnect the touchpad cable. 4 Lift the latch and disconnect the power-button cable. 2 3 1 1 power-button cable 3 touchpad cable 2 status-light cable 42 | Removing the System Board
Procedure 1 Turn the computer over, and open the display . 2 Lift the latch and disconnect the status-light cable.. 3 Lift the latch and disconnect the touchpad cable. 4 Lift the latch and disconnect the power-button cable. 2 3 1 1 power-button cable 3 touchpad cable 2 status-light cable 42 | Removing the System Board

Owners Manual
Page 43
5 Turn the computer over. 6 Peel off the tape from the USB-board cable. 7 Lift the connector latch and, using the pull-tab, disconnect the USB-board cable from the system board. 8 Disconnect the speaker cable from the system board. 9 Disconnect the hard-drive cable from the system board. 10 Disconnect the power-adapter port cable from the system board. 11 Disconnect the camera cable from the system board. 1 6 5 1 power-adapter port cable 3 latch 5 hard-drive cable 3 2 4 2 speaker cable 4 USB-board cable 6 camera cable Removing the System Board | 43
5 Turn the computer over. 6 Peel off the tape from the USB-board cable. 7 Lift the connector latch and, using the pull-tab, disconnect the USB-board cable from the system board. 8 Disconnect the speaker cable from the system board. 9 Disconnect the hard-drive cable from the system board. 10 Disconnect the power-adapter port cable from the system board. 11 Disconnect the camera cable from the system board. 1 6 5 1 power-adapter port cable 3 latch 5 hard-drive cable 3 2 4 2 speaker cable 4 USB-board cable 6 camera cable Removing the System Board | 43
Owners Manual
Page 45
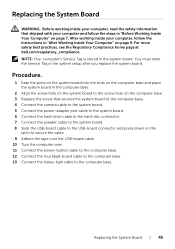
For more safety best practices, see the Regulatory Compliance home page at dell.com/regulatory_compliance. You must enter the Service Tag in the system board. Replacing the System Board | 45 Procedure. 1 Ease the ports on the system board ..., follow the steps in "Before Working Inside Your Computer" on the latch to secure the cable. 9 Adhere the tape over the USB-board cable. 10 Turn the computer over. 11 Connect the power-button cable to the computer base. 12 Connect the touchpad-board cable to the computer base. 13 Connect...
For more safety best practices, see the Regulatory Compliance home page at dell.com/regulatory_compliance. You must enter the Service Tag in the system board. Replacing the System Board | 45 Procedure. 1 Ease the ports on the system board ..., follow the steps in "Before Working Inside Your Computer" on the latch to secure the cable. 9 Adhere the tape over the USB-board cable. 10 Turn the computer over. 11 Connect the power-button cable to the computer base. 12 Connect the touchpad-board cable to the computer base. 13 Connect...
Owners Manual
Page 60
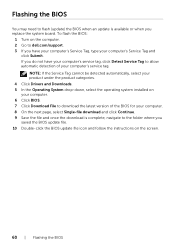
... Download File to download the latest version of your computer's service tag. If you replace the system board. Flashing the BIOS You may need to dell.com/support. 3 If you have your computer's service tag, click Detect Service Tag to the folder where you saved the BIOS update file. 10 Double... download is available or when you do not have your computer's Service Tag, type your computer's Service Tag and click Submit. To flash the BIOS: 1 Turn on the screen. 60 | Flashing the BIOS
... Download File to download the latest version of your computer's service tag. If you replace the system board. Flashing the BIOS You may need to dell.com/support. 3 If you have your computer's service tag, click Detect Service Tag to the folder where you saved the BIOS update file. 10 Double... download is available or when you do not have your computer's Service Tag, type your computer's Service Tag and click Submit. To flash the BIOS: 1 Turn on the screen. 60 | Flashing the BIOS


