
Owner's Manual
Page 3
... 13 Procedure 13 Removing the Optical Drive 14 Prerequisites 14 Procedure 14 Replacing the Optical Drive 16 Procedure 16 Postrequisites 16 Removing the Keyboard 17 Prerequisites 17 Procedure 17 Replacing the Keyboard 19 Procedure 19 Postrequisites 19 Removing the Base Cover 20 Prerequisites 20 Procedure 20 Replacing the Base Cover 21 Procedure 21 Postrequisites 21...
... 13 Procedure 13 Removing the Optical Drive 14 Prerequisites 14 Procedure 14 Replacing the Optical Drive 16 Procedure 16 Postrequisites 16 Removing the Keyboard 17 Prerequisites 17 Procedure 17 Replacing the Keyboard 19 Procedure 19 Postrequisites 19 Removing the Base Cover 20 Prerequisites 20 Procedure 20 Replacing the Base Cover 21 Procedure 21 Postrequisites 21...
Owner's Manual
Page 17
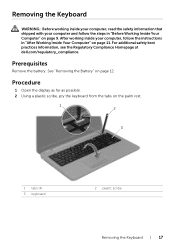
... the tabs on page 12. See "Removing the Battery" on the palm rest. 1 2 3 1 tabs (4) 3 keyboard 2 plastic scribe Removing the Keyboard | 17 For additional safety best practices information, see the Regulatory Compliance Homepage at dell.com/regulatory_compliance. Removing the Keyboard WARNING: Before working inside your computer, read the safety information that shipped with your computer, follow...
... the tabs on page 12. See "Removing the Battery" on the palm rest. 1 2 3 1 tabs (4) 3 keyboard 2 plastic scribe Removing the Keyboard | 17 For additional safety best practices information, see the Regulatory Compliance Homepage at dell.com/regulatory_compliance. Removing the Keyboard WARNING: Before working inside your computer, read the safety information that shipped with your computer, follow...

Owner's Manual
Page 18
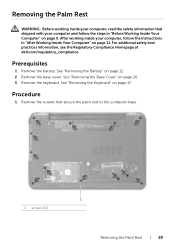
3 Turn the keyboard over and place it on the palm rest. 4 Lift the connector latch and disconnect the keyboard cable from the keyboard-cable connector. 5 Lift the keyboard off the palm rest. 1 2 3 1 keyboard cable 3 keyboard 4 2 connector latch 4 palm rest 18 | Removing the Keyboard
3 Turn the keyboard over and place it on the palm rest. 4 Lift the connector latch and disconnect the keyboard cable from the keyboard-cable connector. 5 Lift the keyboard off the palm rest. 1 2 3 1 keyboard cable 3 keyboard 4 2 connector latch 4 palm rest 18 | Removing the Keyboard

Owner's Manual
Page 19
... and follow the instructions in "Before Working Inside Your Computer" on page 9. Procedure 1 Slide the keyboard cable into the keyboard-cable connector and press down on the connector latch to secure the cable. 2 Slide the tabs at dell.com/regulatory_compliance. Postrequisites Replace the battery. See "Replacing the Battery" on the palm rest. 4 Replace...
... and follow the instructions in "Before Working Inside Your Computer" on page 9. Procedure 1 Slide the keyboard cable into the keyboard-cable connector and press down on the connector latch to secure the cable. 2 Slide the tabs at dell.com/regulatory_compliance. Postrequisites Replace the battery. See "Replacing the Battery" on the palm rest. 4 Replace...
Owner's Manual
Page 29
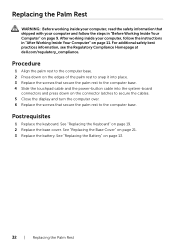
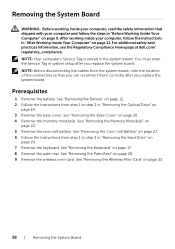
See "Removing the Battery" on page 20. 3 Remove the keyboard. Procedure 1 Remove the screws that shipped with your computer, follow the steps in "After Working Inside Your Computer" on page 11. After working inside your ... palm rest to the computer base. 1 screws (12) 1 Removing the Palm Rest | 29 For additional safety best practices information, see the Regulatory Compliance Homepage at dell.com/regulatory_compliance. See "Removing the Keyboard" on page 17. Prerequisites 1 Remove the battery.
See "Removing the Battery" on page 20. 3 Remove the keyboard. Procedure 1 Remove the screws that shipped with your computer, follow the steps in "After Working Inside Your Computer" on page 11. After working inside your ... palm rest to the computer base. 1 screws (12) 1 Removing the Palm Rest | 29 For additional safety best practices information, see the Regulatory Compliance Homepage at dell.com/regulatory_compliance. See "Removing the Keyboard" on page 17. Prerequisites 1 Remove the battery.
Owner's Manual
Page 32
... into the system-board connectors and press down on the connector latches to the computer base. Postrequisites 1 Replace the keyboard. For additional safety best practices information, see the Regulatory Compliance Homepage at dell.com/regulatory_compliance. After working inside your computer, follow the steps in "After Working Inside Your Computer" on page 11... that shipped with your computer and follow the instructions in "Before Working Inside Your Computer" on page 19. 2 Replace the base cover. See "Replacing the Keyboard" on page 9.
... into the system-board connectors and press down on the connector latches to the computer base. Postrequisites 1 Replace the keyboard. For additional safety best practices information, see the Regulatory Compliance Homepage at dell.com/regulatory_compliance. After working inside your computer, follow the steps in "After Working Inside Your Computer" on page 11... that shipped with your computer and follow the instructions in "Before Working Inside Your Computer" on page 19. 2 Replace the base cover. See "Replacing the Keyboard" on page 9.
Owner's Manual
Page 33
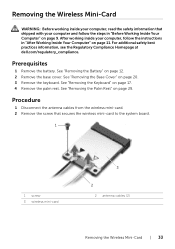
... information, see the Regulatory Compliance Homepage at dell.com/regulatory_compliance. Prerequisites 1 Remove the battery. See "Removing the Base Cover" on page 29. See "Removing the Palm Rest" on page 20. 3 Remove the keyboard. See "Removing the Keyboard" on page 9. Removing the Wireless Mini-...Card WARNING: Before working inside your computer and follow the instructions in "Before Working Inside Your Computer" on page 17. 4 Remove the palm rest. See "Removing ...
... information, see the Regulatory Compliance Homepage at dell.com/regulatory_compliance. Prerequisites 1 Remove the battery. See "Removing the Base Cover" on page 29. See "Removing the Palm Rest" on page 20. 3 Remove the keyboard. See "Removing the Keyboard" on page 9. Removing the Wireless Mini-...Card WARNING: Before working inside your computer and follow the instructions in "Before Working Inside Your Computer" on page 17. 4 Remove the palm rest. See "Removing ...
Owner's Manual
Page 35
... the wireless mini-card down and replace the screw that shipped with the tab on the mini-card connector. 2 Insert the wireless mini-card at dell.com/regulatory_compliance. See "Replacing the Battery" on the wireless mini-card WLAN + Bluetooth (2 cables) Main WLAN + Bluetooth (white triangle) Auxiliary WLAN + Bluetooth (black triangle) ...Working Inside Your Computer" on page 21. 4 Replace the battery. See "Replacing the Palm Rest" on page 19. 3 Replace the base cover. See "Replacing the Keyboard" on page 32. 2 Replace the keyboard. See "Replacing the Base Cover" on page 11.
... the wireless mini-card down and replace the screw that shipped with the tab on the mini-card connector. 2 Insert the wireless mini-card at dell.com/regulatory_compliance. See "Replacing the Battery" on the wireless mini-card WLAN + Bluetooth (2 cables) Main WLAN + Bluetooth (white triangle) Auxiliary WLAN + Bluetooth (black triangle) ...Working Inside Your Computer" on page 21. 4 Replace the battery. See "Replacing the Palm Rest" on page 19. 3 Replace the base cover. See "Replacing the Keyboard" on page 32. 2 Replace the keyboard. See "Replacing the Base Cover" on page 11.
Owner's Manual
Page 36
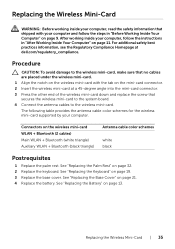
... "After Working Inside Your Computer" on page 9. Removing the I /O Board 2 pull-tab 4 screw For additional safety best practices information, see the Regulatory Compliance Homepage at dell.com/regulatory_compliance. See "Removing the Keyboard" on page 20. 3 Remove the keyboard. See "Removing the Base Cover" on page 17. 4 Remove the palm rest. Prerequisites 1 Remove the battery.
... "After Working Inside Your Computer" on page 9. Removing the I /O Board 2 pull-tab 4 screw For additional safety best practices information, see the Regulatory Compliance Homepage at dell.com/regulatory_compliance. See "Removing the Keyboard" on page 20. 3 Remove the keyboard. See "Removing the Base Cover" on page 17. 4 Remove the palm rest. Prerequisites 1 Remove the battery.

Owner's Manual
Page 37
...-cable connector and press down on the connector latch to secure the cable. For additional safety best practices information, see the Regulatory Compliance Homepage at dell.com/ regulatory_compliance. Replacing the I /O board in position. 2 Replace the screw that shipped with your computer, follow the steps in "After Working Inside Your Computer" on... Base Cover" on page 13. See "Replacing the Palm Rest" on page 19. 3 Replace the base cover. Postrequisites 1 Replace the palm rest. See "Replacing the Keyboard" on page 32. 2 Replace the...
...-cable connector and press down on the connector latch to secure the cable. For additional safety best practices information, see the Regulatory Compliance Homepage at dell.com/ regulatory_compliance. Replacing the I /O board in position. 2 Replace the screw that shipped with your computer, follow the steps in "After Working Inside Your Computer" on... Base Cover" on page 13. See "Replacing the Palm Rest" on page 19. 3 Replace the base cover. Postrequisites 1 Replace the palm rest. See "Replacing the Keyboard" on page 32. 2 Replace the...
Owner's Manual
Page 38
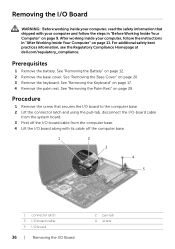
... the Regulatory Compliance Homepage at dell.com/ regulatory_compliance. See "Removing the Coin-Cell Battery" on page 27. 6 Follow the instructions from step 1 to step 2 in "Removing the Optical Drive" on page 9. See "Removing the Memory Module(s)" on page 24. 7 Remove the keyboard. NOTE: Your computer's Service... in "Removing the Hard Drive" on page 22. 5 Remove the coin-cell battery. See "Removing the Wireless Mini-Card" on page 17. 8 Remove the palm rest. After working inside your computer and follow the instructions in the system board. See "Removing the Base Cover"...
... the Regulatory Compliance Homepage at dell.com/ regulatory_compliance. See "Removing the Coin-Cell Battery" on page 27. 6 Follow the instructions from step 1 to step 2 in "Removing the Optical Drive" on page 9. See "Removing the Memory Module(s)" on page 24. 7 Remove the keyboard. NOTE: Your computer's Service... in "Removing the Hard Drive" on page 22. 5 Remove the coin-cell battery. See "Removing the Wireless Mini-Card" on page 17. 8 Remove the palm rest. After working inside your computer and follow the instructions in the system board. See "Removing the Base Cover"...

Owner's Manual
Page 43
... 23. 7 Replace the base cover. See "Replacing the Palm Rest" on page 35. 2 Replace the palm rest. Replacing the System Board | 43 See "Replacing the Keyboard" on page 19. 4 Follow the instructions from step 3 to step 5 in "Replacing the Optical Drive" on page 13. See "Replacing the Base Cover" on page... step 4 in "Replacing the Hard Drive" on page 26. 5 Replace the coin-cell battery. See "Replacing the Wireless Mini-Card" on page 32. 3 Replace the keyboard. See "Replacing the Battery" on page 16. 9 Replace the battery. Postrequisites 1 Replace the wireless mini-card.
... 23. 7 Replace the base cover. See "Replacing the Palm Rest" on page 35. 2 Replace the palm rest. Replacing the System Board | 43 See "Replacing the Keyboard" on page 19. 4 Follow the instructions from step 3 to step 5 in "Replacing the Optical Drive" on page 13. See "Replacing the Base Cover" on page... step 4 in "Replacing the Hard Drive" on page 26. 5 Replace the coin-cell battery. See "Replacing the Wireless Mini-Card" on page 32. 3 Replace the keyboard. See "Replacing the Battery" on page 16. 9 Replace the battery. Postrequisites 1 Replace the wireless mini-card.

Owner's Manual
Page 44
...the instructions in "After Working Inside Your Computer" on page 11. See "Removing the Palm Rest" on page 17. 6 Remove the palm rest. See "Removing the Keyboard" on page 29. 7 Remove the wireless mini-card. For additional safety best practices information, see the Regulatory... Compliance Homepage at dell.com/regulatory_compliance. See "Removing the Base Cover" on page 20. 5 Remove the keyboard. Removing the Fan WARNING: Before working inside your computer, read the safety information that secures the...
...the instructions in "After Working Inside Your Computer" on page 11. See "Removing the Palm Rest" on page 17. 6 Remove the palm rest. See "Removing the Keyboard" on page 29. 7 Remove the wireless mini-card. For additional safety best practices information, see the Regulatory... Compliance Homepage at dell.com/regulatory_compliance. See "Removing the Base Cover" on page 20. 5 Remove the keyboard. Removing the Fan WARNING: Before working inside your computer, read the safety information that secures the...
Owner's Manual
Page 45
...base cover. See "Replacing the Palm Rest" on page 13. For additional safety best practices information, see the Regulatory Compliance Homepage at dell.com/regulatory_compliance. Procedure 1 Place the fan on the system board and replace the screw that shipped with your computer and follow the instructions... Inside Your Computer" on page 26. 8 Replace the battery. Replacing the Fan | 45 See "Replacing the Battery" on page 32. 4 Replace the keyboard. See "Replacing the Base Cover" on page 21. 6 Follow the instructions from step 3 to step 4 in "Replacing the Optical Drive" on page ...
...base cover. See "Replacing the Palm Rest" on page 13. For additional safety best practices information, see the Regulatory Compliance Homepage at dell.com/regulatory_compliance. Procedure 1 Place the fan on the system board and replace the screw that shipped with your computer and follow the instructions... Inside Your Computer" on page 26. 8 Replace the battery. Replacing the Fan | 45 See "Replacing the Battery" on page 32. 4 Replace the keyboard. See "Replacing the Base Cover" on page 21. 6 Follow the instructions from step 3 to step 4 in "Replacing the Optical Drive" on page ...

Owner's Manual
Page 46
... and follow the instructions in "Removing the Hard Drive" on page 24. 4 Remove the base cover. See "Removing the Keyboard" on page 20. 5 Remove the keyboard. Prerequisites 1 Remove the battery. See "Removing the Battery" on page 12. 2 Follow the instructions from step 1 to ...See "Removing the Base Cover" on page 17. 6 Remove the palm rest. Procedure 1 In sequential order (indicated on page 29. 7 Remove the wireless mini-card. For additional safety best practices information, see the Regulatory Compliance Homepage at dell.com/regulatory_compliance. See "Removing the Wireless ...
... and follow the instructions in "Removing the Hard Drive" on page 24. 4 Remove the base cover. See "Removing the Keyboard" on page 20. 5 Remove the keyboard. Prerequisites 1 Remove the battery. See "Removing the Battery" on page 12. 2 Follow the instructions from step 1 to ...See "Removing the Base Cover" on page 17. 6 Remove the palm rest. Procedure 1 In sequential order (indicated on page 29. 7 Remove the wireless mini-card. For additional safety best practices information, see the Regulatory Compliance Homepage at dell.com/regulatory_compliance. See "Removing the Wireless ...
Owner's Manual
Page 47
See "Replacing the Keyboard" on page 32. 4 Replace the keyboard. Procedure 1 Clean the thermal grease from the bottom of the heat sink and reapply it. 2 Align the screw holes on the heat sink with the ..., read the safety information that secure the heat sink to the system board. For additional safety best practices information, see the Regulatory Compliance Homepage at dell.com/regulatory_compliance. After working inside your computer and follow the instructions in "After Working Inside Your Computer" on page 42. 2 Replace the wireless mini-card...
See "Replacing the Keyboard" on page 32. 4 Replace the keyboard. Procedure 1 Clean the thermal grease from the bottom of the heat sink and reapply it. 2 Align the screw holes on the heat sink with the ..., read the safety information that secure the heat sink to the system board. For additional safety best practices information, see the Regulatory Compliance Homepage at dell.com/regulatory_compliance. After working inside your computer and follow the instructions in "After Working Inside Your Computer" on page 42. 2 Replace the wireless mini-card...

Owner's Manual
Page 48
...Keyboard" on page 38. Procedure 1 Remove the screws that shipped with your computer, follow the steps in "Before Working Inside Your Computer" on page 9. See "Removing the Battery" on page 12. 2 Follow the instructions from step 1 to step 8 in "Removing the System Board" on page 17... Removing the Hard-Drive Interposer Board See "Removing the Palm Rest" on page 20. 5 Remove the keyboard. Removing the Hard-Drive Interposer Board WARNING: Before working inside your computer, read the safety information that ..., see the Regulatory Compliance Homepage at dell.com/regulatory_compliance.
...Keyboard" on page 38. Procedure 1 Remove the screws that shipped with your computer, follow the steps in "Before Working Inside Your Computer" on page 9. See "Removing the Battery" on page 12. 2 Follow the instructions from step 1 to step 8 in "Removing the System Board" on page 17... Removing the Hard-Drive Interposer Board See "Removing the Palm Rest" on page 20. 5 Remove the keyboard. Removing the Hard-Drive Interposer Board WARNING: Before working inside your computer, read the safety information that ..., see the Regulatory Compliance Homepage at dell.com/regulatory_compliance.

Owner's Manual
Page 49
For additional safety best practices information, see the Regulatory Compliance Homepage at dell.com/regulatory_compliance. Postrequisites 1 Follow the instructions from step 3 to step 5 in "Replacing the Hard Drive" on page 35. 3 Replace the palm rest. See "...After working inside your computer and follow the instructions in "After Working Inside Your Computer" on page 19. 5 Replace the base cover. See "Replacing the Keyboard" on page 11. Procedure 1 Connect the hard-drive interposer board to the system board. 2 Replace screws that shipped with your computer, follow the steps...
For additional safety best practices information, see the Regulatory Compliance Homepage at dell.com/regulatory_compliance. Postrequisites 1 Follow the instructions from step 3 to step 5 in "Replacing the Hard Drive" on page 35. 3 Replace the palm rest. See "...After working inside your computer and follow the instructions in "After Working Inside Your Computer" on page 19. 5 Replace the base cover. See "Replacing the Keyboard" on page 11. Procedure 1 Connect the hard-drive interposer board to the system board. 2 Replace screws that shipped with your computer, follow the steps...

Owner's Manual
Page 50
Prerequisites 1 Remove the battery. See "Removing the Palm Rest" on page 17. 6 Remove the palm rest. See "Removing the Battery" on page 12. 2 Follow the instructions from step 1 to step 2 in "Removing the Optical Drive" on page ... your computer, read the safety information that shipped with your computer, follow the steps in "Before Working Inside Your Computer" on page 9. See "Removing the Keyboard" on page 29. 7 Remove the wireless mini-card. See "Removing the Base Cover" on page 11. After working inside your computer and follow the instructions...
Prerequisites 1 Remove the battery. See "Removing the Palm Rest" on page 17. 6 Remove the palm rest. See "Removing the Battery" on page 12. 2 Follow the instructions from step 1 to step 2 in "Removing the Optical Drive" on page ... your computer, read the safety information that shipped with your computer, follow the steps in "Before Working Inside Your Computer" on page 9. See "Removing the Keyboard" on page 29. 7 Remove the wireless mini-card. See "Removing the Base Cover" on page 11. After working inside your computer and follow the instructions...
Owner's Manual
Page 52
...| Replacing the Speakers See "Replacing the Battery" on page 32. 4 Replace the keyboard. See "Replacing the Wireless Mini-Card" on page 19. 5 Replace the base cover. See "Replacing the Keyboard" on page 35. 3 Replace the palm rest. For additional safety best practices information,... see the Regulatory Compliance Homepage at dell.com/regulatory_compliance. Procedure 1 Using the alignment posts on the computer base, ...
...| Replacing the Speakers See "Replacing the Battery" on page 32. 4 Replace the keyboard. See "Replacing the Wireless Mini-Card" on page 19. 5 Replace the base cover. See "Replacing the Keyboard" on page 35. 3 Replace the palm rest. For additional safety best practices information,... see the Regulatory Compliance Homepage at dell.com/regulatory_compliance. Procedure 1 Using the alignment posts on the computer base, ...


