Me and My Dell
Page 10
... Restore 132 About Dell Factory Image Restore 132 Starting Dell Factory Image Restore 132 Operating System Disc 133 About Operating System Disc 133 Reinstalling the Operating System Using the Operating System Disc 133 Diagnostics 137 ... Screen is Blank 142 Desktop 142 Laptop 143 Keyboard Not Working, Not Detected, or Working Intermittently 143 External Keyboard 143 Laptop Keyboard 144 System Setup (BIOS 147 Entering System Setup (BIOS 147 System Setup Screens 148 Changing the Boot Sequence for the Current Boot 149 10 Contents
... Restore 132 About Dell Factory Image Restore 132 Starting Dell Factory Image Restore 132 Operating System Disc 133 About Operating System Disc 133 Reinstalling the Operating System Using the Operating System Disc 133 Diagnostics 137 ... Screen is Blank 142 Desktop 142 Laptop 143 Keyboard Not Working, Not Detected, or Working Intermittently 143 External Keyboard 143 Laptop Keyboard 144 System Setup (BIOS 147 Entering System Setup (BIOS 147 System Setup Screens 148 Changing the Boot Sequence for the Current Boot 149 10 Contents
Me and My Dell
Page 11
Changing the Default Boot Sequence 150 Flashing the BIOS 150 Getting Help and Contacting Dell 155 Self-Help Options 155 Accessing Windows Help and Support 155 Contacting Dell 156 Before Calling Dell 159 Computer Maintenance 160 Ergonomic Instructions for Desktops 160 Ergonomic Instructions for Laptops 162 Dell and the Environment 164 Regulatory Compliance Policy 165 Contact...
Changing the Default Boot Sequence 150 Flashing the BIOS 150 Getting Help and Contacting Dell 155 Self-Help Options 155 Accessing Windows Help and Support 155 Contacting Dell 156 Before Calling Dell 159 Computer Maintenance 160 Ergonomic Instructions for Desktops 160 Ergonomic Instructions for Laptops 162 Dell and the Environment 164 Regulatory Compliance Policy 165 Contact...

Me and My Dell
Page 40
... to the system board to be able to install expansion card(s). • Chipset - Provides slot(s) to interact with each other. Contains the system memory or BIOS program. • Power connectors - Provides an interface between the processor's front-side bus, main memory, and peripheral buses. • Flash memory - Provide power to install...
... to the system board to be able to install expansion card(s). • Chipset - Provides slot(s) to interact with each other. Contains the system memory or BIOS program. • Power connectors - Provides an interface between the processor's front-side bus, main memory, and peripheral buses. • Flash memory - Provide power to install...
Me and My Dell
Page 112
...logo appears, continue to wait until you will need to install the Computrace software in the BIOS settings, you see www.absolute.com • send e-mails to disable the Computrace option. Getting Help on Computrace Dell provides help on (or restart) your computer and try again. 3. then, shut down... your computer. 2. This is to change this option. When the DELL logo appears, press immediately. You may contact them for the software to questions • error messages To contact Absolute Software: • see...
...logo appears, continue to wait until you will need to install the Computrace software in the BIOS settings, you see www.absolute.com • send e-mails to disable the Computrace option. Getting Help on Computrace Dell provides help on (or restart) your computer and try again. 3. then, shut down... your computer. 2. This is to change this option. When the DELL logo appears, press immediately. You may contact them for the software to questions • error messages To contact Absolute Software: • see...
Me and My Dell
Page 140
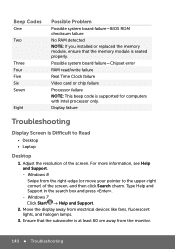
... seated properly. Windows 7 Click Start → Help and Support. 2. Beep Codes One Two Three Four Five Six Seven Eight Possible Problem Possible system board failure-BIOS ROM checksum failure No RAM detected NOTE: If you installed or replaced the memory module, ensure that the subwoofer is at least 60 cm away...
... seated properly. Windows 7 Click Start → Help and Support. 2. Beep Codes One Two Three Four Five Six Seven Eight Possible Problem Possible system board failure-BIOS ROM checksum failure No RAM detected NOTE: If you installed or replaced the memory module, ensure that the subwoofer is at least 60 cm away...
Me and My Dell
Page 147
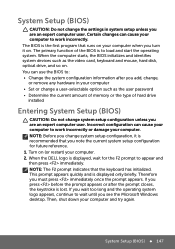
...cause your computer to work incorrectly or damage your computer to work incorrectly. When the DELL logo is to appear and then press immediately. The primary function of hard drive installed Entering System Setup (BIOS) CAUTION: Do not change the settings in your computer when you turn it is displayed... and identifies system devices such as the user password • Determine the current amount of memory or the type of the BIOS is displayed, wait for future reference. 1. This prompt appears quickly and is recommended that you note the current system setup configuration for ...
...cause your computer to work incorrectly or damage your computer to work incorrectly. When the DELL logo is to appear and then press immediately. The primary function of hard drive installed Entering System Setup (BIOS) CAUTION: Do not change the settings in your computer when you turn it is displayed... and identifies system devices such as the user password • Determine the current amount of memory or the type of the BIOS is displayed, wait for future reference. 1. This prompt appears quickly and is recommended that you note the current system setup configuration for ...
Me and My Dell
Page 150
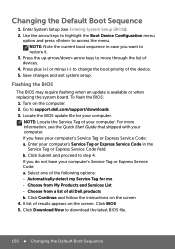
Changing the Default Boot Sequence 1. Go to step 4. Click BIOS 5. Turn on the screen 4. Locate the BIOS update file for me -- Click Submit and proceed to support.dell.com/support/downloads. 3. Select one of results appears on the screen. A list of the following options: -- Save changes and...sequence in the Service Tag or Express Service Code field. NOTE: Locate the Service Tag of all Dell products b. Click Continue and follow the instructions on the computer. 2. To flash the BIOS: 1. Click Download Now to access the menu. Press plus (+) or minus (-) to change ...
Changing the Default Boot Sequence 1. Go to step 4. Click BIOS 5. Turn on the screen 4. Locate the BIOS update file for me -- Click Submit and proceed to support.dell.com/support/downloads. 3. Select one of results appears on the screen. A list of the following options: -- Save changes and...sequence in the Service Tag or Express Service Code field. NOTE: Locate the Service Tag of all Dell products b. Click Continue and follow the instructions on the computer. 2. To flash the BIOS: 1. Click Download Now to access the menu. Press plus (+) or minus (-) to change ...

Me and My Dell
Page 151
...Close. 9. Navigate to download the file on the screen. The file icon appears in the folder and is titled the same as the downloaded BIOS update file. 10. Changing the Default Boot Sequence 151 In the Save As window, select an appropriate location to the folder where you... downloaded the BIOS update file. Double-click the BIOS update file icon and follow the instructions that appear on your download method below window, click For Single File Download via Browser...
...Close. 9. Navigate to download the file on the screen. The file icon appears in the folder and is titled the same as the downloaded BIOS update file. 10. Changing the Default Boot Sequence 151 In the Save As window, select an appropriate location to the folder where you... downloaded the BIOS update file. Double-click the BIOS update file icon and follow the instructions that appear on your download method below window, click For Single File Download via Browser...
Owner's Manual
Page 7
Removing the Display Hinges 63 Prerequisites 63 Procedure 64 Replacing the Display Hinges 65 Procedure 65 Postrequisites 65 Removing the Display Panel 66 Prerequisites 66 Procedure 67 Replacing the Display Panel 69 Procedure 69 Postrequisites 69 Removing the Camera Module 70 Prerequisites 70 Procedure 71 Replacing the Camera Module 72 Procedure 72 Postrequisites 72 Removing the Power-Adapter Port 73 Prerequisites 73 Procedure 74 Replacing the Power-Adapter Port 75 Procedure 75 Postrequisites 75 Flashing the BIOS 76 Contents | 7
Removing the Display Hinges 63 Prerequisites 63 Procedure 64 Replacing the Display Hinges 65 Procedure 65 Postrequisites 65 Removing the Display Panel 66 Prerequisites 66 Procedure 67 Replacing the Display Panel 69 Procedure 69 Postrequisites 69 Removing the Camera Module 70 Prerequisites 70 Procedure 71 Replacing the Camera Module 72 Procedure 72 Postrequisites 72 Removing the Power-Adapter Port 73 Prerequisites 73 Procedure 74 Replacing the Power-Adapter Port 75 Procedure 75 Postrequisites 75 Flashing the BIOS 76 Contents | 7
Owner's Manual
Page 28
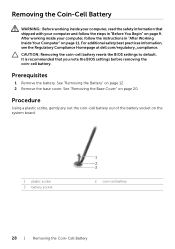
... the Coin-Cell Battery WARNING: Before working inside your computer, read the safety information that you note the BIOS settings before removing the coin-cell battery. CAUTION: Removing the coin-cell battery resets the BIOS settings to default. Procedure Using a plastic scribe, gently pry out the coin-cell battery out of the... inside your computer and follow the instructions in "Before You Begin" on page 9. For additional safety best practices information, see the Regulatory Compliance Homepage at dell.com/regulatory_compliance. See "Removing the Base Cover" on page 20.
... the Coin-Cell Battery WARNING: Before working inside your computer, read the safety information that you note the BIOS settings before removing the coin-cell battery. CAUTION: Removing the coin-cell battery resets the BIOS settings to default. Procedure Using a plastic scribe, gently pry out the coin-cell battery out of the... inside your computer and follow the instructions in "Before You Begin" on page 9. For additional safety best practices information, see the Regulatory Compliance Homepage at dell.com/regulatory_compliance. See "Removing the Base Cover" on page 20.

Owner's Manual
Page 76
... require flashing when an update is complete, navigate to the folder where you saved the BIOS update file. 11 Double-click the BIOS update file icon and follow the instructions on the computer. 2 Go to dell.com/support. 3 Click Start Here under the product categories. 5 Click Drivers & Downloads tab. 6 In the Operating System...
... require flashing when an update is complete, navigate to the folder where you saved the BIOS update file. 11 Double-click the BIOS update file icon and follow the instructions on the computer. 2 Go to dell.com/support. 3 Click Start Here under the product categories. 5 Click Drivers & Downloads tab. 6 In the Operating System...


