
Owner's Manual
Page 6
... Resolving Software and Hardware Incompatibilities 60 Restoring Your Operating System 61 Using Microsoft Windows XP System Restore 61 Using Dell PC Restore by Symantec 62 8 Adding and Replacing Parts Before You Begin 65 Recommended Tools 65 Shutting Down Your Computer 65 Hard Drive 66 Returning a Hard ...Drive to Dell 68 Memory 68 Modem and Mini PCI Card 71 Replacing the Modem 72 Adding a Mini PCI Card 72 CD or DVD Drive 75 Keyboard 76 6 Contents
... Resolving Software and Hardware Incompatibilities 60 Restoring Your Operating System 61 Using Microsoft Windows XP System Restore 61 Using Dell PC Restore by Symantec 62 8 Adding and Replacing Parts Before You Begin 65 Recommended Tools 65 Shutting Down Your Computer 65 Hard Drive 66 Returning a Hard ...Drive to Dell 68 Memory 68 Modem and Mini PCI Card 71 Replacing the Modem 72 Adding a Mini PCI Card 72 CD or DVD Drive 75 Keyboard 76 6 Contents

Owner's Manual
Page 59
...Many drivers such as a printer, mouse, or keyboard. If an exclamation point is next to update the.... 2 In the Control Panel window, under Pick a Category, click Performance and Maintenance. If you may need to replace the driver with your operating system. • You connect or install a new device. All devices require a driver ... Device Driver Rollback to reinstall the driver or install a new driver. Reinstalling Drivers NOTICE: The Dell Support website provides approved drivers for Dell™ computers. Drivers What Is a Driver? A driver is the source of specialized commands that...
...Many drivers such as a printer, mouse, or keyboard. If an exclamation point is next to update the.... 2 In the Control Panel window, under Pick a Category, click Performance and Maintenance. If you may need to replace the driver with your operating system. • You connect or install a new device. All devices require a driver ... Device Driver Rollback to reinstall the driver or install a new driver. Reinstalling Drivers NOTICE: The Dell Support website provides approved drivers for Dell™ computers. Drivers What Is a Driver? A driver is the source of specialized commands that...
Owner's Manual
Page 76
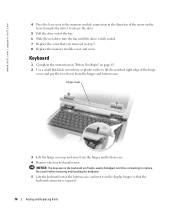
... drive out of the bay. 6 Slide the new drive into the bay until the drive is fully seated. 7 Replace the screw that the keyboard connector is exposed. 76 Adding and Replacing Parts www.dell.com | support.dell.com 4 Press the lever next to the memory module connectors in the direction of the arrow on page...
... drive out of the bay. 6 Slide the new drive into the bay until the drive is fully seated. 7 Replace the screw that the keyboard connector is exposed. 76 Adding and Replacing Parts www.dell.com | support.dell.com 4 Press the lever next to the memory module connectors in the direction of the arrow on page...

Owner's Manual
Page 77
NOTICE: To avoid damage to disconnect it from the bottom case. Adding and Replacing Parts 77 keyboard screws (4) keyboard keyboard connector interface connector 7 Remove the keyboard from the interface connector on the system board, and do not reverse the keyboard connector. 6 Pull up on the keyboard connector to the connector pins, press the keyboard connector evenly into the interface connector on the system board.
NOTICE: To avoid damage to disconnect it from the bottom case. Adding and Replacing Parts 77 keyboard screws (4) keyboard keyboard connector interface connector 7 Remove the keyboard from the interface connector on the system board, and do not reverse the keyboard connector. 6 Pull up on the keyboard connector to the connector pins, press the keyboard connector evenly into the interface connector on the system board.

Owner's Manual
Page 78
Ensure that all four securing tabs are engaged before trying to the interface connector on the keyboard into their respective slots in the palm rest, and lower the keyboard into the bottom case. www.dell.com | support.dell.com 8 Connect the keyboard connector of the replacement keyboard to completely seat the keyboard. 10 Replace the four keyboard screws. 11 Replace the hinge cover. 78 Adding and Replacing Parts keyboard screws (4) keyboard keyboard connector interface connector securing tabs (4) 9 Insert the four securing tabs on the system board.
Ensure that all four securing tabs are engaged before trying to the interface connector on the keyboard into their respective slots in the palm rest, and lower the keyboard into the bottom case. www.dell.com | support.dell.com 8 Connect the keyboard connector of the replacement keyboard to completely seat the keyboard. 10 Replace the four keyboard screws. 11 Replace the hinge cover. 78 Adding and Replacing Parts keyboard screws (4) keyboard keyboard connector interface connector securing tabs (4) 9 Insert the four securing tabs on the system board.
Owner's Manual
Page 110
... returning to Dell, 68 system view, 21 hardware Dell Diagnostics, 49 Hardware Troubleshooter, 60 Help and Support Center, 11 help file, 10 I installing parts before you begin, 65 recommended tools, 65 shutting down your computer, 65 Internet connection about, 23 options, 23 setting up, 23 K keyboard description, 14 fixing problems, 38 replacing, 76 shortcuts...
... returning to Dell, 68 system view, 21 hardware Dell Diagnostics, 49 Hardware Troubleshooter, 60 Help and Support Center, 11 help file, 10 I installing parts before you begin, 65 recommended tools, 65 shutting down your computer, 65 Internet connection about, 23 options, 23 setting up, 23 K keyboard description, 14 fixing problems, 38 replacing, 76 shortcuts...


