User Guide
Page 2
... and Acronyms For a complete list of the U.S. Information in this document to change without the written permission of Intel Corporation; under license. ENERGY STAR is strictly forbidden. If you make better use of Dell Inc.; and is subject to Microsoft® Windows® operating systems are trademarks of your computer. Reproduction in trademarks...
... and Acronyms For a complete list of the U.S. Information in this document to change without the written permission of Intel Corporation; under license. ENERGY STAR is strictly forbidden. If you make better use of Dell Inc.; and is subject to Microsoft® Windows® operating systems are trademarks of your computer. Reproduction in trademarks...
User Guide
Page 15
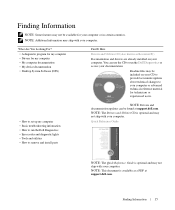
... NOTE: Some features may not be found at support.dell.com. NOTE: Additional information may not ship with your computer. Quick Reference Guide NOTE: The Quick Reference Guide is available as ResourceCD) Documentation and drivers are already installed on your CD to provide... You Looking For? • A diagnostic program for my computer • Drivers for your documentation. You can be available for my computer • My computer documentation • My device documentation • Desktop System Software (DSS) Find It Here Drivers and Utilities CD (also known as a PDF ...
... NOTE: Some features may not be found at support.dell.com. NOTE: Additional information may not ship with your computer. Quick Reference Guide NOTE: The Quick Reference Guide is available as ResourceCD) Documentation and drivers are already installed on your CD to provide... You Looking For? • A diagnostic program for my computer • Drivers for your documentation. You can be available for my computer • My computer documentation • My device documentation • Desktop System Software (DSS) Find It Here Drivers and Utilities CD (also known as a PDF ...

User Guide
Page 17
... reinstall the DSS utility. DSS is necessary for your Dell computer. Finding Information 17 Service call and order status, warranty, and repair information NOTE: Corporate, government, and education customers can also use Windows XP • Documentation for my computer • Documentation for components, such as a modem) Windows Help and Support Center 1 Click the Start button and...
... reinstall the DSS utility. DSS is necessary for your Dell computer. Finding Information 17 Service call and order status, warranty, and repair information NOTE: Corporate, government, and education customers can also use Windows XP • Documentation for my computer • Documentation for components, such as a modem) Windows Help and Support Center 1 Click the Start button and...

User Guide
Page 19
... in this section, follow the safety instructions in the Product Information Guide. The computer turns off . b In the Turn off computer window, click Turn off after the operating system shutdown process finishes. 2 Ensure that the following conditions exist: • You have performed the...turn off your computer. 1 Shut down your Dell™ Product Information Guide. • A component can be replaced by performing the removal procedure in reverse order. CAUTION: Before you begin any of the procedures in this document may require the following safety guidelines to help protect...
... in this section, follow the safety instructions in the Product Information Guide. The computer turns off . b In the Turn off computer window, click Turn off after the operating system shutdown process finishes. 2 Ensure that the following conditions exist: • You have performed the...turn off your computer. 1 Shut down your Dell™ Product Information Guide. • A component can be replaced by performing the removal procedure in reverse order. CAUTION: Before you begin any of the procedures in this document may require the following safety guidelines to help protect...
User Guide
Page 20
...from the electrical outlet before removing the cover. 5 Remove the computer cover: • Remove the mini tower computer cover. • Remove the desktop computer cover. • Remove the small form factor computer cover. • Remove the ultra small form factor computer. CAUTION: To guard against ... in your product documentation, or as directed by touching an unpainted metal surface, such as the metal at the back of cable, press in on the cable itself. NOTICE: Before touching anything inside the computer. 1 Turn off your computer. www.dell.com | support.dell.com CAUTION: Many...
...from the electrical outlet before removing the cover. 5 Remove the computer cover: • Remove the mini tower computer cover. • Remove the desktop computer cover. • Remove the small form factor computer cover. • Remove the ultra small form factor computer. CAUTION: To guard against ... in your product documentation, or as directed by touching an unpainted metal surface, such as the metal at the back of cable, press in on the cable itself. NOTICE: Before touching anything inside the computer. 1 Turn off your computer. www.dell.com | support.dell.com CAUTION: Many...

User Guide
Page 46
... cable-serial ATA cables do not place the colored stripe away from operating and could damage the controller, the drive, or both. 46 www.dell.com | support.dell.com IDE Drive Addressing When you connect two IDE devices to a single IDE interface cable and configure them for the cable select setting, the... configuring devices for correct insertion; that the pin-1 wire in the cable (indicated by a silk-screened "1" printed directly on the other connector. See the drive documentation in hole on the board or card.
... cable-serial ATA cables do not place the colored stripe away from operating and could damage the controller, the drive, or both. 46 www.dell.com | support.dell.com IDE Drive Addressing When you connect two IDE devices to a single IDE interface cable and configure them for the cable select setting, the... configuring devices for correct insertion; that the pin-1 wire in the cable (indicated by a silk-screened "1" printed directly on the other connector. See the drive documentation in hole on the board or card.

User Guide
Page 48
.... NOTICE: To avoid damage to the drive, do not set the drive on a hard surface. www.dell.com | support.dell.com Hard Drive CAUTION: Before you begin any of the procedures in this procedure. 2 Check the documentation for the drive to verify that it is configured for your computer. 3 Follow the procedures in...
.... NOTICE: To avoid damage to the drive, do not set the drive on a hard surface. www.dell.com | support.dell.com Hard Drive CAUTION: Before you begin any of the procedures in this procedure. 2 Check the documentation for the drive to verify that it is configured for your computer. 3 Follow the procedures in...

User Guide
Page 49
... up and out of the computer. 2 1 1 hard drive 2 release tabs (2) Installing a Hard Drive 1 Unpack the replacement hard drive, and prepare it for installation. 2 Check the documentation for the drive to verify that it from the existing drive by unsnapping it is configured for your replacement hard drive does not have the...
... up and out of the computer. 2 1 1 hard drive 2 release tabs (2) Installing a Hard Drive 1 Unpack the replacement hard drive, and prepare it for installation. 2 Check the documentation for the drive to verify that it from the existing drive by unsnapping it is configured for your replacement hard drive does not have the...

User Guide
Page 51
... on the system board. 6 Check all connectors to be certain that came with the drive for instructions on the hard drive. 51 See the documentation for your operating system for drive operation. 9 Enter system setup and update the appropriate Primary Drive option (0 or 1). 10 Exit system setup, ... instructions. 12 Test the hard drive by running the Dell Diagnostics. 13 If the drive you just installed is the primary drive, insert a bootable medium into place. 5 Connect the power and hard-drive cables to the next step. See the documentation that they are properly cabled and firmly seated. 7...
... on the system board. 6 Check all connectors to be certain that came with the drive for instructions on the hard drive. 51 See the documentation for your operating system for drive operation. 9 Enter system setup and update the appropriate Primary Drive option (0 or 1). 10 Exit system setup, ... instructions. 12 Test the hard drive by running the Dell Diagnostics. 13 If the drive you just installed is the primary drive, insert a bootable medium into place. 5 Connect the power and hard-drive cables to the next step. See the documentation that they are properly cabled and firmly seated. 7...

User Guide
Page 52
... guard against electrical shock, always unplug your computer from the electrical outlet before you begin any of the procedures in this procedure. 1 Check the documentation for the drive to verify that it is configured for your computer. 2 Follow the procedures in "Before You Begin." 3 Remove the plastic hard...avoid damage to the lower bay: a Disconnect the power and the hard-drive cables from the back of the upper bay. 52 www.dell.com | support.dell.com Adding a Second Hard Drive CAUTION: Before you begin this section, follow the safety instructions in the Product Information Guide.
... guard against electrical shock, always unplug your computer from the electrical outlet before you begin any of the procedures in this procedure. 1 Check the documentation for the drive to verify that it is configured for your computer. 2 Follow the procedures in "Before You Begin." 3 Remove the plastic hard...avoid damage to the lower bay: a Disconnect the power and the hard-drive cables from the back of the upper bay. 52 www.dell.com | support.dell.com Adding a Second Hard Drive CAUTION: Before you begin this section, follow the safety instructions in the Product Information Guide.

User Guide
Page 62
If you are installing an IDE drive, configure the drive for the cable select setting by using the documentation that the drive is configured for your computer. www.dell.com | support.dell.com 4 Check the documentation that accompanied the drive to verify that came with the drive. 5 Align the shoulder screws on the CD/DVD drive with the shoulder screw slots, and slide the drive into the bay until it clicks into place. 2 1 3 62
If you are installing an IDE drive, configure the drive for the cable select setting by using the documentation that the drive is configured for your computer. www.dell.com | support.dell.com 4 Check the documentation that accompanied the drive to verify that came with the drive. 5 Align the shoulder screws on the CD/DVD drive with the shoulder screw slots, and slide the drive into the bay until it clicks into place. 2 1 3 62

User Guide
Page 68
... in your work area. 5 If you are installing a new card, remove the filler bracket to release it from the top: a Place your fingers. www.dell.com | support.dell.com 2 1 3 4 5 6 1 card retention latch 2 alignment guide 3 card 4 card-edge connector 5 card connector 6 release tab 3 Open the card retention mechanism that ...-slot opening. b With your free hand, gently squeeze the sides of the retention mechanism with the card for installation. NOTE: See the documentation that came with your thumb on configuring the card, making internal connections, or customizing it in place.
... in your work area. 5 If you are installing a new card, remove the filler bracket to release it from the top: a Place your fingers. www.dell.com | support.dell.com 2 1 3 4 5 6 1 card retention latch 2 alignment guide 3 card 4 card-edge connector 5 card connector 6 release tab 3 Open the card retention mechanism that ...-slot opening. b With your free hand, gently squeeze the sides of the retention mechanism with the card for installation. NOTE: See the documentation that came with your thumb on configuring the card, making internal connections, or customizing it in place.

User Guide
Page 70
... to the card. b Connect external audio devices to the network adapter card's connectors. NOTE: See the documentation for the card for the card as described in the card documentation. Do not connect the network cable to the integrated network connector on the card retention latch from the inside... integrated network adapter: a Enter system setup, select Network Controller, and change the setting to pivot the latch open position. 70 www.dell.com | support.dell.com 12 Replace the computer cover. 13 Connect any drivers required for information about the card's cable connections.
... to the card. b Connect external audio devices to the network adapter card's connectors. NOTE: See the documentation for the card for the card as described in the card documentation. Do not connect the network cable to the integrated network connector on the card retention latch from the inside... integrated network adapter: a Enter system setup, select Network Controller, and change the setting to pivot the latch open position. 70 www.dell.com | support.dell.com 12 Replace the computer cover. 13 Connect any drivers required for information about the card's cable connections.

User Guide
Page 72
www.dell.com | support.dell.com 7 Before you replace and lower the card retention mechanism, ensure that came with the alignment bar. • The notch in the top of the ... Network Controller, and change the setting to secure the adapter bracket in place. 9 Close the card retention latch by snapping it into place. See the documentation that : • The tops of the computer. 13 If you removed a sound card: a Enter system setup, select Audio Controller, and change the setting to On...
www.dell.com | support.dell.com 7 Before you replace and lower the card retention mechanism, ensure that came with the alignment bar. • The notch in the top of the ... Network Controller, and change the setting to secure the adapter bracket in place. 9 Close the card retention latch by snapping it into place. See the documentation that : • The tops of the computer. 13 If you removed a sound card: a Enter system setup, select Audio Controller, and change the setting to On...
User Guide
Page 73
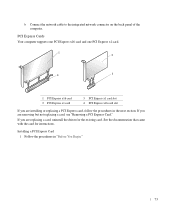
... Express card, follow the procedures in "Before You Begin." 73 If you are removing but not replacing a card, see "Removing a PCI Express Card." See the documentation that came with the card for the existing card.
... Express card, follow the procedures in "Before You Begin." 73 If you are removing but not replacing a card, see "Removing a PCI Express Card." See the documentation that came with the card for the existing card.

User Guide
Page 75
To guard against electrical shock, be sure to a network. See the documentation that the securing slot is fully seated in the connector and press down firmly. CAUTION: Some network adapters automatically start the computer when they are ...
To guard against electrical shock, be sure to a network. See the documentation that the securing slot is fully seated in the connector and press down firmly. CAUTION: Some network adapters automatically start the computer when they are ...

User Guide
Page 76
www.dell.com | support.dell.com 2 1 3 4 1 fully seated card 2 not fully seated card 3 bracket within slot 4 bracket caught outside of the card or filler bracket fits around the alignment guide. ... in the top of slot 9 Before you installed a sound card: a Enter system setup, select Audio Controller, and change the setting to Off. 76 See the documentation for the card for information about the card's cable connections. 13 Replace the computer cover. 14 If you replace and lower the card retention mechanism...
www.dell.com | support.dell.com 2 1 3 4 1 fully seated card 2 not fully seated card 3 bracket within slot 4 bracket caught outside of the card or filler bracket fits around the alignment guide. ... in the top of slot 9 Before you installed a sound card: a Enter system setup, select Audio Controller, and change the setting to Off. 76 See the documentation for the card for information about the card's cable connections. 13 Replace the computer cover. 14 If you replace and lower the card retention mechanism...

User Guide
Page 77
... that secures the card in connectors on the card retention latch from the top: 77 Removing a PCI Express Card 1 Follow the procedures in the card documentation.
... that secures the card in connectors on the card retention latch from the top: 77 Removing a PCI Express Card 1 Follow the procedures in the card documentation.

User Guide
Page 79
... card retention mechanism that secures the adapter bracket and cards in place. Place the serial-port adapter bracket in the slot. 79 NOTE: See the documentation that the adapter is fully seated in the connector and press down firmly. b With your free hand, gently squeeze the sides of the retention mechanism...
... card retention mechanism that secures the adapter bracket and cards in place. Place the serial-port adapter bracket in the slot. 79 NOTE: See the documentation that the adapter is fully seated in the connector and press down firmly. b With your free hand, gently squeeze the sides of the retention mechanism...

User Guide
Page 80
www.dell.com | support.dell.com 2 1 3 4 1 fully seated card 2 not fully seated card 3 bracket within slot 4 bracket caught outside of slot 5 Before you replace and lower the card retention mechanism, ... of the adapter or filler bracket fits around the alignment guide. 6 Gently press down on the system board. 9 Connect any installed cards. NOTE: See the documentation for the serial port adapter for information about the cable connections. 10 Replace the computer cover.
www.dell.com | support.dell.com 2 1 3 4 1 fully seated card 2 not fully seated card 3 bracket within slot 4 bracket caught outside of slot 5 Before you replace and lower the card retention mechanism, ... of the adapter or filler bracket fits around the alignment guide. 6 Gently press down on the system board. 9 Connect any installed cards. NOTE: See the documentation for the serial port adapter for information about the cable connections. 10 Replace the computer cover.


