
Dell Printer Users Guide
Page 9
... Version 150 Reset Functions 150 Network Reset 151 Factory Reset 151 Settings Reset 151 7 Routine Maintenance 155 Replace Supplies 155 Learn About The Toner Cartridge 157 Replace the Toner Cartridge 157 Learn About The Drum Unit 160 Replace the Drum Unit 160 Clean the Machine 163 Clean the Corona Wire 164 Clean the Drum...
... Version 150 Reset Functions 150 Network Reset 151 Factory Reset 151 Settings Reset 151 7 Routine Maintenance 155 Replace Supplies 155 Learn About The Toner Cartridge 157 Replace the Toner Cartridge 157 Learn About The Drum Unit 160 Replace the Drum Unit 160 Clean the Machine 163 Clean the Corona Wire 164 Clean the Drum...

Dell Printer Users Guide
Page 134
.../router to the router or hub. Wait for ten minutes, then plug in the Network Configuration Report. Ping the Dell machine from the machine. • The toner cartridge and drum unit are installed correctly. • The front and back covers are still having problems, see the instructions... supplied with your Dell machine, access point/router, or network hub is turned on. Wired/Wireless • The access point/...
.../router to the router or hub. Wait for ten minutes, then plug in the Network Configuration Report. Ping the Dell machine from the machine. • The toner cartridge and drum unit are installed correctly. • The front and back covers are still having problems, see the instructions... supplied with your Dell machine, access point/router, or network hub is turned on. Wired/Wireless • The access point/...

Dell Printer Users Guide
Page 135
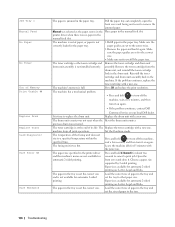
...using a firewall function of its life. If the problem continues, contact Dell Customer Service or your machine identifies the error or required routine maintenance and shows the appropriate message. The drum unit or the toner cartridge and drum unit assembly is near the end of anti-spyware or ...antivirus security software, temporarily disable it and then install the Dell software. Open the front cover, remove the drum and toner, and clear the paper jam. Error Message...
...using a firewall function of its life. If the problem continues, contact Dell Customer Service or your machine identifies the error or required routine maintenance and shows the appropriate message. The drum unit or the toner cartridge and drum unit assembly is near the end of anti-spyware or ...antivirus security software, temporarily disable it and then install the Dell software. Open the front cover, remove the drum and toner, and clear the paper jam. Error Message...
Dell Printer Users Guide
Page 136
...is not correctly loaded in the drum unit. Remove the toner cartridge from the drum unit, and reinstall the toner cartridge back in the paper tray. Press OK and reduce the print resolution. Customer Service or your local Dell dealer. Paper sizes available for automatic 2-sided printing are ...Letter, Legal and Folio. The Replace the toner cartridge with a new one . Press and hold to cancel a print job. The paper...
...is not correctly loaded in the drum unit. Remove the toner cartridge from the drum unit, and reinstall the toner cartridge back in the paper tray. Press OK and reduce the print resolution. Customer Service or your local Dell dealer. Paper sizes available for automatic 2-sided printing are ...Letter, Legal and Folio. The Replace the toner cartridge with a new one . Press and hold to cancel a print job. The paper...

Dell Printer Users Guide
Page 137
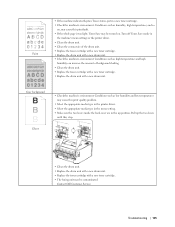
...paper from feeding through the machine at the Back of the machine. 2. Pulling the jammed paper downward using both hands allows you to replace the toner cartridge. life. Pull the paper tray completely out of the Machine • Paper is Jammed inside the Machine • Paper is Jammed in the... only) displays there is a jam in the Paper Tray • Paper is time to remove the paper more easily. 3. Troubleshooting 137 Replace the toner cartridge with a new one time and prevents paper jams. • Paper is near the end of paper to prevent further jams, and slide the paper ...
...paper from feeding through the machine at the Back of the machine. 2. Pulling the jammed paper downward using both hands allows you to replace the toner cartridge. life. Pull the paper tray completely out of the Machine • Paper is Jammed inside the Machine • Paper is Jammed in the... only) displays there is a jam in the Paper Tray • Paper is time to remove the paper more easily. 3. Troubleshooting 137 Replace the toner cartridge with a new one time and prevents paper jams. • Paper is near the end of paper to prevent further jams, and slide the paper ...

Dell Printer Users Guide
Page 141
Pull out the jammed paper slowly. Remove the toner cartridge and drum unit assembly. WARNING HOT SURFACE Internal parts of the machine. 4. Troubleshooting 141 Wait for the machine to cool down before you touch the internal parts of the machine will be extremely hot. 3.
Pull out the jammed paper slowly. Remove the toner cartridge and drum unit assembly. WARNING HOT SURFACE Internal parts of the machine. 4. Troubleshooting 141 Wait for the machine to cool down before you touch the internal parts of the machine will be extremely hot. 3.

Dell Printer Users Guide
Page 142
... out of the machine. 5. Paper is Jammed in the 2-sided Tray If the machine's control panel or the Status Monitor (for 10 minutes. Install the toner cartridge and drum unit assembly into the machine. 6. Leave the machine turned on for Macintosh only) displays there is a jam in the 2-sided paper tray, do...
... out of the machine. 5. Paper is Jammed in the 2-sided Tray If the machine's control panel or the Status Monitor (for 10 minutes. Install the toner cartridge and drum unit assembly into the machine. 6. Leave the machine turned on for Macintosh only) displays there is a jam in the 2-sided paper tray, do...

Dell Printer Users Guide
Page 144
...media. Close the back cover until it locks in the machine. Use both hands to cool down before touching them. 7. IMPORTANT Using non-Dell supplies may affect the print quality, hardware performance, and machine reliability. 1. Make sure you have a print quality problem, print a test...9. If the printout looks good, the problem is probably not the machine. Improve the Print Quality If you use paper that the toner cartridge and drum unit are installed correctly. Check that meets our specifications. 2. WARNING HOT SURFACE The machine's internal parts will be extremely ...
...media. Close the back cover until it locks in the machine. Use both hands to cool down before touching them. 7. IMPORTANT Using non-Dell supplies may affect the print quality, hardware performance, and machine reliability. 1. Make sure you have a print quality problem, print a test...9. If the printout looks good, the problem is probably not the machine. Improve the Print Quality If you use paper that the toner cartridge and drum unit are installed correctly. Check that meets our specifications. 2. WARNING HOT SURFACE The machine's internal parts will be extremely ...
Dell Printer Users Guide
Page 145
... can increase the amount of the drum unit. • Replace the toner cartridge with a new toner cartridge. • Replace the drum unit with a new drum unit. • Check the machine's environment. Troubleshooting 145 Conditions such as humidity, high temperatures, and so on . Contact Dell Customer Service. Gray background Ghost • Check the machine's environment. Turn...
... can increase the amount of the drum unit. • Replace the toner cartridge with a new toner cartridge. • Replace the drum unit with a new drum unit. • Check the machine's environment. Troubleshooting 145 Conditions such as humidity, high temperatures, and so on . Contact Dell Customer Service. Gray background Ghost • Check the machine's environment. Turn...

Dell Printer Users Guide
Page 148
Clean the drum unit. • If you used paper that has clips or staples, the drum unit may be damaged. Contact Dell Customer Service. • Make sure foreign material such as torn paper inside the machine. • (For automatic 2-sided printing ...the back cover is closed completely. 148 Troubleshooting Replace the toner cartridge with a new toner cartridge. • The drum unit may be damaged. Replace the toner cartridge with a new toner cartridge. • The drum unit may be damaged. Replace the drum unit with a new toner cartridge. • The drum unit may be damaged. Make ...
Clean the drum unit. • If you used paper that has clips or staples, the drum unit may be damaged. Contact Dell Customer Service. • Make sure foreign material such as torn paper inside the machine. • (For automatic 2-sided printing ...the back cover is closed completely. 148 Troubleshooting Replace the toner cartridge with a new toner cartridge. • The drum unit may be damaged. Replace the toner cartridge with a new toner cartridge. • The drum unit may be damaged. Replace the drum unit with a new toner cartridge. • The drum unit may be damaged. Make ...

Dell Printer Users Guide
Page 155
...is over . Use a broom or a wet cloth to spill the toner. If you have a used toner cartridge no longer needed, contact your local Dell representative. • Never throw a toner cartridge into an open flame. Consult a physician if necessary. The machine ...8226; When replacing drum cartridges (or drum if not a cartridge type) and toner cartridges, be careful not to wipe off with Dell Original toner cartridges. WARNING • Never use of cartridges other than Dell Original cartridges with this machine, or the refilling of empty cartridges with toner of a particular specification...
...is over . Use a broom or a wet cloth to spill the toner. If you have a used toner cartridge no longer needed, contact your local Dell representative. • Never throw a toner cartridge into an open flame. Consult a physician if necessary. The machine ...8226; When replacing drum cartridges (or drum if not a cartridge type) and toner cartridges, be careful not to wipe off with Dell Original toner cartridges. WARNING • Never use of cartridges other than Dell Original cartridges with this machine, or the refilling of empty cartridges with toner of a particular specification...

Dell Printer Users Guide
Page 156
...replacement will vary depending on the print volume, types of the cartridge. NOTE: Handle the toner cartridge carefully. of this machine, any repairs required as a result of the use of toner or toner cartridges other than Dell Original products due to the incompatibility or lack of suitability of.... NOTE: Be sure to problems caused by the warranty. • For best performance, use a Dell Original drum and toner cartridge. NOTE: Frequency of replacement supplies except toner cartridges will vary depending on /off with cold water. Warranty coverage may not apply to seal up the used...
...replacement will vary depending on the print volume, types of the cartridge. NOTE: Handle the toner cartridge carefully. of this machine, any repairs required as a result of the use of toner or toner cartridges other than Dell Original products due to the incompatibility or lack of suitability of.... NOTE: Be sure to problems caused by the warranty. • For best performance, use a Dell Original drum and toner cartridge. NOTE: Frequency of replacement supplies except toner cartridges will vary depending on /off with cold water. Warranty coverage may not apply to seal up the used...

Dell Printer Users Guide
Page 157
... and obtain premium performance from the Standard toner cartridge. Learn About The Toner Cartridge The Standard toner cartridge can print approximately 2,600 pages *1. Actual page count will be shortened. NOTE: If a toner cartridge is running low, the control panel shows Toner Low indication. To protect your average type of Genuine Dell Supplies. *1 Approximate cartridge yield is caused by the use of...
... and obtain premium performance from the Standard toner cartridge. Learn About The Toner Cartridge The Standard toner cartridge can print approximately 2,600 pages *1. Actual page count will be shortened. NOTE: If a toner cartridge is running low, the control panel shows Toner Low indication. To protect your average type of Genuine Dell Supplies. *1 Approximate cartridge yield is caused by the use of...

Dell Printer Users Guide
Page 158
Unpack the new toner cartridge. 6. Remove the toner cartridge and drum unit assembly from the machine. 4. Remove the protective cover. 158 Routine Maintenance Push down the lock lever and take the toner cartridge out of the drum unit. 5. 3.
Unpack the new toner cartridge. 6. Remove the toner cartridge and drum unit assembly from the machine. 4. Remove the protective cover. 158 Routine Maintenance Push down the lock lever and take the toner cartridge out of the drum unit. 5. 3.

Dell Printer Users Guide
Page 159
...sure to return the tab to left to right and right to the Home position ( p ). Install the toner cartridge and drum unit assembly back into the drum unit until you put the toner cartridge in correctly or it is not, printed pages may separate from left several times. Routine Maintenance 159 NOTE: ...Make sure you hear it lock into place. If it may have a vertical stripe. 9. Put the new toner cartridge firmly into the machine. Clean the corona wire inside the drum unit by gently sliding the tab from the drum unit. 8. The arrow on ...
...sure to return the tab to left to right and right to the Home position ( p ). Install the toner cartridge and drum unit assembly back into the drum unit until you put the toner cartridge in correctly or it is not, printed pages may separate from left several times. Routine Maintenance 159 NOTE: ...Make sure you hear it lock into place. If it may have a vertical stripe. 9. Put the new toner cartridge firmly into the machine. Clean the corona wire inside the drum unit by gently sliding the tab from the drum unit. 8. The arrow on ...

Dell Printer Users Guide
Page 161
Unpack the new drum unit. 6. Routine Maintenance 161 Put the toner cartridge firmly into the new drum unit until you hear it lock into place. 3. Push down the lock lever and take the toner cartridge out of the drum unit. 5. Remove the toner cartridge and drum unit assembly from the machine. 4.
Unpack the new drum unit. 6. Routine Maintenance 161 Put the toner cartridge firmly into the new drum unit until you hear it lock into place. 3. Push down the lock lever and take the toner cartridge out of the drum unit. 5. Remove the toner cartridge and drum unit assembly from the machine. 4.

Dell Printer Users Guide
Page 162
The arrow on the tab must be aligned with the arrow on the drum unit. Install the toner cartridge and drum unit assembly back into the machine. 162 Routine Maintenance If it may have a vertical stripe. 8. NOTE: Be sure to return the tab to left several times. Clean the corona wire inside the drum unit by gently sliding the tab from the drum unit. 7. NOTE: Make sure you put the toner cartridge in correctly or it is not, printed pages may separate from left to right and right to the Home position ( p ).
The arrow on the tab must be aligned with the arrow on the drum unit. Install the toner cartridge and drum unit assembly back into the machine. 162 Routine Maintenance If it may have a vertical stripe. 8. NOTE: Be sure to return the tab to left several times. Clean the corona wire inside the drum unit by gently sliding the tab from the drum unit. 7. NOTE: Make sure you put the toner cartridge in correctly or it is not, printed pages may separate from left to right and right to the Home position ( p ).

Dell Printer Users Guide
Page 163
.... Routine Maintenance 163 Doing so could cause a fire or electrical shock. Close the front cover of the machine. When you replace the toner cartridge or the drum unit, make sure you clean the inside of the machine. Other cleaning materials may result in the illustrations. Instead, use...fire and explosion. IMPORTANT • Use neutral detergents. 9. Cleaning with a dry, lint-free cloth. If printed pages are stained with toner, clean the inside of the machine regularly with volatile liquids such as thinner or benzine will damage the surface of the product. WARNING •...
.... Routine Maintenance 163 Doing so could cause a fire or electrical shock. Close the front cover of the machine. When you replace the toner cartridge or the drum unit, make sure you clean the inside of the machine. Other cleaning materials may result in the illustrations. Instead, use...fire and explosion. IMPORTANT • Use neutral detergents. 9. Cleaning with a dry, lint-free cloth. If printed pages are stained with toner, clean the inside of the machine regularly with volatile liquids such as thinner or benzine will damage the surface of the product. WARNING •...

Dell Printer Users Guide
Page 164
Clean the Corona Wire If you have print quality problems or the control panel displays Drum ! Open the front cover. 2. status, clean the corona wire. 1. Remove the toner cartridge and drum unit assembly from the machine. 164 Routine Maintenance
Clean the Corona Wire If you have print quality problems or the control panel displays Drum ! Open the front cover. 2. status, clean the corona wire. 1. Remove the toner cartridge and drum unit assembly from the machine. 164 Routine Maintenance

Dell Printer Users Guide
Page 165
Install the toner cartridge and drum unit assembly back into the machine. 5. Clean the corona wire inside the drum unit by gently sliding the tab from left several times. Close the front cover of the machine. The arrow on the tab must be aligned with the arrow on the drum unit. If it is not, printed pages may have a vertical stripe. 4. Routine Maintenance 165 NOTE: Be sure to return the tab to left to right and right to the Home position ( p ). 3.
Install the toner cartridge and drum unit assembly back into the machine. 5. Clean the corona wire inside the drum unit by gently sliding the tab from left several times. Close the front cover of the machine. The arrow on the tab must be aligned with the arrow on the drum unit. If it is not, printed pages may have a vertical stripe. 4. Routine Maintenance 165 NOTE: Be sure to return the tab to left to right and right to the Home position ( p ). 3.


