User Guide
Page 1
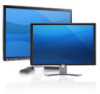
...to change without the written permission of the U.S. Dell Inc. disclaims any manner whatsoever without notice. © 2012 Dell Inc. is a registered trademark of Dell Inc. As an ENERGY STAR partner, Dell Inc. Dell™ E1713S/E2013H/E2213H/E2313H Monitor User's Guide Setting the display resolution to 1280... x 1024 (for E1713S) or 1600 x 900 (for E2013H) or 1920 x 1080 (for...
...to change without the written permission of the U.S. Dell Inc. disclaims any manner whatsoever without notice. © 2012 Dell Inc. is a registered trademark of Dell Inc. As an ENERGY STAR partner, Dell Inc. Dell™ E1713S/E2013H/E2213H/E2313H Monitor User's Guide Setting the display resolution to 1280... x 1024 (for E1713S) or 1600 x 900 (for E2013H) or 1920 x 1080 (for...
User Guide
Page 2
Dell™ E1713S/E2013H/E2213H/E2313H Monitor User's Guide About Your Monitor Setting Up the Monitor Operating the Monitor Troubleshooting Appendix Notes, Cautions, Warnings NOTE: A NOTE indicates important information that this document is strictly forbidden. ...Model E1713Sc/E1713Sb/E2013Hc/E2213Hb/E2313Hf October 2012 Rev. CAUTION: A CAUTION indicates potential damage to either trademarks or registered trademarks of Dell Inc.; Microsoft and Windows are trademarks of Microsoft Corporation in this document to refer to hardware or loss of the U.S. Trademarks...
Dell™ E1713S/E2013H/E2213H/E2313H Monitor User's Guide About Your Monitor Setting Up the Monitor Operating the Monitor Troubleshooting Appendix Notes, Cautions, Warnings NOTE: A NOTE indicates important information that this document is strictly forbidden. ...Model E1713Sc/E1713Sb/E2013Hc/E2213Hb/E2313Hf October 2012 Rev. CAUTION: A CAUTION indicates potential damage to either trademarks or registered trademarks of Dell Inc.; Microsoft and Windows are trademarks of Microsoft Corporation in this document to refer to hardware or loss of the U.S. Trademarks...
User Guide
Page 3
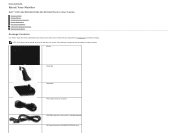
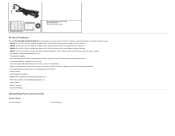
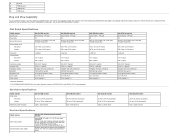
... countries) VGA Cable (attached to Contents Page About Your Monitor Dell™ E1713S/E2013H/E2213H/E2313H Monitor User's Guide Package Contents Product Features Identifying Parts and Controls Monitor Specifications Plug and Play Capability LCD Monitor Quality & Pixel Policy Maintenance Guidelines Package Contents Your monitor ships with your monitor. Ensure that you have received all the components shown below...
... countries) VGA Cable (attached to Contents Page About Your Monitor Dell™ E1713S/E2013H/E2213H/E2313H Monitor User's Guide Package Contents Product Features Identifying Parts and Controls Monitor Specifications Plug and Play Capability LCD Monitor Quality & Pixel Policy Maintenance Guidelines Package Contents Your monitor ships with your monitor. Ensure that you have received all the components shown below...
User Guide
Page 4
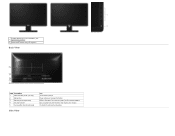
... Display. On-Screen Display (OSD) adjustments for lower resolutions. ENERGY STAR compliant (for E2013H/E2213H/E2313H only) EPEAT Gold compliant (for lower resolutions. BFR/PVC- Security lock slot. The monitor's features include: E1713S: 43.3 cm (17.0 inches) viewable area display. 1280 x...play capability if supported by your system. Dell Display Manager included (comes in the CD attached with the monitor). reduced. Drivers and Documentation media Quick Setup Guide Product Information Guide Product Features The Dell™ E1713S/E2013H/E2213H/E2313H flat panel display has an...
... Display. On-Screen Display (OSD) adjustments for lower resolutions. ENERGY STAR compliant (for E2013H/E2213H/E2313H only) EPEAT Gold compliant (for lower resolutions. BFR/PVC- Security lock slot. The monitor's features include: E1713S: 43.3 cm (17.0 inches) viewable area display. 1280 x...play capability if supported by your system. Dell Display Manager included (comes in the CD attached with the monitor). reduced. Drivers and Documentation media Quick Setup Guide Product Information Guide Product Features The Dell™ E1713S/E2013H/E2213H/E2313H flat panel display has an...
User Guide
Page 5
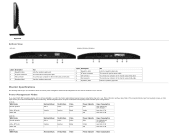
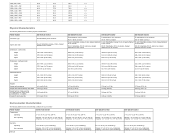
1. Function buttons (For more information, see Operating the Monitor) 2. Power On/Off button (with the slot to contact Dell for technical support. Use a security lock with LED indicator) Back View Label Description 1 VESA mounting holes (100 mm) 2 Rating label 3 Barcode serial number label 4 Security lock slot 5 Dell soundbar mounting brackets Side View Use To mount the monitor. Power ratings and energy information. Refer to this label if you need to help secure your monitor. To attach the optional Dell Soundbar.
1. Function buttons (For more information, see Operating the Monitor) 2. Power On/Off button (with the slot to contact Dell for technical support. Use a security lock with LED indicator) Back View Label Description 1 VESA mounting holes (100 mm) 2 Rating label 3 Barcode serial number label 4 Security lock slot 5 Dell soundbar mounting brackets Side View Use To mount the monitor. Power ratings and energy information. Refer to this label if you need to help secure your monitor. To attach the optional Dell Soundbar.
User Guide
Page 6
...(Typical) Active-Off mode Inactive Inactive Blank Amber Less than 0.5 W Switch Off - - - To connect the monitor power cable. Right Side Bottom View E1713S: E2013H/E2213H/E2313H: Label Description 1 Regulatory label 2 AC power connector 3 VGA connector 4 Regulatory label Use Lists the .... Power Indicator Blue Amber Off Power Consumption 20 W (Maximum) 14 W(Typical) Less than 0.5 W Less than 0.5 W E2013H: VESA Modes Normal operation Active-Off mode Switch Off Horizontal Sync Active Inactive - Lists the regulatory approvals. To connect your computer...
...(Typical) Active-Off mode Inactive Inactive Blank Amber Less than 0.5 W Switch Off - - - To connect the monitor power cable. Right Side Bottom View E1713S: E2013H/E2213H/E2313H: Label Description 1 Regulatory label 2 AC power connector 3 VGA connector 4 Regulatory label Use Lists the .... Power Indicator Blue Amber Off Power Consumption 20 W (Maximum) 14 W(Typical) Less than 0.5 W Less than 0.5 W E2013H: VESA Modes Normal operation Active-Off mode Switch Off Horizontal Sync Active Inactive - Lists the regulatory approvals. To connect your computer...
User Guide
Page 7
... luminance and contrast. Active Inactive - Normal operation Active-Off mode Switch Off E2313H: VESA Modes Normal operation Active-Off mode Switch Off Active Inactive - NOTE: Dell E2013H/E2213H/E2313H monitor is pressed in Active-Off mode, the following messages will only function in Off mode can only be displayed: Activate the computer and...
... luminance and contrast. Active Inactive - Normal operation Active-Off mode Switch Off E2313H: VESA Modes Normal operation Active-Off mode Switch Off Active Inactive - NOTE: Dell E2013H/E2213H/E2313H monitor is pressed in Active-Off mode, the following messages will only function in Off mode can only be displayed: Activate the computer and...

User Guide
Page 8
sync 14 V-sync 15 DDC clock DVI Connector Pin Number 1 2 3 4 5 6 7 8 9 10 11 12 13 14 15 16 17 18 19 20 24-pin Side of the 15-pin Side Signal Cable 1 Video-Red 2 Video-Green 3 Video-Blue 4 GND 5 Self-test 6 GND-R 7 GND-G 8 GND-B 9 DDC +5V 10 GND-sync 11 GND 12 DDC data 13 H - Pin Number Monitor Side of the Connected Signal Cable TMDS RX2TMDS RX2+ TMDS Ground Floating Floating DDC Clock DDC Data Floating TMDS RX1TMDS RX1+ TMDS Ground Floating Floating +5 V power Self test Hot Plug Detect TMDS RX0TMDS RX0+ TMDS Ground Floating
sync 14 V-sync 15 DDC clock DVI Connector Pin Number 1 2 3 4 5 6 7 8 9 10 11 12 13 14 15 16 17 18 19 20 24-pin Side of the 15-pin Side Signal Cable 1 Video-Red 2 Video-Green 3 Video-Blue 4 GND 5 Self-test 6 GND-R 7 GND-G 8 GND-B 9 DDC +5V 10 GND-sync 11 GND 12 DDC data 13 H - Pin Number Monitor Side of the Connected Signal Cable TMDS RX2TMDS RX2+ TMDS Ground Floating Floating DDC Clock DDC Data Floating TMDS RX1TMDS RX1+ TMDS Ground Floating Floating +5 V power Self test Hot Plug Detect TMDS RX0TMDS RX0+ TMDS Ground Floating
User Guide
Page 9
... 83 % (typical) ** Resolution Specifications Model number Scan range Horizontal Vertical Maximum preset resolution Dell E1713S monitor 30 kHz to 81 kHz (automatic) 56 Hz to 76 Hz (automatic) 1280 x 1024 at 60 Hz Dell E2013H monitor 30 kHz to 83 kHz (automatic) 56 Hz to 76 Hz (automatic) 1600 x ...LCD TN 43.3 cm (17.0 inches) (17.0-inch viewable image size) 337.9 mm (13.30 inches) 270.3 mm (10.64 inches) Dell E2013H monitor Active matrix - The monitor automatically provides the computer with hard-coating 3H LED light bar system 5 ms typical (black to white) 16.7 mil colors 83 % (typical) **...
... 83 % (typical) ** Resolution Specifications Model number Scan range Horizontal Vertical Maximum preset resolution Dell E1713S monitor 30 kHz to 81 kHz (automatic) 56 Hz to 76 Hz (automatic) 1280 x 1024 at 60 Hz Dell E2013H monitor 30 kHz to 83 kHz (automatic) 56 Hz to 76 Hz (automatic) 1600 x ...LCD TN 43.3 cm (17.0 inches) (17.0-inch viewable image size) 337.9 mm (13.30 inches) 270.3 mm (10.64 inches) Dell E2013H monitor Active matrix - The monitor automatically provides the computer with hard-coating 3H LED light bar system 5 ms typical (black to white) 16.7 mil colors 83 % (typical) **...
User Guide
Page 11
... °C to 60 °C (-4 °F to 140 °F) Shipping: -20 °C to 60 °C (-4 °F to 140 °F) Dell E2013H monitor Dell E2213H monitor Dell E2313H monitor 0 °C to 40 °C (32 °F to 104 °F) Storage: -20 °C to 60 °C (-4 °F to 140 °...44 inches) 4.31 kg (9.50 lb) 3.62 kg (7.98 lb) 3.02 kg (6.66 lb) 0.33 kg (0.73 lb) Dell E2013H monitor Dell E2213H monitor Dell E2313H monitor D-subminiature, blue connector D-subminiature, blue connector; DVI-D: White connector DVI-D: White connector DVI-D: White connector D-sub: Detachable, Analog, ...
... °C to 60 °C (-4 °F to 140 °F) Shipping: -20 °C to 60 °C (-4 °F to 140 °F) Dell E2013H monitor Dell E2213H monitor Dell E2313H monitor 0 °C to 40 °C (32 °F to 104 °F) Storage: -20 °C to 60 °C (-4 °F to 140 °...44 inches) 4.31 kg (9.50 lb) 3.62 kg (7.98 lb) 3.02 kg (6.66 lb) 0.33 kg (0.73 lb) Dell E2013H monitor Dell E2213H monitor Dell E2313H monitor D-subminiature, blue connector D-subminiature, blue connector; DVI-D: White connector DVI-D: White connector DVI-D: White connector D-sub: Detachable, Analog, ...
User Guide
Page 12
...your antistatic screen, slightly dampen a soft, clean cloth with 1 to 5 fixed pixels is not uncommon for one or more pixels to see Dell Support site at: www.dell.com/support/monitors. This white powder occurs during the shipping of any kind as some detergents leave a milky film on your... monitor, use benzene, thinner, ammonia, abrasive cleaners, or compressed air. Operating Non-operating Thermal dissipation 5,000 m (16,400 ft) max 10,668 m (35,...
...your antistatic screen, slightly dampen a soft, clean cloth with 1 to 5 fixed pixels is not uncommon for one or more pixels to see Dell Support site at: www.dell.com/support/monitors. This white powder occurs during the shipping of any kind as some detergents leave a milky film on your... monitor, use benzene, thinner, ammonia, abrasive cleaners, or compressed air. Operating Non-operating Thermal dissipation 5,000 m (16,400 ft) max 10,668 m (35,...
User Guide
Page 13
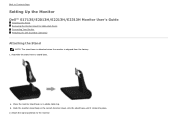
... the stand riser to Contents Page Setting Up the Monitor Dell™ E1713S/E2013H/E2213H/E2313H Monitor User's Guide Attaching the Stand Removing the Monitor Stand for VESA Wall Mount Connecting Your Monitor Attaching the Dell Soundbar (Optional) Attaching the Stand NOTE: The stand base is detached when the monitor is shipped from the factory. 1. Attach the stand...
... the stand riser to Contents Page Setting Up the Monitor Dell™ E1713S/E2013H/E2213H/E2313H Monitor User's Guide Attaching the Stand Removing the Monitor Stand for VESA Wall Mount Connecting Your Monitor Attaching the Dell Soundbar (Optional) Attaching the Stand NOTE: The stand base is detached when the monitor is shipped from the factory. 1. Attach the stand...
User Guide
Page 14
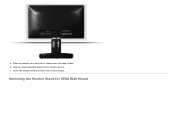
Place the monitor on a soft cloth or cushion near the edge of desk. Align the stand assembly bracket to the monitor groove. Insert the bracket towards monitor until it locks in place. b. Removing the Monitor Stand for VESA Wall Mount c. a.
Place the monitor on a soft cloth or cushion near the edge of desk. Align the stand assembly bracket to the monitor groove. Insert the bracket towards monitor until it locks in place. b. Removing the Monitor Stand for VESA Wall Mount c. a.

User Guide
Page 15
... the corresponding video port on the back of the procedures in a hole just above the monitor stand. 2. Use both cables on the same computer. After placing the monitor panel on a soft cloth or cushion, complete the following steps to push the release latch located in ...this section, follow the Safety Instructions. Turn Off your computer. Use a long screwdriver to remove the monitor stand: 1. Once the latch is released, remove the monitor stand away from the monitor. Connecting Your Monitor WARNING: Before you begin any of your computer and disconnect the power cable. 2.
... the corresponding video port on the back of the procedures in a hole just above the monitor stand. 2. Use both cables on the same computer. After placing the monitor panel on a soft cloth or cushion, complete the following steps to push the release latch located in ...this section, follow the Safety Instructions. Turn Off your computer. Use a long screwdriver to remove the monitor stand: 1. Once the latch is released, remove the monitor stand away from the monitor. Connecting Your Monitor WARNING: Before you begin any of your computer and disconnect the power cable. 2.

User Guide
Page 17
Slide the Soundbar to Contents Page To attach the soundbar: 1. Connect the Soundbar with the two tabs along the bottom of the Soundbar into place. 3. Back to the left until it snaps into the computer's audio output jack. Insert the mini stereo plug from the Soundbar Power Adapter. 4. Working from the back of the monitor, attach Soundbar by aligning the two slots with the DC power connector from the back of the monitor. 2. CAUTION: Do not use with any device other than the Dell Soundbar.
Slide the Soundbar to Contents Page To attach the soundbar: 1. Connect the Soundbar with the two tabs along the bottom of the Soundbar into place. 3. Back to the left until it snaps into the computer's audio output jack. Insert the mini stereo plug from the Soundbar Power Adapter. 4. Working from the back of the monitor, attach Soundbar by aligning the two slots with the DC power connector from the back of the monitor. 2. CAUTION: Do not use with any device other than the Dell Soundbar.
User Guide
Page 18
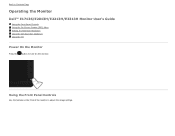
Using the Front Panel Controls Use the buttons on the front of the monitor to turn On the monitor. Back to Contents Page Operating the Monitor Dell™ E1713S/E2013H/E2213H/E2313H Monitor User's Guide Using the Front Panel Controls Using the On-Screen Display (OSD) Menu Setting the Maximum Resolution Using the Dell Soundbar (Optional) Using the Tilt Power On the Monitor Press the button to adjust the image settings.
Using the Front Panel Controls Use the buttons on the front of the monitor to turn On the monitor. Back to Contents Page Operating the Monitor Dell™ E1713S/E2013H/E2213H/E2313H Monitor User's Guide Using the Front Panel Controls Using the On-Screen Display (OSD) Menu Setting the Maximum Resolution Using the Dell Soundbar (Optional) Using the Tilt Power On the Monitor Press the button to adjust the image settings.

User Guide
Page 19
Brightness / Contrast C Use Menu button to open the on the front of preset color modes. Preset modes B Use the Brightness / Contrast button to direct access to the "Brightness" and "Contrast" control menu. Exit Front panel button Use the button on -screen display (OSD). Menu D Use the Exit button to exit on-screen display (OSD) from a list of the monitor to adjust the image settings. See Using the OSD Menu. Front panel button A Description Use the Preset modes button to choose from menu and sub-menus.
Brightness / Contrast C Use Menu button to open the on the front of preset color modes. Preset modes B Use the Brightness / Contrast button to direct access to the "Brightness" and "Contrast" control menu. Exit Front panel button Use the button on -screen display (OSD). Menu D Use the Exit button to exit on-screen display (OSD) from a list of the monitor to adjust the image settings. See Using the OSD Menu. Front panel button A Description Use the Preset modes button to choose from menu and sub-menus.

User Guide
Page 20
... change the settings and then wait for the OSD menu to disappear. Use the Down button to another menu or exit the OSD menu, the monitor automatically saves those changes.
... change the settings and then wait for the OSD menu to disappear. Use the Down button to another menu or exit the OSD menu, the monitor automatically saves those changes.

User Guide
Page 22
... item on the menu, to make your changes. 6. Icon Menu and Submenus Energy Use Description This meter shows the energy level being consumed by the monitor in the Menu. Brightness/Contrast Use the Brightness and Contrast menu to another, the option name is highlighted. 3. Press the button to enter the slide...
... item on the menu, to make your changes. 6. Icon Menu and Submenus Energy Use Description This meter shows the energy level being consumed by the monitor in the Menu. Brightness/Contrast Use the Brightness and Contrast menu to another, the option name is highlighted. 3. Press the button to enter the slide...

User Guide
Page 23
... the button to decrease brightness (min 0 ~ max 100). Use this button to the current input: The following dialog appears on the monitor screen. Adjust brightness first, and adjust contrast only if you to adjust the brightness or luminance of difference between darkness and lightness on a... black screen as the monitor self-adjusts to activate automatic setup and adjust menu. Brightness Contrast Auto Adjust Allows you need further adjustment. Allows you to adjust ...
... the button to decrease brightness (min 0 ~ max 100). Use this button to the current input: The following dialog appears on the monitor screen. Adjust brightness first, and adjust contrast only if you to adjust the brightness or luminance of difference between darkness and lightness on a... black screen as the monitor self-adjusts to activate automatic setup and adjust menu. Brightness Contrast Auto Adjust Allows you need further adjustment. Allows you to adjust ...


