User Guide
Page 1
...Your Monitor Setting Up Your Monitor Connecting Your Monitor Using the OSD On-Screen Menu/Display (OSD) Special OSD Functions OSD Warning Messages Setting the Optimal Resolution Using the Touch Screen Software About Your Touch Screen Software Installing Touch Screen Software Uninstalling Touch Screen Software Using the Touch Screen Control Panel Advanced Settings Dell Right Mouse Button Tool (RMBT) Tool Tray Center Desktop Tool Edge Acceleration Tool (EAT) Solving Problems General Problems Touch screen Problems Appendix Warranty Information CAUTION:General Safety Instructions CAUTION: Monitor...
...Your Monitor Setting Up Your Monitor Connecting Your Monitor Using the OSD On-Screen Menu/Display (OSD) Special OSD Functions OSD Warning Messages Setting the Optimal Resolution Using the Touch Screen Software About Your Touch Screen Software Installing Touch Screen Software Uninstalling Touch Screen Software Using the Touch Screen Control Panel Advanced Settings Dell Right Mouse Button Tool (RMBT) Tool Tray Center Desktop Tool Edge Acceleration Tool (EAT) Solving Problems General Problems Touch screen Problems Appendix Warranty Information CAUTION:General Safety Instructions CAUTION: Monitor...
User Guide
Page 6
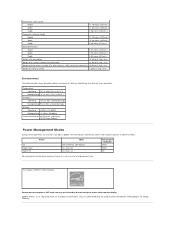
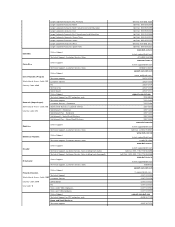
... ) Stand dimensions: Height 5.47 inches (139 mm ) Width 9.76 inches (248 mm ) Depth 3.58 inches (91 mm ) Weight with packaging 18.04 lb (8.2 kg ) max Weight with stand assembly and video cable 14.08 lb (6.4 kg ) max Weight without stand assembly (For wall mount or VESA mount considerations) 10.56 lb (4.8 kg ) max Weight of time. Zero power consumption in different modes. As an ENERGY STAR Partner, DELL...
... ) Stand dimensions: Height 5.47 inches (139 mm ) Width 9.76 inches (248 mm ) Depth 3.58 inches (91 mm ) Weight with packaging 18.04 lb (8.2 kg ) max Weight with stand assembly and video cable 14.08 lb (6.4 kg ) max Weight without stand assembly (For wall mount or VESA mount considerations) 10.56 lb (4.8 kg ) max Weight of time. Zero power consumption in different modes. As an ENERGY STAR Partner, DELL...
User Guide
Page 7
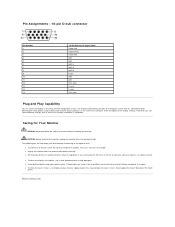
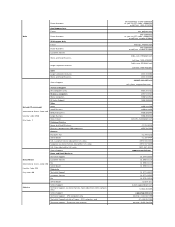
...) or any Plug and Play-compatible system. l To clean the touch screen, use thinner or benzene, abrasive cleaners, or compressed air. Apply cleaner to a rag and wipe the touch screen. l Avoid getting liquids inside , have a qualified service technician check it before you can configure itself and optimize the display settings. The following tips will help keep your touchmonitor. Pin Assignments - 15-pin D-sub connector Pin Number 1 2 3 4 5 6 7 8 9 10 11...
...) or any Plug and Play-compatible system. l To clean the touch screen, use thinner or benzene, abrasive cleaners, or compressed air. Apply cleaner to a rag and wipe the touch screen. l Avoid getting liquids inside , have a qualified service technician check it before you can configure itself and optimize the display settings. The following tips will help keep your touchmonitor. Pin Assignments - 15-pin D-sub connector Pin Number 1 2 3 4 5 6 7 8 9 10 11...
User Guide
Page 8
... you . Title to products passes from Dell to Contents Page Appendix Dell™ E157FPT Touch Screen Monitor Contents Warranty Information CAUTION:General Safety Instructions CAUTION: Monitor Safety Instructions Contacting Dell Regulatory Notices Your Monitor Setup Guide Warranty Information U.S. Title to software will provide such service and support to you . DELL MAKES NO WARRANTIES FOR SERVICE, SOFTWARE, OR NON-DELL BRANDED PRODUCT. WARRANTY AND SERVICE FOR NON-DELL BRANDED PRODUCT, IF ANY, IS PROVIDED...
... you . Title to products passes from Dell to Contents Page Appendix Dell™ E157FPT Touch Screen Monitor Contents Warranty Information CAUTION:General Safety Instructions CAUTION: Monitor Safety Instructions Contacting Dell Regulatory Notices Your Monitor Setup Guide Warranty Information U.S. Title to software will provide such service and support to you . DELL MAKES NO WARRANTIES FOR SERVICE, SOFTWARE, OR NON-DELL BRANDED PRODUCT. WARRANTY AND SERVICE FOR NON-DELL BRANDED PRODUCT, IF ANY, IS PROVIDED...
User Guide
Page 9
... preventive maintenance ¡ Problems caused by using accessories, parts, or components not supplied by this limited warranty? What is shipped. You agree and represent that is covered by Dell l Products with missing or altered Service Tags or serial numbers l Products for the Dell computer with your hardware product(s), see your -our end-user customer's-Dell-branded hardware products, including Dell-branded peripheral products...
... preventive maintenance ¡ Problems caused by using accessories, parts, or components not supplied by this limited warranty? What is shipped. You agree and represent that is covered by Dell l Products with missing or altered Service Tags or serial numbers l Products for the Dell computer with your hardware product(s), see your -our end-user customer's-Dell-branded hardware products, including Dell-branded peripheral products...

User Guide
Page 11
... time you request a replacement part, but we will not charge you for most products that has been installed by clicking the "I agree to these Terms and Conditions" button, may be returned unless you return the entire computer under any type of volume purchase agreement or any non-Dell customized hardware and/or software product(s) may be subject...
... time you request a replacement part, but we will not charge you for most products that has been installed by clicking the "I agree to these Terms and Conditions" button, may be returned unless you return the entire computer under any type of volume purchase agreement or any non-Dell customized hardware and/or software product(s) may be subject...
User Guide
Page 12
.... After reading this section, equipment refers to clean your device away from the display quickly and keep the display dry. l Keep your display. l Avoid placing loose papers underneath your device in a closed -in wall unit, or on a bed, sofa, or rug. These ODD devices contain no user adjustments nor any user serviceable or replaceable parts. Do not use : l Place the equipment on or tripped over...
.... After reading this section, equipment refers to clean your device away from the display quickly and keep the display dry. l Keep your display. l Avoid placing loose papers underneath your device in a closed -in wall unit, or on a bed, sofa, or rug. These ODD devices contain no user adjustments nor any user serviceable or replaceable parts. Do not use : l Place the equipment on or tripped over...
User Guide
Page 13
... when handling the adapter during normal operation. OR ¡ A manual voltage selection switch - l Norway and Sweden: If this device. Incorrect insertion of your equipment to a power source: l Check the voltage rating before you use with this product is equipped with either an internal power source or an external adapter. l Japan Only: Use only the Dell-provided AC power cable with a 3-prong power cable, connect the power cable to operate at...
... when handling the adapter during normal operation. OR ¡ A manual voltage selection switch - l Norway and Sweden: If this device. Incorrect insertion of your equipment to a power source: l Check the voltage rating before you use with this product is equipped with either an internal power source or an external adapter. l Japan Only: Use only the Dell-provided AC power cable with a 3-prong power cable, connect the power cable to operate at...
User Guide
Page 15
... any AC input voltage according to remove any cover or touch the inside a car trunk. l For support by phone: l For support through the support number listed and your User's Guide or Owner's Manual for setting the AC voltage input. CAUTION: If any internal components can be seen through the Internet and by phone, use , contact a local or an international operator. Turn on General Safety Instructions and Power Safety...
... any AC input voltage according to remove any cover or touch the inside a car trunk. l For support by phone: l For support through the support number listed and your User's Guide or Owner's Manual for setting the AC voltage input. CAUTION: If any internal components can be seen through the Internet and by phone, use , contact a local or an international operator. Turn on General Safety Instructions and Power Safety...
User Guide
Page 18
... Corporate Accounts Spare Parts Colombia Online Support Technical Support, Customer Service, Sales Costa Rica Online Support Technical Support, Customer Service, Sales Online Support Czech Republic (Prague) International Access Code: 00 Country Code: 420 Denmark (Copenhagen) International Access Code: 00 Country Code: 45 Technical Support Customer Service Fax Technical Fax Switchboard Online Support Technical Support for XPS computers only Home and Small Business Technical Support toll-free: 800 858...
... Corporate Accounts Spare Parts Colombia Online Support Technical Support, Customer Service, Sales Costa Rica Online Support Technical Support, Customer Service, Sales Online Support Czech Republic (Prague) International Access Code: 00 Country Code: 420 Denmark (Copenhagen) International Access Code: 00 Country Code: 45 Technical Support Customer Service Fax Technical Fax Switchboard Online Support Technical Support for XPS computers only Home and Small Business Technical Support toll-free: 800 858...
User Guide
Page 20
... Corporate Technical Support Customer Service Fax Switchboard Online Support Technical Support, Customer Service, Sales (dial from within U.K. XPS computers only Technical Support outside of Japan - Customer Service (dial within U.K. only) U.K. XPS computers only Technical Support - Sales (dial within U.K. Dimension and Inspiron 080-25068032 or 080-25068034 or your city STD code + 60003355 or toll-free: 1800 425 8045 eec_ap@dell.com...
... Corporate Technical Support Customer Service Fax Switchboard Online Support Technical Support, Customer Service, Sales (dial from within U.K. XPS computers only Technical Support outside of Japan - Customer Service (dial within U.K. only) U.K. XPS computers only Technical Support - Sales (dial within U.K. Dimension and Inspiron 080-25068032 or 080-25068034 or your city STD code + 60003355 or toll-free: 1800 425 8045 eec_ap@dell.com...
User Guide
Page 21
... Access Code: 00 Country Code: 60 City Code: 4 Online Support Support Home/Small Business Sales Corporate Sales Customer Service Fax Online Support Technical Support - Dell Precision, OptiPlex, and Latitude Technical Support - Projectors, PDAs, Printers, Routers Faxbox Service City Code: 44 24-Hour Automated Order Status Service Customer Service Business Sales Division - government agencies, educational institutions, and medical institutions Global Segment Japan Individual User Individual User Online...
... Access Code: 00 Country Code: 60 City Code: 4 Online Support Support Home/Small Business Sales Corporate Sales Customer Service Fax Online Support Technical Support - Dell Precision, OptiPlex, and Latitude Technical Support - Projectors, PDAs, Printers, Routers Faxbox Service City Code: 44 24-Hour Automated Order Status Service Customer Service Business Sales Division - government agencies, educational institutions, and medical institutions Global Segment Japan Individual User Individual User Online...
User Guide
Page 27
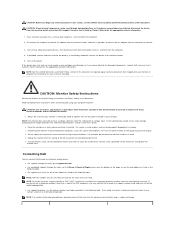
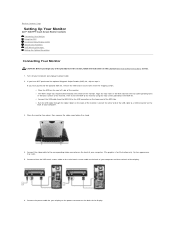
... Page Setting Up Your Monitor Dell™ E157FPT Touch Screen Monitor Contents Connecting Your Monitor Using the OSD On-Screen Menu/Display (OSD) Special OSD Functions OSD Warning Messages Setting the Optimal Resolution Connecting Your Monitor CAUTION: Before you begin any of your computer. 3. If you have NOT purchased the optional Magnetic Stripe Reader (MSR) kit, skip to a USB connector on the back of the display. 6. Connect the other end of the USB cable to step 3. Connect the power cable for...
... Page Setting Up Your Monitor Dell™ E157FPT Touch Screen Monitor Contents Connecting Your Monitor Using the OSD On-Screen Menu/Display (OSD) Special OSD Functions OSD Warning Messages Setting the Optimal Resolution Connecting Your Monitor CAUTION: Before you begin any of your computer. 3. If you have NOT purchased the optional Magnetic Stripe Reader (MSR) kit, skip to a USB connector on the back of the display. 6. Connect the other end of the USB cable to step 3. Connect the power cable for...
User Guide
Page 28
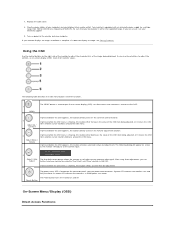
... the image being displayed. If pressed while the OSD menu is showing, this button directly accesses the Volume adjustment function. An amber LED indicates the monitor is used to open the on power to the incoming video signal. The following dialog will appear on the connector panel, near the power cord connector. The 'MENU' button is in the OSD. If pressed while the OSD menu is complete. Replace the cable cover. 8. The following table describes the OSD menu buttons and...
... the image being displayed. If pressed while the OSD menu is showing, this button directly accesses the Volume adjustment function. An amber LED indicates the monitor is used to open the on power to the incoming video signal. The following dialog will appear on the connector panel, near the power cord connector. The 'MENU' button is in the OSD. If pressed while the OSD menu is complete. Replace the cable cover. 8. The following table describes the OSD menu buttons and...
User Guide
Page 37
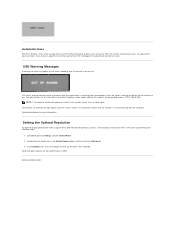
... not synchronizing with the signal that the monitor is too high or too low for the Horizontal and Vertical frequency ranges addressable by performing the following steps: 1. SeeSolving Problems for best performance is receiving from the computer. Click Start, point to use. Setting the Optimal Resolution For optimal display performance while using the Microsoft® Windows® operating systems, set the display resolution to 1024 by 768 pixels, then click OK...
... not synchronizing with the signal that the monitor is too high or too low for the Horizontal and Vertical frequency ranges addressable by performing the following steps: 1. SeeSolving Problems for best performance is receiving from the computer. Click Start, point to use. Setting the Optimal Resolution For optimal display performance while using the Microsoft® Windows® operating systems, set the display resolution to 1024 by 768 pixels, then click OK...
User Guide
Page 38
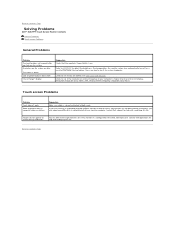
... your monitors properly. Vertical refresh frequency should be set to 1024 x 768. Targets do not appear on the screen are dim. Contact Dell Application for help with modifying this file. Refer to CONTRAST to 60 Hz. See OSD LOCK and UNLOCK. During operation, the monitor screen may experience difficulties in a configuration file called, EloTarget.conf. Contact Dell support for every monitor in calibrating all of the LCD display. Suggestion Make sure cable...
... your monitors properly. Vertical refresh frequency should be set to 1024 x 768. Targets do not appear on the screen are dim. Contact Dell Application for help with modifying this file. Refer to CONTRAST to 60 Hz. See OSD LOCK and UNLOCK. During operation, the monitor screen may experience difficulties in a configuration file called, EloTarget.conf. Contact Dell support for every monitor in calibrating all of the LCD display. Suggestion Make sure cable...
User Guide
Page 40
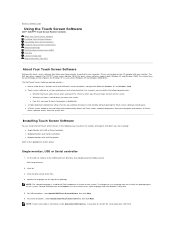
... a double-click. Default selection from the dropdown uses the current users input language from the system files. For USB controllers, select Install USB Touch Screen Drivers, then click Next. 6. If you need to touch to extract driver files. 4. The Dell Touch Screen Software package contains: l Native 32-bit drivers, for both Windows XP and Windows 2000, this manual uses the terminology and descriptions for the touchmonitor. On the Dell CD, browse to connect the serial cable later, click Next...
... a double-click. Default selection from the dropdown uses the current users input language from the system files. For USB controllers, select Install USB Touch Screen Drivers, then click Next. 6. If you need to touch to extract driver files. 4. The Dell Touch Screen Software package contains: l Native 32-bit drivers, for both Windows XP and Windows 2000, this manual uses the terminology and descriptions for the touchmonitor. On the Dell CD, browse to connect the serial cable later, click Next...
User Guide
Page 43
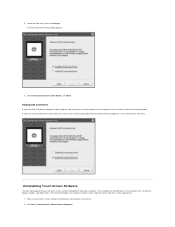
... the Dell entry, then click Change. If there are closed. 2. These components include touch screen software files, directories, program folders, and folder items. The Uninstall program also removes all touch screen software components from the Add or Remove programs in the Control Panel, Dell entry. 2. Select Install Serial Touchscreen Drivers, click Next. Click Start " Control Panel "Add or Remove Programs. Make sure the touch screen software and Windows control panels are no Dell USB devices attached to calibrate the touchmonitors...
... the Dell entry, then click Change. If there are closed. 2. These components include touch screen software files, directories, program folders, and folder items. The Uninstall program also removes all touch screen software components from the Add or Remove programs in the Control Panel, Dell entry. 2. Select Install Serial Touchscreen Drivers, click Next. Click Start " Control Panel "Add or Remove Programs. Make sure the touch screen software and Windows control panels are no Dell USB devices attached to calibrate the touchmonitors...

User Guide
Page 44
... Dell entry, then click Remove. 4. You may be disabled. Click Details to ensure that accepts touchscreens with any orientation of the X or Y axis, in the Tool Tray (lower right corner of the video image by adjusting the horizontal and vertical controls on the desktop. l When you change the size of the display) . Right-click the Dell icon in the Windows system tray and choose Dell Touch screen...
... Dell entry, then click Remove. 4. You may be disabled. Click Details to ensure that accepts touchscreens with any orientation of the X or Y axis, in the Tool Tray (lower right corner of the video image by adjusting the horizontal and vertical controls on the desktop. l When you change the size of the display) . Right-click the Dell icon in the Windows system tray and choose Dell Touch screen...
User Guide
Page 48
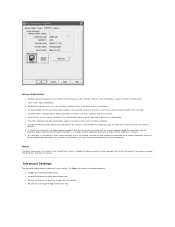
... "Windows Monitor" from the Windows Display Properties control panel. l Driver Version lists the version number of the Windows COM port. l The EloVA icon will launch the video alignment program only for Disabling/Enabling touch. Advanced Settings The Advanced dialog contains additional Touch settings. l An option to align all monitors in a multiple monitor application when only a single monitor alignment is desired. l The Identify Monitor button displays the Dell logo on . l If a serial port is reserved for a touch screen controller...
... "Windows Monitor" from the Windows Display Properties control panel. l Driver Version lists the version number of the Windows COM port. l The EloVA icon will launch the video alignment program only for Disabling/Enabling touch. Advanced Settings The Advanced dialog contains additional Touch settings. l An option to align all monitors in a multiple monitor application when only a single monitor alignment is desired. l The Identify Monitor button displays the Dell logo on . l If a serial port is reserved for a touch screen controller...


