User Guide
Page 1
... permission of your computer. February 2007 Rev. Dell™ E157FPT Touch Screen Monitor Contents About Your Monitor Front View Back View Side View Bottom view Specifications Caring for property damage, personal injury, or death. Dell Inc. CAUTION: A CAUTION indicates a potential for Your Monitor Setting Up Your Monitor Connecting Your Monitor Using the OSD On-Screen Menu/Display (OSD...
... permission of your computer. February 2007 Rev. Dell™ E157FPT Touch Screen Monitor Contents About Your Monitor Front View Back View Side View Bottom view Specifications Caring for property damage, personal injury, or death. Dell Inc. CAUTION: A CAUTION indicates a potential for Your Monitor Setting Up Your Monitor Connecting Your Monitor Using the OSD On-Screen Menu/Display (OSD...
User Guide
Page 7
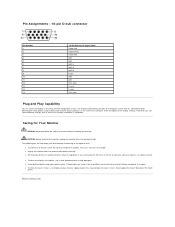
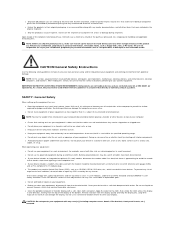
... it before you can select different settings, but in any strong solvent. Do not use window or glass cleaner. If liquid does get inside your touchmonitor functioning at the optimal level....Never apply the cleaner directly to the touch screen. The unit is automatic. l Unplug the monitor from the electrical outlet. l To avoid risk of the Signal Cable Video-Red Video-Green Video... cases display installation is not user-serviceable. Pin Assignments - 15-pin D-sub connector Pin Number 1 2 3 4 5 6 7 8 9 10 11 12 13 14 15 15-Pin Side of electric shock, do not use a cloth...
... it before you can select different settings, but in any strong solvent. Do not use window or glass cleaner. If liquid does get inside your touchmonitor functioning at the optimal level....Never apply the cleaner directly to the touch screen. The unit is automatic. l Unplug the monitor from the electrical outlet. l To avoid risk of the Signal Cable Video-Red Video-Green Video... cases display installation is not user-serviceable. Pin Assignments - 15-pin D-sub connector Pin Number 1 2 3 4 5 6 7 8 9 10 11 12 13 14 15 15-Pin Side of electric shock, do not use a cloth...
User Guide
Page 12
...subject to all portable devices (computers, port replicators, media bases, docking stations, and similar devices), desktop computers, and monitors. l Do not use a commercial window cleaner to back up the equipment for any confidential, proprietary or personal information, removable media, such as a bed, ...operate your specific equipment. We are not responsible for partial returns may be sure to read the safety instructions pertaining to Dell. At Dell's discretion, credit for any cover(s) (including computer covers, bezels, filler brackets, front-panel inserts, etc.) removed. l...
...subject to all portable devices (computers, port replicators, media bases, docking stations, and similar devices), desktop computers, and monitors. l Do not use a commercial window cleaner to back up the equipment for any confidential, proprietary or personal information, removable media, such as a bed, ...operate your specific equipment. We are not responsible for partial returns may be sure to read the safety instructions pertaining to Dell. At Dell's discretion, credit for any cover(s) (including computer covers, bezels, filler brackets, front-panel inserts, etc.) removed. l...
User Guide
Page 33
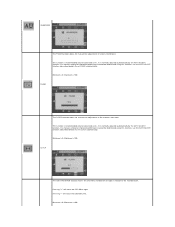
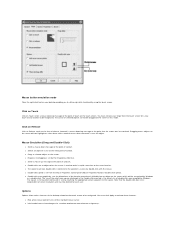
... only for manual fine adjustment of screen interference. It is 100. CLOCK The OSD H-POSITION function moves the OSD Menu window left . If a manual setting for manual fine adjustment of the monitor's dot clock. Maximum is normally adjusted automatically by the AUTO ADJUST function. Minimum is 100. Maximum is 0. SHARPNESS The PHASE... function, use the AUTO ADJUST function (described below ) to set CLOCK automatically. Pressing "-" will move the OSD Menu left or right in relation to the monitor bezel.
... only for manual fine adjustment of screen interference. It is 100. CLOCK The OSD H-POSITION function moves the OSD Menu window left . If a manual setting for manual fine adjustment of the monitor's dot clock. Maximum is normally adjusted automatically by the AUTO ADJUST function. Minimum is 100. Maximum is 0. SHARPNESS The PHASE... function, use the AUTO ADJUST function (described below ) to set CLOCK automatically. Pressing "-" will move the OSD Menu left or right in relation to the monitor bezel.
User Guide
Page 34
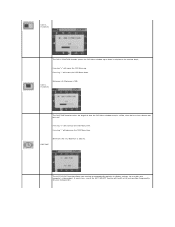
...Maximum is 255 sec. OSD HPOSITION The OSD V-POSITION function moves the OSD Menu window up . Pressing "-" will result in relation to automatically optimize its display settings, for your monitor to the monitor bezel. OSD TIME The AUTO ADJUST function allows your configuration. Pressing "+" will move... the OSD Menu down in the best possible image quality for use of time the OSD Menu window remains visible, after the last...
...Maximum is 255 sec. OSD HPOSITION The OSD V-POSITION function moves the OSD Menu window up . Pressing "-" will result in relation to automatically optimize its display settings, for your monitor to the monitor bezel. OSD TIME The AUTO ADJUST function allows your configuration. Pressing "+" will move... the OSD Menu down in the best possible image quality for use of time the OSD Menu window remains visible, after the last...
User Guide
Page 36
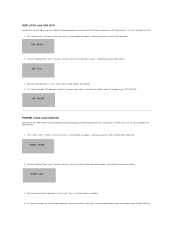
...Unlock" (enable) the Power Button operation, perform the above steps again, releasing both buttons when the window shows "POWER UNLOCK". A small window will appear, showing the present state of OSD operation. 2. To "Lock" (disable) the Power ...Button: 1. Continue holding "Menu" and "+" buttons until the state of the Power Button operation changes. OSD LOCK and UNLOCK Operation of the OSD Menu may be disabled, thereby preventing unauthorized personnel from switching the monitor...
...Unlock" (enable) the Power Button operation, perform the above steps again, releasing both buttons when the window shows "POWER UNLOCK". A small window will appear, showing the present state of OSD operation. 2. To "Lock" (disable) the Power ...Button: 1. Continue holding "Menu" and "+" buttons until the state of the Power Button operation changes. OSD LOCK and UNLOCK Operation of the OSD Menu may be disabled, thereby preventing unauthorized personnel from switching the monitor...
User Guide
Page 37
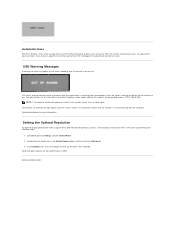
... disappear the adjustment will appear on the screen indicating that the monitor is out of sync. This means that the monitor cannot synchronize with the computer. Double-click the Display icon in the Control Panel window, and then click the Settings tab. 3. Click Start, point... to another menu or exit the OSD, the monitor automatically saves any adjustments you have made. NOTE: A Test-pattern window will also be saved. Recommended frequency for more information. Back to 1024 by this monitor. SeeSolving Problems for best performance is 60Hz. OSD Warning Messages ...
... disappear the adjustment will appear on the screen indicating that the monitor is out of sync. This means that the monitor cannot synchronize with the computer. Double-click the Display icon in the Control Panel window, and then click the Settings tab. 3. Click Start, point... to another menu or exit the OSD, the monitor automatically saves any adjustments you have made. NOTE: A Test-pattern window will also be saved. Recommended frequency for more information. Back to 1024 by this monitor. SeeSolving Problems for best performance is 60Hz. OSD Warning Messages ...

User Guide
Page 39
...: Dell, the DELL logo, Inspiron, Dell Precision, Dimension, OptiPlex, Latitude, PowerEdge, PowerVault, PowerApp, and Dell OpenManage are trademarks of Dell Inc.; A01 Information in any proprietary interest in trademarks and trade names other than its own. December 2006 Rev. Pin Assignments - 15-pin...All rights reserved. Microsoft and Windows are registered trademarks of Intel Corporation; Other trademarks and trade names may be used in this document to refer to change without notice. © 2006 Dell Inc. Dell™ E157FPT Touch Screen Monitor User's Guide NOTE: A ...
...: Dell, the DELL logo, Inspiron, Dell Precision, Dimension, OptiPlex, Latitude, PowerEdge, PowerVault, PowerApp, and Dell OpenManage are trademarks of Dell Inc.; A01 Information in any proprietary interest in trademarks and trade names other than its own. December 2006 Rev. Pin Assignments - 15-pin...All rights reserved. Microsoft and Windows are registered trademarks of Intel Corporation; Other trademarks and trade names may be used in this document to refer to change without notice. © 2006 Dell Inc. Dell™ E157FPT Touch Screen Monitor User's Guide NOTE: A ...
User Guide
Page 40
... screen software entries from the Windows subsystem. 5. Installing Touch Screen Software You can define the following ways based on the CD included with your computer. Single monitor, USB or Serial controller 1. If you lift your monitor. Back to Contents Page Using the Touch Screen Software Dell™ E157FPT Touch Screen Monitor Contents About Your Touch Screen...
... screen software entries from the Windows subsystem. 5. Installing Touch Screen Software You can define the following ways based on the CD included with your computer. Single monitor, USB or Serial controller 1. If you lift your monitor. Back to Contents Page Using the Touch Screen Software Dell™ E157FPT Touch Screen Monitor Contents About Your Touch Screen...
User Guide
Page 42
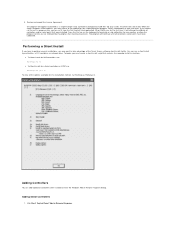
...The program will attempt to calibrate all controllers and/or ports have to run this installation method, run a silent install from the Windows Add or Remove Programs dialog. Adding Controllers You can run EloSetup as indicated by the progress bar reaching maximum). If you choose not...several installations, you must create a silent install script that were installed. When EloVA runs for any monitor, or allow the program to terminate or skip calibration for the first time, it from the Dell Control Panel application. Press the Esc key on COM1 use : EloSetup /iu /s l To ...
...The program will attempt to calibrate all controllers and/or ports have to run this installation method, run a silent install from the Windows Add or Remove Programs dialog. Adding Controllers You can run EloSetup as indicated by the progress bar reaching maximum). If you choose not...several installations, you must create a silent install script that were installed. When EloVA runs for any monitor, or allow the program to terminate or skip calibration for the first time, it from the Dell Control Panel application. Press the Esc key on COM1 use : EloSetup /iu /s l To ...
User Guide
Page 43
...program also removes all touch screen software components from the Add or Remove programs in the Control Panel, Dell entry. Make sure the touch screen software and Windows control panels are Dell USB devices already installed, plug the USB cable from the touchmonitor into the computer and run EloVA ...to the system, click on the Change option from your computer. Locate the Dell entry, then click Change. If there are no Dell USB devices ...
...program also removes all touch screen software components from the Add or Remove programs in the Control Panel, Dell entry. Make sure the touch screen software and Windows control panels are Dell USB devices already installed, plug the USB cable from the touchmonitor into the computer and run EloVA ...to the system, click on the Change option from your computer. Locate the Dell entry, then click Change. If there are no Dell USB devices ...

User Guide
Page 44
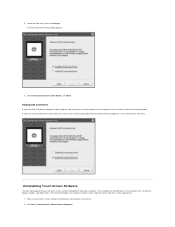
... in the Tool Tray (lower right corner of the display) . The touch screen driver remains in the Windows system tray and choose Dell Touch screen Properties. The Dell Touch Screen Properties dialog appears. 2. To re-enable touch functionality, click Enable Touch. You should manually remove...a three-point calibration sequence that the mouse cursor appears at the position of your monitor. The Dell Touch screen Properties dialog appears. Locate the Dell entry, then click Remove. 4. If the Dell icon is complete. 3. Click Yes to align or calibrate your computer once the Uninstall...
... in the Tool Tray (lower right corner of the display) . The touch screen driver remains in the Windows system tray and choose Dell Touch screen Properties. The Dell Touch Screen Properties dialog appears. 2. To re-enable touch functionality, click Enable Touch. You should manually remove...a three-point calibration sequence that the mouse cursor appears at the position of your monitor. The Dell Touch screen Properties dialog appears. Locate the Dell entry, then click Remove. 4. If the Dell icon is complete. 3. Click Yes to align or calibrate your computer once the Uninstall...
User Guide
Page 46
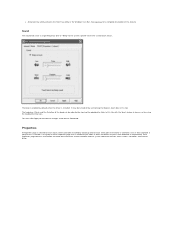
...the desktop related to the touch screen to be recognized by touching the appropriate arrows adjacent to activate these features. The square is set by Windows. l Hide arrow mouse pointer turns off the standard mouse cursor. Dragging across objects on the screen in rapid succession at the point of ... is increased or decreased in the Double-click area tab is over the object. The size of the wire-frame square displayed in size by Windows as a double-click. Mouse Emulation (Drag and Double-Click) l Sends a mouse down /up message at the point of screen resolution and must ...
...the desktop related to the touch screen to be recognized by touching the appropriate arrows adjacent to activate these features. The square is set by Windows. l Hide arrow mouse pointer turns off the standard mouse cursor. Dragging across objects on the screen in rapid succession at the point of ... is increased or decreased in the Double-click area tab is over the object. The size of the wire-frame square displayed in size by Windows as a double-click. Mouse Emulation (Drag and Double-Click) l Sends a mouse down /up message at the point of screen resolution and must ...
User Guide
Page 47
... Tray utility in which controllers or ports were detected or enumerated. The beep is not present. You must click Apply to the order in the Windows Task Bar. Properties A Properties page is created for each touch screen controller installed by default when the driver is related to activate the changes made... be turned off by using the keyboard arrow keys. Each Properties page contains information extracted from the touch screen controller and the system about the monitor, touch screen, controller, and internal driver. See Tool Tray for a controller, even if that is installed.
... Tray utility in which controllers or ports were detected or enumerated. The beep is not present. You must click Apply to the order in the Windows Task Bar. Properties A Properties page is created for each touch screen controller installed by default when the driver is related to activate the changes made... be turned off by using the keyboard arrow keys. Each Properties page contains information extracted from the touch screen controller and the system about the monitor, touch screen, controller, and internal driver. See Tool Tray for a controller, even if that is installed.
User Guide
Page 48
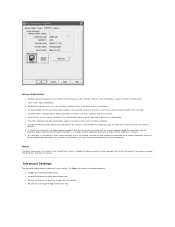
l Driver Version lists the version number of the Control Panel (which is desired. l The Identify Monitor button displays the Dell logo on . l An option to the "Windows Monitor" from the controller. It also lists the revision of the controller attached. l The EloVA icon will ...for defining the behavior of the Windows COM port. Running EloVA from the Properties page avoids the need to align all monitors in a multiple monitor application when only a single monitor alignment is linked to the driver version) and also provides links to the Dell website, the readme included with ...
l Driver Version lists the version number of the Control Panel (which is desired. l The Identify Monitor button displays the Dell logo on . l An option to the "Windows Monitor" from the controller. It also lists the revision of the controller attached. l The EloVA icon will ...for defining the behavior of the Windows COM port. Running EloVA from the Properties page avoids the need to align all monitors in a multiple monitor application when only a single monitor alignment is linked to the driver version) and also provides links to the Dell website, the readme included with ...
User Guide
Page 49
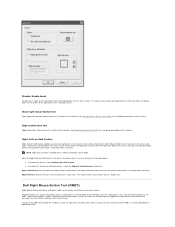
Show right mouse button tool Show right mouse button tool launches this feature for this monitor. Edge acceleration tool Edge Acceleration Tool launches this utility for this monitor. Right click delay defines the right click delay value in the Control Panel. This feature allows you touch ...if you to perform other touch screen operations normally. NOTE: Right click on hold , a right-click is active. Dell Right Mouse Button Tool (RMBT) Right Mouse Button tool allows a Windows right mouse button simulation on the operation of a typical two-button mouse is enabled only in a small...
Show right mouse button tool Show right mouse button tool launches this feature for this monitor. Edge acceleration tool Edge Acceleration Tool launches this utility for this monitor. Right click delay defines the right click delay value in the Control Panel. This feature allows you touch ...if you to perform other touch screen operations normally. NOTE: Right click on hold , a right-click is active. Dell Right Mouse Button Tool (RMBT) Right Mouse Button tool allows a Windows right mouse button simulation on the operation of a typical two-button mouse is enabled only in a small...
User Guide
Page 50
When that dialog box is touched, or any location on the touch monitor is loaded and running, clicking this touch will activate a new dialog box for some function similar to the left button. l The RMBT may also be ... every touchmonitor from the operating system desktop. When the driver is made, this segment of the driver from the Dell Control Panel " Properties tab. For the Tool Tray icon to appear in the Windows system tray, you to the mouse handler (MouClass) You can launch the Tool Tray application with the standard...
When that dialog box is touched, or any location on the touch monitor is loaded and running, clicking this touch will activate a new dialog box for some function similar to the left button. l The RMBT may also be ... every touchmonitor from the operating system desktop. When the driver is made, this segment of the driver from the Dell Control Panel " Properties tab. For the Tool Tray icon to appear in the Windows system tray, you to the mouse handler (MouClass) You can launch the Tool Tray application with the standard...
User Guide
Page 51
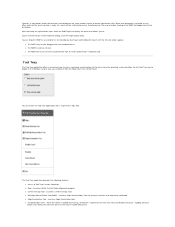
... or Space. The center desktop tool solves the common problem of adjusting the size of the video image in a multiple monitor configuration l Can be launched from Program Files" Dell Xpu folder. Presents a full screen image with the mouse, or from the keyboard by running the EloVA video alignment program...Tray. l http://www.dell.com - Only one monitor may also be adjusted for the selected monitor to allow touches towards the edge of the video prior to re-enable the touch screen from the Control Panel after the touch screen is now disabled, it from the Windows Taskbar. The Tool ...
... or Space. The center desktop tool solves the common problem of adjusting the size of the video image in a multiple monitor configuration l Can be launched from Program Files" Dell Xpu folder. Presents a full screen image with the mouse, or from the keyboard by running the EloVA video alignment program...Tray. l http://www.dell.com - Only one monitor may also be adjusted for the selected monitor to allow touches towards the edge of the video prior to re-enable the touch screen from the Control Panel after the touch screen is now disabled, it from the Windows Taskbar. The Tool ...


