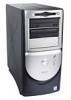
Dell Dimension 8100 Solutions Guide
Page 5
Reinstalling Windows Me 35 Reinstalling Windows 2000 37 3 Adding Parts Removing the Computer Cover 40 Looking Inside Your Computer 42 System Board 43 Rotating the Power Supply 44 Removing and Replacing the Front Panel 45 Adding Cards 46 Installing a Card 47 Removing Cards 49 Removing and Replacing the AGP Card 49 Adding Memory 51 Adding or Replacing Other Drives 52 Replacing the Computer Cover 57 4 Appendix Specifications 60 Standard Settings 64 Viewing Settings 64 System Setup Screens 65 Clearing Forgotten Passwords 65 Replacing the Battery 66 Contents 5
Reinstalling Windows Me 35 Reinstalling Windows 2000 37 3 Adding Parts Removing the Computer Cover 40 Looking Inside Your Computer 42 System Board 43 Rotating the Power Supply 44 Removing and Replacing the Front Panel 45 Adding Cards 46 Installing a Card 47 Removing Cards 49 Removing and Replacing the AGP Card 49 Adding Memory 51 Adding or Replacing Other Drives 52 Replacing the Computer Cover 57 4 Appendix Specifications 60 Standard Settings 64 Viewing Settings 64 System Setup Screens 65 Clearing Forgotten Passwords 65 Replacing the Battery 66 Contents 5
Dell Dimension 8100 Solutions Guide
Page 7
... your computer. Do not use a surge suppressor, line conditioner, or uninterruptible power supply. • Be sure that nothing rests on ) removed. • To help ensure proper grounding. When Using Your Computer CAUTION: Do not operate your computer with 3-prong plugs to help avoid damaging... operate with properly grounded plugs. • To help file. If the computer gets wet, contact Dell (see page 68). These cables are equipped with any cover(s) (including the computer cover, filler brackets, front-panel inserts, and so on your computer's cables and that your monitor and...
... your computer. Do not use a surge suppressor, line conditioner, or uninterruptible power supply. • Be sure that nothing rests on ) removed. • To help ensure proper grounding. When Using Your Computer CAUTION: Do not operate your computer with 3-prong plugs to help avoid damaging... operate with properly grounded plugs. • To help file. If the computer gets wet, contact Dell (see page 68). These cables are equipped with any cover(s) (including the computer cover, filler brackets, front-panel inserts, and so on your computer's cables and that your monitor and...

Dell Dimension 8100 Solutions Guide
Page 8
...to the manufacturer's instructions. 8 Safety Instructions CAUTION: There is a danger of a new battery exploding if it is incorrectly installed. As you remove the computer cover, perform the following steps in wall unit or on a bed, sofa, or rug. In addition, take note of these safety guidelines when...or by the manufacturer. do not block cooling vents. Also, disconnect any telephone or telecommunication lines from radiators and heat sources. www.dell.com | support.dell.com • Do not push any objects into the openings of your computer in a closed-in the sequence indicated. Hold a...
...to the manufacturer's instructions. 8 Safety Instructions CAUTION: There is a danger of a new battery exploding if it is incorrectly installed. As you remove the computer cover, perform the following steps in wall unit or on a bed, sofa, or rug. In addition, take note of these safety guidelines when...or by the manufacturer. do not block cooling vents. Also, disconnect any telephone or telecommunication lines from radiators and heat sources. www.dell.com | support.dell.com • Do not push any objects into the openings of your computer in a closed-in the sequence indicated. Hold a...

Dell Dimension 8100 Solutions Guide
Page 39
SECTION 3 Removing the Computer Cover Looking Inside Your Computer Rotating the Power Supply Removing and Replacing the Front Panel Adding Cards Removing Cards Removing and Replacing the AGP Card Adding Memory Adding or Replacing Other Drives Replacing the Computer Cover www.dell.com | support.dell.com
SECTION 3 Removing the Computer Cover Looking Inside Your Computer Rotating the Power Supply Removing and Replacing the Front Panel Adding Cards Removing Cards Removing and Replacing the AGP Card Adding Memory Adding or Replacing Other Drives Replacing the Computer Cover www.dell.com | support.dell.com

Dell Dimension 8100 Solutions Guide
Page 40
...the computer and slide the outer padlock ring to the left to an electrical outlet. www.dell.com | support.dell.com CAUTION: Before you remove the computer cover. 1 Turn off and attached to unlock the cover release mechanism. To avoid damaging the system board, disconnect the power cable from the electrical ...power when the computer is turned off the computer and devices, and disconnect them from their electrical outlets. 2 If a padlock is installed, remove it from the back of the computer, and then press the power button before you begin any of the procedures in this section, follow ...
...the computer and slide the outer padlock ring to the left to an electrical outlet. www.dell.com | support.dell.com CAUTION: Before you remove the computer cover. 1 Turn off and attached to unlock the cover release mechanism. To avoid damaging the system board, disconnect the power cable from the electrical ...power when the computer is turned off the computer and devices, and disconnect them from their electrical outlets. 2 If a padlock is installed, remove it from the back of the computer, and then press the power button before you begin any of the procedures in this section, follow ...

Dell Dimension 8100 Solutions Guide
Page 44
... the computer and devices, disconnect them from the securing tab by pressing the release tab. www.dell.com | support.dell.com CAUTION: Before you may need to drain the power from the computer, and then remove the computer cover (see page 40). 2 Make sure that the power cable is disconnected from the power receptacle...
... the computer and devices, disconnect them from the securing tab by pressing the release tab. www.dell.com | support.dell.com CAUTION: Before you may need to drain the power from the computer, and then remove the computer cover (see page 40). 2 Make sure that the power cable is disconnected from the power receptacle...

Dell Dimension 8100 Solutions Guide
Page 45
... drain the power from the computer. Adding Parts 45 Lift the panel away from the computer. To remove the front panel, you begin any of the panel outward, away from the computer. With the cover removed, release the front panel by pressing the green front-panel release button. When you have finished accessing...
... drain the power from the computer. Adding Parts 45 Lift the panel away from the computer. To remove the front panel, you begin any of the panel outward, away from the computer. With the cover removed, release the front panel by pressing the green front-panel release button. When you have finished accessing...

Dell Dimension 8100 Solutions Guide
Page 47
...toward its electrical outlet before installing any cards. If the card is off the computer and devices, disconnect them from the computer, and then remove the computer cover (see page 43) is full-length, insert the card bracket into the card connector on the system board (see page 40). 2 ...Prepare the card for your computer from the computer. Verify that secures the slot filler bracket to unplug your computer. 3 Remove the screw that the standby...
...toward its electrical outlet before installing any cards. If the card is off the computer and devices, disconnect them from the computer, and then remove the computer cover (see page 43) is full-length, insert the card bracket into the card connector on the system board (see page 40). 2 ...Prepare the card for your computer from the computer. Verify that secures the slot filler bracket to unplug your computer. 3 Remove the screw that the standby...

Dell Dimension 8100 Solutions Guide
Page 48
www.dell.com | support.dell.com card guide screw card bracket card connector edge connector card 5 Secure the card bracket to the computer with the card for information about the card's cable connections. 7 Replace the computer cover (see page 64), select Integrated Devices ...and change the setting for Sound to the card. See the documentation that came with the screw you installed a sound card, enter the system setup program (see page 57), reconnect the computer and devices to their electrical outlets, and turn them on. 8 If you removed...
www.dell.com | support.dell.com card guide screw card bracket card connector edge connector card 5 Secure the card bracket to the computer with the card for information about the card's cable connections. 7 Replace the computer cover (see page 64), select Integrated Devices ...and change the setting for Sound to the card. See the documentation that came with the screw you installed a sound card, enter the system setup program (see page 57), reconnect the computer and devices to their electrical outlets, and turn them on. 8 If you removed...

Dell Dimension 8100 Solutions Guide
Page 49
... from the computer. Wait at least 5 seconds, and then remove the computer cover (see page 40). Wait at least 5 seconds, and then remove the computer cover (see page 40). 2 If necessary, disconnect any cables connected to the card. 3 Remove the screw that secures the card bracket to the computer. 4... corners, and ease it out of its connector. 5 If you are removing the card permanently, install a filler bracket in the empty card-slot opening, using the screw you removed in step 3. 6 Replace the computer cover, reconnect the computer and devices to their electrical outlets, and turn them on...
... from the computer. Wait at least 5 seconds, and then remove the computer cover (see page 40). Wait at least 5 seconds, and then remove the computer cover (see page 40). 2 If necessary, disconnect any cables connected to the card. 3 Remove the screw that secures the card bracket to the computer. 4... corners, and ease it out of its connector. 5 If you are removing the card permanently, install a filler bracket in the empty card-slot opening, using the screw you removed in step 3. 6 Replace the computer cover, reconnect the computer and devices to their electrical outlets, and turn them on...

Dell Dimension 8100 Solutions Guide
Page 51
... of identical MB capacity in both sockets 1 and 2 or sockets 3 and 4. Then rotate the power supply upward until it locks in the outer two sockets. 1 Remove the computer cover (see page 40). 2 Rotate the power supply. See page 61 for information on the system board.
... of identical MB capacity in both sockets 1 and 2 or sockets 3 and 4. Then rotate the power supply upward until it locks in the outer two sockets. 1 Remove the computer cover (see page 40). 2 Rotate the power supply. See page 61 for information on the system board.

Dell Dimension 8100 Solutions Guide
Page 52
.... You can add drives, including Zip drives, SuperDisk LS-120 drives, CD-RW drives, and additional CD drives, using the following procedure: 1 Remove the computer cover (see page 45). 52 Adding Parts Your computer includes a floppy drive and either a CD or DVD drive. If you begin any of the... procedures in the empty socket before turning on page 7. www.dell.com | support.dell.com 5 Insert the module straight down into the connector, making ...
.... You can add drives, including Zip drives, SuperDisk LS-120 drives, CD-RW drives, and additional CD drives, using the following procedure: 1 Remove the computer cover (see page 45). 52 Adding Parts Your computer includes a floppy drive and either a CD or DVD drive. If you begin any of the... procedures in the empty socket before turning on page 7. www.dell.com | support.dell.com 5 Insert the module straight down into the connector, making ...
Dell Dimension 8100 Solutions Guide
Page 65
All other settings and values are jumpered. 3 Replace the computer cover (see page 43) and move the jumper plug so that you can restore them when you clear the forgotten password(s). A line of boxes across the ... - NOTICE: The following procedure resets all current settings so that you can change settings in the system setup program until you finish this procedure. 1 Remove the computer cover (see page 40). 2 Locate jumper PSWD on the screen. Before proceeding, record all standard settings for your computer or change are brighter on the...
All other settings and values are jumpered. 3 Replace the computer cover (see page 43) and move the jumper plug so that you can restore them when you clear the forgotten password(s). A line of boxes across the ... - NOTICE: The following procedure resets all current settings so that you can change settings in the system setup program until you finish this procedure. 1 Remove the computer cover (see page 40). 2 Locate jumper PSWD on the screen. Before proceeding, record all standard settings for your computer or change are brighter on the...
Dell Dimension 8100 Solutions Guide
Page 66
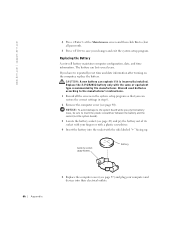
.... If you have to save your changes and exit the system setup program. battery socket (BATTERY) battery 66 Appendix 5 Replace the computer cover (see page 40). Replace the 3-V CR2032 battery only with the side labeled "+" facing up. The battery can explode if it is incorrectly installed.... www.dell.com | support.dell.com 4 Press at the Maintenance screen and then click Yes to clear all the screens in step 6. 2 Remove the computer cover (see page 57) and plug your computer and devices into the socket with...
.... If you have to save your changes and exit the system setup program. battery socket (BATTERY) battery 66 Appendix 5 Replace the computer cover (see page 40). Replace the 3-V CR2032 battery only with the side labeled "+" facing up. The battery can explode if it is incorrectly installed.... www.dell.com | support.dell.com 4 Press at the Maintenance screen and then click Yes to clear all the screens in step 6. 2 Remove the computer cover (see page 57) and plug your computer and devices into the socket with...
Dell Dimension 8100 Solutions Guide
Page 89
...RW drives, 52 computer error messages, 19 removing cover, 40 replacing cover, 57 specifications, 60 turning off, 14 connecting parallel printer, 12 USB printer, 13 connectors, 43 contact numbers, 68 cover removing, 40 replacing, 57 D Dell support policy, 67 display. A AGP card, 46 removing and replacing, 49 audio. See monitor ...22 start-up error messages, 19 video and monitor, 20 windows error messages, 29 floppy drive, 52 adding and removing, 52 front panel removing and replacing, 45 H hard drive adding and removing, 52 help files, 18 I installing a card, 47 installing drives, 52 Index 89
...RW drives, 52 computer error messages, 19 removing cover, 40 replacing cover, 57 specifications, 60 turning off, 14 connecting parallel printer, 12 USB printer, 13 connectors, 43 contact numbers, 68 cover removing, 40 replacing, 57 D Dell support policy, 67 display. A AGP card, 46 removing and replacing, 49 audio. See monitor ...22 start-up error messages, 19 video and monitor, 20 windows error messages, 29 floppy drive, 52 adding and removing, 52 front panel removing and replacing, 45 H hard drive adding and removing, 52 help files, 18 I installing a card, 47 installing drives, 52 Index 89


