Owner's Manual
Page 5
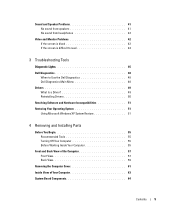
... is blank 42 If the screen is difficult to read 43 3 Troubleshooting Tools Diagnostic Lights 45 Dell Diagnostics 48 When to Use the Dell Diagnostics 48 Dell Diagnostics Main Menu 48 Drivers 49 What Is a Driver 49 Reinstalling Drivers 50 Resolving Software and ...Hardware Incompatibilities 51 Restoring Your Operating System 51 Using Microsoft Windows XP System Restore 51 4 Removing and Installing Parts Before You Begin 55 Recommended Tools 55 Turning...
... is blank 42 If the screen is difficult to read 43 3 Troubleshooting Tools Diagnostic Lights 45 Dell Diagnostics 48 When to Use the Dell Diagnostics 48 Dell Diagnostics Main Menu 48 Drivers 49 What Is a Driver 49 Reinstalling Drivers 50 Resolving Software and ...Hardware Incompatibilities 51 Restoring Your Operating System 51 Using Microsoft Windows XP System Restore 51 4 Removing and Installing Parts Before You Begin 55 Recommended Tools 55 Turning...
Owner's Manual
Page 14
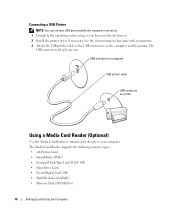
... the printer driver if necessary. The USB connectors fit only one way. Connecting a USB Printer NOTE: You can connect USB devices while the computer is turned on the computer and the printer.
... the printer driver if necessary. The USB connectors fit only one way. Connecting a USB Printer NOTE: You can connect USB devices while the computer is turned on the computer and the printer.

Owner's Manual
Page 16
... in the display settings. • In clone mode, the monitor and TV display the same image. • In extended desktop mode, you connect the TV, turn on the back of the network cable to ensure that it to a network device. For information on computer network device network cable 16 Setting Up...
... in the display settings. • In clone mode, the monitor and TV display the same image. • In extended desktop mode, you connect the TV, turn on the back of the network cable to ensure that it to a network device. For information on computer network device network cable 16 Setting Up...

Owner's Manual
Page 24
... the display and the hard drive after a defined period of inactivity, click the Start button, click Turn Off Computer, and then click Stand by turning off the computer. To exit from standby mode, it entered hibernate mode. To activate hibernate mode: 1 Click the Start button and click Control Panel. 2 Under ...
... the display and the hard drive after a defined period of inactivity, click the Start button, click Turn Off Computer, and then click Stand by turning off the computer. To exit from standby mode, it entered hibernate mode. To activate hibernate mode: 1 Click the Start button and click Control Panel. 2 Under ...

Owner's Manual
Page 25
.... Because hibernate mode requires a special file on your hard drive with enough disk space to store the contents of the computer memory, Dell creates an appropriately sized hibernate mode file before the monitor does, your computer may appear to be locked up. Each scheme has different ...pick a Control Panel icon, click Power Options. 4 Define your standby mode settings, hibernate mode settings, and other power settings in the Turn off monitor, Turn off the hard drive. Changing the time-out for a scheme field permanently changes the default settings for that you set the monitor to ...
.... Because hibernate mode requires a special file on your hard drive with enough disk space to store the contents of the computer memory, Dell creates an appropriately sized hibernate mode file before the monitor does, your computer may appear to be locked up. Each scheme has different ...pick a Control Panel icon, click Power Options. 4 Define your standby mode settings, hibernate mode settings, and other power settings in the Turn off monitor, Turn off the hard drive. Changing the time-out for a scheme field permanently changes the default settings for that you set the monitor to ...

Owner's Manual
Page 26
... program these functions, click an option from standby mode or hibernate mode. • Program the power button to activate standby mode, activate hibernate mode, or turn off feature.
... program these functions, click an option from standby mode or hibernate mode. • Program the power button to activate standby mode, activate hibernate mode, or turn off feature.
Owner's Manual
Page 29
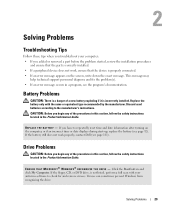
... before the problem started, review the installation procedures and ensure that the part is correctly installed. • If a peripheral device does not work properly, contact Dell (see page 92). R E P L A C E T H E B A T T E R Y - Click the Start button and click My Computer. If the floppy, CD, or DVD...Solving Problems 29 Discard used batteries according to the manufacturer's instructions. If you have to repeatedly reset time and date information after turning on the screen, write down the exact message. Battery Problems CAUTION: There is a danger of the procedures in this section...
... before the problem started, review the installation procedures and ensure that the part is correctly installed. • If a peripheral device does not work properly, contact Dell (see page 92). R E P L A C E T H E B A T T E R Y - Click the Start button and click My Computer. If the floppy, CD, or DVD...Solving Problems 29 Discard used batteries according to the manufacturer's instructions. If you have to repeatedly reset time and date information after turning on the screen, write down the exact message. Battery Problems CAUTION: There is a danger of the procedures in this section...
Owner's Manual
Page 30
... CD/DVD-RW. TU R N O F F S T A N D B Y M O D E I N W I N D O W S B E F O R E W R I T I S C - R W D I N G T O A C D / D V D - See page 108. The CD/DVD-RW drive must receive a steady stream of your screen. • Ensure that the volume is turned up by clicking any boxes that the sound is interrupted, an error occurs. NOTE: This system supports an optional USB floppy drive. See page 24...
... CD/DVD-RW. TU R N O F F S T A N D B Y M O D E I N W I N D O W S B E F O R E W R I T I S C - R W D I N G T O A C D / D V D - See page 108. The CD/DVD-RW drive must receive a steady stream of your screen. • Ensure that the volume is turned up by clicking any boxes that the sound is interrupted, an error occurs. NOTE: This system supports an optional USB floppy drive. See page 24...

Owner's Manual
Page 35
... by pressing a key on your keyboard or moving your mouse, press and hold the power button for at least 8 to 10 seconds until the computer turns off . The computer stops responding NOTICE: You might lose data if you are unable to get a response by pressing a key on your keyboard or ...moving your mouse, press and hold the power button for at least 8 to 10 seconds until the computer turns off . If you are unable to All Programs→ Accessories, and then click Program Compatibility Wizard. 2 In the welcome screen, click Next. 3 Follow the ...
... by pressing a key on your keyboard or moving your mouse, press and hold the power button for at least 8 to 10 seconds until the computer turns off . The computer stops responding NOTICE: You might lose data if you are unable to get a response by pressing a key on your keyboard or ...moving your mouse, press and hold the power button for at least 8 to 10 seconds until the computer turns off . If you are unable to All Programs→ Accessories, and then click Program Compatibility Wizard. 2 In the welcome screen, click Next. 3 Follow the ...
Owner's Manual
Page 37
... mouse extension cables, if used, and connect the mouse directly to the computer. 3 Reconnect the mouse cable as shown on page 95. • Run the Dell Diagnostics (see page 48). See page 50. R U N T H E H A R D W A R E TR O U B L E S H O O T E R - Solving Problems 37 TE S T T H E M O U S E - CHECK THE MOUSE SETTINGS -... press to display the Start menu. 2 Type u, press the keyboard arrow keys to highlight Shut down or Turn Off, and then press . 3 After the computer turns off, reconnect the mouse cable as shown on the setup diagram for your computer. 4 Start the computer. ...
... mouse extension cables, if used, and connect the mouse directly to the computer. 3 Reconnect the mouse cable as shown on page 95. • Run the Dell Diagnostics (see page 48). See page 50. R U N T H E H A R D W A R E TR O U B L E S H O O T E R - Solving Problems 37 TE S T T H E M O U S E - CHECK THE MOUSE SETTINGS -... press to display the Start menu. 2 Type u, press the keyboard arrow keys to highlight Shut down or Turn Off, and then press . 3 After the computer turns off, reconnect the mouse cable as shown on the setup diagram for your computer. 4 Start the computer. ...
Owner's Manual
Page 39
...• Ensure that the electrical outlet is securely connected to verify that the computer turns on properly. • Ensure that the processor cable is turned on a power strip • Multiple power strips connected to the same electrical outlet... for setup and troubleshooting information. I F T H E P O W E R L I G H T I N T E R F E R E N C E - C H E C K T H E P R I N T E R D O C U M E N T A T I O N - ENSURE THAT THE PRINTER IS TURNED ON Solving Problems 39 Also bypass power protection devices, power strips, and power extension cables to the system board (see page 72).
...• Ensure that the electrical outlet is securely connected to verify that the computer turns on properly. • Ensure that the processor cable is turned on a power strip • Multiple power strips connected to the same electrical outlet... for setup and troubleshooting information. I F T H E P O W E R L I G H T I N T E R F E R E N C E - C H E C K T H E P R I N T E R D O C U M E N T A T I O N - ENSURE THAT THE PRINTER IS TURNED ON Solving Problems 39 Also bypass power protection devices, power strips, and power extension cables to the system board (see page 72).

Owner's Manual
Page 41
...for instructions. E N S U R E T H A T T H E S U B W O O F E R A N D T H E S P E A K E R S A R E T U R N E D O N - Ensure that the volume is turned up and that the sound is working by testing it with another device, such as shown on the setup diagram supplied with the speakers. TE... in the lower-right corner of the procedures in this section, follow the safety instructions located in some MP3 players overrides the Windows volume setting. Turn off . C H E C K T H E S P E A K E R C A B L E C O N N E C T I N D O W S V O L U M E C O N T R O L - See the setup diagram supplied with...
...for instructions. E N S U R E T H A T T H E S U B W O O F E R A N D T H E S P E A K E R S A R E T U R N E D O N - Ensure that the volume is turned up and that the sound is working by testing it with another device, such as shown on the setup diagram supplied with the speakers. TE... in the lower-right corner of the procedures in this section, follow the safety instructions located in some MP3 players overrides the Windows volume setting. Turn off . C H E C K T H E S P E A K E R C A B L E C O N N E C T I N D O W S V O L U M E C O N T R O L - See the setup diagram supplied with...
Owner's Manual
Page 42
... the lower-right corner of the procedures in this section, follow the safety instructions located in the Product Information Guide. Ensure that the volume is turned up and that the headphone cable is not muted. R U N T H E H A R D W A R E TR O U B L E S H O O T E R - Ensure that the sound is securely inserted into the ...It is connected as shown on . If the screen is blank CHECK THE MONITOR CABLE CONNECTION - • Ensure that the monitor is turned on the setup diagram for your computer. • If you begin any of your screen. If the power light is lit or blinking,...
... the lower-right corner of the procedures in this section, follow the safety instructions located in the Product Information Guide. Ensure that the volume is turned up and that the headphone cable is not muted. R U N T H E H A R D W A R E TR O U B L E S H O O T E R - Ensure that the sound is securely inserted into the ...It is connected as shown on . If the screen is blank CHECK THE MONITOR CABLE CONNECTION - • Ensure that the monitor is turned on the setup diagram for your computer. • If you begin any of your screen. If the power light is lit or blinking,...

Owner's Manual
Page 43
... C H E C K T H E M O N I T O R S E T T I N G S - Solving Problems 43 If your speaker system includes a subwoofer, ensure that the electrical outlet is working by testing it with another device, such as a lamp. Turn off nearby devices to check for instructions on adjusting the contrast and brightness, demagnetizing (degaussing) the monitor, and running the monitor self-test. C H E C K T H E D I A G N O S T I C L I T O R - M O V E T H E S U B W O O F E R A W A Y F R O M T H E M O N I G H T S - M O V E T H E M O N I C A L O U T L E T - Ensure that...
... C H E C K T H E M O N I T O R S E T T I N G S - Solving Problems 43 If your speaker system includes a subwoofer, ensure that the electrical outlet is working by testing it with another device, such as a lamp. Turn off nearby devices to check for instructions on adjusting the contrast and brightness, demagnetizing (degaussing) the monitor, and running the monitor self-test. C H E C K T H E D I A G N O S T I C L I T O R - M O V E T H E S U B W O O F E R A W A Y F R O M T H E M O N I G H T S - M O V E T H E M O N I C A L O U T L E T - Ensure that...

Owner's Manual
Page 45
... page 111). If the computer starts normally, reinstall an additional module. When the computer starts normally, the lights flash. button. Contact Dell (see page 57). After the computer completes POST, all modules without error. • If available, install properly working memory of the... pre-BIOS failure electrical outlet and press the power has occurred. Continue until you have identified a faulty module or reinstalled all four lights turn off " Plug the computer into your computer has four lights labeled "1," "2," "3," and "4" on the front panel (see page 111)....
... page 111). If the computer starts normally, reinstall an additional module. When the computer starts normally, the lights flash. button. Contact Dell (see page 57). After the computer completes POST, all modules without error. • If available, install properly working memory of the... pre-BIOS failure electrical outlet and press the power has occurred. Continue until you have identified a faulty module or reinstalled all four lights turn off " Plug the computer into your computer has four lights labeled "1," "2," "3," and "4" on the front panel (see page 111)....
Owner's Manual
Page 47
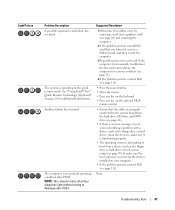
... • Move the mouse • Press any key on the keyboard • Press any key on your computer. • If the problem persists, contact Dell (see page 64). • If there is in the quick resume mode. See "Using Intel® Viiv™ Quick Resume Technology (Optional)" on your ... Description A possible expansion card failure has occurred. Another failure has occurred. None. The system is attempting to Windows after POST. NOTE: The computer turns off all four diagnostic lights before booting to boot from the hard drive, CD drive, and DVD drive (see page 111).
... • Move the mouse • Press any key on the keyboard • Press any key on your computer. • If the problem persists, contact Dell (see page 64). • If there is in the quick resume mode. See "Using Intel® Viiv™ Quick Resume Technology (Optional)" on your ... Description A possible expansion card failure has occurred. Another failure has occurred. None. The system is attempting to Windows after POST. NOTE: The computer turns off all four diagnostic lights before booting to boot from the hard drive, CD drive, and DVD drive (see page 111).

Owner's Manual
Page 48
... procedures in this section, follow the instructions on the screen. NOTICE: The Dell Diagnostics works only on Dell™ computers. 1 Turn on your computer, perform the checks in "Solving Problems" on the symptom of devices. Dell Diagnostics Main Menu 1 After the Dell Diagnostics loads and the Main Menu screen appears, click the button for technical...
... procedures in this section, follow the instructions on the screen. NOTICE: The Dell Diagnostics works only on Dell™ computers. 1 Turn on your computer, perform the checks in "Solving Problems" on the symptom of devices. Dell Diagnostics Main Menu 1 After the Dell Diagnostics loads and the Main Menu screen appears, click the button for technical...

Owner's Manual
Page 53
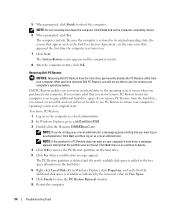
...Reboot in when you purchased the computer. PC Restore restores your computer. NOTICE: If you do not press in certain regions. Using Dell PC Restore by Symantec only as the last method to restore your computer- including data files-are permanently deleted from the hard drive... process takes approximately 6-10 minutes to complete. If possible, back up all data before using PC Restore. To use PC Restore: 1 Turn on the hard drive and removes any files or programs until the system restoration is unchecked. Troubleshooting Tools 53 Data files include documents, spreadsheets...
...Reboot in when you purchased the computer. PC Restore restores your computer. NOTICE: If you do not press in certain regions. Using Dell PC Restore by Symantec only as the last method to restore your computer- including data files-are permanently deleted from the hard drive... process takes approximately 6-10 minutes to complete. If possible, back up all data before using PC Restore. To use PC Restore: 1 Turn on the hard drive and removes any files or programs until the system restoration is unchecked. Troubleshooting Tools 53 Data files include documents, spreadsheets...
Owner's Manual
Page 54
...Quit, and then log on to restore your computer's hard drive, a message appears stating that appeared the first time the computer was turned on your computer's operating system. 5 When prompted, click Finish to gain additional hard-drive space. Because the computer is available as...you remove PC Restore from the hard drive, you cannot ever recall it to the computer as a local administrator. Removing Dell PC Restore NOTICE: Removing Dell PC Restore from the hard drive permanently deletes the PC Restore utility from your computer's operating system to its original operating ...
...Quit, and then log on to restore your computer's hard drive, a message appears stating that appeared the first time the computer was turned on your computer's operating system. 5 When prompted, click Finish to gain additional hard-drive space. Because the computer is available as...you remove PC Restore from the hard drive, you cannot ever recall it to the computer as a local administrator. Removing Dell PC Restore NOTICE: Removing Dell PC Restore from the hard drive permanently deletes the PC Restore utility from your computer's operating system to its original operating ...
Owner's Manual
Page 55
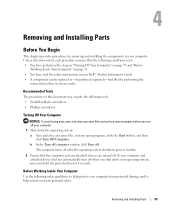
...that the computer and any attached devices are turned off. b In the Turn off computer window, click Turn off your computer. Removing and Installing Parts 55 Recommended Tools The procedures in reverse order. The computer turns off when you turn off after the operating system shutdown process finishes... conditions exist: • You have performed the steps in "Turning Off Your Computer" on page 55 and "Before Working Inside Your Computer" on page 55. • You have read the safety information in your Dell™ Product Information Guide. • A component can be replaced...
...that the computer and any attached devices are turned off. b In the Turn off computer window, click Turn off your computer. Removing and Installing Parts 55 Recommended Tools The procedures in reverse order. The computer turns off when you turn off after the operating system shutdown process finishes... conditions exist: • You have performed the steps in "Turning Off Your Computer" on page 55 and "Before Working Inside Your Computer" on page 55. • You have read the safety information in your Dell™ Product Information Guide. • A component can be replaced...

