Owner's Manual
Page 10
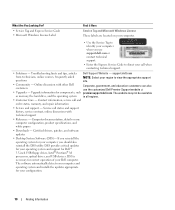
... USB devices. DSS is necessary for correct operation of your operating system and support for your Dell computer. support.dell.com NOTE: Select your configuration. 10 Finding Information Online discussion with technical support • Reference - The software automatically detects your computer...- What Are You Looking For? • Service Tag and Express Service Code • Microsoft Windows License Label Find it Here Service Tag and Microsoft Windows License These labels are located on my computer configuration, product specifications, and white papers • Downloads...
... USB devices. DSS is necessary for correct operation of your operating system and support for your Dell computer. support.dell.com NOTE: Select your configuration. 10 Finding Information Online discussion with technical support • Reference - The software automatically detects your computer...- What Are You Looking For? • Service Tag and Express Service Code • Microsoft Windows License Label Find it Here Service Tag and Microsoft Windows License These labels are located on my computer configuration, product specifications, and white papers • Downloads...

Owner's Manual
Page 35
... restart your computer. If necessary, uninstall and then reinstall the program. The Program Compatibility Wizard configures a program so that is designed for at least 8 to 10 seconds until the computer turns off . If you are unable to perform an operating system shutdown. C H E C K T H E S O F T W A R E D O C U M E N T A T I... you are unable to get a response by pressing a key on your keyboard or moving your mouse, press and hold the power button for an earlier Windows operating system RUN THE PROGRAM COMPATIBILITY WIZARD - TU R N T H E C O M P U T E R O F F - A program crashes repeatedly ...
... restart your computer. If necessary, uninstall and then reinstall the program. The Program Compatibility Wizard configures a program so that is designed for at least 8 to 10 seconds until the computer turns off . If you are unable to perform an operating system shutdown. C H E C K T H E S O F T W A R E D O C U M E N T A T I... you are unable to get a response by pressing a key on your keyboard or moving your mouse, press and hold the power button for an earlier Windows operating system RUN THE PROGRAM COMPATIBILITY WIZARD - TU R N T H E C O M P U T E R O F F - A program crashes repeatedly ...

Owner's Manual
Page 48
... questions periodically. Tests a specific device. Dell Diagnostics Main Menu 1 After the Dell Diagnostics loads and the Main Menu screen appears, click the button for technical assistance. This test typically takes 10 to run the Dell Diagnostics before you contact Dell for the option you want to 20 ... You can customize the tests you want . NOTICE: The Dell Diagnostics works only on Dell™ computers. 1 Turn on page 29 and run . If you cannot resolve the error condition, contact Dell (see the Microsoft® Windows® desktop. If you wait too long and the operating...
... questions periodically. Tests a specific device. Dell Diagnostics Main Menu 1 After the Dell Diagnostics loads and the Main Menu screen appears, click the button for technical assistance. This test typically takes 10 to run the Dell Diagnostics before you contact Dell for the option you want to 20 ... You can customize the tests you want . NOTICE: The Dell Diagnostics works only on Dell™ computers. 1 Turn on page 29 and run . If you cannot resolve the error condition, contact Dell (see the Microsoft® Windows® desktop. If you wait too long and the operating...

Owner's Manual
Page 51
... to which you previously extracted the driver files. 9 When the name of the appropriate driver appears, click Next. 10 Click Finish and restart your computer. Dell PC Restore permanently deletes all data on computers purchased in certain regions. To access help, see page 11. 3 ... hardware, software, or other system settings have left the computer in when you purchased the computer. Using Microsoft Windows XP System Restore The Microsoft Windows XP operating system provides System Restore to allow you received the computer. To resolve incompatibilities using System Restore. Resolving...
... to which you previously extracted the driver files. 9 When the name of the appropriate driver appears, click Next. 10 Click Finish and restart your computer. Dell PC Restore permanently deletes all data on computers purchased in certain regions. To access help, see page 11. 3 ... hardware, software, or other system settings have left the computer in when you purchased the computer. Using Microsoft Windows XP System Restore The Microsoft Windows XP operating system provides System Restore to allow you received the computer. To resolve incompatibilities using System Restore. Resolving...

Owner's Manual
Page 53
...Performance and Maintenance. 3 Click System. 4 Click the System Restore tab. The restore process takes approximately 6-10 minutes to All Programs→ Accessories→ System Tools, and then click System Restore. 2 Click Undo... the computer. Enabling System Restore If you do not want to proceed with www.dell.com appears at the top of free hard-disk space available, System Restore is ...NOTICE: Using PC Restore permanently deletes all data before using PC Restore. If you reinstall Windows XP with less than 200 MB of the screen. 2 Immediately upon seeing the blue bar...
...Performance and Maintenance. 3 Click System. 4 Click the System Restore tab. The restore process takes approximately 6-10 minutes to All Programs→ Accessories→ System Tools, and then click System Restore. 2 Click Undo... the computer. Enabling System Restore If you do not want to proceed with www.dell.com appears at the top of free hard-disk space available, System Restore is ...NOTICE: Using PC Restore permanently deletes all data before using PC Restore. If you reinstall Windows XP with less than 200 MB of the screen. 2 Immediately upon seeing the blue bar...
Owner's Manual
Page 107
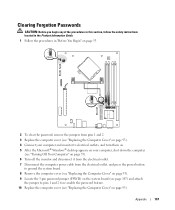
... cover (see "Replacing the Computer Cover" on page 93). 4 Connect your computer and monitor to electrical outlets, and turn them on. 5 After the Microsoft® Windows® desktop appears on your computer, shut down the computer (see "Turning Off Your Computer" on page 55). 6 Turn off the monitor and disconnect it... the 3-pin password jumper (PSWD) on the system board (see page 107) and attach the jumper to pins 1 and 2 to re-enable the password feature. 10 Replace the computer cover (see "Replacing the Computer Cover" on page 93). Appendix 107
... cover (see "Replacing the Computer Cover" on page 93). 4 Connect your computer and monitor to electrical outlets, and turn them on. 5 After the Microsoft® Windows® desktop appears on your computer, shut down the computer (see "Turning Off Your Computer" on page 55). 6 Turn off the monitor and disconnect it... the 3-pin password jumper (PSWD) on the system board (see page 107) and attach the jumper to pins 1 and 2 to re-enable the password feature. 10 Replace the computer cover (see "Replacing the Computer Cover" on page 93). Appendix 107

Owner's Manual
Page 130
... 9 error messages diagnostic lights, 45 F floppy drive installing, 87 removing, 85 H hard drive installing, 77 problems, 31 removing, 76 hardware Dell Diagnostics, 48 Hardware Troubleshooter, 51 Help and Support Center, 11 hibernate mode, 24, 26 Hyper-Threading, 27 I IEEE 1394 problems, 33 installing ..., 37 N network Network Setup Wizard, 17 problems, 38 setting up , 17 problems, 31 K keyboard problems, 34 L labels Microsoft Windows, 10 Service Tag, 10 lights back of computer, 45 diagnostic, 45 M media card reader installing, 83 problems, 33 removing, 82 using, 14 memory 4-GB configurations...
... 9 error messages diagnostic lights, 45 F floppy drive installing, 87 removing, 85 H hard drive installing, 77 problems, 31 removing, 76 hardware Dell Diagnostics, 48 Hardware Troubleshooter, 51 Help and Support Center, 11 hibernate mode, 24, 26 Hyper-Threading, 27 I IEEE 1394 problems, 33 installing ..., 37 N network Network Setup Wizard, 17 problems, 38 setting up , 17 problems, 31 K keyboard problems, 34 L labels Microsoft Windows, 10 Service Tag, 10 lights back of computer, 45 diagnostic, 45 M media card reader installing, 83 problems, 33 removing, 82 using, 14 memory 4-GB configurations...

Owner's Manual
Page 131
...29 blue screen, 35 CD drive, 30 CD/DVD-RW drive, 30 computer crashes, 34-35 problems (continued) computer stops responding, 34-35 Dell Diagnostics, 48 diagnostic lights, 45 drives, 29 DVD drive, 30 e-mail, 31 error messages, 32 general, 34 hard drive, 31 IEEE 1394...monitor, 42 volume adjusting, 41 Product Information Guide, 9 Program Compatibility Wizard, 35 R regulatory information, 9 restoring Windows XP, 51-52 S safety instructions, 9 SATA. See monitor serial ATA, 75 Service Tag, 10 settings system setup, 99 Setup Diagram, 9 software Hyper-Threading, 27 problems, 35-36 sound problems, 41 ...
...29 blue screen, 35 CD drive, 30 CD/DVD-RW drive, 30 computer crashes, 34-35 problems (continued) computer stops responding, 34-35 Dell Diagnostics, 48 diagnostic lights, 45 drives, 29 DVD drive, 30 e-mail, 31 error messages, 32 general, 34 hard drive, 31 IEEE 1394...monitor, 42 volume adjusting, 41 Product Information Guide, 9 Program Compatibility Wizard, 35 R regulatory information, 9 restoring Windows XP, 51-52 S safety instructions, 9 SATA. See monitor serial ATA, 75 Service Tag, 10 settings system setup, 99 Setup Diagram, 9 software Hyper-Threading, 27 problems, 35-36 sound problems, 41 ...

Service Manual
Page 21
... amount of the module. 5. To verify that memory size has changed, press to electrical outlets, and turn them on. 8. Log on your Microsoft® Windows® desktop and click Properties. 11. Cards CAUTION: Before you insert the module correctly, the securing clips snap into the cutouts at each end of... 4 crossbar NOTICE: To avoid damage to the memory module, press the module straight down into the connector while you apply equal force to your computer. 10. Insert the module into the connector until the module snaps into the computer. 7. If you begin any of the module. 6.
... amount of the module. 5. To verify that memory size has changed, press to electrical outlets, and turn them on. 8. Log on your Microsoft® Windows® desktop and click Properties. 11. Cards CAUTION: Before you insert the module correctly, the securing clips snap into the cutouts at each end of... 4 crossbar NOTICE: To avoid damage to the memory module, press the module straight down into the connector while you apply equal force to your computer. 10. Insert the module into the connector until the module snaps into the computer. 7. If you begin any of the module. 6.

Service Manual
Page 61
...to the devices specified in system setup. 3. This test typically takes 10 to 20 minutes and requires no interaction on your computer and try ...select the version appropriate for the option you are having. 2. Custom Tests a specific device. After the Dell Diagnostics loads and the Main Menu screen appears, click the button for your computer is located at the... top of the Tree problem you want. If you cannot resolve the error condition, contact Dell (see the Windows desktop. When the boot device list appears, highlight IDE CD-ROM Device and press . 4. Write ...
...to the devices specified in system setup. 3. This test typically takes 10 to 20 minutes and requires no interaction on your computer and try ...select the version appropriate for the option you are having. 2. Custom Tests a specific device. After the Dell Diagnostics loads and the Main Menu screen appears, click the button for your computer is located at the... top of the Tree problem you want. If you cannot resolve the error condition, contact Dell (see the Windows desktop. When the boot device list appears, highlight IDE CD-ROM Device and press . 4. Write ...

Service Manual
Page 72
...3. Close the computer cover (see System Board Components). Connect your computer, the jumper plug is attached to reenable the password feature. 10. Remove the jumper plug from the electrical outlet, and press the power button to electrical outlets, and turn them on pins 2 ...shut down the computer (see Removing the Computer Cover). 9. Open the computer cover (see Turning Off Your Computer). 6. After the Microsoft® Windows® desktop appears on . c. Locate the 3-pin password jumper (PSWD) on pins 1 and 2 and wait approximately five seconds. Back to ...
...3. Close the computer cover (see System Board Components). Connect your computer, the jumper plug is attached to reenable the password feature. 10. Remove the jumper plug from the electrical outlet, and press the power button to electrical outlets, and turn them on pins 2 ...shut down the computer (see Removing the Computer Cover). 9. Open the computer cover (see Turning Off Your Computer). 6. After the Microsoft® Windows® desktop appears on . c. Locate the 3-pin password jumper (PSWD) on pins 1 and 2 and wait approximately five seconds. Back to ...


