Owner's Manual
Page 1
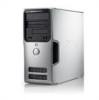
Dell™ Dimension™ 5150/E510 Owner's Manual Service Tag cover latch release CD or DVD eject button CD or DVD activity light FlexBay for optional floppy drive or Media Card Reader microphone connector headphone connector diagnostic lights hard-drive activity light power button/ power activity light USB 2.0 connectors (2) power connector sound connectors (integrated) (5) VGA video connector (integrated) network adapter USB 2.0 connectors (5) Model DCSM card slots for PCI Express x16 (1), PCI (2), PCI Express x1 (1) www.dell.com | support.dell.com
Dell™ Dimension™ 5150/E510 Owner's Manual Service Tag cover latch release CD or DVD eject button CD or DVD activity light FlexBay for optional floppy drive or Media Card Reader microphone connector headphone connector diagnostic lights hard-drive activity light power button/ power activity light USB 2.0 connectors (2) power connector sound connectors (integrated) (5) VGA video connector (integrated) network adapter USB 2.0 connectors (5) Model DCSM card slots for PCI Express x16 (1), PCI (2), PCI Express x1 (1) www.dell.com | support.dell.com
Owner's Manual
Page 2
... to change without the written permission of Microsoft Corporation; Trademarks used in this text: Dell, the DELL logo, Inspiron, Dell Precision, Dimension, OptiPlex, Latitude, PowerEdge, PowerVault, PowerApp, DellNet, and PowerConnect are not applicable. Intel and Pentium are registered trademarks of Dell Inc. Notes, Notices, and Cautions NOTE: A NOTE indicates important information that helps you how...
... to change without the written permission of Microsoft Corporation; Trademarks used in this text: Dell, the DELL logo, Inspiron, Dell Precision, Dimension, OptiPlex, Latitude, PowerEdge, PowerVault, PowerApp, DellNet, and PowerConnect are not applicable. Intel and Pentium are registered trademarks of Dell Inc. Notes, Notices, and Cautions NOTE: A NOTE indicates important information that helps you how...

Owner's Manual
Page 3
Contents Finding Information 9 1 Setting Up and Using Your Computer Setting Up a Printer 13 Printer Cable 13 Connecting a Printer 13 Connecting to the Internet 14 Setting Up Your Internet Connection 15 Playing CDs and DVDs 16 Adjusting the Volume 17 Adjusting the Picture 17 Copying CDs and DVDs 18 How to Copy a CD or DVD 18 Using Blank CDs and DVDs 19 Helpful Tips 20 Using a Media Card Reader (Optional 20 Connecting Two Monitors 21 Connecting Two Monitors With VGA Connectors 22 Connecting One Monitor With a VGA Connector and One Monitor With a DVI Connector 22 Connecting a ...
Contents Finding Information 9 1 Setting Up and Using Your Computer Setting Up a Printer 13 Printer Cable 13 Connecting a Printer 13 Connecting to the Internet 14 Setting Up Your Internet Connection 15 Playing CDs and DVDs 16 Adjusting the Volume 17 Adjusting the Picture 17 Copying CDs and DVDs 18 How to Copy a CD or DVD 18 Using Blank CDs and DVDs 19 Helpful Tips 20 Using a Media Card Reader (Optional 20 Connecting Two Monitors 21 Connecting Two Monitors With VGA Connectors 22 Connecting One Monitor With a VGA Connector and One Monitor With a DVI Connector 22 Connecting a ...
Owner's Manual
Page 4
About RAID Configurations 27 Determining If RAID Is Working 28 RAID Level 1 28 Troubleshooting RAID 29 Recovering From a Multiple Hard Drive Failure Using the Intel® RAID Option ROM Utility 29 Recovering From a Single Hard Drive Failure Using the Intel Matrix Storage Manager 29 Setting Your Computer to RAID-Enabled Mode 30 2 Solving Problems Troubleshooting Tips 31 Battery Problems 31 Drive Problems 32 CD and DVD drive problems 32 Hard drive problems 33 E-Mail, Modem, and Internet Problems 33 Error Messages 34 Media Card Reader Problems 35 Keyboard Problems 36 Lockups and ...
About RAID Configurations 27 Determining If RAID Is Working 28 RAID Level 1 28 Troubleshooting RAID 29 Recovering From a Multiple Hard Drive Failure Using the Intel® RAID Option ROM Utility 29 Recovering From a Single Hard Drive Failure Using the Intel Matrix Storage Manager 29 Setting Your Computer to RAID-Enabled Mode 30 2 Solving Problems Troubleshooting Tips 31 Battery Problems 31 Drive Problems 32 CD and DVD drive problems 32 Hard drive problems 33 E-Mail, Modem, and Internet Problems 33 Error Messages 34 Media Card Reader Problems 35 Keyboard Problems 36 Lockups and ...
Owner's Manual
Page 5
...Problems 44 If the screen is blank 44 If the screen is difficult to read 45 3 Troubleshooting Tools Diagnostic Lights 47 Dell Diagnostics 50 Dell Diagnostics Main Menu 50 Drivers 51 What Is a Driver 51 Identifying Drivers 52 Reinstalling Drivers 52 Resolving Software and Hardware ...Incompatibilities 53 Restoring Your Operating System 53 Using Microsoft Windows XP System Restore 54 Using Dell PC Restore by Symantec 55 Using the Operating System CD 57 4 Removing and Installing Parts Before You Begin 59 Recommended Tools...
...Problems 44 If the screen is blank 44 If the screen is difficult to read 45 3 Troubleshooting Tools Diagnostic Lights 47 Dell Diagnostics 50 Dell Diagnostics Main Menu 50 Drivers 51 What Is a Driver 51 Identifying Drivers 52 Reinstalling Drivers 52 Resolving Software and Hardware ...Incompatibilities 53 Restoring Your Operating System 53 Using Microsoft Windows XP System Restore 54 Using Dell PC Restore by Symantec 55 Using the Operating System CD 57 4 Removing and Installing Parts Before You Begin 59 Recommended Tools...
Owner's Manual
Page 6
System Board Components 67 Memory 68 DDR2 Memory Overview 68 Addressing Memory With 4-GB Configurations 69 Installing Memory 69 Removing Memory 71 Cards 72 PCI Cards 72 PCI Express Cards 76 Drive Panel 80 Removing the Drive Panel 80 Removing the Drive-Panel Insert 81 Replacing the Drive-Panel Insert 82 Replacing the Drive Panel 82 Drives 83 IDE Drive Addressing 83 Connecting Drive Cables 84 Drive Interface Connectors 84 Power Cable Connector 84 Connecting and Disconnecting Drive Cables 85 Hard Drive 85 Removing a Hard Drive 85 Installing a Hard Drive 86 Adding a Second ...
System Board Components 67 Memory 68 DDR2 Memory Overview 68 Addressing Memory With 4-GB Configurations 69 Installing Memory 69 Removing Memory 71 Cards 72 PCI Cards 72 PCI Express Cards 76 Drive Panel 80 Removing the Drive Panel 80 Removing the Drive-Panel Insert 81 Replacing the Drive-Panel Insert 82 Replacing the Drive Panel 82 Drives 83 IDE Drive Addressing 83 Connecting Drive Cables 84 Drive Interface Connectors 84 Power Cable Connector 84 Connecting and Disconnecting Drive Cables 85 Hard Drive 85 Removing a Hard Drive 85 Installing a Hard Drive 86 Adding a Second ...
Owner's Manual
Page 7
... Computer, Keyboard, and Monitor 116 Mouse 117 Floppy Drive 117 CDs and DVDs 117 Dell Technical Support Policy (U.S. Only 119 Class A 119 Class B 119 FCC Identification Information 120 Contacting Dell 120 Index 139 Contents 7 Only 118 Definition of "Dell-Installed" Software and Peripherals 118 Definition of "Third-Party" Software and Peripherals 118 FCC...
... Computer, Keyboard, and Monitor 116 Mouse 117 Floppy Drive 117 CDs and DVDs 117 Dell Technical Support Policy (U.S. Only 119 Class A 119 Class B 119 FCC Identification Information 120 Contacting Dell 120 Index 139 Contents 7 Only 118 Definition of "Dell-Installed" Software and Peripherals 118 Definition of "Third-Party" Software and Peripherals 118 FCC...

Owner's Manual
Page 9
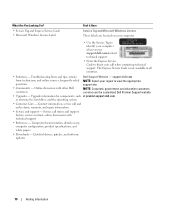
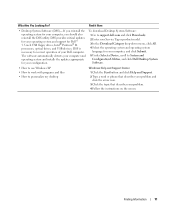
Finding Information NOTE: Additional documentation may be included with your computer, depending on your country. What Are You Looking For? • Warranty information • Safety instructions • Regulatory information • Ergonomics information • End User License Agreement Find it Here Dell™ Product Information Guide • How to set up my computer Setup Diagram Finding Information 9
Finding Information NOTE: Additional documentation may be included with your computer, depending on your country. What Are You Looking For? • Warranty information • Safety instructions • Regulatory information • Ergonomics information • End User License Agreement Find it Here Dell™ Product Information Guide • How to set up my computer Setup Diagram Finding Information 9
Owner's Manual
Page 10
...• Use the Service Tag to identify your computer when you use the customized Dell Premier Support website • Upgrades - Upgrade information for components, such at premier.support.dell.com. Service call and order status, warranty, and repair information • Service ...- Contact information, service call status and support history, service contract, online discussions with other Dell NOTE: Corporate, government, and education customers customers can also use support.dell.comorcontact technical support. • Enter the Express Service Code to direct your region to view...
...• Use the Service Tag to identify your computer when you use the customized Dell Premier Support website • Upgrades - Upgrade information for components, such at premier.support.dell.com. Service call and order status, warranty, and repair information • Service ...- Contact information, service call status and support history, service contract, online discussions with other Dell NOTE: Corporate, government, and education customers customers can also use support.dell.comorcontact technical support. • Enter the Express Service Code to direct your region to view...
Owner's Manual
Page 11
...system and installs the updates appropriate for your problem. 4 Follow the instructions on the screen. To download Desktop System Software: 1 Go to support.dell.com and click Downloads. 2 Enter your Service Tag or product model. 3 In the Download Category drop-down menu, click All. 4 Select... the operating system and operating system language for Dell™ 3.5-inch USB floppy drives, Intel® Pentium® M processors, optical drives, and USB devices. If you reinstall the operating system for...
...system and installs the updates appropriate for your problem. 4 Follow the instructions on the screen. To download Desktop System Software: 1 Go to support.dell.com and click Downloads. 2 Enter your Service Tag or product model. 3 In the Download Category drop-down menu, click All. 4 Select... the operating system and operating system language for Dell™ 3.5-inch USB floppy drives, Intel® Pentium® M processors, optical drives, and USB devices. If you reinstall the operating system for...

Owner's Manual
Page 12
12 Finding Information
12 Finding Information
Owner's Manual
Page 13
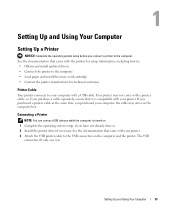
Setting Up and Using Your Computer Setting Up a Printer NOTICE: Complete the operating system setup before you connect a printer to the USB connectors on . 1 Complete the operating system setup, if you purchase a cable separately, ensure that it is turned on the computer and the printer. If you purchased a printer cable at the same time you purchased your computer, the cable may not come with a printer cable, so if you have not already done so. 2 Install the printer driver if necessary. See the documentation that came with a USB cable. Setting Up and Using Your Computer 13 ...
Setting Up and Using Your Computer Setting Up a Printer NOTICE: Complete the operating system setup before you connect a printer to the USB connectors on . 1 Complete the operating system setup, if you purchase a cable separately, ensure that it is turned on the computer and the printer. If you purchased a printer cable at the same time you purchased your computer, the cable may not come with a printer cable, so if you have not already done so. 2 Install the printer driver if necessary. See the documentation that came with a USB cable. Setting Up and Using Your Computer 13 ...

Owner's Manual
Page 14
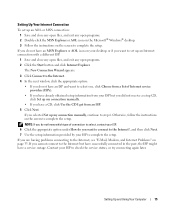
NOTE: If you use your telephone on the same line simultaneously. • Cable modem connections that provide high-speed Internet access through your existing telephone line. With a DSL connection, you can access the Internet and use a dial-up connection, you are using a dial-up connection, connect a telephone line to the modem connector on your computer and to the Internet NOTE: ISPs and ISP offerings vary by country. Dial-up connections are using a DSL or cable modem connection, contact your ISP for setup instructions. 14 Setting Up and Using Your Computer If you are ...
NOTE: If you use your telephone on the same line simultaneously. • Cable modem connections that provide high-speed Internet access through your existing telephone line. With a DSL connection, you can access the Internet and use a dial-up connection, you are using a dial-up connection, connect a telephone line to the modem connector on your computer and to the Internet NOTE: ISPs and ISP offerings vary by country. Dial-up connections are using a DSL or cable modem connection, contact your ISP for setup instructions. 14 Setting Up and Using Your Computer If you are ...
Owner's Manual
Page 15
The New Connection Wizard appears. 3 Click Connect to the Internet. 4 In the next window, click the appropriate option: • If you do not have a service outage. Otherwise, follow the instructions on page 33. If you are having problems connecting to the Internet, see "E-Mail, Modem, and Internet Problems" on the screen to complete the setup. If you do you want to select one, click Choose from a list of connection to select, contact your ISP. 6 Click the appropriate option under How do not have a CD, click Use the CD I got from an ISP. 5 Click Next. NOTE: If you do not know which ...
The New Connection Wizard appears. 3 Click Connect to the Internet. 4 In the next window, click the appropriate option: • If you do not have a service outage. Otherwise, follow the instructions on page 33. If you are having problems connecting to the Internet, see "E-Mail, Modem, and Internet Problems" on the screen to complete the setup. If you do you want to select one, click Choose from a list of connection to select, contact your ISP. 6 Click the appropriate option under How do not have a CD, click Use the CD I got from an ISP. 5 Click Next. NOTE: If you do not know which ...

Owner's Manual
Page 16
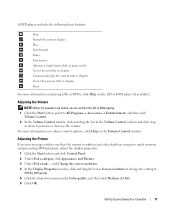
NOTE: Ensure that came with your computer. NOTICE: Do not move the computer when you are not using the drive. A CD player includes the following basic buttons: Play Move backward within the current track Pause Move forward within the current track Stop Go to the previous track Eject Go to copy CDs, see the CD software that you follow all copyright laws when you open or close it. Playing CDs and DVDs NOTICE: Do not press down on the front of the drive. 2 Place the disc, label side up, in the center of the tray. 3 Press the eject button or gently push in the tray. To format CDs ...
NOTE: Ensure that came with your computer. NOTICE: Do not move the computer when you are not using the drive. A CD player includes the following basic buttons: Play Move backward within the current track Pause Move forward within the current track Stop Go to the previous track Eject Go to copy CDs, see the CD software that you follow all copyright laws when you open or close it. Playing CDs and DVDs NOTICE: Do not press down on the front of the drive. 2 Place the disc, label side up, in the center of the tray. 3 Press the eject button or gently push in the tray. To format CDs ...
Owner's Manual
Page 17
Adjusting the Picture If an error message notifies you do not hear the CD or DVD playing. 1 Click the Start button, point to All Programs→ Accessories→ Entertainment, and then click Volume Control. 2 In the Volume Control window, click and drag the bar in Screen resolution to change the setting to 800 by 600 pixels. 5 Click the drop-down to the previous title or chapter Eject For more information on playing CDs or DVDs, click Help on volume control options, click Help in pause mode Go to the next title or chapter Continuously play the current title or chapter Go to ...
Adjusting the Picture If an error message notifies you do not hear the CD or DVD playing. 1 Click the Start button, point to All Programs→ Accessories→ Entertainment, and then click Volume Control. 2 In the Volume Control window, click and drag the bar in Screen resolution to change the setting to 800 by 600 pixels. 5 Click the drop-down to the previous title or chapter Eject For more information on playing CDs or DVDs, click Help on volume control options, click Help in pause mode Go to the next title or chapter Continuously play the current title or chapter Go to ...
Owner's Manual
Page 18
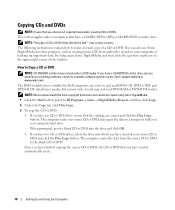
...following instructions explain how to make an exact copy of the window. For help, open Sonic DigitalMedia and then click the question mark icon in Dell computers can also use Sonic DigitalMedia for available software patches on the Sonic support website at www.sonic.com. NOTE: Most commercial DVDs have ...to a temporary folder on your source CD or DVD and click the Disc Copy button. NOTE: The types of CD or DVD drives offered by Dell™ may not read DVD-RAM or DVD-R DL media. Copying CDs and DVDs NOTE: Ensure that you have created automatically ejects. 18 Setting ...
...following instructions explain how to make an exact copy of the window. For help, open Sonic DigitalMedia and then click the question mark icon in Dell computers can also use Sonic DigitalMedia for available software patches on the Sonic support website at www.sonic.com. NOTE: Most commercial DVDs have ...to a temporary folder on your source CD or DVD and click the Disc Copy button. NOTE: The types of CD or DVD drives offered by Dell™ may not read DVD-RAM or DVD-R DL media. Copying CDs and DVDs NOTE: Ensure that you have created automatically ejects. 18 Setting ...

Owner's Manual
Page 19
After creating a CD-R, you plan to erase, rewrite, or update information on CDs. CD-Writable Drives Media Type CD-R CD-RW Read Yes Yes Write Yes Yes Rewritable No Yes DVD-Writable Drives Media Type CD-R CD-RW DVD+R DVD-R DVD+RW DVD-RW DVD+R DL DVD-R DL DVD-RAM Read Yes Yes Yes Yes Yes Yes Yes Maybe Maybe Write Yes Yes Yes Yes Yes Yes Yes No No Rewritable No Yes No No Yes Yes No No No Setting Up and Using Your Computer 19 Use blank CD-Rs to both CD and DVD recording media. After you create a DVD+/-R disc, you may not be used to permanently store large amounts of the disc ...
After creating a CD-R, you plan to erase, rewrite, or update information on CDs. CD-Writable Drives Media Type CD-R CD-RW Read Yes Yes Write Yes Yes Rewritable No Yes DVD-Writable Drives Media Type CD-R CD-RW DVD+R DVD-R DVD+RW DVD-RW DVD+R DL DVD-R DL DVD-RAM Read Yes Yes Yes Yes Yes Yes Yes Maybe Maybe Write Yes Yes Yes Yes Yes Yes Yes No No Rewritable No Yes No No Yes Yes No No No Setting Up and Using Your Computer 19 Use blank CD-Rs to both CD and DVD recording media. After you create a DVD+/-R disc, you may not be used to permanently store large amounts of the disc ...
Owner's Manual
Page 20
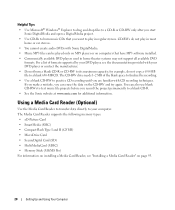
You can also use blank CD-RWs to test music file projects before you can be played only on MP3 players or on page 95. 20 Setting Up and Using Your Computer Using a Media Card Reader (Optional) Use the Media Card Reader to transfer data directly to your DVD player or contact the manufacturer. • Do not burn a blank CD-R or CD-RW to its maximum capacity; If you make a mistake, you record the project permanently to a blank CD-R. • See the Sonic website at www.sonic.com for example, do not play in most home or car stereos. • You cannot create audio DVDs with CD ...
You can also use blank CD-RWs to test music file projects before you can be played only on MP3 players or on page 95. 20 Setting Up and Using Your Computer Using a Media Card Reader (Optional) Use the Media Card Reader to transfer data directly to your DVD player or contact the manufacturer. • Do not burn a blank CD-R or CD-RW to its maximum capacity; If you make a mistake, you record the project permanently to a blank CD-R. • See the Sonic website at www.sonic.com for example, do not play in most home or car stereos. • You cannot create audio DVDs with CD ...

Owner's Manual
Page 21
The instructions tell you begin any of them must have VGA connectors, you are connecting two monitors that supports dual monitors, follow the safety instructions in the connector. Setting Up and Using Your Computer 21 Connecting Two Monitors CAUTION: Before you how to the TV. Check the card orientation and try again. If you may connect only one monitor (VGA or DVI) in addition to connect either two monitors (each with a VGA connector), one monitor with a VGA connector and one of the procedures in this section, follow these instructions to determine the proper ...
The instructions tell you begin any of them must have VGA connectors, you are connecting two monitors that supports dual monitors, follow the safety instructions in the connector. Setting Up and Using Your Computer 21 Connecting Two Monitors CAUTION: Before you how to the TV. Check the card orientation and try again. If you may connect only one monitor (VGA or DVI) in addition to connect either two monitors (each with a VGA connector), one monitor with a VGA connector and one of the procedures in this section, follow these instructions to determine the proper ...
