
Owner's Manual
Page 6
Drive Panels 76 Removing the Drive Panel 76 Removing the Drive-Panel Insert 77 Replacing the Drive-Panel Insert 77 Replacing the Drive Panel 78 Drives 79 IDE Drive Addressing 79 Connecting Drive Cables 80 Drive Interface Connectors 80 Power Cable Connector 80 Connecting and Disconnecting Drive Cables 81 Hard Drive 81 Removing a Hard Drive 82 Installing a Hard Drive 83 Adding a Second Hard Drive 84 Floppy Drive 85 Removing a Floppy Drive 85 Installing a Floppy Drive 87...
Drive Panels 76 Removing the Drive Panel 76 Removing the Drive-Panel Insert 77 Replacing the Drive-Panel Insert 77 Replacing the Drive Panel 78 Drives 79 IDE Drive Addressing 79 Connecting Drive Cables 80 Drive Interface Connectors 80 Power Cable Connector 80 Connecting and Disconnecting Drive Cables 81 Hard Drive 81 Removing a Hard Drive 82 Installing a Hard Drive 83 Adding a Second Hard Drive 84 Floppy Drive 85 Removing a Floppy Drive 85 Installing a Floppy Drive 87...

Owner's Manual
Page 29
...identify and resolve modem problems. (Modem Helper is connected to a digital telephone network. R U N T H E M O D E M H E L P E R D I A G N O S T I N G S - The modem does not operate while it to a telephone. Hard drive problems RUN CHECK DISK - 1 Click the Start button and click My Computer. 2 Right-click Local Disk C:. 3 Click Properties. 4 Click the Tools tab. 5 Under Error-checking...you cannot open your e-mail attachments: 1 In Outlook Express, click Tools, click Options, and then click Security. 2 Click Do not allow attachments to remove the checkmark. CHECK THE TELEPHONE JACK -
...identify and resolve modem problems. (Modem Helper is connected to a digital telephone network. R U N T H E M O D E M H E L P E R D I A G N O S T I N G S - The modem does not operate while it to a telephone. Hard drive problems RUN CHECK DISK - 1 Click the Start button and click My Computer. 2 Right-click Local Disk C:. 3 Click Properties. 4 Click the Tools tab. 5 Under Error-checking...you cannot open your e-mail attachments: 1 In Outlook Express, click Tools, click Options, and then click Security. 2 Click Do not allow attachments to remove the checkmark. CHECK THE TELEPHONE JACK -

Owner's Manual
Page 44
... (see page 63), and then restart the computer. A possible graphics card failure has occurred. • If the computer has a graphics card, remove the card, reinstall it (see page 70), and then restart the computer. • If the problem still exists, install a graphics card that you..., install properly working memory of the same type into your computer (see page 63). • If the problem persists, contact Dell (see page 118). A possible floppy or hard drive failure has occurred. Reinstall all power and data cables and restart the computer. • If the problem persists, contact...
... (see page 63), and then restart the computer. A possible graphics card failure has occurred. • If the computer has a graphics card, remove the card, reinstall it (see page 70), and then restart the computer. • If the problem still exists, install a graphics card that you..., install properly working memory of the same type into your computer (see page 63). • If the problem persists, contact Dell (see page 118). A possible floppy or hard drive failure has occurred. Reinstall all power and data cables and restart the computer. • If the problem persists, contact...
Owner's Manual
Page 50
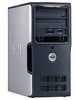
...in when you to return your computer to an earlier operating state (without affecting data files. • Dell PC Restore by Symantec restores your hard drive to the operating state it was in an undesirable operating state. Using Microsoft Windows XP System Restore The ...Dell™ computer to an Earlier Operating State If problems occur after you install a device driver, use System Restore. Restoring the Computer to the Windows Classic view. All calendar dates with available restore points appear in this document were written for information on the hard drive and removes...
...in when you to return your computer to an earlier operating state (without affecting data files. • Dell PC Restore by Symantec restores your hard drive to the operating state it was in an undesirable operating state. Using Microsoft Windows XP System Restore The ...Dell™ computer to an Earlier Operating State If problems occur after you install a device driver, use System Restore. Restoring the Computer to the Windows Classic view. All calendar dates with available restore points appear in this document were written for information on the hard drive and removes...

Owner's Manual
Page 51
...automatically disabled. If possible, back up all data on . If two or more restore points are permanently deleted from the hard drive. Using Dell PC Restore by Symantec only as the last method to restore your computer- If possible, back up the data before using...PC Restore restores your computer. Data files include documents, spreadsheets, e-mail messages, digital photos, music files, and so on the hard drive and removes any files or programs until the system restoration is unchecked. 4 Select a restore point and click Next. The Restoration Complete screen ...
...automatically disabled. If possible, back up all data on . If two or more restore points are permanently deleted from the hard drive. Using Dell PC Restore by Symantec only as the last method to restore your computer- If possible, back up the data before using...PC Restore restores your computer. Data files include documents, spreadsheets, e-mail messages, digital photos, music files, and so on the hard drive and removes any files or programs until the system restoration is unchecked. 4 Select a restore point and click Next. The Restoration Complete screen ...

Owner's Manual
Page 56
... (4) 12 Service Tag Use this latch to identify your computer when you access the Dell Support website or call technical support. 56 Removing and Installing Parts NOTICE: Keep the vent area clean and dust-free to the hard drive. Used to remove the cover. It is adequately ventilated. On computers with a sound card, the microphone...
... (4) 12 Service Tag Use this latch to identify your computer when you access the Dell Support website or call technical support. 56 Removing and Installing Parts NOTICE: Keep the vent area clean and dust-free to the hard drive. Used to remove the cover. It is adequately ventilated. On computers with a sound card, the microphone...

Owner's Manual
Page 60
www.dell.com | support.dell.com 4 Locate the three hinge tabs on page 53. Inside View of Your Computer CAUTION: Before you begin any of the computer cover and pivot ... computer. 5 Grip the sides of the procedures in this section, follow the safety instructions located in a secure location. power supply system board CD or DVD drive *floppy drive hard drive *May not be present on all computers. 60 Removing and Installing Parts
www.dell.com | support.dell.com 4 Locate the three hinge tabs on page 53. Inside View of Your Computer CAUTION: Before you begin any of the computer cover and pivot ... computer. 5 Grip the sides of the procedures in this section, follow the safety instructions located in a secure location. power supply system board CD or DVD drive *floppy drive hard drive *May not be present on all computers. 60 Removing and Installing Parts

Owner's Manual
Page 79
...configure them for optional floppy drive or Media Card Reader hard drive(s) Connect CD/DVD drives to the connector labeled "IDE" on the system board. Drives Your computer supports a combination of these devices: • Up to two serial ATA drives • One FlexBay drive (floppy drive or Media Card Reader)...to the middle connector on the interface cable is the slave device (drive 1). See the drive documentation in your upgrade kit for information on the system board. Removing and Installing Parts 79 Serial ATA hard drives should be connected to the connectors labeled "SATA0" or "SATA2" ...
...configure them for optional floppy drive or Media Card Reader hard drive(s) Connect CD/DVD drives to the connector labeled "IDE" on the system board. Drives Your computer supports a combination of these devices: • Up to two serial ATA drives • One FlexBay drive (floppy drive or Media Card Reader)...to the middle connector on the interface cable is the slave device (drive 1). See the drive documentation in your upgrade kit for information on the system board. Removing and Installing Parts 79 Serial ATA hard drives should be connected to the connectors labeled "SATA0" or "SATA2" ...

Owner's Manual
Page 81
.... When connecting and disconnecting a serial ATA data cable, hold the cable by the black connector at each end. Removing and Installing Parts 81 Instead, set it . that will sufficiently cushion it on a hard surface. Hard Drive CAUTION: Before you begin any of the procedures in this section, follow the safety instructions located in hole...
.... When connecting and disconnecting a serial ATA data cable, hold the cable by the black connector at each end. Removing and Installing Parts 81 Instead, set it . that will sufficiently cushion it on a hard surface. Hard Drive CAUTION: Before you begin any of the procedures in this section, follow the safety instructions located in hole...

Owner's Manual
Page 82
serial ATA data cable power cable 82 Removing and Installing Parts www.dell.com | support.dell.com NOTICE: If you are replacing a hard drive that contains data you begin this procedure. Check the documentation for your files before you want to verify that it is configured for the drive to keep, back up your computer. Removing a Hard Drive 1 Follow the procedures in "Before You Begin" on page 53." 2 Disconnect the power and hard-drive cables from the drive.
serial ATA data cable power cable 82 Removing and Installing Parts www.dell.com | support.dell.com NOTICE: If you are replacing a hard drive that contains data you begin this procedure. Check the documentation for your files before you want to verify that it is configured for the drive to keep, back up your computer. Removing a Hard Drive 1 Follow the procedures in "Before You Begin" on page 53." 2 Disconnect the power and hard-drive cables from the drive.

Owner's Manual
Page 83
.... 4 Connect the power and hard-drive cables to verify that it from the old drive by unsnapping it is configured for the drive to the drive. tabs (2) hard drive Installing a Hard Drive 1 Unpack the replacement hard drive, and prepare it for installation. 2 Check the documentation for your computer. Removing and Installing Parts 83 NOTE: If your replacement hard drive does not have the plastic...
.... 4 Connect the power and hard-drive cables to verify that it from the old drive by unsnapping it is configured for the drive to the drive. tabs (2) hard drive Installing a Hard Drive 1 Unpack the replacement hard drive, and prepare it for installation. 2 Check the documentation for your computer. Removing and Installing Parts 83 NOTE: If your replacement hard drive does not have the plastic...
Owner's Manual
Page 84
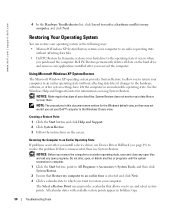
... plastic guide bracket from the electrical outlet before removing the cover. www.dell.com | support.dell.com 5 Check all connectors to be certain that came with the drive for instructions on installing any of the bay. 4 Snap the bracket to the hard drive. 84 Removing and Installing Parts See the documentation that they are properly cabled and...
... plastic guide bracket from the electrical outlet before removing the cover. www.dell.com | support.dell.com 5 Check all connectors to be certain that came with the drive for instructions on installing any of the bay. 4 Snap the bracket to the hard drive. 84 Removing and Installing Parts See the documentation that they are properly cabled and...

Owner's Manual
Page 85
... procedures in "Before You Begin" on page 53." 2 Remove the drive panel (see page 76). NOTE: If you are adding a floppy drive, see page 61). Removing a Floppy Drive 1 Follow the procedures in "Before You Begin" on page 53. Removing and Installing Parts 85 5 Gently slide the new drive (second hard drive) into place until you begin any of the...
... procedures in "Before You Begin" on page 53." 2 Remove the drive panel (see page 76). NOTE: If you are adding a floppy drive, see page 61). Removing a Floppy Drive 1 Follow the procedures in "Before You Begin" on page 53. Removing and Installing Parts 85 5 Gently slide the new drive (second hard drive) into place until you begin any of the...

Owner's Manual
Page 105
... of 20 inches/sec (50.8 cm/sec) 27-G faired square wave with a velocity change of hard drive installed Before you use system setup, it is recommended that you are an expert computer user, do not change , or remove any hardware in your computer work incorrectly. Appendix 105 Environmental Temperature: Operating Storage Relative humidity...
... of 20 inches/sec (50.8 cm/sec) 27-G faired square wave with a velocity change of hard drive installed Before you use system setup, it is recommended that you are an expert computer user, do not change , or remove any hardware in your computer work incorrectly. Appendix 105 Environmental Temperature: Operating Storage Relative humidity...
Owner's Manual
Page 136
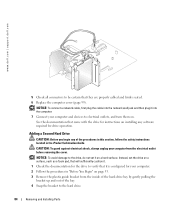
... Internet connection, about, 13 connection, options, 13 connection, setting up, 14 problems, 29 K keyboard problems, 32 H hard drive activity light, 56 installing, 83 installing second, 84 problems, 29 removing, 82 hardware Dell Diagnostics, 46 Hardware Troubleshooter, 49 headphone connector, 56 hibernate mode, 24-25 Hyper-Threading, 26 I installing parts before you begin, 53 recommended...
... Internet connection, about, 13 connection, options, 13 connection, setting up, 14 problems, 29 K keyboard problems, 32 H hard drive activity light, 56 installing, 83 installing second, 84 problems, 29 removing, 82 hardware Dell Diagnostics, 46 Hardware Troubleshooter, 49 headphone connector, 56 hibernate mode, 24-25 Hyper-Threading, 26 I installing parts before you begin, 53 recommended...
Owner's Manual
Page 137
...Network Setup Wizard, 23 O operating system reinstalling Windows XP, 50 P password clearing, 112 jumper, 112 PCI cards installing, 66 removing, 69 PCI Express cards installing, 70 removing, 75 playing CDs and DVDs, 15 power button, 56 connector, 58 conserving, 23 hibernate mode, 24-25 managing, 23 ...USB, 11 problems battery, 27 blue screen, 33 CD drive, 28 CD-RW drive, 28 computer crashes, 32-33 computer stops responding, 32 Dell Diagnostics, 46 diagnostic lights, 43 drives, 27 DVD drive, 28 e-mail, 29 error messages, 30 general, 32 hard drive, 29 Internet, 29 keyboard, 32 Media Card Reader, 31...
...Network Setup Wizard, 23 O operating system reinstalling Windows XP, 50 P password clearing, 112 jumper, 112 PCI cards installing, 66 removing, 69 PCI Express cards installing, 70 removing, 75 playing CDs and DVDs, 15 power button, 56 connector, 58 conserving, 23 hibernate mode, 24-25 managing, 23 ...USB, 11 problems battery, 27 blue screen, 33 CD drive, 28 CD-RW drive, 28 computer crashes, 32-33 computer stops responding, 32 Dell Diagnostics, 46 diagnostic lights, 43 drives, 27 DVD drive, 28 e-mail, 29 error messages, 30 general, 32 hard drive, 29 Internet, 29 keyboard, 32 Media Card Reader, 31...


