

Owner's Manual
Page 1
... or DVD drive light PC Card connectors (2)** breakaway hinge USB 2.0 connectors (2) headphone connector * On computers with integrated IEEE 1394 connectors. ** On computers with integrated PC Card connectors. SPDIF-out connector integrated video connector diagnostic lights (4) keyboard connector center/LFE connector microphone connector USB 2.0 connectors (6) IEEE 1394 connector parallel connector mouse connector surround connector line-out connector line-in connector network adapter connector optional video card connector (see the setup diagram) modem connectors (2) power connector voltage...
... or DVD drive light PC Card connectors (2)** breakaway hinge USB 2.0 connectors (2) headphone connector * On computers with integrated IEEE 1394 connectors. ** On computers with integrated PC Card connectors. SPDIF-out connector integrated video connector diagnostic lights (4) keyboard connector center/LFE connector microphone connector USB 2.0 connectors (6) IEEE 1394 connector parallel connector mouse connector surround connector line-out connector line-in connector network adapter connector optional video card connector (see the setup diagram) modem connectors (2) power connector voltage...

Owner's Manual
Page 13
... and lift the stand away. 3 Place the computer in the upright position. Setting Up and Using Your Computer 13 To remove the stand: 1 Turn the computer over so that came with the printer for setup information, including how to: • Obtain and install updated drivers. • Connect the printer to the computer. 4 Tighten the screw. 5 Place the computer in...
... and lift the stand away. 3 Place the computer in the upright position. Setting Up and Using Your Computer 13 To remove the stand: 1 Turn the computer over so that came with the printer for setup information, including how to: • Obtain and install updated drivers. • Connect the printer to the computer. 4 Tighten the screw. 5 Place the computer in...
Owner's Manual
Page 14
www.dell.com | support.dell.com Printer Cable Your printer connects to your computer with your printer. 14 Setting Up and Using Your Computer Attach the cable to the parallel connector on the printer and snap the two clips into the two notches. If the Add New Hardware Wizard window appears, click Cancel. 5 Install the printer driver if necessary. NOTICE: For best results, use a 3-m (10-ft) or...
www.dell.com | support.dell.com Printer Cable Your printer connects to your computer with your printer. 14 Setting Up and Using Your Computer Attach the cable to the parallel connector on the printer and snap the two clips into the two notches. If the Add New Hardware Wizard window appears, click Cancel. 5 Install the printer driver if necessary. NOTICE: For best results, use a 3-m (10-ft) or...

Owner's Manual
Page 15
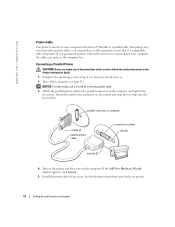
Connecting a USB Printer NOTE: You can connect USB devices while the computer is turned on the computer and the printer. See the documentation that came with your printer. 3 Attach the USB printer cable to the USB connectors on . 1 Complete the operating system setup if you have not already done so. 2 Install the printer driver if necessary. USB connector on computer USB printer cable USB connector on printer Setting Up and Using Your Computer 15 The USB connectors fit only one way.
Connecting a USB Printer NOTE: You can connect USB devices while the computer is turned on the computer and the printer. See the documentation that came with your printer. 3 Attach the USB printer cable to the USB connectors on . 1 Complete the operating system setup if you have not already done so. 2 Install the printer driver if necessary. USB connector on computer USB printer cable USB connector on printer Setting Up and Using Your Computer 15 The USB connectors fit only one way.

Owner's Manual
Page 16
... use of an adapter. IEEE 1394 connector IEEE 1394 cable Setting Up a Home and Office Network Connecting to a network connection device, such as digital video cameras. www.dell.com | support.dell.com Connecting an IEEE 1394 Device (Optional) IEEE 1394 devices can move large amounts of data between computers and peripheral devices and are ideal for locations.) NOTE: The connector can accept six-pin IEEE 1394 devices with the use a network cable with multimedia devices, such as a network...
... use of an adapter. IEEE 1394 connector IEEE 1394 cable Setting Up a Home and Office Network Connecting to a network connection device, such as digital video cameras. www.dell.com | support.dell.com Connecting an IEEE 1394 Device (Optional) IEEE 1394 devices can move large amounts of data between computers and peripheral devices and are ideal for locations.) NOTE: The connector can accept six-pin IEEE 1394 devices with the use a network cable with multimedia devices, such as a network...

Owner's Manual
Page 35
... that your network settings are correct and that the network cable is properly inserted into the connector. PC Card Problems NOTE: Your computer is listed. Ensure that no network communication exists. See page 52. No light indicates that the PC Card is connected as shown on page 16. See page 52. CHECK THE PC CARD - Double-click the Safely Remove Hardware icon in the Windows taskbar...
... that your network settings are correct and that the network cable is properly inserted into the connector. PC Card Problems NOTE: Your computer is listed. Ensure that no network communication exists. See page 52. No light indicates that the PC Card is connected as shown on page 16. See page 52. CHECK THE PC CARD - Double-click the Safely Remove Hardware icon in the Windows taskbar...

Owner's Manual
Page 39
... working by testing it with the speakers. ENSURE THAT THE SUBWOOFER AND THE SPEAKERS ARE TURNED ON - RUN THE SPEAKER DIAGNOSTICS - See the setup diagram supplied with another device, such as shown on the setup diagram supplied with the speakers. ADJUST THE WINDOWS VOLUME CONTROL - TEST THE ELECTRICAL OUTLET - ENABLE DIGITAL MODE - DISCONNECT HEADPHONES FROM THE HEADPHONE CONNECTOR - To enable digital mode: 1 Click the Start button, click Control Panel, and then click Sounds, Speech, and Audio Devices. 2 Click Sounds and Audio Devices. 3 Click the Hardware...
... working by testing it with the speakers. ENSURE THAT THE SUBWOOFER AND THE SPEAKERS ARE TURNED ON - RUN THE SPEAKER DIAGNOSTICS - See the setup diagram supplied with another device, such as shown on the setup diagram supplied with the speakers. ADJUST THE WINDOWS VOLUME CONTROL - TEST THE ELECTRICAL OUTLET - ENABLE DIGITAL MODE - DISCONNECT HEADPHONES FROM THE HEADPHONE CONNECTOR - To enable digital mode: 1 Click the Start button, click Control Panel, and then click Sounds, Speech, and Audio Devices. 2 Click Sounds and Audio Devices. 3 Click the Hardware...

Owner's Manual
Page 40
... headphone cable is connected as a lamp. 40 Solving Problems No sound from headphones CHECK THE HEADPHONE CABLE CONNECTION - To disable digital mode: 1 Click the Start button, click Control Panel, and then click Sounds, Speech, and Audio Devices. 2 Click Sounds and Audio Devices. 3 Click the Hardware tab. 4 Double-click the name of your CD drive. 5 Click the Properties tab. 6 Uncheck the Enable digital CD audio for troubleshooting procedures. Ensure that the sound is working by testing it...
... headphone cable is connected as a lamp. 40 Solving Problems No sound from headphones CHECK THE HEADPHONE CABLE CONNECTION - To disable digital mode: 1 Click the Start button, click Control Panel, and then click Sounds, Speech, and Audio Devices. 2 Click Sounds and Audio Devices. 3 Click the Hardware tab. 4 Double-click the name of your CD drive. 5 Click the Properties tab. 6 Uncheck the Enable digital CD audio for troubleshooting procedures. Ensure that the sound is working by testing it...

Owner's Manual
Page 41
... MONITOR - If the screen is defective. See the monitor documentation for instructions. MOVE THE MONITOR AWAY FROM EXTERNAL POWER SOURCES - Solving Problems 41 TEST THE VIDEO EXTENSION CABLE (IF USED) - MOVE THE SUBWOOFER AWAY FROM THE MONITOR - RESTORE THE RECOMMENDED SETTINGS - ADJUST THE WINDOWS® DISPLAY SETTINGS - 1 Click the Start button and click Control Panel. 2 Click Appearance and Themes. 3 Click Display and click the Settings tab. 4 Try different settings for interference. Swap the computer and monitor power cables...
... MONITOR - If the screen is defective. See the monitor documentation for instructions. MOVE THE MONITOR AWAY FROM EXTERNAL POWER SOURCES - Solving Problems 41 TEST THE VIDEO EXTENSION CABLE (IF USED) - MOVE THE SUBWOOFER AWAY FROM THE MONITOR - RESTORE THE RECOMMENDED SETTINGS - ADJUST THE WINDOWS® DISPLAY SETTINGS - 1 Click the Start button and click Control Panel. 2 Click Appearance and Themes. 3 Click Display and click the Settings tab. 4 Try different settings for interference. Swap the computer and monitor power cables...

Owner's Manual
Page 48
... a driver program. Each device has its driver recognizes. Identifying Drivers 1 Click the Start button and click Control Panel. 2 In the Control Panel window, under Pick a Category, click Performance and Maintenance. 3 In the Performance and Maintenance window, click System. 4 In the System Properties window, click the Hardware tab. 48 Advanced Troubleshooting www.dell.com | support.dell.com 3 If you : • Upgrade your operating system. • Reinstall your operating system. • Connect or install a new device. Displays error conditions encountered, error codes, and problem...
... a driver program. Each device has its driver recognizes. Identifying Drivers 1 Click the Start button and click Control Panel. 2 In the Control Panel window, under Pick a Category, click Performance and Maintenance. 3 In the Performance and Maintenance window, click System. 4 In the System Properties window, click the Hardware tab. 48 Advanced Troubleshooting www.dell.com | support.dell.com 3 If you : • Upgrade your operating system. • Reinstall your operating system. • Connect or install a new device. Displays error conditions encountered, error codes, and problem...
Owner's Manual
Page 49
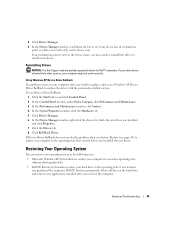
... problem, then use Windows XP Device Driver Rollback to the operating state that existed before you installed the new driver. To use Device Driver Rollback: 1 Click the Start button and click Control Panel. 2 In the Control Panel window, under Pick a Category, click Performance and Maintenance. 3 In the Performance and Maintenance window, click System. 4 In the System Properties window, click the Hardware tab. 5 Click Device Manager. 6 In the Device Manager window, right-click the device for Dell™ computers. Reinstalling Drivers NOTICE: The Dell Support...
... problem, then use Windows XP Device Driver Rollback to the operating state that existed before you installed the new driver. To use Device Driver Rollback: 1 Click the Start button and click Control Panel. 2 In the Control Panel window, under Pick a Category, click Performance and Maintenance. 3 In the Performance and Maintenance window, click System. 4 In the System Properties window, click the Hardware tab. 5 Click Device Manager. 6 In the Device Manager window, right-click the device for Dell™ computers. Reinstalling Drivers NOTICE: The Dell Support...
Owner's Manual
Page 50
... using System Restore. The Restoration Complete screen appears after you install a device driver, use System Restore. NOTICE: Make regular backups of your data files or recover them. If a calendar date has only one restore point, then that you set your computer. If that Restore my computer to an earlier time is complete. 1 Click the Start button, point to an Earlier Operating State If problems occur after System Restore...
... using System Restore. The Restoration Complete screen appears after you install a device driver, use System Restore. NOTICE: Make regular backups of your data files or recover them. If a calendar date has only one restore point, then that you set your computer. If that Restore my computer to an earlier time is complete. 1 Click the Start button, point to an Earlier Operating State If problems occur after System Restore...

Owner's Manual
Page 56
...-speed serial multimedia devices, such as digital video cameras. (This feature is only available on computers with a network connector card, use Category 3 wiring, force the network speed to 10 Mbps to ensure reliable operation. If you have a USB printer, plug it into a USB connector. Connect the other end of the network cable to the network adapter connector on the card.) To attach your computer to a network or modem, connect one end of your network device. www.dell.com | support.dell...
...-speed serial multimedia devices, such as digital video cameras. (This feature is only available on computers with a network connector card, use Category 3 wiring, force the network speed to 10 Mbps to ensure reliable operation. If you have a USB printer, plug it into a USB connector. Connect the other end of the network cable to the network adapter connector on the card.) To attach your computer to a network or modem, connect one end of your network device. www.dell.com | support.dell...

Owner's Manual
Page 57
... center/LFE connector 15 keyboard connector 16 diagnostic lights (4) 17 integrated video connector 18 SPDIF-out connector Use the back USB connectors for devices that typically remain connected, such as joysticks or cameras. Use this connector does not have a standard keyboard, plug it , plug the cable from their electrical outlets, and then press the power button to attach your computer has the optional video card installed. Reattaching the Front Door To prevent damage to help you troubleshoot...
... center/LFE connector 15 keyboard connector 16 diagnostic lights (4) 17 integrated video connector 18 SPDIF-out connector Use the back USB connectors for devices that typically remain connected, such as joysticks or cameras. Use this connector does not have a standard keyboard, plug it , plug the cable from their electrical outlets, and then press the power button to attach your computer has the optional video card installed. Reattaching the Front Door To prevent damage to help you troubleshoot...

Owner's Manual
Page 68
... on the back panel. 4 Close the computer cover (see page 72). 5 Attach the computer stand (see "Memory" on the system board. 68 Adding Parts www.dell.com | support.dell.com Installing a Video Card NOTE: If you purchased the optional video card, ensure that if you purchased your computer with 128 MB of memory installed and you want to add another 128 MB of memory, you connected your monitor cable to the correct video connector.
... on the back panel. 4 Close the computer cover (see page 72). 5 Attach the computer stand (see "Memory" on the system board. 68 Adding Parts www.dell.com | support.dell.com Installing a Video Card NOTE: If you purchased the optional video card, ensure that if you purchased your computer with 128 MB of memory installed and you want to add another 128 MB of memory, you connected your monitor cable to the correct video connector.
Owner's Manual
Page 69
... disconnect a network cable, first unplug the cable from your computer and then unplug it from any new modules that your computer and attached devices are : • Install a pair of the procedures in this section, follow the safety instructions located in connectors DDR_A0 and DDR_B0. Adding Parts 69 Otherwise, your computer, turn off when you shut down the computer through the Start menu (see page...
... disconnect a network cable, first unplug the cable from your computer and then unplug it from any new modules that your computer and attached devices are : • Install a pair of the procedures in this section, follow the safety instructions located in connectors DDR_A0 and DDR_B0. Adding Parts 69 Otherwise, your computer, turn off when you shut down the computer through the Start menu (see page...
Owner's Manual
Page 78
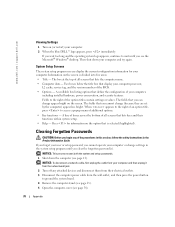
... number of the option titles contain settings or values. System Setup Screens The system setup program screens display the current configuration information for information on the option that you can change settings in the Product Information Guide. The fields that is divided into five areas: • Title - Clearing Forgotten Passwords CAUTION: Before you clear the forgotten password(s). A scrollable box listing options that display your computer. If you forget your user or setup password...
... number of the option titles contain settings or values. System Setup Screens The system setup program screens display the current configuration information for information on the option that you can change settings in the Product Information Guide. The fields that is divided into five areas: • Title - Clearing Forgotten Passwords CAUTION: Before you clear the forgotten password(s). A scrollable box listing options that display your computer. If you forget your user or setup password...

Owner's Manual
Page 79
... restore the correct settings in the Product Information Guide. Discard used batteries according to the manufacturer's instructions. If you have to repeatedly reset time and date information after turning on your computer with the same or equivalent type recommended by the manufacturer. Turning on the computer, replace the battery. The battery can explode if it is incorrectly installed. NOTICE: To connect a network cable, first plug the cable into the network...
... restore the correct settings in the Product Information Guide. Discard used batteries according to the manufacturer's instructions. If you have to repeatedly reset time and date information after turning on your computer with the same or equivalent type recommended by the manufacturer. Turning on the computer, replace the battery. The battery can explode if it is incorrectly installed. NOTICE: To connect a network cable, first plug the cable into the network...

Owner's Manual
Page 81
... "Dell-Installed" Software and Peripherals Dell-installed software includes the operating system and some of the computer's service contract. Appendix 81 Dell Technical Support Policy (U.S. Support for the computer and any internal expansion cards, or Dell-branded module bay or PC Card accessories. NOTICE: To connect a network cable, first plug the cable into the network wall jack and then plug it into the computer. 13 Connect your computer and devices to electrical outlets, and turn them...
... "Dell-Installed" Software and Peripherals Dell-installed software includes the operating system and some of the computer's service contract. Appendix 81 Dell Technical Support Policy (U.S. Support for the computer and any internal expansion cards, or Dell-branded module bay or PC Card accessories. NOTICE: To connect a network cable, first plug the cable into the network wall jack and then plug it into the computer. 13 Connect your computer and devices to electrical outlets, and turn them...

Owner's Manual
Page 102
... network adapter O operating system reinstalling Windows XP, 50 P password clearing system setup, 78 PC Cards installing, 63 problems, 35 removing, 64 types, 62 power problems, 36 turning off your computer, 21 power light conditions, 36 printer cable, 14 connecting, 13 parallel, 14 problems, 37 setting up , 18 IRQ conflicts, 52 K keyboard problems, 33 L lights CD/DVD drive, 54 hard drive, 54 M memory connectors, 61 messages error, 29 Microsoft License Label, 9 modem problems, 27 monitor blank, 40 hard to read , 41 problems, 40 motherboard. 102 Index hardware drivers, 48 problems...
... network adapter O operating system reinstalling Windows XP, 50 P password clearing system setup, 78 PC Cards installing, 63 problems, 35 removing, 64 types, 62 power problems, 36 turning off your computer, 21 power light conditions, 36 printer cable, 14 connecting, 13 parallel, 14 problems, 37 setting up , 18 IRQ conflicts, 52 K keyboard problems, 33 L lights CD/DVD drive, 54 hard drive, 54 M memory connectors, 61 messages error, 29 Microsoft License Label, 9 modem problems, 27 monitor blank, 40 hard to read , 41 problems, 40 motherboard. 102 Index hardware drivers, 48 problems...


