Dell Dimension 2350 Owner's Manual
Page 11
... is connected to AC power. Computers with a fixed-voltage power supply do not have a voltage selection switch on the back panel and operate at the correct operating voltage. NOTICE: To help prevent electric shock or system board damage. For Japan, the voltage selection switch must be set to the 115-V position even though the AC power available in your location. • Before working inside the...
... is connected to AC power. Computers with a fixed-voltage power supply do not have a voltage selection switch on the back panel and operate at the correct operating voltage. NOTICE: To help prevent electric shock or system board damage. For Japan, the voltage selection switch must be set to the 115-V position even though the AC power available in your location. • Before working inside the...
Dell Dimension 2350 Owner's Manual
Page 60
... work correctly. Using Windows XP Device Driver Rollback If a problem occurs on the screen. 3 When the InstallShield Wizard Complete window appears, remove the ResourceCD and click Finish to step 2. If not, go to restart the computer. 4 When you install drivers obtained from the Dell Dimension ResourceCD: 1 With the Windows desktop displayed, insert the ResourceCD into the CD or DVD drive. 60 Advanced Troubleshooting Using the Dell Dimension ResourceCD If using Device Driver Rollback or System Restore...
... work correctly. Using Windows XP Device Driver Rollback If a problem occurs on the screen. 3 When the InstallShield Wizard Complete window appears, remove the ResourceCD and click Finish to step 2. If not, go to restart the computer. 4 When you install drivers obtained from the Dell Dimension ResourceCD: 1 With the Windows desktop displayed, insert the ResourceCD into the CD or DVD drive. 60 Advanced Troubleshooting Using the Dell Dimension ResourceCD If using Device Driver Rollback or System Restore...
Dell Dimension 2350 Owner's Manual
Page 61
... the problem. For drivers information, see page 34. To access Windows Help, see the documentation that came with the device. Creating a Restore Point 1 Click the Start button and click Help and Support. 2 Click System Restore. 3 Follow the instructions on using System Restore. NOTICE: Before you installed additional hardware, the drivers for hardware that came on the screen. See Windows Help for information on the screen. If those drivers are automatically displayed in...
... the problem. For drivers information, see page 34. To access Windows Help, see the documentation that came with the device. Creating a Restore Point 1 Click the Start button and click Help and Support. 2 Click System Restore. 3 Follow the instructions on using System Restore. NOTICE: Before you installed additional hardware, the drivers for hardware that came on the screen. See Windows Help for information on the screen. If those drivers are automatically displayed in...

Dell Dimension 2350 Owner's Manual
Page 70
... before you connect a mouse to the parallel connector. Connect a network cable to a sound or telephony program. 70 A d d i n g Pa r ts Connect a USB device such as a cassette player, CD player, or VCR. Plug your computer's PS/2 mouse into the green mouse connector. Turn off the computer and any of the USB connectors. www.dell.com | support.dell.com Back View 16 15 1 14 2 13 12 3 4 11 5 10 6 9 7 8 1 cover thumbscrew 2 mouse connector 3 diagnostic lights (4) 4 parallel connector 5 line-in connector 6 cover latch 7 network adapter connector 8 PCI card slots (3) 9 USB...
... before you connect a mouse to the parallel connector. Connect a network cable to a sound or telephony program. 70 A d d i n g Pa r ts Connect a USB device such as a cassette player, CD player, or VCR. Plug your computer's PS/2 mouse into the green mouse connector. Turn off the computer and any of the USB connectors. www.dell.com | support.dell.com Back View 16 15 1 14 2 13 12 3 4 11 5 10 6 9 7 8 1 cover thumbscrew 2 mouse connector 3 diagnostic lights (4) 4 parallel connector 5 line-in connector 6 cover latch 7 network adapter connector 8 PCI card slots (3) 9 USB...

Dell Dimension 2350 Owner's Manual
Page 97
... receive your computer, the jumper is attached to electrical outlets, and turn them on. You can change settings in brackets, but not those that your computer and devices to only one pin. 7 Replace the computer cover (see page 71). Clearing Forgotten Passwords CAUTION: Before you shut down the computer through the Start menu (see page 74) on page 9. Options identified by touching an...
... receive your computer, the jumper is attached to electrical outlets, and turn them on. You can change settings in brackets, but not those that your computer and devices to only one pin. 7 Replace the computer cover (see page 71). Clearing Forgotten Passwords CAUTION: Before you shut down the computer through the Start menu (see page 74) on page 9. Options identified by touching an...
Dell Dimension 2350 Owner's Manual
Page 135
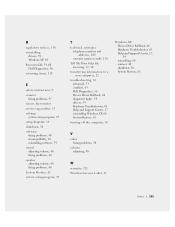
... software, 59 sound adjusting volume, 48 fixing problems, 48 speaker adjusting volume, 48 fixing problems, 48 System Restore, 61 system setup program, 95 T technical assistance telephone numbers and addresses, 100 warranty repair or credit, 118 Tell Me How help file accessing, 17, 34 transferring information to a new computer, 22 troubleshooting, 32 advanced, 53 conflicts, 63 Dell Diagnostics, 56 Device Driver Rollback, 60 diagnostic lights, 54 drivers, 59 Hardware Troubleshooter, 63 Help and Support Center...
... software, 59 sound adjusting volume, 48 fixing problems, 48 speaker adjusting volume, 48 fixing problems, 48 System Restore, 61 system setup program, 95 T technical assistance telephone numbers and addresses, 100 warranty repair or credit, 118 Tell Me How help file accessing, 17, 34 transferring information to a new computer, 22 troubleshooting, 32 advanced, 53 conflicts, 63 Dell Diagnostics, 56 Device Driver Rollback, 60 diagnostic lights, 54 drivers, 59 Hardware Troubleshooter, 63 Help and Support Center...
User Guide
Page 2
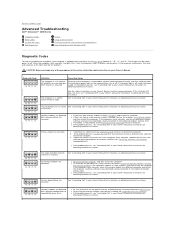
... on the back panel labeled "A," "B," "C," and "D." l Reseat all memory modules, reinstall one memory module installed, reinstall it and restart the computer. l If the problem persists, see "Contacting Dell" in your Owner's Manual for instructions on obtaining technical assistance. Memory modules are detected, but a memory configuration or compatibility error exists. Back to Contents Page Advanced Troubleshooting Dell™ Dimension™ 2350 Series Diagnostic Codes Beep Codes System Messages Dell Diagnostics Drivers Using System Restore Resolving Software and Hardware...
... on the back panel labeled "A," "B," "C," and "D." l Reseat all memory modules, reinstall one memory module installed, reinstall it and restart the computer. l If the problem persists, see "Contacting Dell" in your Owner's Manual for instructions on obtaining technical assistance. Memory modules are detected, but a memory configuration or compatibility error exists. Back to Contents Page Advanced Troubleshooting Dell™ Dimension™ 2350 Series Diagnostic Codes Beep Codes System Messages Dell Diagnostics Drivers Using System Restore Resolving Software and Hardware...
User Guide
Page 3
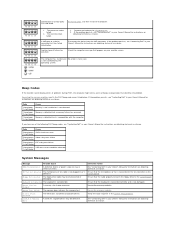
... on obtaining technical assistance. CMOS checksum error 1 short beep 2 long beeps; Floppy Not Detected The floppy drive cable may fix the POST beep code errors listed below. Reseat the memory modules. Beep Codes If the monitor cannot display errors or problems during POST, the computer might emit a series of the following POST beep codes, see "Contacting Dell" in your Owner's Manual for instructions on obtaining technical assistance. Video subsystem failure 2 short beeps 2 long beeps; Keyboard not detected The keyboard is connected to it...
... on obtaining technical assistance. CMOS checksum error 1 short beep 2 long beeps; Floppy Not Detected The floppy drive cable may fix the POST beep code errors listed below. Reseat the memory modules. Beep Codes If the monitor cannot display errors or problems during POST, the computer might emit a series of the following POST beep codes, see "Contacting Dell" in your Owner's Manual for instructions on obtaining technical assistance. Video subsystem failure 2 short beeps 2 long beeps; Keyboard not detected The keyboard is connected to it...
User Guide
Page 5
..., mouse, or keyboard. In the Performance and Maintenance window, click System. 4. To use the device. If a problem is the source of the test and any device has an exclamation point (a yellow circle with any device, perform the steps in your Dell Dimension ResourceCD provide approved drivers for running the Dell Diagnostics from other sources, your operating system. l You connect or install a new device. Click the Start button and click Control Panel. 2. Click Device Manager. 6. Click the Start button and...
..., mouse, or keyboard. In the Performance and Maintenance window, click System. 4. To use the device. If a problem is the source of the test and any device has an exclamation point (a yellow circle with any device, perform the steps in your Dell Dimension ResourceCD provide approved drivers for running the Dell Diagnostics from other sources, your operating system. l You connect or install a new device. Click the Start button and click Control Panel. 2. Click Device Manager. 6. Click the Start button and...
User Guide
Page 6
... Next. Using the Dell Dimension ResourceCD If using System Restore. With the Windows desktop displayed, insert the ResourceCD into the CD or DVD drive. 5. At the Welcome Dell System Owner screen, click Next. HINT: The ResourceCD displays drivers only for the new hardware might not be displayed by the ResourceCD. Using System Restore The Microsoft® Windows® XP operating system provides System Restore to an earlier operating state, save and close all open files...
... Next. Using the Dell Dimension ResourceCD If using System Restore. With the Windows desktop displayed, insert the ResourceCD into the CD or DVD drive. 5. At the Welcome Dell System Owner screen, click Next. HINT: The ResourceCD displays drivers only for the new hardware might not be displayed by the ResourceCD. Using System Restore The Microsoft® Windows® XP operating system provides System Restore to an earlier operating state, save and close all open files...
User Guide
Page 10
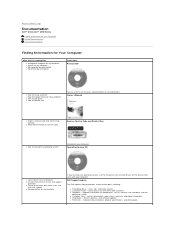
... to set up a printer l How to troubleshoot and solve problems l How to add parts l How to contact Dell You can use this CD to access documentation or reinstall drivers Owner's Manual l Express Service Code and Service Tag Number l Microsoft® Windows® License Label Express Service Code and Product Key l How to reinstall my operating system Located on your operating system, use the ResourceCD to technical service and support questions l Online discussions with other users and technical support l Documentation...
... to set up a printer l How to troubleshoot and solve problems l How to add parts l How to contact Dell You can use this CD to access documentation or reinstall drivers Owner's Manual l Express Service Code and Service Tag Number l Microsoft® Windows® License Label Express Service Code and Product Key l How to reinstall my operating system Located on your operating system, use the ResourceCD to technical service and support questions l Online discussions with other users and technical support l Documentation...
User Guide
Page 11
... Support. 2. Click the Start button, and then click Help and Support. 2. Click User and system guides, and then click User's guides. 3. Right-click only the following link to the file: Dell Dimension 2350 Tell Me How (.chm) (579 KB). 2. Setup diagram (.pdf) (848 KB) - You can quickly link to information on the following topics: l Hardware and software features of your computer l The Windows desktop, where you can be downloaded...
... Support. 2. Click the Start button, and then click Help and Support. 2. Click User and system guides, and then click User's guides. 3. Right-click only the following link to the file: Dell Dimension 2350 Tell Me How (.chm) (579 KB). 2. Setup diagram (.pdf) (848 KB) - You can quickly link to information on the following topics: l Hardware and software features of your computer l The Windows desktop, where you can be downloaded...
User Guide
Page 13
... Adding and Replacing Parts Dell™ Dimension™ 2350 Series Shutting Down the Computer Removing the Computer Cover Looking Inside Your Computer Adding or Removing Cards Adding Memory Removing the Front Panel Removing the Front-Panel Insert Hard Drive Floppy Drive Replacing the CD/DVD Drive Adding a Second CD/DVD Drive Replacing the Microprocessor Replacing the System Board Replacing the Power Supply Replacing the Battery Replacing the Computer Cover Shutting Down the Computer NOTICE: To prevent data loss, you must turn them off your monitor and any other devices connected to power...
... Adding and Replacing Parts Dell™ Dimension™ 2350 Series Shutting Down the Computer Removing the Computer Cover Looking Inside Your Computer Adding or Removing Cards Adding Memory Removing the Front Panel Removing the Front-Panel Insert Hard Drive Floppy Drive Replacing the CD/DVD Drive Adding a Second CD/DVD Drive Replacing the Microprocessor Replacing the System Board Replacing the Power Supply Replacing the Battery Replacing the Computer Cover Shutting Down the Computer NOTICE: To prevent data loss, you must turn them off your monitor and any other devices connected to power...
User Guide
Page 24
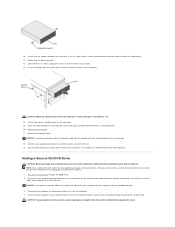
.... After you install a drive, see the documentation that the jumper setting on the cable with the drive for drive operation. NOTICE: To disconnect a network cable, first unplug the cable from your Owner's Manual. Gently slide the drive into the computer. 18. Connect the power and data cables to provide airflow for instructions on installing and using the drive software. 1. Use the securing screw that your computer from the network wall jack. 3. Adding a Second CD/DVD Drive CAUTION...
.... After you install a drive, see the documentation that the jumper setting on the cable with the drive for drive operation. NOTICE: To disconnect a network cable, first unplug the cable from your Owner's Manual. Gently slide the drive into the computer. 18. Connect the power and data cables to provide airflow for instructions on installing and using the drive software. 1. Use the securing screw that your computer from the network wall jack. 3. Adding a Second CD/DVD Drive CAUTION...

User Guide
Page 25
... computer and devices to dissipate any software required for drive operation. While you work, periodically touch an unpainted metal surface to electrical outlets, and turn them into the drive. Ensure that the jumper setting on the drive (pin 1 is in the upper drive bay and connect its middle data connector to the new drive. 15. Remove two of the way to ensure the drive is set for "cable select" (see...
... computer and devices to dissipate any software required for drive operation. While you work, periodically touch an unpainted metal surface to electrical outlets, and turn them into the drive. Ensure that the jumper setting on the drive (pin 1 is in the upper drive bay and connect its middle data connector to the new drive. 15. Remove two of the way to ensure the drive is set for "cable select" (see...

User Guide
Page 36
..., reconnect the keyboard cable as shown on the setup diagram for your operating system documentation for additional troubleshooting information Check for configuration and troubleshooting instructions. Click the Start button, click Control Panel, and then click Printers and Other Hardware. 2. Click Mouse. 3. a solid orange connection speed light indicates a 100-Mbps connection. l Errors occur and programs crash for technical assistance. If the problem persists, contact the hardware manufacturer for no apparent reason. Mouse Problems Restart the computer...
..., reconnect the keyboard cable as shown on the setup diagram for your operating system documentation for additional troubleshooting information Check for configuration and troubleshooting instructions. Click the Start button, click Control Panel, and then click Printers and Other Hardware. 2. Click Mouse. 3. a solid orange connection speed light indicates a 100-Mbps connection. l Errors occur and programs crash for technical assistance. If the problem persists, contact the hardware manufacturer for no apparent reason. Mouse Problems Restart the computer...
User Guide
Page 37
... correct phone number. To access help file, or search for cable connection information. If the power light is off or is not receiving power. Test the electrical outlet - Ensure that data is actively being transferred on . Check for setup and troubleshooting information. The computer is in standby or hibernate mode. l If the problem persists, contact Dell (see "Contacting Dell" in your network settings are securely connected to...
... correct phone number. To access help file, or search for cable connection information. If the power light is off or is not receiving power. Test the electrical outlet - Ensure that data is actively being transferred on . Check for setup and troubleshooting information. The computer is in standby or hibernate mode. l If the problem persists, contact Dell (see "Contacting Dell" in your network settings are securely connected to...
User Guide
Page 38
... that the speakers are connected to MP3 songs, ensure that the sound is listed, Windows recognizes the scanner. Run the speaker diagnostics - Some speaker systems have been listening to the computer's front-panel headphone connector. Reinstall the audio (sound) driver - No sound from the headphone connector - Ensure that the volume is turned up and that you have self- Click the Start button, click Control Panel, and then click Sounds, Speech, and Audio Devices. 2. Restart...
... that the speakers are connected to MP3 songs, ensure that the sound is listed, Windows recognizes the scanner. Run the speaker diagnostics - Some speaker systems have been listening to the computer's front-panel headphone connector. Reinstall the audio (sound) driver - No sound from the headphone connector - Ensure that the volume is turned up and that you have self- Click the Start button, click Control Panel, and then click Sounds, Speech, and Audio Devices. 2. Restart...

User Guide
Page 39
... running the monitor self-test. If you are using a video extension cable and removing the cable solves the problem, the cable is lit or blinking, the monitor has power. See the monitor documentation for instructions. Click Appearance and Themes. 3. Click Display, and then click the Settings tab. 4. Restore the recommended settings - Check the monitor power light - If the power light is connected as a lamp. Fans, fluorescent lights, halogen lamps, and other electrical devices can cause poor picture quality. Turn...
... running the monitor self-test. If you are using a video extension cable and removing the cable solves the problem, the cable is lit or blinking, the monitor has power. See the monitor documentation for instructions. Click Appearance and Themes. 3. Click Display, and then click the Settings tab. 4. Restore the recommended settings - Check the monitor power light - If the power light is connected as a lamp. Fans, fluorescent lights, halogen lamps, and other electrical devices can cause poor picture quality. Turn...

User Guide
Page 55
...power connector Connect the power cable. Back to Contents Page Back View 1 mouse connector Plug a standard mouse into a USB connector. 2 diagnostic lights (4) Use the lights to help you troubleshoot a computer problem based on the diagnostic code. If you have a USB mouse, plug it into a USB connector. 13 voltage selection switch See the safety instructions in connector to attach a record/playback device such as a cassette player, CD player, or VCR. 5 network adapter connector Connect a network cable to the network adapter connector. 6 PCI card slots (3) Use these slots...
...power connector Connect the power cable. Back to Contents Page Back View 1 mouse connector Plug a standard mouse into a USB connector. 2 diagnostic lights (4) Use the lights to help you troubleshoot a computer problem based on the diagnostic code. If you have a USB mouse, plug it into a USB connector. 13 voltage selection switch See the safety instructions in connector to attach a record/playback device such as a cassette player, CD player, or VCR. 5 network adapter connector Connect a network cable to the network adapter connector. 6 PCI card slots (3) Use these slots...


