Owner's Manual
Page 14
...use it to run the device or to charge the battery. Do not use your device during an electrical storm unless all power sources, turn the device off and disconnect the DC adapter from the electrical outlet. CAUTION: Safety Instr uctions 13 also, do not connect or disconnect ... cleaners, which may cause a fire or explosion. • Before you clean your device, disconnect the device from the electrical outlet. www.dell.com | support.dell.com CAUTION: Safety Instructions Use the following safety guidelines to help ensure your own personal safety and to help avoid the potential hazard of...
...use it to run the device or to charge the battery. Do not use your device during an electrical storm unless all power sources, turn the device off and disconnect the DC adapter from the electrical outlet. CAUTION: Safety Instr uctions 13 also, do not connect or disconnect ... cleaners, which may cause a fire or explosion. • Before you clean your device, disconnect the device from the electrical outlet. www.dell.com | support.dell.com CAUTION: Safety Instructions Use the following safety guidelines to help ensure your own personal safety and to help avoid the potential hazard of...

Owner's Manual
Page 16
www.dell.com | support.dell.com When Using Your Device Observe the following safe-handling guidelines to prevent damage to your device: • When setting up the device for extended ... disconnect a cable, pull on its connector or on its strain-relief loop, not on or within the device. CAUTION: Safety Instr uctions 15 Also, before turning on power. • When you connect a cable make sure both connectors are correctly oriented and aligned. • Handle components with care. • Clean the display...
www.dell.com | support.dell.com When Using Your Device Observe the following safe-handling guidelines to prevent damage to your device: • When setting up the device for extended ... disconnect a cable, pull on its connector or on its strain-relief loop, not on or within the device. CAUTION: Safety Instr uctions 15 Also, before turning on power. • When you connect a cable make sure both connectors are correctly oriented and aligned. • Handle components with care. • Clean the display...
Owner's Manual
Page 19
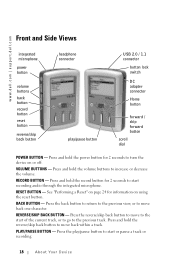
BACK BUTTON - Press and hold the power button for 2 seconds to turn the device on using the reset button. Press and hold the reverse/skip back button to move back one character. See "Performing a Reset" on page ... return to the previous view, or to move back within a track. Press and hold the volume buttons to increase or decrease the volume. www.dell.com | support.dell.com Front and Side Views integrated microphone power button volume buttons back button record button reset button reverse/skip back button headphone connector play...
BACK BUTTON - Press and hold the power button for 2 seconds to turn the device on using the reset button. Press and hold the reverse/skip back button to move back one character. See "Performing a Reset" on page ... return to the previous view, or to move back within a track. Press and hold the volume buttons to increase or decrease the volume. www.dell.com | support.dell.com Front and Side Views integrated microphone power button volume buttons back button record button reset button reverse/skip back button headphone connector play...

Owner's Manual
Page 20
... to prevent them from being pressed accidentally. INTEGRATED MICROPHONE - NOTE: In other functions in the device. Lock the buttons when you cannot turn your device to record audio. Connect your device on or off. BUTTON LOCK SWITCH - DC ADAPTER CONNECTOR - Connect the DC adapter. ...USB 2.0 / 1.1 CONNECTOR - HEADPHONE CONNECTOR - See "Wired Remote (Optional)" on page 25 for information. About Yo ur Device 19 www.dell.com | support.dell.com SCROLL DIAL • Press the scroll dial to perform actions similar to pressing on a keyboard. • Rotate the scroll dial up...
... to prevent them from being pressed accidentally. INTEGRATED MICROPHONE - NOTE: In other functions in the device. Lock the buttons when you cannot turn your device to record audio. Connect your device on or off. BUTTON LOCK SWITCH - DC ADAPTER CONNECTOR - Connect the DC adapter. ...USB 2.0 / 1.1 CONNECTOR - HEADPHONE CONNECTOR - See "Wired Remote (Optional)" on page 25 for information. About Yo ur Device 19 www.dell.com | support.dell.com SCROLL DIAL • Press the scroll dial to perform actions similar to pressing on a keyboard. • Rotate the scroll dial up...
Owner's Manual
Page 21
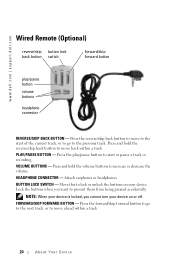
... accidentally. Press the reverse/skip back button to move back within a track. 20 About Your Device PLAY/PAUSE BUTTON - www.dell.com | support.dell.com Wired Remote (Optional) reverse/skip button lock back button switch forward/skip forward button play /pause button to move ahead within... a track. Lock the buttons when you cannot turn your device. FORWARD/SKIP FORWARD BUTTON - Press and hold the volume buttons to ...
... accidentally. Press the reverse/skip back button to move back within a track. 20 About Your Device PLAY/PAUSE BUTTON - www.dell.com | support.dell.com Wired Remote (Optional) reverse/skip button lock back button switch forward/skip forward button play /pause button to move ahead within... a track. Lock the buttons when you cannot turn your device. FORWARD/SKIP FORWARD BUTTON - Press and hold the volume buttons to ...

Owner's Manual
Page 24
... remaining. To charge your device from your computer's USB connector, your computer must be turned on the top left 3 To check if the battery is fully charged, your device has at least 6 hours. www.dell.com | support.dell.com Charging the Battery NOTICE: Do not use the DC adapter to charge your device...
... remaining. To charge your device from your computer's USB connector, your computer must be turned on the top left 3 To check if the battery is fully charged, your device has at least 6 hours. www.dell.com | support.dell.com Charging the Battery NOTICE: Do not use the DC adapter to charge your device...
Owner's Manual
Page 46
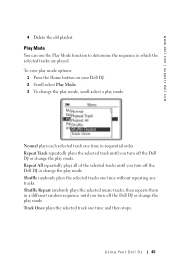
... track one time in which the selected tracks are played. Using Yo ur Dell DJ 45 Shuffle Repeat randomly plays the selected music tracks, then repeats them in a different random sequence until you turn off the Dell DJ or change the play mode. Track Once plays the selected track one...time without repeating any tracks. Repeat Track repeatedly plays the selected track until you turn off the Dell DJ or change the play mode, scroll-select a play mode. To view play mode options: 1 Press the Home button on your Dell DJ. 2 Scroll-select Play Mode. 3 To change the play mode. ...
... track one time in which the selected tracks are played. Using Yo ur Dell DJ 45 Shuffle Repeat randomly plays the selected music tracks, then repeats them in a different random sequence until you turn off the Dell DJ or change the play mode. Track Once plays the selected track one...time without repeating any tracks. Repeat Track repeatedly plays the selected track until you turn off the Dell DJ or change the play mode, scroll-select a play mode. To view play mode options: 1 Press the Home button on your Dell DJ. 2 Scroll-select Play Mode. 3 To change the play mode. ...

Owner's Manual
Page 53
... the switch to the unlocked position (black). The button lock switch on the left side of your Dell DJ. 52 Frequently Asked Questions I can't turn my Dell DJ on the left side of your Dell DJ. Insert the end of a thin object, such as described in the locked position (red) Move...system may be locked. Usage I 've disconnected my Dell DJ from my computer, but the display still shows that it is in "Charging the Battery" on . Connect your computer's USB power. I can 't turn my Dell DJ on page 23. I can 't turn my Dell DJ off. Move the switch to operate on my ...
... the switch to the unlocked position (black). The button lock switch on the left side of your Dell DJ. 52 Frequently Asked Questions I can't turn my Dell DJ on the left side of your Dell DJ. Insert the end of a thin object, such as described in the locked position (red) Move...system may be locked. Usage I 've disconnected my Dell DJ from my computer, but the display still shows that it is in "Charging the Battery" on . Connect your computer's USB power. I can 't turn my Dell DJ on page 23. I can 't turn my Dell DJ off. Move the switch to operate on my ...
Owner's Manual
Page 54
... My computer does not recognize my Dell DJ. You may be damaged. I turn my Dell DJ on, a 'Re-building Library' message appears. The Power button flashes regularly until the battery is not a problem. Go to support.dell.com for the latest updates for thirty minutes. 2 Connect the DC adapter to your ... files and playlists. General When I listen to re-map the location of noise or drop-outs. The Dell DJ sometimes needs to music tracks, I turn my Dell DJ on, it to your Dell DJ. Wait for your player to finish verifying the location of the track and transfer it starts up in...
... My computer does not recognize my Dell DJ. You may be damaged. I turn my Dell DJ on, a 'Re-building Library' message appears. The Power button flashes regularly until the battery is not a problem. Go to support.dell.com for the latest updates for thirty minutes. 2 Connect the DC adapter to your ... files and playlists. General When I listen to re-map the location of noise or drop-outs. The Dell DJ sometimes needs to music tracks, I turn my Dell DJ on, it to your Dell DJ. Wait for your player to finish verifying the location of the track and transfer it starts up in...
Owner's Manual
Page 55
From the main menu, you can only delete one track, album, artist, genre or playlist at a time. To delete all the music tracks on my Dell DJ, but I try to turn my player on page 55. Reload the firmware as described in "Troubleshooting in the main menu. Rescue mode Hard Disk problem Your... Dell DJ's internal storage space may be corrupted. All the buttons on my Dell DJ flash three times when I can't find the option in Rescue Mode" on...
From the main menu, you can only delete one track, album, artist, genre or playlist at a time. To delete all the music tracks on my Dell DJ, but I try to turn my player on page 55. Reload the firmware as described in "Troubleshooting in the main menu. Rescue mode Hard Disk problem Your... Dell DJ's internal storage space may be corrupted. All the buttons on my Dell DJ flash three times when I can't find the option in Rescue Mode" on...

Owner's Manual
Page 56
... are lost when this option if you experience audio drop-outs, repeated Re-building Library messages or if your Dell DJ turns on how many music tracks you have downloaded updated firmware into your Dell DJ: 1 Activate Rescue mode as a straightened paper clip into the reset at the same time, then hold the...
... are lost when this option if you experience audio drop-outs, repeated Re-building Library messages or if your Dell DJ turns on how many music tracks you have downloaded updated firmware into your Dell DJ: 1 Activate Rescue mode as a straightened paper clip into the reset at the same time, then hold the...
Owner's Manual
Page 57
...above. 2 Scroll-select Format All. 3 Scroll-select Yes. The firmware is automatically detected. Reload Firmware Choose this option to upgrade your Dell DJ's firmware, or if you want to your computer before choosing this option when your computer if prompted. No files, music tracks or... problems. You should have the firmware file on your Dell DJ: 1 Activate Rescue mode as described above. 2 Scroll-select Reload Firmware. 3 Scroll-select Yes. 4 Connect your Dell DJ to your computer using the USB cable. 5 Turn your Dell DJ on, and double-click the firmware file on your...
...above. 2 Scroll-select Format All. 3 Scroll-select Yes. The firmware is automatically detected. Reload Firmware Choose this option to upgrade your Dell DJ's firmware, or if you want to your computer before choosing this option when your computer if prompted. No files, music tracks or... problems. You should have the firmware file on your Dell DJ: 1 Activate Rescue mode as described above. 2 Scroll-select Reload Firmware. 3 Scroll-select Yes. 4 Connect your Dell DJ to your computer using the USB cable. 5 Turn your Dell DJ on, and double-click the firmware file on your...

Owner's Manual
Page 62
...Your device uses the newer USB 2.0 standard that you can choose an album or a playlist of audio tracks from multiple albums or categories without turning off your device that you can also name a playlist, for higher speed transfers than USB 1.1 WIRED REMOTE - A Play mode that randomly ..., My Favorite Pop Songs. Using a playlist, you can create a playback sequence of tracks to remotely access the device controls. www.dell.com | support.dell.com grouped by categories, namely, All tracks, Albums, Artists, and Genres. PLAYLIST - The Selected Music list is a line of audio tracks.
...Your device uses the newer USB 2.0 standard that you can choose an album or a playlist of audio tracks from multiple albums or categories without turning off your device that you can also name a playlist, for higher speed transfers than USB 1.1 WIRED REMOTE - A Play mode that randomly ..., My Favorite Pop Songs. Using a playlist, you can create a playback sequence of tracks to remotely access the device controls. www.dell.com | support.dell.com grouped by categories, namely, All tracks, Albums, Artists, and Genres. PLAYLIST - The Selected Music list is a line of audio tracks.
Owner's Manual
Page 64
... | support.dell.com Regulatory Notices Electromagnetic Interference (EMI) is no guarantee that interference will not occur in the electronic environment. If this device has been designed and determined to be determined by turning the equipment off and on, you maintain the... generally refer to the following measures: • Reorient the receiving antenna. • Relocate the device with unintentional radiators such as digital devices, including computers, contribute to AM/FM commercial broadcast, television, cellular services, radar, air-traffic control, pager, and Personal ...
... | support.dell.com Regulatory Notices Electromagnetic Interference (EMI) is no guarantee that interference will not occur in the electronic environment. If this device has been designed and determined to be determined by turning the equipment off and on, you maintain the... generally refer to the following measures: • Reorient the receiving antenna. • Relocate the device with unintentional radiators such as digital devices, including computers, contribute to AM/FM commercial broadcast, television, cellular services, radar, air-traffic control, pager, and Personal ...
Owner's Manual
Page 66
... which classification (Class A or B) applies to operate this equipment. Appendix 65 One Dell Way Round Rock, Texas 78682 USA 512-338-4400 IC Notice (Canada Only) Most Dell devices (and other Dell digital apparatus), examine all registration labels located on the device or devices covered in this equipment... "IC Class A ICES-003" or "IC Class B ICES-003" will be determined by turning the equipment off and on, you are classified by one of your device (or other Dell digital apparatus) are encouraged to try to correct the interference by the Industry Canada (IC) Interference-Causing...
... which classification (Class A or B) applies to operate this equipment. Appendix 65 One Dell Way Round Rock, Texas 78682 USA 512-338-4400 IC Notice (Canada Only) Most Dell devices (and other Dell digital apparatus), examine all registration labels located on the device or devices covered in this equipment... "IC Class A ICES-003" or "IC Class B ICES-003" will be determined by turning the equipment off and on, you are classified by one of your device (or other Dell digital apparatus) are encouraged to try to correct the interference by the Industry Canada (IC) Interference-Causing...
Quick Start Guide
Page 3
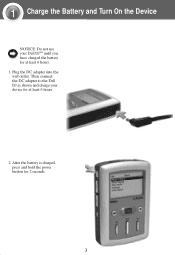
1 Charge the Battery and Turn On the Device NOTICE: Do not use your device for 2 seconds. 3 Then connect the DC adapter to the Dell DJ as shown and charge your Dell DJTM until you have charged the battery for at least 6 hours. 2. After the battery is charged, press and hold the power button for at least 6 hours. 1. Plug the DC adapter into the wall outlet.
1 Charge the Battery and Turn On the Device NOTICE: Do not use your device for 2 seconds. 3 Then connect the DC adapter to the Dell DJ as shown and charge your Dell DJTM until you have charged the battery for at least 6 hours. 2. After the battery is charged, press and hold the power button for at least 6 hours. 1. Plug the DC adapter into the wall outlet.
