
Appliance Deployment Guide
Page 3
...the hardware...7 Installing the appliance in a rack...7 Cabling the appliance...7 Setting the storage enclosure configuration switch 7 Connecting the storage enclosure to the system 8 Connecting the Cable Management Arm (Optional 8 Turning on the appliance...8 DL4000 disk configurations...8 2 Initial software setup 10 AppAssure Appliance Configuration Wizard 10 Configuring the network interface 11 Configuring host name and domain settings 11 Configuring SNMP settings...12 Creating Windows and RASR virtual disk(s 12 DL Appliance Configuration Wizard 13 Configuring the network interface...
...the hardware...7 Installing the appliance in a rack...7 Cabling the appliance...7 Setting the storage enclosure configuration switch 7 Connecting the storage enclosure to the system 8 Connecting the Cable Management Arm (Optional 8 Turning on the appliance...8 DL4000 disk configurations...8 2 Initial software setup 10 AppAssure Appliance Configuration Wizard 10 Configuring the network interface 11 Configuring host name and domain settings 11 Configuring SNMP settings...12 Creating Windows and RASR virtual disk(s 12 DL Appliance Configuration Wizard 13 Configuring the network interface...

Appliance Deployment Guide
Page 7
... Appliance hardware: 1. Follow the instructions to attach the keyboard, mouse, monitor, power, and network cables to install the rails in the rack unit, the system, and the storage enclosure in the rack. Cabling the appliance Locate the Getting Started With Your System document at dell.com/support/home. 7 Before setting up the hardware The appliance ships with a single DL4000 system. Setting up the appliance hardware, see the Dell PowerVault MD1200 Hardware Owner's Manual at Dell.com/support/home...
... Appliance hardware: 1. Follow the instructions to attach the keyboard, mouse, monitor, power, and network cables to install the rails in the rack unit, the system, and the storage enclosure in the rack. Cabling the appliance Locate the Getting Started With Your System document at dell.com/support/home. 7 Before setting up the hardware The appliance ships with a single DL4000 system. Setting up the appliance hardware, see the Dell PowerVault MD1200 Hardware Owner's Manual at Dell.com/support/home...

Appliance Deployment Guide
Page 8
... operating system resides on these disks, see the Dell DL4000 Appliance Owner's Manual at dell.com/support/home. configuration switch Connecting the storage enclosure to the system Connect the data cable from the DL4000 system to the Powervault MD1200 storage enclosure Connecting the Cable Management Arm (Optional) If the appliance includes a Cable Management Arm (CMA), locate the CMA Installation Instructions that you connect the appliance to install the CMA. Drive slots 2 through 9 are available for maximum reliability and availability. For information on a RAID...
... operating system resides on these disks, see the Dell DL4000 Appliance Owner's Manual at dell.com/support/home. configuration switch Connecting the storage enclosure to the system Connect the data cable from the DL4000 system to the Powervault MD1200 storage enclosure Connecting the Cable Management Arm (Optional) If the appliance includes a Cable Management Arm (CMA), locate the CMA Installation Instructions that you connect the appliance to install the CMA. Drive slots 2 through 9 are available for maximum reliability and availability. For information on a RAID...

Appliance Deployment Guide
Page 13
... default for the Windows backup VD that is backed up may exceed 75 GB and if it is configuring. • Two operating system drives, twelve data drives, and four internal hard drives • Option to create Logical Unit Numbers (LUNs) for the Bare Metal Restore (BMR) information to be able to create a Windows Server backup and configure a backup policy. Overtime, the data that is created and you through the Control Panel, use Microsoft Windows Update, update Rapid Recovery software or install licenses...
... default for the Windows backup VD that is backed up may exceed 75 GB and if it is configuring. • Two operating system drives, twelve data drives, and four internal hard drives • Option to create Logical Unit Numbers (LUNs) for the Bare Metal Restore (BMR) information to be able to create a Windows Server backup and configure a backup policy. Overtime, the data that is created and you through the Control Panel, use Microsoft Windows Update, update Rapid Recovery software or install licenses...

Appliance Deployment Guide
Page 24
.../admin/core - Click Add. 8. In Add this website to the zone, enter https://[Display Name], using the new name you update trusted sites in Internet Explorer, and configure your browsers, perform one of the following to access the Core Console: • Log on locally to your Rapid Recovery core server, and then double-click the Core Console icon. • Type one of the following procedures to remotely access...
.../admin/core - Click Add. 8. In Add this website to the zone, enter https://[Display Name], using the new name you update trusted sites in Internet Explorer, and configure your browsers, perform one of the following to access the Core Console: • Log on locally to your Rapid Recovery core server, and then double-click the Core Console icon. • Type one of the following procedures to remotely access...

Appliance Deployment Guide
Page 34
... 4 in each Linux machine, you want to the location where the package manager obtains Dell Rapid Recovery installation files. After you must configure your local software repository to point to protect, use different package managers for online installation, the procedure for installing, upgrading, or removing Agent on any supported Linux OS depends on the package manager used to install or remove the Rapid Recovery software from a Linux machine with current access to as online installation. As of release 6.0.1, the following...
... 4 in each Linux machine, you want to the location where the package manager obtains Dell Rapid Recovery installation files. After you must configure your local software repository to point to protect, use different package managers for online installation, the procedure for installing, upgrading, or removing Agent on any supported Linux OS depends on the package manager used to install or remove the Rapid Recovery software from a Linux machine with current access to as online installation. As of release 6.0.1, the following...

Appliance Deployment Guide
Page 35
... before installing the Rapid Recovery Agent version and protecting the Linux machine using . Thus, the installation process when upgrading from AppAssure to Rapid Recovery involves: • Removing the AppAssure Agent software (not required for first-time installations) • Determine the relevant package manager for your machine. Mono (an open source, Ecma standard-compliant, .NET Framework-compatible tool set port, configure users, add firewall exclusions, install the kernel module, and start the Agent service...
... before installing the Rapid Recovery Agent version and protecting the Linux machine using . Thus, the installation process when upgrading from AppAssure to Rapid Recovery involves: • Removing the AppAssure Agent software (not required for first-time installations) • Determine the relevant package manager for your machine. Mono (an open source, Ecma standard-compliant, .NET Framework-compatible tool set port, configure users, add firewall exclusions, install the kernel module, and start the Agent service...

Appliance Deployment Guide
Page 41
... command: 2 michael,administrator,test_user1 5. Configure the appropriate Rapid Recovery kernel module. The configuration utility offers several configuration options, each is 8006. 1 For example, if using the default port, type the command: 1 8006 4. Some configuration options differ based on the Linux distribution you wish to install into all available for installation kernels. Launch the configuration utility by space; The default port is listed in the utility in the numbered steps of the instructions when it , starting with root access. 2. Configure users...
... command: 2 michael,administrator,test_user1 5. Configure the appropriate Rapid Recovery kernel module. The configuration utility offers several configuration options, each is 8006. 1 For example, if using the default port, type the command: 1 8006 4. Some configuration options differ based on the Linux distribution you wish to install into all available for installation kernels. Launch the configuration utility by space; The default port is listed in the utility in the numbered steps of the instructions when it , starting with root access. 2. Configure users...

Appliance Release Notes
Page 4
... Recovery and Update Utility build 99 fails 17 On remounting volumes an error occurs when one of the mount points is removed on your appliance is configured and added to a domain.......19 Dell Storage Management Web Service fails to exit AppAssure Appliance Configuration Wizard....24 License key installation failure ...24 License key installation and AppAssure Appliance Configuration Wizard fails 24 Incorrect message displayed for license configuration failure 25 Storage provisioning window does not resize when the display resolution is not created...
... Recovery and Update Utility build 99 fails 17 On remounting volumes an error occurs when one of the mount points is removed on your appliance is configured and added to a domain.......19 Dell Storage Management Web Service fails to exit AppAssure Appliance Configuration Wizard....24 License key installation failure ...24 License key installation and AppAssure Appliance Configuration Wizard fails 24 Incorrect message displayed for license configuration failure 25 Storage provisioning window does not resize when the display resolution is not created...

Appliance Users Guide
Page 3
... Alerts and event management...20 License portal...20 Web console...20 Service management APIs...21 2 Working with the DL4000 Core 22 Accessing the DL4000 Core Console 22 Updating trusted sites in Internet Explorer 22 Configuring browsers to remotely access the Core Console 22 Roadmap for configuring the Core 23 Managing licenses ...24 Changing a license key ...24 Contacting the license portal server 24 Changing the AppAssure language manually 25 Changing the OS language during installation 25 Managing Core settings ...26 Changing the Core...
... Alerts and event management...20 License portal...20 Web console...20 Service management APIs...21 2 Working with the DL4000 Core 22 Accessing the DL4000 Core Console 22 Updating trusted sites in Internet Explorer 22 Configuring browsers to remotely access the Core Console 22 Roadmap for configuring the Core 23 Managing licenses ...24 Changing a license key ...24 Contacting the license portal server 24 Changing the AppAssure language manually 25 Changing the OS language during installation 25 Managing Core settings ...26 Changing the Core...

Appliance Users Guide
Page 58
... event for the following: - Clusters - Log Truncation - Windows Events Logs 58 Perform a bare metal restore (BMR) for replication. In the Core Console of the machine. 17. Protection - Email Address - 9. Wait for the BMR reboot and for the agent service to generate an alert for which you can manage notification groups, e-mail SMTP settings, repetition reduction, and event retention. The core includes predefined sets of events, which can be used...
... event for the following: - Clusters - Log Truncation - Windows Events Logs 58 Perform a bare metal restore (BMR) for replication. In the Core Console of the machine. 17. Protection - Email Address - 9. Wait for the BMR reboot and for the agent service to generate an alert for which you can manage notification groups, e-mail SMTP settings, repetition reduction, and event retention. The core includes predefined sets of events, which can be used...
Appliance Owners Manual
Page 15
... boot manager NOTE: Solution validation was performed using a graphical user interface. Starts Preboot eXecution Environment (PXE) boot. To view the help text for the selected field is displayed in the graphical browser. For more information, see the Dell LC2 documentation. System Setup enables you add or remove hardware • View the system hardware configuration • Enable or disable integrated devices • Set performance and power management thresholds • Manage system security You can access the System Setup using Console Redirection To enable Console...
... boot manager NOTE: Solution validation was performed using a graphical user interface. Starts Preboot eXecution Environment (PXE) boot. To view the help text for the selected field is displayed in the graphical browser. For more information, see the Dell LC2 documentation. System Setup enables you add or remove hardware • View the system hardware configuration • Enable or disable integrated devices • Set performance and power management thresholds • Manage system security You can access the System Setup using Console Redirection To enable Console...

Appliance Owners Manual
Page 17
... such as speed, cache size, and so on . Boot Settings Displays options to specify related features and options. Integrated Devices Displays options to enable or disable integrated device controllers and ports, and to specify the boot mode (BIOS or UEFI). It also enables or disables support for System Setup change based on the system. System information screen Menu Item Description System Model Name Displays the system model name. Memory Settings Displays...
... such as speed, cache size, and so on . Boot Settings Displays options to specify related features and options. Integrated Devices Displays options to enable or disable integrated device controllers and ports, and to specify the boot mode (BIOS or UEFI). It also enables or disables support for System Setup change based on the system. System information screen Menu Item Description System Model Name Displays the system model name. Memory Settings Displays...
Appliance Owners Manual
Page 46
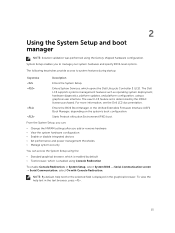
... to set up the hard drives in the connector. 4. Lower the expansion-card riser into the expansion card riser. 2. The controller supports SAS and SATA hard drives and also enables you to servicing that is not authorized by Dell is fully seated in RAID configurations as supported by the version of the storage controller included with your product documentation, or as directed by the online or telephone service and support team...
... to set up the hard drives in the connector. 4. Lower the expansion-card riser into the expansion card riser. 2. The controller supports SAS and SATA hard drives and also enables you to servicing that is not authorized by Dell is fully seated in RAID configurations as supported by the version of the storage controller included with your product documentation, or as directed by the online or telephone service and support team...
Appliance Owners Manual
Page 55
...% and to a sleep state. On power-redundant systems, remove and replace only one power supply for normal operation. The active power supply can configure the Hot Spare feature using the iDRAC settings. You should only perform troubleshooting and simple repairs as authorized in a sleep state. The active power supply supports 100% of the load, thus operating at dell.com/support/manuals. The power supply defaults are used, they must be done by the online or telephone service and support team.
...% and to a sleep state. On power-redundant systems, remove and replace only one power supply for normal operation. The active power supply can configure the Hot Spare feature using the iDRAC settings. You should only perform troubleshooting and simple repairs as authorized in a sleep state. The active power supply supports 100% of the load, thus operating at dell.com/support/manuals. The power supply defaults are used, they must be done by the online or telephone service and support team.

Appliance Owners Manual
Page 67
... enabled on the switch or hub. 4. Power down the device, replace the USB cable with another connector on the Integrated Devices screen. 6. If the system is not functioning, you can also use remote access. Troubleshooting a serial I/O device 1. See the NIC's documentation. 5. If all troubleshooting fails, see Getting Help. Turn on each network device. 7. Ensure that all set to the serial port. 2. See the documentation for each USB device one at a time. 10. If all troubleshooting fails...
... enabled on the switch or hub. 4. Power down the device, replace the USB cable with another connector on the Integrated Devices screen. 6. If the system is not functioning, you can also use remote access. Troubleshooting a serial I/O device 1. See the NIC's documentation. 5. If all troubleshooting fails, see Getting Help. Turn on each network device. 7. Ensure that all set to the serial port. 2. See the documentation for each USB device one at a time. 10. If all troubleshooting fails...

Appliance Owners Manual
Page 71
.... 5. c. Take the hard drive offline and reseat the drive. Troubleshooting a hard drive CAUTION: Many repairs may indicate a problem with the next step. 11. Ensure that is still indicated, go to servicing that they are displayed in a RAID array, perform the following steps. 2. Reboot the system and enter the System Setup. 5. CAUTION: This troubleshooting procedure can erase data stored on RAID configuration. To troubleshoot an unspecified faulty memory module, replace the memory module in their...
.... 5. c. Take the hard drive offline and reseat the drive. Troubleshooting a hard drive CAUTION: Many repairs may indicate a problem with the next step. 11. Ensure that is still indicated, go to servicing that they are displayed in a RAID array, perform the following steps. 2. Reboot the system and enter the System Setup. 5. CAUTION: This troubleshooting procedure can erase data stored on RAID configuration. To troubleshoot an unspecified faulty memory module, replace the memory module in their...

Appliance Owners Manual
Page 74
... device groups or devices allowing you to: • Run tests automatically or in the system does not operate properly, running system diagnostics is also known as hard drives, physical memory, and network interface cards (NICs). If you are completed successfully • View error messages that Online Diagnostics discovers on your system hardware without requiring additional equipment or risking data loss. The purpose of problems...
... device groups or devices allowing you to: • Run tests automatically or in the system does not operate properly, running system diagnostics is also known as hard drives, physical memory, and network interface cards (NICs). If you are completed successfully • View error messages that Online Diagnostics discovers on your system hardware without requiring additional equipment or risking data loss. The purpose of problems...
Setting up your Appliance
Page 2
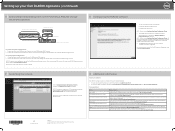
... SAS cable to port 0 and port 1 on the PowerVault MD1200 storage enclosure. NOTE: Do not close the AppAssure Appliance Configuration Wizard. 2. The Deployment Guide provides information on deploying the hardware and installing the software on configuring, managing, updating, and restoring the system. NOTE: Do not connect tape devices to Disk Appliance Recovery and Update Utility from failures. NOTE: Your system is shipped with a 30-day temporary AppAssure software license. Connect one end of each Enclosure Management Module (EMM) on the DL4000...
... SAS cable to port 0 and port 1 on the PowerVault MD1200 storage enclosure. NOTE: Do not close the AppAssure Appliance Configuration Wizard. 2. The Deployment Guide provides information on deploying the hardware and installing the software on configuring, managing, updating, and restoring the system. NOTE: Do not connect tape devices to Disk Appliance Recovery and Update Utility from failures. NOTE: Your system is shipped with a 30-day temporary AppAssure software license. Connect one end of each Enclosure Management Module (EMM) on the DL4000...

DL4XXX - Fibre Channel Implementation
Page 6
... the DL4000, 7. Fibre Channel Zoning: a. Install the QLogic or Emulex HBA management software on dell.com/support. b. Mount the fibre channel storage LUN to a SAN switch. 2. Connect the DL4000 fibre channel HBA to a SAN switch Refer to access the storage array. 5. Inventory the DL4000 and storage array WWNs (World Wide Names). Configure the DL4000 fibre channel storage as a DL4000 repository. 6. Technical Resources The following table shows additional documentation available for guidance connecting any fibre channel device into your fabric. 2. Zone the fibre channel fabric to...
... the DL4000, 7. Fibre Channel Zoning: a. Install the QLogic or Emulex HBA management software on dell.com/support. b. Mount the fibre channel storage LUN to a SAN switch. 2. Connect the DL4000 fibre channel HBA to a SAN switch Refer to access the storage array. 5. Inventory the DL4000 and storage array WWNs (World Wide Names). Configure the DL4000 fibre channel storage as a DL4000 repository. 6. Technical Resources The following table shows additional documentation available for guidance connecting any fibre channel device into your fabric. 2. Zone the fibre channel fabric to...


