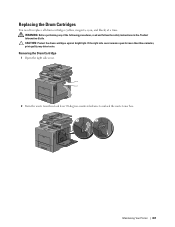
Dell Multifunction Color Laser Printer Users Guide
Page 18
... Print Media 464 Storing Consumables 464 Replacing the Toner Cartridges 465 Removing the Toner Cartridge 465 Installing a Toner Cartridge 466 Replacing the Drum Cartridges 467 Removing the Drum Cartridge 467 Installing a Drum Cartridge 469 Replacing the Fusing Unit 473 Removing the Fusing Unit 473 Installing a Fusing Unit 474 Replacing the Transfer Belt Unit...
Dell Multifunction Color Laser Printer Users Guide
Page 35
About the Printer This chapter provides an overview of your Dell™ C3765dnf Multifunction Color Laser Printer. Front and Rear View Front View 4 2 15 1 14 10 13 11 12 3 4 9 8 7 1 Duplex Automatic Document Feeder (DADF) 2 Transfer Belt Unit 3 Drum Cartridges 4 Waste Toner Box 5 Right Side Cover 6 Power Switch 7 Tray1 8 Optional 550-Sheet Feeder (Tray2) 5 6 9 Multipurpose Feeder (MPF) 10 Toner Cartridges 11 Front Cover 12 Front USB Port 13 Output Tray Extension 14 Operator Panel 15 Top Cover About the Printer 33
Dell Multifunction Color Laser Printer Users Guide
Page 147
...or waste toner box is unknown. Displays the maximum capacity of the paper tray. Indicates that there is not available. Dell™ Printer Configuration Web Tool 145 Values: Cyan Toner Cartridge Magenta Toner Cartridge Yellow Toner Cartridge Black Toner Cartridge Consumables ... tray. Displays the maximum capacity of the paper tray. Values: Location Details Displays the location where a fault occurred. Indicates that the drum cartridge and/or waste toner box needs to be replaced soon. Indicates that the toner needs to be replaced soon. Indicates that there...
Dell Multifunction Color Laser Printer Users Guide
Page 451
...for the printer to recover. Select Close, or wait for 60 seconds for the printer to recover. For more information about reinserting the drum cartridge, see "Modem Speed." If the message remains, replace the cartridge. Check if the telephone line cord is repeated. Select Close... • Check the printer or remote machine if the memory is fully installed. For more information about modem speed, see "Replacing the Drum Cartridges." Close the front cover. If the message remains, replace the cartridge. Make sure that the multipurpose feeder (MPF) is full. ...
Dell Multifunction Color Laser Printer Users Guide
Page 452
...toner cartridge. For more information about cleaning the CTD sensor, see "Replacing the Toner Cartridges." For more information about replacing the drum cartridge, see "Replacing the Toner Cartridges." Remove the unsupported black toner cartridge, and install a supported toner cartridge. For more ...970 What you can do Make sure that the yellow toner cartridge is fully installed. For more information about replacing the drum cartridge, see "Replacing the Toner Cartridges." Remove the unsupported cyan toner cartridge, and install a supported toner cartridge. Remove ...
Dell Multifunction Color Laser Printer Users Guide
Page 457
... 558 mm (21.97 inches) Width: 530 mm (20.87 inches) Depth: 530 mm (20.87 inches) Weight (including toner cartridges and drum cartridges): 32.7 kg (72.09 lb) Memory Base memory Maximum memory Connector DIMM size Speed 512 MB 1024 MB (512 MB + 512 MB) ... Operating System, and Interface PDL/Emulations PCL 6, PCL5e, PostScript, HBPL, XPS (Host Based) Specifications 455 29 Specifications Operating System Compatibility Your Dell™ C3765dnf Multifunction Color Laser Printer is compatible with Microsoft® Windows® XP, Windows XP 64-bit Edition, Windows Server® 2003, Windows ...
Dell Multifunction Color Laser Printer Users Guide
Page 465
... to conserve toner cartridge and paper. b Click Visit Dell printer supplies ordering web site. To use the EMail Alert Setup feature that require attention replacing (However, the printer can order consumables (toner cartridges, drum cartridges, and waste toner box) from the printer automatically... by the following : • Any supply or maintenance items that notifies you can change several settings in your web browser, launch the Dell Printer Configuration Web Tool, and...
Dell Multifunction Color Laser Printer Users Guide
Page 469
... the waste toner box. CAUTION: Protect the drum cartridges against bright light. Maintaining Your Printer 467 WARNING: Before performing any of the following procedures, read and follow the safety instructions in the Product Information Guide. Removing the Drum Cartridge 1 Open the right side cover. 2... Turn the waste toner box lock lever 90-degrees counterclockwise to replace all drum cartridges (yellow, magenta, cyan, and black) at a time. If the ...
Dell Multifunction Color Laser Printer Users Guide
Page 471
5 Slightly pressing down the tab on the drum cartridge that you want to remove the other hand from the drum cartridge. Installing a Drum Cartridge 1 Unpack a new drum cartridge of the desired color. 2 Remove the orange protective cover from underneath, and then pull it out completely. 7 Repeat the steps 5 and 6 to replace, pull it out halfway with one hand. 6 Support the drum cartridge with the other three cartridges. Maintaining Your Printer 469
Dell Multifunction Color Laser Printer Users Guide
Page 472
3 Insert the drum cartridge into the associated cartridge slot, and then push until it stops. 4 Repeat the steps 1 to 3 to insert the other three cartridges. 5 Remove the cleaning rod from inside the printer. 6 Remove the cleaning pad by pressing the white tabs between your thumb and index finger. 7 Unpack a new cleaning pad. 470 Maintaining Your Printer
Dell Multifunction Color Laser Printer Users Guide
Page 474
CAUTION: If the waste toner box does not fit into place properly, make sure that the drum cartridge is fully inserted in the previous step. 13 Turn the waste toner box lock lever 90-degrees clockwise to lock the waste toner box. 14 Close the right side cover. 472 Maintaining Your Printer 12 Reinsert the removed waste toner box.
Dell Multifunction Color Laser Printer Users Guide
Page 494
16 Close the right side cover. 17 Close the rear cover. Cleaning the Raster Optical Scanner (ROS) Window To prevent deterioration of printing quality due to stains inside the printer, clean inside the printer regularly by using the cleaning rod whenever you replace drum cartridges. 1 Open the right side cover. 492 Maintaining Your Printer
Dell Multifunction Color Laser Printer Users Guide
Page 536
Action 5 Verify that the correct print media is complete. See "Replacing the Drum Cartridges." No Go to action 3. Contact Dell. Types." The task is being used . a Replace the drum cartridges. b After you replace the drum cartridges, click Chart Print on the Diagnosis tab. Go to action 6. See "Cleaning the Raster Optical Scanner (ROS) Window." a Replace...
Dell Multifunction Color Laser Printer Users Guide
Page 537
...Roller (2nd BTR), and the Retard Roller." c Click Pitch Configuration Chart. Does this solve your problem? Does this solve your problem? Contact Dell. a Replace the fusing unit. c Click Pitch Configuration Chart. a Replace the transfer belt unit, the 2nd BTR, and the retard roller...printed. The task is printed. No Go to action 2. The Pitch Configuration Chart is complete. The task is complete. Contact Dell. See "Replacing the Drum Cartridges." See "Installing a Toner Cartridge." Does this solve your problem? 5 Replace the transfer belt unit, the 2nd Belt ...
Dell Multifunction Color Laser Printer Users Guide
Page 538
... problem? 5 Verify that the On check box under Non-Dell Toner is complete. For example, change the Paper Type setting. If not, use the print media recommended for the printer. See "Replacing the Drum Cartridges." The task is selected in the Toner Saver drop-...in the printer driver. a On the General tab, change the plain paper to thick. c Click 4 Colors Configuration Chart. Contact Dell. 536 Troubleshooting Guide a Replace the drum cartridges. No Go to action 4. b Ensure that the correct print media is complete. See "Supported Paper Types." Does this solve...
Dell Multifunction Color Laser Printer Users Guide
Page 539
...click Chart Print on the Printer Maintenance tab. a Replace the drum cartridges. The task is printed. Go to action 2. No Go to be replaced. Troubleshooting Guide 537 The 4 Colors Configuration Chart is complete. Contact Dell. Confirm the amount of toner left in the Status Monitor. ...b Ensure that the On check box under Non-Dell Toner is black Action Yes 1 Ensure that the drum cartridges are using non-Dell brand toner cartridges, enable the Non-Dell Toner option. Drum Cartridge." b Replace the toner cartridges as necessary. Part or the entire ...
Dell Multifunction Color Laser Printer Users Guide
Page 540
... Configuration Chart is printed. The Pitch Configuration Chart is complete. The task is printed. Contact Dell. Proceed to the b Click Pitch Configuration Chart. b After you replace the drum cartridges, click Chart Print on the Diagnosis tab. a On the Graphics tab, ensure that... Chart Print on your problem? 3 Replace the drum cartridges. Does this solve your problem? 3 Replace the fusing unit. Contact Dell. b After you replace the drum cartridges, click Chart Print on the Diagnosis tab. a Replace the drum cartridges. location of the problem using the Pitch...
Dell Multifunction Color Laser Printer Users Guide
Page 541
...The task is printed. a Remove the drum cartridges, and keep them in the dark place. d Launch the Tool Box, and click Chart Print on the Diagnosis tab. c Click Pitch Configuration Chart. c Click Pitch Configuration Chart. No Contact Dell. Vertical blanks Action 1 Clean inside the...2nd BTR, and the retard roller, click Chart Print on the Diagnosis tab. See "Cleaning the Raster Optical Scanner (ROS) Window." Contact Dell. a After the cleaning is complete. Go to action 2. e Click Pitch Configuration Chart. The task is completed, click Chart Print on ...
Dell Multifunction Color Laser Printer Users Guide
Page 542
...? d Click Ghost Configuration Chart. Does this solve your problem? 2b If you replace the drum cartridges, click Chart Print on the Diagnosis tab. No Contact Dell. Contact Dell. Ghosting Action Yes 1 Locate the cause of the problem using non-recommended print media, use...action a Launch the Tool Box, and click Chart Print on the Diagnosis tab. c Click Ghost Configuration Chart. Contact Dell. Negative ghost - 2b 2a Replace the drum cartridges. The task is printed. b After you are using the Ghost Configuration Chart. a On the operator panel, press...
Dell Multifunction Color Laser Printer Users Guide
Page 543
... solve your problem? The task is printed. No Contact Dell. Fog Action 1 Replace the drum cartridges. c Click 4 Colors Configuration Chart. See "Replacing the Drum Cartridges." Yes Go to action 2. b After you replace the drum cartridges, click Chart Print on the Pitch Configuration Chart? 2 Replace the drum cartridges. Does the pattern on the output match with...