
User's Guide
Page 8
... Media in the Priority Sheet Inserter (PSI 219 Loading an Envelope in the Priority Sheet Inserter (PSI 221 Loading Letterhead 223 Loading Print Media When Manual Duplex Printing 224 When Using the Multipurpose Feeder (MPF 224 When Using the Priority Sheet Inserter (PSI 225 6 Contents
... Media in the Priority Sheet Inserter (PSI 219 Loading an Envelope in the Priority Sheet Inserter (PSI 221 Loading Letterhead 223 Loading Print Media When Manual Duplex Printing 224 When Using the Multipurpose Feeder (MPF 224 When Using the Priority Sheet Inserter (PSI 225 6 Contents
User's Guide
Page 11
...273 Original Type 273 Lighter/Darker 274 Sending a Fax Automatically 274 Sending a Fax Manually 275 Confirming Transmissions 275 Automatic Redialing 275 Sending a Delayed Fax 276 Sending a Fax...Receiving Faxes 280 Receiving a Fax Automatically in the Fax Mode 280 Receiving a Fax Manually in the Telephone Mode 280 Receiving a Fax Automatically in the Telephone/Fax or Ans Machine/Fax Mode 280 Receiving ...a Fax Manually Using an External Telephone 280 Receiving Faxes Using the DRPD Mode 281 Receiving Faxes in the...
...273 Original Type 273 Lighter/Darker 274 Sending a Fax Automatically 274 Sending a Fax Manually 275 Confirming Transmissions 275 Automatic Redialing 275 Sending a Delayed Fax 276 Sending a Fax...Receiving Faxes 280 Receiving a Fax Automatically in the Fax Mode 280 Receiving a Fax Manually in the Telephone Mode 280 Receiving a Fax Automatically in the Telephone/Fax or Ans Machine/Fax Mode 280 Receiving ...a Fax Manually Using an External Telephone 280 Receiving Faxes Using the DRPD Mode 281 Receiving Faxes in the...
User's Guide
Page 21
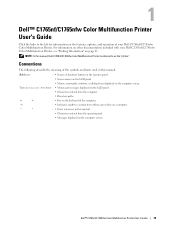
...of the computer. → : • Indicates a path to a certain item within a procedure on a computer. NOTE: In this manual. • Characters entered from the computer. • Directory paths. < > : • Key on the keyboard of hardware button on...the symbols and fonts used in this manual, Dell C1765nf/C1765nfw Color Multifunction Printer is referred to as the "printer." For information on other documentation included with your Dell C1765nf/C1765nfw Color Multifunction Printer. 1 Dell™ C1765nf/C1765nfw Color Multifunction Printer User's Guide Click the links to...
...of the computer. → : • Indicates a path to a certain item within a procedure on a computer. NOTE: In this manual. • Characters entered from the computer. • Directory paths. < > : • Key on the keyboard of hardware button on...the symbols and fonts used in this manual, Dell C1765nf/C1765nfw Color Multifunction Printer is referred to as the "printer." For information on other documentation included with your Dell C1765nf/C1765nfw Color Multifunction Printer. 1 Dell™ C1765nf/C1765nfw Color Multifunction Printer User's Guide Click the links to...
User's Guide
Page 23
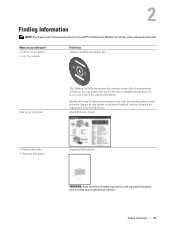
...are those of the Dell™ C1765nfw Color Multifunction Printer unless otherwise mentioned. Quick Reference Guide • Safety information • Warranty information Important Information WARNING: Read and follow all safety instructions in this manual are you looking for? • Drivers for my printer • My User... may be included on your disc to provide last-minute updates about technical changes to your printer or advanced technical reference material for your printer. 2 Finding Information NOTE: The images used in the Important Information prior to setting up and ...
...are those of the Dell™ C1765nfw Color Multifunction Printer unless otherwise mentioned. Quick Reference Guide • Safety information • Warranty information Important Information WARNING: Read and follow all safety instructions in this manual are you looking for? • Drivers for my printer • My User... may be included on your disc to provide last-minute updates about technical changes to your printer or advanced technical reference material for your printer. 2 Finding Information NOTE: The images used in the Important Information prior to setting up and ...
User's Guide
Page 24
... Express Service Code and Service Tag are you looking for components, such as printer driver • Customer Care - Drivers • Manuals - Printer documentation and product specifications Go to technical service and support questions • Documentation for my printer • Answers to support.dell.com. What are located inside the side door of your region and...
... Express Service Code and Service Tag are you looking for components, such as printer driver • Customer Care - Drivers • Manuals - Printer documentation and product specifications Go to technical service and support questions • Documentation for my printer • Answers to support.dell.com. What are located inside the side door of your region and...
User's Guide
Page 25
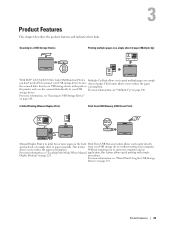
... pages on the front Print From USB Memory feature allows you to print directly and back side of a single sheet of paper manually. the printer, and save sheet of paper. allows you to reduce the paper the scanned data. For more information, see "Direct Print Using... indicates their links. 3 Scanning to a USB Storage Device Printing multiple pages on a single sheet of paper (Multiple-Up) With Dell™ C1765nf/C1765nfw Color Multifunction Printer, Multiple-Up Print allows you to print multiple pages on a single you don't need a PC to connect your USB storage device...
... pages on the front Print From USB Memory feature allows you to print directly and back side of a single sheet of paper manually. the printer, and save sheet of paper. allows you to reduce the paper the scanned data. For more information, see "Direct Print Using... indicates their links. 3 Scanning to a USB Storage Device Printing multiple pages on a single sheet of paper (Multiple-Up) With Dell™ C1765nf/C1765nfw Color Multifunction Printer, Multiple-Up Print allows you to print multiple pages on a single you don't need a PC to connect your USB storage device...
User's Guide
Page 27
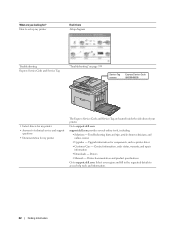
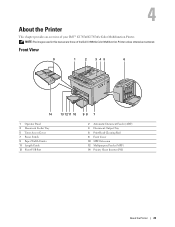
... Tray 6 Print Head Cleaning Rod 8 Front Cover 10 MPF Extension 12 Multipurpose Feeder (MPF) 14 Priority Sheet Inserter (PSI) About the Printer 25 NOTE: The images used in this manual are those of your Dell™ C1765nf/C1765nfw Color Multifunction Printer. 4 About the Printer This chapter provides an overview of the Dell C1765nfw Color Multifunction Printer unless otherwise mentioned.
... Tray 6 Print Head Cleaning Rod 8 Front Cover 10 MPF Extension 12 Multipurpose Feeder (MPF) 14 Priority Sheet Inserter (PSI) About the Printer 25 NOTE: The images used in this manual are those of your Dell™ C1765nf/C1765nfw Color Multifunction Printer. 4 About the Printer This chapter provides an overview of the Dell C1765nfw Color Multifunction Printer unless otherwise mentioned.
User's Guide
Page 35
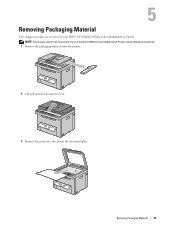
Removing Packaging Material 33 NOTE: The images used in this manual are those of your Dell™ C1765nf/C1765nfw Color Multifunction Printer. 5 Removing Packaging Material This chapter provides an overview of the Dell C1765nfw Color Multifunction Printer unless otherwise mentioned. 1 Remove the packaging material from the printer. 2 Lift and open the document cover. 3 Remove the protective sheet from the document glass.
Removing Packaging Material 33 NOTE: The images used in this manual are those of your Dell™ C1765nf/C1765nfw Color Multifunction Printer. 5 Removing Packaging Material This chapter provides an overview of the Dell C1765nfw Color Multifunction Printer unless otherwise mentioned. 1 Remove the packaging material from the printer. 2 Lift and open the document cover. 3 Remove the protective sheet from the document glass.

User's Guide
Page 37
... Ethernet Wall jack connector Phone connector Connection specifications IEEE 802.11b/802.11g (Dell C1765nfw Color Multifunction Printer only) USB 2.0 compatible 10 Base-T/100 Base-TX compatible RJ11 RJ11 NOTE: The images used in this manual are those of the Dell C1765nfw Color Multifunction Printer unless otherwise mentioned. 1 2 3 4 1 Ethernet Port 2 USB Port 3 Wall Jack Connector 4 Phone Connector...
... Ethernet Wall jack connector Phone connector Connection specifications IEEE 802.11b/802.11g (Dell C1765nfw Color Multifunction Printer only) USB 2.0 compatible 10 Base-T/100 Base-TX compatible RJ11 RJ11 NOTE: The images used in this manual are those of the Dell C1765nfw Color Multifunction Printer unless otherwise mentioned. 1 2 3 4 1 Ethernet Port 2 USB Port 3 Wall Jack Connector 4 Phone Connector...

User's Guide
Page 39
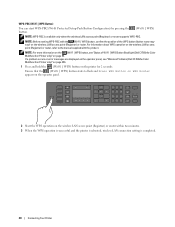
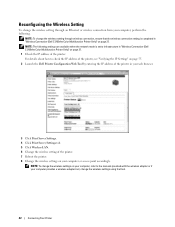
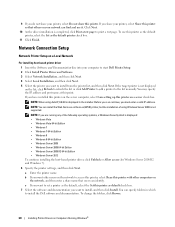
... and register devices required for wireless configuration, by entering PIN assignments in the printer and computer. Connecting Your Printer 37 To setup a wireless connection, see "Wireless Connection (Dell C1765nfw Color Multifunction Printer Only)" on page 37. WPS 2.0 works on access points with the ...Operator Panel Menu)*1 WPS-PIN*2 Auto SSID Setup Manual SSID Setup *1 WPS-PBC (Wi-Fi Protected Setup-Push Button Configuration) is a method to a LAN drop or hub. Wireless Connection (Dell C1765nfw Color Multifunction Printer Only) The specifications of wireless setting function are described...
... and register devices required for wireless configuration, by entering PIN assignments in the printer and computer. Connecting Your Printer 37 To setup a wireless connection, see "Wireless Connection (Dell C1765nfw Color Multifunction Printer Only)" on page 37. WPS 2.0 works on access points with the ...Operator Panel Menu)*1 WPS-PIN*2 Auto SSID Setup Manual SSID Setup *1 WPS-PBC (Wi-Fi Protected Setup-Push Button Configuration) is a method to a LAN drop or hub. Wireless Connection (Dell C1765nfw Color Multifunction Printer Only) The specifications of wireless setting function are described...
User's Guide
Page 40
Ensure that the (Wi-Fi | WPS) button starts to the manual supplied with the (Wi-Fi | WPS) button, confirm the position of Wi-Fi | WPS Button Backlight (Dell C1765nfw Color Multifunction Printer only)" on the wireless LAN access point (Registrar) or router. If a problem occurs or error messages are ...button (button name may vary) on page 93. NOTE: For more information on the (Wi-Fi | WPS) button, see "Wireless Problems (Dell C1765nfw Color Multifunction Printer only)" on page 356. 1 Press and hold the (Wi-Fi | WPS) button on the wireless LAN access point (Registrar) or router ...
Ensure that the (Wi-Fi | WPS) button starts to the manual supplied with the (Wi-Fi | WPS) button, confirm the position of Wi-Fi | WPS Button Backlight (Dell C1765nfw Color Multifunction Printer only)" on the wireless LAN access point (Registrar) or router. If a problem occurs or error messages are ...button (button name may vary) on page 93. NOTE: For more information on the (Wi-Fi | WPS) button, see "Wireless Problems (Dell C1765nfw Color Multifunction Printer only)" on page 356. 1 Press and hold the (Wi-Fi | WPS) button on the wireless LAN access point (Registrar) or router ...
User's Guide
Page 41
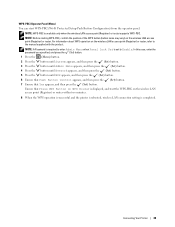
... wireless LAN access point (Registrar) or router within two minutes. 8 When the WPS operation is successful and the printer is rebooted, wireless LAN connection setting is set to the manual supplied with the product. WPS-PBC (Operator Panel Menu) You can start the WPS-PBC on the wireless LAN access... point (Registrar) or router. NOTE: A Password is required to enter Admin Menu when Panel Lock Set is completed. Connecting Your Printer 39 For information ...
... wireless LAN access point (Registrar) or router within two minutes. 8 When the WPS operation is successful and the printer is rebooted, wireless LAN connection setting is set to the manual supplied with the product. WPS-PBC (Operator Panel Menu) You can start the WPS-PBC on the wireless LAN access... point (Registrar) or router. NOTE: A Password is required to enter Admin Menu when Panel Lock Set is completed. Connecting Your Printer 39 For information ...
User's Guide
Page 42
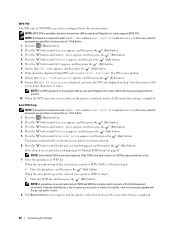
... When the encryption type of the selected access point is completed. 40 Connecting Your Printer For details, refer to the manual supplied with the access point or router. 8 The Restart System screen appears and the printer is rebooted, wireless LAN connection setting is WEP in step 6: • Enter ... the PIN code displayed on the wireless LAN access point (Registrar) or router, refer to the manual supplied with the product. 10 When the WPS operation is successful and the printer is rebooted, wireless LAN connection setting is not detected turn on wireless network. 6 Press the button...
... When the encryption type of the selected access point is completed. 40 Connecting Your Printer For details, refer to the manual supplied with the access point or router. 8 The Restart System screen appears and the printer is rebooted, wireless LAN connection setting is WEP in step 6: • Enter ... the PIN code displayed on the wireless LAN access point (Registrar) or router, refer to the manual supplied with the product. 10 When the WPS operation is successful and the printer is rebooted, wireless LAN connection setting is not detected turn on wireless network. 6 Press the button...
User's Guide
Page 43
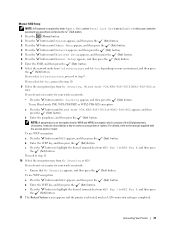
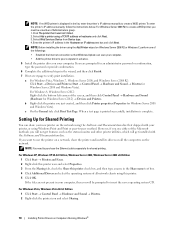
...appears, and then press the (Set) button. 5 Press the button until Wireless Setup appears, and then press the (Set) button. 6 Press the button until Manual Setup appears, and then press the (Set) button. 7 Enter the SSID, and then press the (Set) button. 8 Select the network mode from Infrastructure and... not set to Enable. b Enter the WEP key, and then press the (Set) button. If you select Infrastructure, proceed to step 9. Connecting Your Printer 41 c Press the button to highlight the desired transmit key from No Security, Mixed mode PSK, WPA-PSK-TKIP, WPA2-PSK-AES, or WEP. If...
...appears, and then press the (Set) button. 5 Press the button until Wireless Setup appears, and then press the (Set) button. 6 Press the button until Manual Setup appears, and then press the (Set) button. 7 Enter the SSID, and then press the (Set) button. 8 Select the network mode from Infrastructure and... not set to Enable. b Enter the WEP key, and then press the (Set) button. If you select Infrastructure, proceed to step 9. Connecting Your Printer 41 c Press the button to highlight the desired transmit key from No Security, Mixed mode PSK, WPA-PSK-TKIP, WPA2-PSK-AES, or WEP. If...
User's Guide
Page 44
... computer, refer to infrastructure in "Wireless Connection (Dell C1765nfw Color Multifunction Printer Only)" on page 37. 1 Check the IP address of the printer. 7 Reboot the printer. 8 Change the wireless settings on your computer, perform the following settings are available when the network mode is set to the manuals provided with the wireless adapter or if your...
... computer, refer to infrastructure in "Wireless Connection (Dell C1765nfw Color Multifunction Printer Only)" on page 37. 1 Check the IP address of the printer. 7 Reboot the printer. 8 Change the wireless settings on your computer, perform the following settings are available when the network mode is set to the manuals provided with the wireless adapter or if your...
User's Guide
Page 55
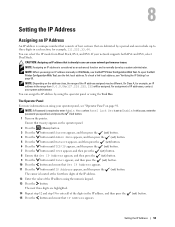
NOTE: When you specified, and press the (Set) button. 1 Turn on page 91. To open the Dell Printer Configuration Web Tool, use the Dell™ Printer Configuration Web Tool. You can assign the IP address by using the operator panel or using your operator panel, see "Verifying the IP Settings" on ... IP address. 12 Enter the value of the IP address assigned may be assigned. In this case, enter the password you assign an IP address manually in each section, for example, 111.222.33.44. NOTE: Assigning an IP address is considered as an advanced function and is normally done by...
NOTE: When you specified, and press the (Set) button. 1 Turn on page 91. To open the Dell Printer Configuration Web Tool, use the Dell™ Printer Configuration Web Tool. You can assign the IP address by using the operator panel or using your operator panel, see "Verifying the IP Settings" on ... IP address. 12 Enter the value of the IP address assigned may be assigned. In this case, enter the password you assign an IP address manually in each section, for example, 111.222.33.44. NOTE: Assigning an IP address is considered as an advanced function and is normally done by...
User's Guide
Page 59
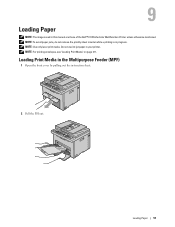
Do not use ink jet paper in the Multipurpose Feeder (MPF) 1 Open the front cover by pulling out the instruction sheet. 2 Pull the PSI out. Loading Print Media in your printer. 9 Loading Paper NOTE: The images used in progress. NOTE: For printing envelopes, see "Loading Print Media" on page 211. Loading Paper 57 NOTE: To avoid paper jams, do not remove the priority sheet inserter while a printing is in this manual are those of the Dell™ C1765nfw Color Multifunction Printer unless otherwise mentioned. NOTE: Use only laser print media.
Do not use ink jet paper in the Multipurpose Feeder (MPF) 1 Open the front cover by pulling out the instruction sheet. 2 Pull the PSI out. Loading Print Media in your printer. 9 Loading Paper NOTE: The images used in progress. NOTE: For printing envelopes, see "Loading Print Media" on page 211. Loading Paper 57 NOTE: To avoid paper jams, do not remove the priority sheet inserter while a printing is in this manual are those of the Dell™ C1765nfw Color Multifunction Printer unless otherwise mentioned. NOTE: Use only laser print media.
User's Guide
Page 67
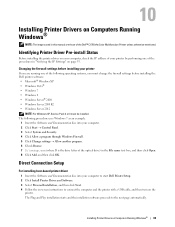
... 1 Insert the Software and Documentation disc into your printer If you are those of the Dell™ C1765nfw Color Multifunction Printer unless otherwise mentioned. Installing Printer Drivers on page 55. Identifying Printer Driver Pre-install Status Before installing the printer driver on your computer, check the IP address of... software proceeds to connect the computer and the printer with a USB cable, and then turn on the printer. 10 Installing Printer Drivers on Computers Running Windows® NOTE: The images used in this manual are running one of the procedures in the File...
... 1 Insert the Software and Documentation disc into your printer If you are those of the Dell™ C1765nfw Color Multifunction Printer unless otherwise mentioned. Installing Printer Drivers on page 55. Identifying Printer Driver Pre-install Status Before installing the printer driver on your computer, check the IP address of... software proceeds to connect the computer and the printer with a USB cable, and then turn on the printer. 10 Installing Printer Drivers on Computers Running Windows® NOTE: The images used in this manual are running one of the procedures in the File...
User's Guide
Page 70
... any of using AutoIP, 0.0.0.0 is not displayed on your computer to start Dell Printer Setup. 2 Click Install Printer Driver and Software. 3 Select Network Installation, and then click Next. 4 Select Local Installation, and then click Next. 5 Select the printer you want to the list manually. b If you want other users on the network to print a test...
... any of using AutoIP, 0.0.0.0 is not displayed on your computer to start Dell Printer Setup. 2 Click Install Printer Driver and Software. 3 Select Network Installation, and then click Next. 4 Select Local Installation, and then click Next. 5 Select the printer you want to the list manually. b If you want other users on the network to print a test...
User's Guide
Page 80
To enter the printer's IP address manually, follow the instructions below. Enter the printer's IP address in the list, enter the printer's IP address manually to verify print installation. For Windows 8, Windows Server 2012: Right-click the bottom left corner of all the computers on Windows Server 2008 R2 or ...
To enter the printer's IP address manually, follow the instructions below. Enter the printer's IP address in the list, enter the printer's IP address manually to verify print installation. For Windows 8, Windows Server 2012: Right-click the bottom left corner of all the computers on Windows Server 2008 R2 or ...

