
User's Guide
Page 3
...55 Connecting the printer using the Wireless Setup Wizard 56 Connecting the printer to a wireless network using Wi‑Fi Protected Setup 56 Connecting the printer to a wireless network using the Embedded Web Server 57 Changing port settings after installing a new network Internal Solutions Port 58 Setting up serial printing...59 Verifying printer setup...60 Printing a menu settings page ...60 Printing a network setup page...60 Loading paper and specialty media 61 Setting the paper size and type...61 Configuring Universal paper settings...61 Loading the 550‑sheet tray...61 Loading...
...55 Connecting the printer using the Wireless Setup Wizard 56 Connecting the printer to a wireless network using Wi‑Fi Protected Setup 56 Connecting the printer to a wireless network using the Embedded Web Server 57 Changing port settings after installing a new network Internal Solutions Port 58 Setting up serial printing...59 Verifying printer setup...60 Printing a menu settings page ...60 Printing a network setup page...60 Loading paper and specialty media 61 Setting the paper size and type...61 Configuring Universal paper settings...61 Loading the 550‑sheet tray...61 Loading...

User's Guide
Page 10
...your operating system. Initial setup instructions: • Connecting the printer • Installing the printer software Additional setup and instructions for using the printer: • Selecting and storing paper and specialty media • Loading paper • Configuring printer settings • Viewing and printing documents and photos • Setting up and using the printer software The latest supplemental information, updates, and technical support: • Documentation • Driver downloads • Product upgrades • Service call and repair information • Order status...
...your operating system. Initial setup instructions: • Connecting the printer • Installing the printer software Additional setup and instructions for using the printer: • Selecting and storing paper and specialty media • Loading paper • Configuring printer settings • Viewing and printing documents and photos • Setting up and using the printer software The latest supplemental information, updates, and technical support: • Documentation • Driver downloads • Product upgrades • Service call and repair information • Order status...
User's Guide
Page 54
... then click Continue. Note: If the configured printer does not appear in Mac OS X version 10.5. d From the Easy Install screen, click Install. b Follow the instructions on your printer. - d Type the printer IP address in the Network/Ports menu • By printing a network setup page or menu settings page, and then finding the TCP/IP section Note: You will need the IP address if you are installed on the computer screen. 3 Select Ethernet...
... then click Continue. Note: If the configured printer does not appear in Mac OS X version 10.5. d From the Easy Install screen, click Install. b Follow the instructions on your printer. - d Type the printer IP address in the Network/Ports menu • By printing a network setup page or menu settings page, and then finding the TCP/IP section Note: You will need the IP address if you are installed on the computer screen. 3 Select Ethernet...

User's Guide
Page 56
...: Make sure to : > Network/Ports > Network [x] > Network [x] Setup > Wireless > Wireless Connection Setup > Wi‑Fi Protected Setup > Start Push Button Method 2 Follow the instructions on the printer display. Using the Push Button Configuration method 1 From the printer control panel, navigate to type the correct SSID. For more information, see the documentation that came with the wireless network adapter. To set to Auto. Connecting the printer to a wireless network using Wi‑Fi Protected Setup Before you begin , make sure that came with the wireless network adapter...
...: Make sure to : > Network/Ports > Network [x] > Network [x] Setup > Wireless > Wireless Connection Setup > Wi‑Fi Protected Setup > Start Push Button Method 2 Follow the instructions on the printer display. Using the Push Button Configuration method 1 From the printer control panel, navigate to type the correct SSID. For more information, see the documentation that came with the wireless network adapter. To set to Auto. Connecting the printer to a wireless network using Wi‑Fi Protected Setup Before you begin , make sure that came with the wireless network adapter...
User's Guide
Page 59
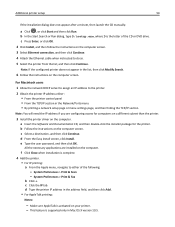
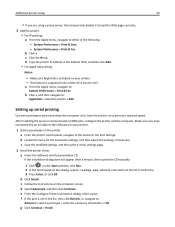
... is activated on your printer. 1 Set the parameters in Mac OS X version 10.5. Make sure you are using a proxy server, then temporarily disable it to load the Web page correctly. 2 Add the printer. • For IP printing: a From the Apple menu, navigate to the menu for the serial port settings, and then adjust the settings, if necessary. f If the port is supported only in the printer. d Type the printer IP address in the list, then click Refresh...
... is activated on your printer. 1 Set the parameters in Mac OS X version 10.5. Make sure you are using a proxy server, then temporarily disable it to load the Web page correctly. 2 Add the printer. • For IP printing: a From the Apple menu, navigate to the menu for the serial port settings, and then adjust the settings, if necessary. f If the port is supported only in the printer. d Type the printer IP address in the list, then click Refresh...
User's Guide
Page 60
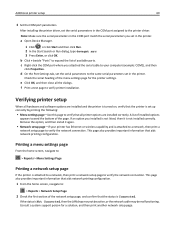
.... f Print a test page to expand the list of the network setup page, and confirm that aids network printing configuration. Check the serial heading of the page. c Right‑click the COM port where you set the serial parameters in the printer. e Click OK, and then close all printer options are installed correctly. This page also provides important information that the status is attached to a network, then print a network setup page to : > Reports > Menu Settings Page Printing a network setup page If the printer is Connected. After installing the printer driver, set in...
.... f Print a test page to expand the list of the network setup page, and confirm that aids network printing configuration. Check the serial heading of the page. c Right‑click the COM port where you set the serial parameters in the printer. e Click OK, and then close all printer options are installed correctly. This page also provides important information that the status is attached to a network, then print a network setup page to : > Reports > Menu Settings Page Printing a network setup page If the printer is Connected. After installing the printer driver, set in...

User's Guide
Page 86
... > Print. For Macintosh users a Customize the settings in the address field. Adjusting toner darkness 1 Open a Web browser, and then type the printer IP address in the Page Setup dialog: 1 With a document open, choose File > Page Setup. 2 Choose a paper size or create a custom size to match the paper loaded, or select the appropriate tray or feeder. 3 Click Print. Printing 86 Printing Printing forms and a document Printing forms Use the Forms and Favorites application to quickly and easily access frequently used forms or other settings 2 Depending on your printer model...
... > Print. For Macintosh users a Customize the settings in the address field. Adjusting toner darkness 1 Open a Web browser, and then type the printer IP address in the Page Setup dialog: 1 With a document open, choose File > Page Setup. 2 Choose a paper size or create a custom size to match the paper loaded, or select the appropriate tray or feeder. 3 Click Print. Printing 86 Printing Printing forms and a document Printing forms Use the Forms and Favorites application to quickly and easily access frequently used forms or other settings 2 Depending on your printer model...

User's Guide
Page 89
... 25% cotton. • Use only new envelopes from the tray settings to match the paper loaded in the tray. • Preprinting, perforation, and creasing may significantly affect the print quality and cause jams or other paper feed problems. • Before loading the card stock on the tray, flex and fan the card stock to loosen them. For more information, visit Documents: http://support.dell.com. • .pdf • .xps Images: • .dcx...
... 25% cotton. • Use only new envelopes from the tray settings to match the paper loaded in the tray. • Preprinting, perforation, and creasing may significantly affect the print quality and cause jams or other paper feed problems. • Before loading the card stock on the tray, flex and fan the card stock to loosen them. For more information, visit Documents: http://support.dell.com. • .pdf • .xps Images: • .dcx...

User's Guide
Page 92
... jobs > select your user name > Confidential Jobs > enter the PIN > Print • For other print jobs, navigate to: Held jobs > select your user name > select the print job > specify the number of copies > Print Printing confidential and other held jobs Note: Confidential and Verify print jobs are automatically deleted from the printer control panel. • All print jobs that can set the printer to store print jobs in the printer memory until you start the print job from memory after printing. Printing 92 Use...
... jobs > select your user name > Confidential Jobs > enter the PIN > Print • For other print jobs, navigate to: Held jobs > select your user name > select the print job > specify the number of copies > Print Printing confidential and other held jobs Note: Confidential and Verify print jobs are automatically deleted from the printer control panel. • All print jobs that can set the printer to store print jobs in the printer memory until you start the print job from memory after printing. Printing 92 Use...

User's Guide
Page 102
... scanner glass. For example: 1 Load an original document faceup, short edge first into the ADF tray. Creating a custom copy job The custom copy job or job build is enabled, the scanner scans the first set the copy size to 100%. 1 Load an original document faceup, short edge first into the ADF tray. Note: Change the scan job settings, if necessary. 5 If you scan one page using the ADF, then a set consists of all scanned pages until the ADF tray...
... scanner glass. For example: 1 Load an original document faceup, short edge first into the ADF tray. Creating a custom copy job The custom copy job or job build is enabled, the scanner scans the first set the copy size to 100%. 1 Load an original document faceup, short edge first into the ADF tray. Note: Change the scan job settings, if necessary. 5 If you scan one page using the ADF, then a set consists of all scanned pages until the ADF tray...

User's Guide
Page 161
... print jobs. Network Address UAA LAA View the network addresses. View Card Speed View the speed of the following : • Network/Ports > Standard Network > Standard Network Setup > Network Card • Network/Ports > Network [x] > Network [x] Setup > Network Card Use To View Card Status Connected Disconnected View the connection status of the wireless network adapter. Understanding the printer menus 161 Use Mac Binary PS On Off Auto Standard Network Setup OR Network [x] Setup Reports Network Card TCP/IP IPv6 Wireless AppleTalk To Set the printer to a wireless network...
... print jobs. Network Address UAA LAA View the network addresses. View Card Speed View the speed of the following : • Network/Ports > Standard Network > Standard Network Setup > Network Card • Network/Ports > Network [x] > Network [x] Setup > Network Card Use To View Card Status Connected Disconnected View the connection status of the wireless network adapter. Understanding the printer menus 161 Use Mac Binary PS On Off Auto Standard Network Setup OR Network [x] Setup Reports Network Card TCP/IP IPv6 Wireless AppleTalk To Set the printer to a wireless network...

User's Guide
Page 166
... USB port. The menu selection is the factory default setting. • On processes raw binary PostScript print jobs. • Off filters print jobs using the standard protocol. Notes: • Auto is then updated. Note: This menu is available only when the printer is the factory default setting. • Disabled turns off job buffering. Set the netmask information for an external print server. Set the network address information for the USB Buffer, disable or reduce the size of the parallel, serial, and network...
... USB port. The menu selection is the factory default setting. • On processes raw binary PostScript print jobs. • Off filters print jobs using the standard protocol. Notes: • Auto is then updated. Note: This menu is available only when the printer is the factory default setting. • Disabled turns off job buffering. Set the netmask information for an external print server. Set the network address information for the USB Buffer, disable or reduce the size of the parallel, serial, and network...

User's Guide
Page 284
... interface card. USB/parallel interface card does not operate correctly Action Yes No Step 1 Make sure the USB or parallel interface card is solved. Use the correct cable, and then make it is securely connected to step 2. The problem is installed. The problem is solved. Note: A USB or parallel interface card from another printer may not work on this printer. Note: If necessary, manually add the tray in the printer driver" on page 36. Troubleshooting 284...
... interface card. USB/parallel interface card does not operate correctly Action Yes No Step 1 Make sure the USB or parallel interface card is solved. Use the correct cable, and then make it is securely connected to step 2. The problem is installed. The problem is solved. Note: A USB or parallel interface card from another printer may not work on this printer. Note: If necessary, manually add the tray in the printer driver" on page 36. Troubleshooting 284...
User's Guide
Page 292
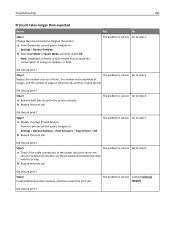
... 1 Change the environmental settings of energy or supplies, or both. Note: Disabling Eco-Mode or Quiet Mode may increase the consumption of the printer. Yes No The problem is solved. Reduce the number and size of fonts, the number and complexity of images, and the number of pages in the printer memory. The problem is solved. Go to the printer and print server are secure. Step 5 a Check if the cable connections to...
... 1 Change the environmental settings of energy or supplies, or both. Note: Disabling Eco-Mode or Quiet Mode may increase the consumption of the printer. Yes No The problem is solved. Reduce the number and size of fonts, the number and complexity of images, and the number of pages in the printer memory. The problem is solved. Go to the printer and print server are secure. Step 5 a Check if the cable connections to...
User's Guide
Page 333
... Embedded Web Server 108 creating shortcuts using the printer control panel 108 setting up e‑mail function 107 using a shortcut number 109 using the address book 110 using 89 environmental settings conserving supplies 223 display brightness, adjusting 226 Eco‑Mode 223 Hibernate mode 225 Quiet Mode 224 Sleep mode 225 erasing non‑volatile memory 228 erasing printer hard disk memory 228 erasing volatile memory 227 Error reading USB drive. Contact system administrator. 265 fax port 50 Fax server 'To Format' not set up . Remove...
... Embedded Web Server 108 creating shortcuts using the printer control panel 108 setting up e‑mail function 107 using a shortcut number 109 using the address book 110 using 89 environmental settings conserving supplies 223 display brightness, adjusting 226 Eco‑Mode 223 Hibernate mode 225 Quiet Mode 224 Sleep mode 225 erasing non‑volatile memory 228 erasing printer hard disk memory 228 erasing volatile memory 227 Error reading USB drive. Contact system administrator. 265 fax port 50 Fax server 'To Format' not set up . Remove...

User's Guide
Page 334
... Imaging unit very low, [x] estimated pages remain [84.xy] 266 importing a configuration using the Embedded Web Server 27 Incompatible tray [x] [59] 266 Incorrect paper size, open [paper source] [34] 266 individual settings information erasing 228 initial fax setup 115 using the Embedded Web Server 115 Insert Tray [x] 267 inserting a header or footer 103 Install duplex 267 Install Tray [x] 267 installing an Internal Solutions Port 36 installing an optional card 34 installing options order of installation 47 installing printer hard disk 41 installing printer on a network Ethernet networking...
... Imaging unit very low, [x] estimated pages remain [84.xy] 266 importing a configuration using the Embedded Web Server 27 Incompatible tray [x] [59] 266 Incorrect paper size, open [paper source] [34] 266 individual settings information erasing 228 initial fax setup 115 using the Embedded Web Server 115 Insert Tray [x] 267 inserting a header or footer 103 Install duplex 267 Install Tray [x] 267 installing an Internal Solutions Port 36 installing an optional card 34 installing options order of installation 47 installing printer hard disk 41 installing printer on a network Ethernet networking...

User's Guide
Page 336
... Parallel port [x] disabled [56] 272 parts checking status 234 checking, from printer control panel 234 checking, using the Embedded Web Server 234 PCL Emul menu 218 PDF menu 217 Personal Identification Number method using 56 phone splitter 121 photos copying 96 placing separator sheets between copies 101 port settings configuring 58 PostScript menu 217 power cord socket 50 preparing to set up the printer on an Ethernet network 53 print irregularities 301 print job canceling, from computer 94 print quality cleaning the scanner glass 232 print quality troubleshooting blank pages...
... Parallel port [x] disabled [56] 272 parts checking status 234 checking, from printer control panel 234 checking, using the Embedded Web Server 234 PCL Emul menu 218 PDF menu 217 Personal Identification Number method using 56 phone splitter 121 photos copying 96 placing separator sheets between copies 101 port settings configuring 58 PostScript menu 217 power cord socket 50 preparing to set up the printer on an Ethernet network 53 print irregularities 301 print job canceling, from computer 94 print quality cleaning the scanner glass 232 print quality troubleshooting blank pages...

User's Guide
Page 338
... cartridge [32.xy] 274 Replace unsupported imaging unit [32.xy] 275 Replace wiper 275 Restore held jobs? 275 Scan document too long 275 Scanner automatic feeder cover open 275 Scanner disabled by admin [840.01] 275 Scanner disabled. Contact system administrator. 278 printer options troubleshooting internal option is disabled. 271 Non‑Dell [supply type], see User's Guide [33.xy] 271 Not enough free space in flash memory for resources [52] 271 Paper changes needed to complete job 277 Too many disks installed...
... cartridge [32.xy] 274 Replace unsupported imaging unit [32.xy] 275 Replace wiper 275 Restore held jobs? 275 Scan document too long 275 Scanner automatic feeder cover open 275 Scanner disabled by admin [840.01] 275 Scanner disabled. Contact system administrator. 278 printer options troubleshooting internal option is disabled. 271 Non‑Dell [supply type], see User's Guide [33.xy] 271 Not enough free space in flash memory for resources [52] 271 Paper changes needed to complete job 277 Too many disks installed...
User's Guide
Page 340
... sending fax at a scheduled time 131 sending fax using the address book 131 Serial [x] menu 168 Serial option [x] error [54] 276 Serial port [x] disabled [56] 276 serial printing setting up 59 Set Date/Time menu 176 setting paper size 61 paper type 61 TCP/IP address 162 setting the fax number 128 setting the outgoing fax name 128 setting the Universal paper size 61 setting up e‑mail alerts 245 setting up fax country‑ or region‑specific 124 digital telephone service 122 DSL connection 120 standard telephone line connection 116 VoIP connection...
... sending fax at a scheduled time 131 sending fax using the address book 131 Serial [x] menu 168 Serial option [x] error [54] 276 Serial port [x] disabled [56] 276 serial printing setting up 59 Set Date/Time menu 176 setting paper size 61 paper type 61 TCP/IP address 162 setting the fax number 128 setting the outgoing fax name 128 setting the Universal paper size 61 setting up e‑mail alerts 245 setting up fax country‑ or region‑specific 124 digital telephone service 122 DSL connection 120 standard telephone line connection 116 VoIP connection...

User's Guide
Page 341
... home screen buttons and icons 17 uneven print density 312 Unformatted flash detected [53] 278 Universal Paper Size setting 61 Universal Setup menu 157 unlinking trays 77, 78 Unsupported camera mode, unplug camera and change mode 278 Unsupported option in slot [x] [55] 278 Unsupported USB hub, please remove 265 updating options in printer driver 52 USB port 50 USB port [x] disabled [56] 278 USB/parallel interface card troubleshooting 284 using a shortcut number scanning to an FTP address 139 using Forms...
... home screen buttons and icons 17 uneven print density 312 Unformatted flash detected [53] 278 Universal Paper Size setting 61 Universal Setup menu 157 unlinking trays 77, 78 Unsupported camera mode, unplug camera and change mode 278 Unsupported option in slot [x] [55] 278 Unsupported USB hub, please remove 265 updating options in printer driver 52 USB port 50 USB port [x] disabled [56] 278 USB/parallel interface card troubleshooting 284 using a shortcut number scanning to an FTP address 139 using Forms...


