User Guide
Page 2
... options...14 Installing hardware options...19 Attaching cables...20 Setting up the printer software...21 Networking...23 Verifying printer setup...28 Loading paper and specialty media 30 Setting the paper size and type...30 Configuring Universal paper settings...30 Using the standard bin and paper stop 31 Loading trays...31 Loading the multipurpose feeder...36 Linking...
... options...14 Installing hardware options...19 Attaching cables...20 Setting up the printer software...21 Networking...23 Verifying printer setup...28 Loading paper and specialty media 30 Setting the paper size and type...30 Configuring Universal paper settings...30 Using the standard bin and paper stop 31 Loading trays...31 Loading the multipurpose feeder...36 Linking...
User Guide
Page 3
.../Ports menu...63 Security menu...70 Settings menu...72 Saving money and the environment 83 Saving paper and toner...83 Saving energy...83 Recycling...86 Securing the printer 87 Using the security lock feature...87 Statement of Volatility...87 Erasing volatile memory...88 Erasing... 89 Estimated number of remaining pages 90 Ordering supplies...90 Storing supplies...90 Replacing supplies...91 Moving the printer...95 Managing the printer 97 Managing printer messages...97 Accessing Status Monitor Center...97 Checking the virtual display...97 Viewing reports...98 Configuring supply notifications ...
.../Ports menu...63 Security menu...70 Settings menu...72 Saving money and the environment 83 Saving paper and toner...83 Saving energy...83 Recycling...86 Securing the printer 87 Using the security lock feature...87 Statement of Volatility...87 Erasing volatile memory...88 Erasing... 89 Estimated number of remaining pages 90 Ordering supplies...90 Storing supplies...90 Replacing supplies...91 Moving the printer...95 Managing the printer 97 Managing printer messages...97 Accessing Status Monitor Center...97 Checking the virtual display...97 Viewing reports...98 Configuring supply notifications ...
User Guide
Page 7
... support so that they may serve you looking for : • Connecting the printer to view context‑sensitive information. Dell Support Web site-http://support.dell.com Support telephone numbers and hours of publications, click the Networking Guide link. For...Web site. Initial setup instructions: • Connecting the printer • Installing the printer software Additional setup and instructions for using the printer: • Selecting and storing paper and specialty media • Loading paper • Configuring printer settings • Viewing and printing documents and photos ...
... support so that they may serve you looking for : • Connecting the printer to view context‑sensitive information. Dell Support Web site-http://support.dell.com Support telephone numbers and hours of publications, click the Networking Guide link. For...Web site. Initial setup instructions: • Connecting the printer • Installing the printer software Additional setup and instructions for using the printer: • Selecting and storing paper and specialty media • Loading paper • Configuring printer settings • Viewing and printing documents and photos ...
User Guide
Page 8
...any hardware options, then leave enough room for proper ventilation: Free from stray staples and paper clips. - Clean, dry, and free of space around the printer for them also. Learning about the printer 8 What are you plan to 104°F) • Allow the following recommended amount ... to open trays, covers, and doors. If you looking for? • Software and Drivers-Certified drivers for my printer and installers for Dell printer software • Readme files-Last‑minute technical changes, or advanced technical reference materials for experienced users or technicians &#...
...any hardware options, then leave enough room for proper ventilation: Free from stray staples and paper clips. - Clean, dry, and free of space around the printer for them also. Learning about the printer 8 What are you plan to 104°F) • Allow the following recommended amount ... to open trays, covers, and doors. If you looking for? • Software and Drivers-Certified drivers for my printer and installers for Dell printer software • Readme files-Last‑minute technical changes, or advanced technical reference materials for experienced users or technicians &#...

User Guide
Page 10
Learning about the printer 10 1 Printer control panel 2 Paper stop 3 Standard bin 4 Front door release button 5 Controller board access door 6 Standard 250‑sheet tray 7 Optional 550‑sheet tray 8 50‑sheet multipurpose feeder 9 Front door
Learning about the printer 10 1 Printer control panel 2 Paper stop 3 Standard bin 4 Front door release button 5 Controller board access door 6 Standard 250‑sheet tray 7 Optional 550‑sheet tray 8 50‑sheet multipurpose feeder 9 Front door
User Guide
Page 22
... accept the license agreement. 6 Click Continue, and then follow the instructions on the computer screen. Installing the Local Printer Settings Utility 1 Visit http://support.dell.com, and then download the software. 2 Double‑click the downloaded software. 3 Select an installation type, and...utility is supported only in the printer driver to change the toner darkness, power saver, and paper size settings for use. Use the printer software to make them available for all print jobs. For Windows users 1 Open the printers folder. Additional printer setup 22 c Press Enter, or...
... accept the license agreement. 6 Click Continue, and then follow the instructions on the computer screen. Installing the Local Printer Settings Utility 1 Visit http://support.dell.com, and then download the software. 2 Double‑click the downloaded software. 3 Select an installation type, and...utility is supported only in the printer driver to change the toner darkness, power saver, and paper size settings for use. Use the printer software to make them available for all print jobs. For Windows users 1 Open the printers folder. Additional printer setup 22 c Press Enter, or...
User Guide
Page 30
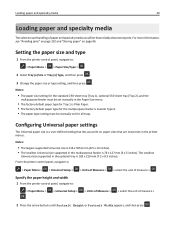
...Paper Size menu. • The factory default paper type for Tray 1 is Plain Paper. • The factory default paper type for all trays. From the printer control panel, navigate to: > Paper Menu > > Universal Setup > Specify the paper height and width 1 From the printer control panel, navigate to : > Paper Menu > > Paper... "Avoiding jams" on page 102 and "Storing paper" on paper sizes that lets you print on page 46. The smallest Universal size supported in the printer menus. Loading paper and specialty media 30 Loading paper and specialty media The selection and handling of measure...
...Paper Size menu. • The factory default paper type for Tray 1 is Plain Paper. • The factory default paper type for all trays. From the printer control panel, navigate to: > Paper Menu > > Universal Setup > Specify the paper height and width 1 From the printer control panel, navigate to : > Paper Menu > > Paper... "Avoiding jams" on page 102 and "Storing paper" on paper sizes that lets you print on page 46. The smallest Universal size supported in the printer menus. Loading paper and specialty media 30 Loading paper and specialty media The selection and handling of measure...

User Guide
Page 31
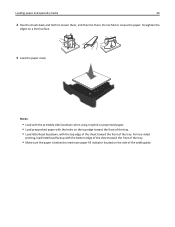
...the bin as it stacks. Doing so may cause a jam. It collects prints facedown. Using the standard bin and paper stop , pull it flips forward. To open the paper stop The standard bin holds up to another location. Keep all other trays closed until needed. 1 Pull the tray ...completely out. Note: Do not remove trays while a job prints or while Busy appears on the printer display. The standard bin includes a paper stop when moving the printer to 150 sheets of 20‑lb paper. Loading paper and specialty media 31 3 Change the settings, and then press . Note: Close the...
...the bin as it stacks. Doing so may cause a jam. It collects prints facedown. Using the standard bin and paper stop , pull it flips forward. To open the paper stop The standard bin holds up to another location. Keep all other trays closed until needed. 1 Pull the tray ...completely out. Note: Do not remove trays while a job prints or while Busy appears on the printer display. The standard bin includes a paper stop when moving the printer to 150 sheets of 20‑lb paper. Loading paper and specialty media 31 3 Change the settings, and then press . Note: Close the...

User Guide
Page 32
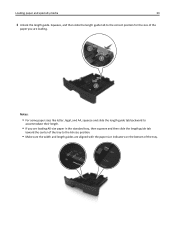
Loading paper and specialty media 32 2 Squeeze, and then slide the width guide tab to the correct position for the size of the paper you are loading.
Loading paper and specialty media 32 2 Squeeze, and then slide the width guide tab to the correct position for the size of the paper you are loading.
User Guide
Page 33
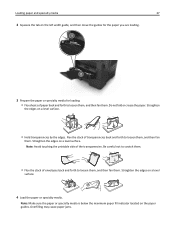
... 33 3 Unlock the length guide. Squeeze, and then slide the length guide tab to the correct position for the size of the paper you are loading. 1 2 3 Notes: • For some paper sizes like letter, legal, and A4, squeeze and slide the length guide tab backward to accommodate their length. • If you... are loading A6-size paper in the standard tray, then squeeze and then slide the length guide tab toward the center of the tray to the A6‑size position. &#...
... 33 3 Unlock the length guide. Squeeze, and then slide the length guide tab to the correct position for the size of the paper you are loading. 1 2 3 Notes: • For some paper sizes like letter, legal, and A4, squeeze and slide the length guide tab backward to accommodate their length. • If you... are loading A6-size paper in the standard tray, then squeeze and then slide the length guide tab toward the center of the tray to the A6‑size position. &#...
User Guide
Page 34
... with the top edge of the sheet toward the front of the tray. • Make sure the paper is below the maximum paper fill indicator located on a level surface. 5 Load the paper stack. Loading paper and specialty media 34 4 Flex the sheets back and forth to loosen them, and then fan them.... Notes: • Load with the printable side facedown when using recycled or preprinted paper. • Load prepunched paper with the holes on the top edge toward the front of the tray. • Load letterhead facedown, with the bottom edge of the...
... with the top edge of the sheet toward the front of the tray. • Make sure the paper is below the maximum paper fill indicator located on a level surface. 5 Load the paper stack. Loading paper and specialty media 34 4 Flex the sheets back and forth to loosen them, and then fan them.... Notes: • Load with the printable side facedown when using recycled or preprinted paper. • Load prepunched paper with the holes on the top edge toward the front of the tray. • Load letterhead facedown, with the bottom edge of the...

User Guide
Page 35
Loading paper and specialty media 35 6 Insert the tray. 7 From the printer control panel, set the paper size and type in the tray. Note: Set the correct paper size and type to match the paper loaded in the Paper menu to avoid paper jams and print quality problems.
Loading paper and specialty media 35 6 Insert the tray. 7 From the printer control panel, set the paper size and type in the tray. Note: Set the correct paper size and type to match the paper loaded in the Paper menu to avoid paper jams and print quality problems.

User Guide
Page 36
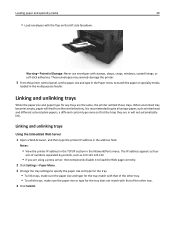
You can also use it for single‑page print jobs on different paper sizes and types or specialty media, such as card stock, transparencies, and envelopes. b Pull the extender gently so that the multipurpose feeder is fully extended and open. Loading paper and specialty media 36 Loading the multipurpose feeder Use the multipurpose feeder when printing on letterhead. 1 Open the multipurpose feeder. 1 2 a Pull the multipurpose feeder extender.
You can also use it for single‑page print jobs on different paper sizes and types or specialty media, such as card stock, transparencies, and envelopes. b Pull the extender gently so that the multipurpose feeder is fully extended and open. Loading paper and specialty media 36 Loading the multipurpose feeder Use the multipurpose feeder when printing on letterhead. 1 Open the multipurpose feeder. 1 2 a Pull the multipurpose feeder extender.
User Guide
Page 37
... them. Overfilling may cause paper jams. Loading paper and specialty media 37 2 Squeeze the tab on the left width guide, and then move the guides for the paper you are loading. 3 Prepare the paper or specialty media for loading. • Flex sheets of paper back and forth to loosen...specialty media. Straighten the edges on a level surface. • Hold transparencies by the edges. Note: Make sure the paper or specialty media is below the maximum paper fill indicator located on a level surface. Note: Avoid touching the printable side of envelopes back and forth to loosen them...
... them. Overfilling may cause paper jams. Loading paper and specialty media 37 2 Squeeze the tab on the left width guide, and then move the guides for the paper you are loading. 3 Prepare the paper or specialty media for loading. • Flex sheets of paper back and forth to loosen...specialty media. Straighten the edges on a level surface. • Hold transparencies by the edges. Note: Make sure the paper or specialty media is below the maximum paper fill indicator located on a level surface. Note: Avoid touching the printable side of envelopes back and forth to loosen them...

User Guide
Page 38
Loading paper and specialty media 38 • Load paper, transparencies, and card stock with the top edge entering the printer first. For more information on loading transparencies, see the packaging that the transparencies came in. • Load letterhead faceup with the recommended printable side faceup and the top edge entering the printer first. For two‑sided (duplex) printing, load letterhead facedown with the bottom edge entering the printer first.
Loading paper and specialty media 38 • Load paper, transparencies, and card stock with the top edge entering the printer first. For more information on loading transparencies, see the packaging that the transparencies came in. • Load letterhead faceup with the recommended printable side faceup and the top edge entering the printer first. For two‑sided (duplex) printing, load letterhead facedown with the bottom edge entering the printer first.
User Guide
Page 39
...does not match with that of the other tray. • To unlink trays, make sure the paper size or type for the tray match with that the trays they are the same, the printer will feed from the next linked tray. Linking and unlinking trays Using the Embedded Web Server 1 ...Open a Web browser, and then type the printer IP address in the Network/Ports menu. These envelopes may severely damage the printer. 5 From the printer control panel, set the paper size and type in the multipurpose feeder. The IP address appears as four sets of ...
...does not match with that of the other tray. • To unlink trays, make sure the paper size or type for the tray match with that the trays they are the same, the printer will feed from the next linked tray. Linking and unlinking trays Using the Embedded Web Server 1 ...Open a Web browser, and then type the printer IP address in the Network/Ports menu. These envelopes may severely damage the printer. 5 From the printer control panel, set the paper size and type in the multipurpose feeder. The IP address appears as four sets of ...
User Guide
Page 40
...: • Print a network setup page or menu settings page, and then locate the IP address in the printer. Note: Plain Paper is the factory default paper type for the tray using the Local Printer Settings Utility. Loading paper and specialty media 40 Using the printer settings on the computer Depending on your operating system, access the...
...: • Print a network setup page or menu settings page, and then locate the IP address in the printer. Note: Plain Paper is the factory default paper type for the tray using the Local Printer Settings Utility. Loading paper and specialty media 40 Using the printer settings on the computer Depending on your operating system, access the...

User Guide
Page 41
... the Custom menu using a proxy server, then temporarily disable it to load the Web page correctly. 2 Click Settings > Paper Menu. 3 From the Tray Configuration section, select a paper source, and then select a custom paper type under the paper type column. 4 Click Submit. Using the printer settings on the computer Depending on your operating system, access the...
... the Custom menu using a proxy server, then temporarily disable it to load the Web page correctly. 2 Click Settings > Paper Menu. 3 From the Tray Configuration section, select a paper source, and then select a custom paper type under the paper type column. 4 Click Submit. Using the printer settings on the computer Depending on your operating system, access the...
User Guide
Page 42
... or transportation environment is either grain long, running the length of the paper, or grain short, running the width of the paper. Grain is very different from the printer environment. The optional trays can automatically feed paper weights up to feed properly, causing jams. For best performance, use ...might not be stiff enough to 90‑g/m2 (24‑lb) bond grain long paper. Storing paper unwrapped in hot, humid, cold, or dry conditions, even in the same environment as the printer for 24-48 hours before buying large quantities. smoothness between 100 and 300 Sheffield points...
... or transportation environment is either grain long, running the length of the paper, or grain short, running the width of the paper. Grain is very different from the printer environment. The optional trays can automatically feed paper weights up to feed properly, causing jams. For best performance, use ...might not be stiff enough to 90‑g/m2 (24‑lb) bond grain long paper. Storing paper unwrapped in hot, humid, cold, or dry conditions, even in the same environment as the printer for 24-48 hours before buying large quantities. smoothness between 100 and 300 Sheffield points...
User Guide
Page 43
... lithographic or engraved printing process. • Avoid papers with a software application to successfully print on the paper package. • Do not use with the printer: • Chemically treated papers used to make copies without carbon paper, also known as carbonless papers, carbonless copy paper (CCP), or no carbon required (NCR) paper • Preprinted papers with a high degree of the...
... lithographic or engraved printing process. • Avoid papers with a software application to successfully print on the paper package. • Do not use with the printer: • Chemically treated papers used to make copies without carbon paper, also known as carbonless papers, carbonless copy paper (CCP), or no carbon required (NCR) paper • Preprinted papers with a high degree of the...


