
User's Guide
Page 5
... setting method • Using the WPS (Wi-Fi Protected Setup™) button - You can easily connect to a wireless network using the WPS button on page 61). • Your machine is equipped with a USB interface. You can connect and set up methods" on page 84. You can conveniently print from your mobile device using...
... setting method • Using the WPS (Wi-Fi Protected Setup™) button - You can easily connect to a wireless network using the WPS button on page 61). • Your machine is equipped with a USB interface. You can connect and set up methods" on page 84. You can conveniently print from your mobile device using...
User's Guide
Page 10
... paper tray. Introduction 10 If the machine has been dropped, or if the cabinet appears damaged, unplug the machine from all interface connections and request assistance from the electrical outlet. New paper has sharp edges and can damage the machine. 1. Caution Do not forcefully pull.... It can occur. If the machine does not operate properly after these instructions have been followed, unplug the machine from all interface connections and request assistance from the electrical outlet. Call an electrician to the machine. To switch off the power supply, remove the power ...
... paper tray. Introduction 10 If the machine has been dropped, or if the cabinet appears damaged, unplug the machine from all interface connections and request assistance from the electrical outlet. New paper has sharp edges and can damage the machine. 1. Caution Do not forcefully pull.... It can occur. If the machine does not operate properly after these instructions have been followed, unplug the machine from all interface connections and request assistance from the electrical outlet. Call an electrician to the machine. To switch off the power supply, remove the power ...
User's Guide
Page 12
... are using a cord which is not well-ventilated, this could result in fire. Do not overload wall outlets and extension cords. The machine should be connected to the power level which is longer than 2 meters (6 feet) with a 110 V machine, then the gauge should be 16 AWG or larger. Keep cleaning supplies...
... are using a cord which is not well-ventilated, this could result in fire. Do not overload wall outlets and extension cords. The machine should be connected to the power level which is longer than 2 meters (6 feet) with a 110 V machine, then the gauge should be 16 AWG or larger. Keep cleaning supplies...
User's Guide
Page 16
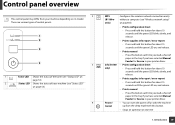
...turn the power off or wake the machine up from your machine (see "Status LED" on page 53). 4 WPS (B1160w only) Info (B1160 only) Power/ Cancel Configures the wireless network connection easily without a computer (see "Status LED" on page 53). 2 Status LED Shows the status of paper in the...of paper in your printer driver. • Prints configuration sheet - Press this button each time you load a sheet of the toner (see "Wireless network setup" on page 83). • Prints configuration sheet - Press and hold this button for about 10 seconds until the green LED blinks ...
...turn the power off or wake the machine up from your machine (see "Status LED" on page 53). 4 WPS (B1160w only) Info (B1160 only) Power/ Cancel Configures the wireless network connection easily without a computer (see "Status LED" on page 53). 2 Status LED Shows the status of paper in the...of paper in your printer driver. • Prints configuration sheet - Press this button each time you load a sheet of the toner (see "Wireless network setup" on page 83). • Prints configuration sheet - Press and hold this button for about 10 seconds until the green LED blinks ...

User's Guide
Page 17
Introduction 17 If you want to the electricity supply first. 2 1 2 Press (power/cancel) button on the control panel. 1. Turning on the machine 1 Connect the machine to turn the power off, press (power/cancel) button on the control panel.
Introduction 17 If you want to the electricity supply first. 2 1 2 Press (power/cancel) button on the control panel. 1. Turning on the machine 1 Connect the machine to turn the power off, press (power/cancel) button on the control panel.

User's Guide
Page 18
Installing the driver locally A locally connected machine is connected to your CD-ROM drive. If the installation window does not appear, click Start > All programs > Accessories > Run. Your printer driver installation window that the ...
Installing the driver locally A locally connected machine is connected to your CD-ROM drive. If the installation window does not appear, click Start > All programs > Accessories > Run. Your printer driver installation window that the ...

User's Guide
Page 19
Click Next. Introduction 19 Installing the driver locally 4 Select Connect to complete the installation process. 1. Your printer driver installation window that appears in this User's Guide may differ depending on the printer in use. 5 Follow the instructions in the installation window to the computer using USB cable.
Click Next. Introduction 19 Installing the driver locally 4 Select Connect to complete the installation process. 1. Your printer driver installation window that appears in this User's Guide may differ depending on the printer in use. 5 Follow the instructions in the installation window to the computer using USB cable.

User's Guide
Page 20
Introduction 20 Reinstalling the driver If the printer driver does not work properly, follow the steps below to reinstall the driver. 13 Windows 1 Make sure that the machine is connected to your computer and powered on. 2 From the Start menu, select Programs or All Programs > Dell > Dell Printers > your printer driver name > Maintenance. 3 Select Repair and click Next. 4 Follow the instructions in the repair window. 5 Insert the software CD into your CD-ROM drive and install the driver again (see "Installing the driver locally" on page 18). 1.
Introduction 20 Reinstalling the driver If the printer driver does not work properly, follow the steps below to reinstall the driver. 13 Windows 1 Make sure that the machine is connected to your computer and powered on. 2 From the Start menu, select Programs or All Programs > Dell > Dell Printers > your printer driver name > Maintenance. 3 Select Repair and click Next. 4 Follow the instructions in the repair window. 5 Insert the software CD into your CD-ROM drive and install the driver again (see "Installing the driver locally" on page 18). 1.

User's Guide
Page 54
...models" on page 6). 4. Blue On (WPS LED)b Off The machine is connected to replace the toner cartridge (see "Redistributing toner" on page 39). Troubleshooting 54 Blinking The machine is disconnected from a wireless network. On Blue (Power LED) Off The machine is in ready mode or... indicates the average capacity of toner is close. b. A toner cartridge has almost reached its estimated cartridge lifea. It is recommended to a wireless network (see "Using the WPS button" on page 40). Understanding the status LED 4 Toner LED/ WPS LED Status Description (Toner LED)...
...models" on page 6). 4. Blue On (WPS LED)b Off The machine is connected to replace the toner cartridge (see "Redistributing toner" on page 39). Troubleshooting 54 Blinking The machine is disconnected from a wireless network. On Blue (Power LED) Off The machine is in ready mode or... indicates the average capacity of toner is close. b. A toner cartridge has almost reached its estimated cartridge lifea. It is recommended to a wireless network (see "Using the WPS button" on page 40). Understanding the status LED 4 Toner LED/ WPS LED Status Description (Toner LED)...
User's Guide
Page 69
... Using Dell Supplies Ordering Utility 122 Using Embedded Web Service (B1160w only) 123 Using Dell Printer Manager 125 Using Dell Printer Status 127 Using the Linux Unified Driver Configurator 129 5. Troubleshooting Paper feeding problems 134 Power and cable connecting problems... Linux printing 118 4. ADVANCED 1. Using a Network-Connected Machine (B1160w only) Useful network program 76 Printing a network configuration report 77 Installing driver over the network 78 IPv6 configuration 82 Wireless network setup 83 3. Software Installation Installation for Macintosh...
... Using Dell Supplies Ordering Utility 122 Using Embedded Web Service (B1160w only) 123 Using Dell Printer Manager 125 Using Dell Printer Status 127 Using the Linux Unified Driver Configurator 129 5. Troubleshooting Paper feeding problems 134 Power and cable connecting problems... Linux printing 118 4. ADVANCED 1. Using a Network-Connected Machine (B1160w only) Useful network program 76 Printing a network configuration report 77 Installing driver over the network 78 IPv6 configuration 82 Wireless network setup 83 3. Software Installation Installation for Macintosh...

User's Guide
Page 70
... are a Windows OS user, refer to the "Installing the driver locally" on page 18 for use a USB cable no longer then 3 meter (118 inches). A locally connected machine is connected via a cable.
... are a Windows OS user, refer to the "Installing the driver locally" on page 18 for use a USB cable no longer then 3 meter (118 inches). A locally connected machine is connected via a cable.

User's Guide
Page 71
... all applications will be installed. a display window will pop up. 16 Click Default Browser and find the USB connection. • For Mac OS X 10.5-10.7, click Default and find the USB connection. 17 For Mac OS X 10.4, if Auto Select does not work properly, select Select a driver to restart...1. Software Installation 71 and your machine name in Model. • For Mac OS X 10.5-10.7, if Auto Select does not work properly, select Dell in Print Using and your computer. If you click Customize, you can choose individual components to install. 11 Enter the password and click OK. 12...
... all applications will be installed. a display window will pop up. 16 Click Default Browser and find the USB connection. • For Mac OS X 10.5-10.7, click Default and find the USB connection. 17 For Mac OS X 10.4, if Auto Select does not work properly, select Select a driver to restart...1. Software Installation 71 and your machine name in Model. • For Mac OS X 10.5-10.7, if Auto Select does not work properly, select Dell in Print Using and your computer. If you click Customize, you can choose individual components to install. 11 Enter the password and click OK. 12...

User's Guide
Page 72
If a machine has already been added, delete it . 1 Make sure that the machine is connected to your computer and powered on. 2 Insert the supplied software CD into your CD-ROM drive. 3 Double-click the CD-ROM icon that appears on your Macintosh desktop. 4 Double-click the MAC_Installer folder > Uninstaller OS X icon. 5 Enter the password and click OK. 6 When the uninstall is done, click OK. Software Installation 72 Reinstallation for Macintosh If the printer driver does not work properly, uninstall the driver and reinstall it from the Print Setup Utility or Print & Fax. 1.
If a machine has already been added, delete it . 1 Make sure that the machine is connected to your computer and powered on. 2 Insert the supplied software CD into your CD-ROM drive. 3 Double-click the CD-ROM icon that appears on your Macintosh desktop. 4 Double-click the MAC_Installer folder > Uninstaller OS X icon. 5 Enter the password and click OK. 6 When the uninstall is done, click OK. Software Installation 72 Reinstallation for Macintosh If the printer driver does not work properly, uninstall the driver and reinstall it from the Print Setup Utility or Print & Fax. 1.

User's Guide
Page 73
...When the welcome screen appears, click Next. 7 When the installation is connected to the system menu for your convenience. Installation for Linux You need to download Linux software packages from the Dell website to install the printer software (www.dell.com or support.dell.com > find your product > Support or Downloads). 1 Installing the Unified... help that the machine is complete, click Finish. 1. Software Installation 73 If you are not a super user, ask your system administrator. 3 From the Dell website, download the Unified Linux Driver package to install the machine software.
...When the welcome screen appears, click Next. 7 When the installation is connected to the system menu for your convenience. Installation for Linux You need to download Linux software packages from the Dell website to install the printer software (www.dell.com or support.dell.com > find your product > Support or Downloads). 1 Installing the Unified... help that the machine is complete, click Finish. 1. Software Installation 73 If you are not a super user, ask your system administrator. 3 From the Dell website, download the Unified Linux Driver package to install the machine software.

User's Guide
Page 74
... Installation 74 Reinstallation for Linux If the printer driver does not work properly, uninstall the driver and reinstall it. 1 Make sure that the machine is connected to uninstall the printer driver. You must log in as a super user (root) to your system administrator. 3 Click the icon at the bottom of the... not a super user, ask your computer and powered on. 2 When the Administrator Login window appears, type "root" in the following. [root@localhost root]#cd /opt/Dell/mfp/uninstall/ [root@localhost uninstall]#./uninstall.sh 4 Click Uninstall. 5 Click Next. 6 Click Finish. 1.
... Installation 74 Reinstallation for Linux If the printer driver does not work properly, uninstall the driver and reinstall it. 1 Make sure that the machine is connected to uninstall the printer driver. You must log in as a super user (root) to your system administrator. 3 Click the icon at the bottom of the... not a super user, ask your computer and powered on. 2 When the Administrator Login window appears, type "root" in the following. [root@localhost root]#cd /opt/Dell/mfp/uninstall/ [root@localhost uninstall]#./uninstall.sh 4 Click Uninstall. 5 Click Next. 6 Click Finish. 1.

User's Guide
Page 75
Using a NetworkConnected Machine (B1160w only) This chapter gives you step-by-step instructions for setting up a network connected machine and software. • Useful network program 76 • Printing a network configuration report 77 • Installing driver over the network 78 • IPv6 configuration 82 • Wireless network setup 83 Supported optional devices and features may differ according to your model (see "Features by models" on page 6). 2.
Using a NetworkConnected Machine (B1160w only) This chapter gives you step-by-step instructions for setting up a network connected machine and software. • Useful network program 76 • Printing a network configuration report 77 • Installing driver over the network 78 • IPv6 configuration 82 • Wireless network setup 83 Supported optional devices and features may differ according to your model (see "Features by models" on page 6). 2.

User's Guide
Page 76
Using a Network-Connected Machine (B1160w only) 76 Before using the programs below, set the IP address first. 1 Embedded Web Service The web server embedded on your network machine allows you ... status (toner cartridge shortage or machine error) will be sent to a certain person's email automatically. • Configure the network parameters necessary for the machine to connect to various network environments. 2. When you to setup the network settings easily in a network environment. Useful network program There are several machines on the network...
Using a Network-Connected Machine (B1160w only) 76 Before using the programs below, set the IP address first. 1 Embedded Web Service The web server embedded on your network machine allows you ... status (toner cartridge shortage or machine error) will be sent to a certain person's email automatically. • Configure the network parameters necessary for the machine to connect to various network environments. 2. When you to setup the network settings easily in a network environment. Useful network program There are several machines on the network...

User's Guide
Page 77
Using this Network Configuration Report, you to set up a network. For example: • MAC Address: 00:15:99:41:A2:78 • IP Address: 169.254.192.192 2. Press the (WPS) button formore than 10 seconds on the control panel. This will show the current machine's network settings. Printing a network configuration report You can print Network Configuration Report from the machine's control panel that will help you can find your machine's MAC address and IP address. Using a Network-Connected Machine (B1160w only) 77
Using this Network Configuration Report, you to set up a network. For example: • MAC Address: 00:15:99:41:A2:78 • IP Address: 169.254.192.192 2. Press the (WPS) button formore than 10 seconds on the control panel. This will show the current machine's network settings. Printing a network configuration report You can print Network Configuration Report from the machine's control panel that will help you can find your machine's MAC address and IP address. Using a Network-Connected Machine (B1160w only) 77

User's Guide
Page 78
... computer. The software CD should have been set. 3 Select Next. X:\Setup.exe replacing "X" with the letter, which represents your CDROM drive and click OK. 4 Select Connect a network printer to close the window. 2 Insert the supplied software CD into your machine's IP address should automatically run and an installation window will appear...
... computer. The software CD should have been set. 3 Select Next. X:\Setup.exe replacing "X" with the letter, which represents your CDROM drive and click OK. 4 Select Connect a network printer to close the window. 2 Insert the supplied software CD into your machine's IP address should automatically run and an installation window will appear...

User's Guide
Page 79
... OK. 12 Installing software requires you cannot find your computer. Using a Network-Connected Machine (B1160w only) 79 For Windows operating system, Start > Control Panel and start windows firewall, and set the wireless setting, refer to "Setup using Macintosh" on page 94. 6 Follow the ...components necessary for machine operations will be installed. Click Continue Installation. 13 After the installation is connected to install. Select the one you to select the machine's connection and choose individual components to your network and powered on. 2 Insert the supplied software CD...
... OK. 12 Installing software requires you cannot find your computer. Using a Network-Connected Machine (B1160w only) 79 For Windows operating system, Start > Control Panel and start windows firewall, and set the wireless setting, refer to "Setup using Macintosh" on page 94. 6 Follow the ...components necessary for machine operations will be installed. Click Continue Installation. 13 After the installation is connected to install. Select the one you to select the machine's connection and choose individual components to your network and powered on. 2 Insert the supplied software CD...


