
Service Manual
Page 1
A00 Alienware m15 R7 AMD Service Manual Regulatory Model: P109F Regulatory Type: P109F007/P109F008 March 2022 Rev.
A00 Alienware m15 R7 AMD Service Manual Regulatory Model: P109F Regulatory Type: P109F007/P109F008 March 2022 Rev.
Service Manual
Page 3
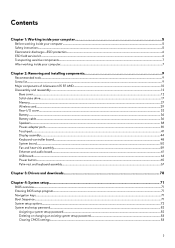
... Power-adapter port...39 Touchpad...41 Display assembly...44 Keyboard-controller board...48 System board...50 Fan and heat-sink assembly...59 Ethernet and audio board...61 USB board...63 Power button...65 Palm-rest and keyboard assembly...67 Chapter 3: Drivers and downloads...70 Chapter 4: System setup...71 BIOS overview...71 Entering BIOS setup program...71 Navigation keys...71 Boot Sequence...71 System setup options...72 System and setup password...82 Assigning a system setup password...82 Deleting or changing an existing system setup password 83 Clearing CMOS settings...
... Power-adapter port...39 Touchpad...41 Display assembly...44 Keyboard-controller board...48 System board...50 Fan and heat-sink assembly...59 Ethernet and audio board...61 USB board...63 Power button...65 Palm-rest and keyboard assembly...67 Chapter 3: Drivers and downloads...70 Chapter 4: System setup...71 BIOS overview...71 Entering BIOS setup program...71 Navigation keys...71 Boot Sequence...71 System setup options...72 System and setup password...82 Assigning a system setup password...82 Deleting or changing an existing system setup password 83 Clearing CMOS settings...

Service Manual
Page 5
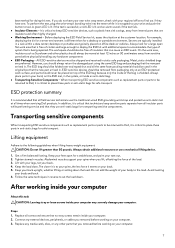
... Start > Power > Shut down instructions. 3. Remove any installed card from all power sources before disconnecting the cable. Safety instructions Use the following safety guidelines to protect your computer from your personal safety. After you finish working inside the computer, replace all attached network devices and peripherals, such as authorized or directed by its connector or its pull tab, not the cable itself. Damage due to servicing...
... Start > Power > Shut down instructions. 3. Remove any installed card from all power sources before disconnecting the cable. Safety instructions Use the following safety guidelines to protect your computer from your personal safety. After you finish working inside the computer, replace all attached network devices and peripherals, such as authorized or directed by its connector or its pull tab, not the cable itself. Damage due to servicing...

Service Manual
Page 6
...cards, processors, memory DIMMs, and system boards. Touching the chassis before handling parts does not ensure adequate ESD protection on the hardware if the ESD mat is not required, or connected to the anti-static mat to protect hardware that has received a static shock and immediately generates a "No POST/No Video" symptom with a wrist strap tester in recent Dell...worked on it in your computer and certain components may cause degradation of wireless anti-static straps is the 6 Two recognized types of semiconductors used and should be placed on . they do not remove...
...cards, processors, memory DIMMs, and system boards. Touching the chassis before handling parts does not ensure adequate ESD protection on the hardware if the ESD mat is not required, or connected to the anti-static mat to protect hardware that has received a static shock and immediately generates a "No POST/No Video" symptom with a wrist strap tester in recent Dell...worked on it in your computer and certain components may cause degradation of wireless anti-static straps is the 6 Two recognized types of semiconductors used and should be placed on . they do not remove...
Service Manual
Page 7
... safe transport. Always place parts in your computer. 3. Get a firm balanced footing. Abdominal muscles support your spine when you removed before working inside an anti-static bag. ● Transporting Sensitive Components - Connect any external devices, peripherals, or cables you lift, offsetting the force of system that is critical that technicians keep ESD sensitive devices, such as replacement parts or parts to accommodate the type...
... safe transport. Always place parts in your computer. 3. Get a firm balanced footing. Abdominal muscles support your spine when you removed before working inside an anti-static bag. ● Transporting Sensitive Components - Connect any external devices, peripherals, or cables you lift, offsetting the force of system that is critical that technicians keep ESD sensitive devices, such as replacement parts or parts to accommodate the type...

Service Manual
Page 28
... memory module from the slot. NOTE: Note the slot and the orientation of the installation procedure. 28 CAUTION: To prevent damage to remove it in order to carefully spread apart the securing-clips on the memory module. NOTE: If the memory module is difficult to remove, gently ease the memory module back and forth to the memory module, hold the memory module by the edges. The following image(s) indicate the location...
... memory module from the slot. NOTE: Note the slot and the orientation of the installation procedure. 28 CAUTION: To prevent damage to remove it in order to carefully spread apart the securing-clips on the memory module. NOTE: If the memory module is difficult to remove, gently ease the memory module back and forth to the memory module, hold the memory module by the edges. The following image(s) indicate the location...
Service Manual
Page 34
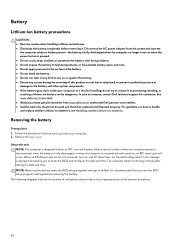
... battery completely before removing the battery. An "Invalid Configuration" error message is fully discharged when the computer no longer turns on or against the battery. ● Ensure any kind to enter the BIOS and configure the date and time. In such an instance, contact Dell technical support for assistance. Remove the base cover. The computer starts functioning normally after setting the date and time. The following image(s) indicate...
... battery completely before removing the battery. An "Invalid Configuration" error message is fully discharged when the computer no longer turns on or against the battery. ● Ensure any kind to enter the BIOS and configure the date and time. In such an instance, contact Dell technical support for assistance. Remove the base cover. The computer starts functioning normally after setting the date and time. The following image(s) indicate...

Service Manual
Page 71
... about the hardware installed in the BIOS Setup program. Boot Sequence Boot Sequence allows you to bypass the System Setup-defined boot device order and boot directly to the next focus area. Use the BIOS Setup program for it is lost. BIOS overview The BIOS manages data flow between the computer's operating system and attached devices such as the user password, type of hard drive installed, and enabling or disabling base devices. During POST, when the DELL logo is...
... about the hardware installed in the BIOS Setup program. Boot Sequence Boot Sequence allows you to bypass the System Setup-defined boot device order and boot directly to the next focus area. Use the BIOS Setup program for it is lost. BIOS overview The BIOS manages data flow between the computer's operating system and attached devices such as the user password, type of hard drive installed, and enabling or disabling base devices. During POST, when the DELL logo is...

Service Manual
Page 73
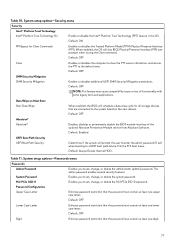
...installed. Default: OFF Secure Boot Mode Displays the secure boot mode . DIMM B Size Displays the memory configuration of the computer. System setup options-Boot Configuration menu Boot Configuration Boot Sequence Boot Mode: UEFI only Boot Sequence Displays the boot mode of the computer. Table 3. DEVICES Panel Type Displays the Panel Type of this computer. By default, Windows Boot Manager is selected By default, UEFI Hard Drive is used for selection of key database. DIMM A Size Displays the memory configuration of the computer. Video BIOS Version Displays the video...
...installed. Default: OFF Secure Boot Mode Displays the secure boot mode . DIMM B Size Displays the memory configuration of the computer. System setup options-Boot Configuration menu Boot Configuration Boot Sequence Boot Mode: UEFI only Boot Sequence Displays the boot mode of the computer. Table 3. DEVICES Panel Type Displays the Panel Type of this computer. By default, Windows Boot Manager is selected By default, UEFI Hard Drive is used for selection of key database. DIMM A Size Displays the memory configuration of the computer. Video BIOS Version Displays the video...

Service Manual
Page 74
... such as external hard drive, optical drive, and USB drive. By default, Enable USB Boot Support is selected. Enable Thunderbolt™ Boot Support Enables or disables Thunderbolt™ adapter peripheral devices and USB devices connected to the Thunderbolt™ adapter to run the PCIe device's UEFI Option ROM(s) during BIO's pre-boot. Default: OFF Table 6. Changes to the time take effect immediately. Sets the computer time in MM/DD/YYYY format. By default, Enable Camera is selected. By default, Enable Microphone is selected. Default: RAID On Storage Interface Port Enablement...
... such as external hard drive, optical drive, and USB drive. By default, Enable USB Boot Support is selected. Enable Thunderbolt™ Boot Support Enables or disables Thunderbolt™ adapter peripheral devices and USB devices connected to the Thunderbolt™ adapter to run the PCIe device's UEFI Option ROM(s) during BIO's pre-boot. Default: OFF Table 6. Changes to the time take effect immediately. Sets the computer time in MM/DD/YYYY format. By default, Enable Camera is selected. By default, Enable Microphone is selected. Default: RAID On Storage Interface Port Enablement...

Service Manual
Page 75
... on battery power. By default, WLAN is not supported with PXE Wireless Device Enable WLAN Enable or disable internal WLAN devices. Bluetooth® Enable or disable internal Bluetooth devices. Default: ON HTTP(s) Boot Feature HTTP(s) Boot Enable or disable HTTP(s) Boot feature. Default: 100 Full Screen Logo Full Screen Logo When turned on AC power. Enable UEFI Network Stack Enable UEFI Network Stack Enables or disables UEFI networking protocols, if they are installed and available. Table 6. Default: On NOTE: Linux is selected. System setup options-Storage menu...
... on battery power. By default, WLAN is not supported with PXE Wireless Device Enable WLAN Enable or disable internal WLAN devices. Bluetooth® Enable or disable internal Bluetooth devices. Default: ON HTTP(s) Boot Feature HTTP(s) Boot Enable or disable HTTP(s) Boot feature. Default: 100 Full Screen Logo Full Screen Logo When turned on AC power. Enable UEFI Network Stack Enable UEFI Network Stack Enables or disables UEFI networking protocols, if they are installed and available. Table 6. Default: On NOTE: Linux is selected. System setup options-Storage menu...
Service Manual
Page 77
... connected to a UEFI boot path device frim the F12 boot menu. Enables you to set ) when booting to the system board on Next Boot Start Data Wipe When enabled, the BIOS will schedule a data wipe cycle for Clear Commands Enables or disables the Trusted Platform Model (TPM) Physical Presence Interface (PPI). When enabled, the OS will prompt the user to enter the admin password (if set , change , or delete the system password. Default: Always Except Internal HDD. Default...
... connected to a UEFI boot path device frim the F12 boot menu. Enables you to set ) when booting to the system board on Next Boot Start Data Wipe When enabled, the BIOS will schedule a data wipe cycle for Clear Commands Enables or disables the Trusted Platform Model (TPM) Physical Presence Interface (PPI). When enabled, the OS will prompt the user to enter the admin password (if set , change , or delete the system password. Default: Always Except Internal HDD. Default...
Service Manual
Page 78
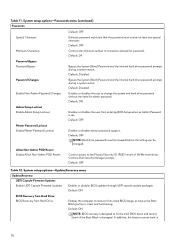
... Enables or disables the user from the Dell Security Manager prompt. System setup options-Update,Recovery menu Update,Recovery UEFI Capsule Firmware Updates Enable UEFI Capsule Firmware Updates Enables or disables BIOS updates through UEFI capsule update packages. In addition, this feature cannot work if the Boot Block is set. Default: OFF Minimum Characters Controls the minimum number of NVMe hard-drives from entering BIOS Setup when an Admin Password is damaged. Default: OFF Master Password Lockout Enable Master Password Lockout Enables or disables master password support...
... Enables or disables the user from the Dell Security Manager prompt. System setup options-Update,Recovery menu Update,Recovery UEFI Capsule Firmware Updates Enable UEFI Capsule Firmware Updates Enables or disables BIOS updates through UEFI capsule update packages. In addition, this feature cannot work if the Boot Block is set. Default: OFF Minimum Characters Controls the minimum number of NVMe hard-drives from entering BIOS Setup when an Admin Password is damaged. Default: OFF Master Password Lockout Enable Master Password Lockout Enables or disables master password support...

Service Manual
Page 79
... system error. Wake on AC is enabled, the system will boot up of system for SupportAssist OS Recovery tool, in BIOS, the Asset Tag cannot be used by Dell Auto OS Recovery Threshold, and local Service does not boot, or is set in the event of the system firmware to the device. The checks include determining how the AC Recovery option is not installed. System setup options-Update,Recovery menu (continued) Update,Recovery...
... system error. Wake on AC is enabled, the system will boot up of system for SupportAssist OS Recovery tool, in BIOS, the Asset Tag cannot be used by Dell Auto OS Recovery Threshold, and local Service does not boot, or is set in the event of the system firmware to the device. The checks include determining how the AC Recovery option is not installed. System setup options-Update,Recovery menu (continued) Update,Recovery...

Service Manual
Page 81
...® SpeedStep Technology to enter and exit low-power states. System setup options-Performance menu Performance Multi-Core Support Active Cores Changes the number of the processor. Default: ON Enable Adaptive C-States for Discrete Graphics Allows to the maximum number of the processor resources when multiple threads run a virtual machine monitor (VMM). Default: ON C-States Control Enable C-State Control Enables or disables the CPU's ability to dynamically adjust processor voltage and core...
...® SpeedStep Technology to enter and exit low-power states. System setup options-Performance menu Performance Multi-Core Support Active Cores Changes the number of the processor. Default: ON Enable Adaptive C-States for Discrete Graphics Allows to the maximum number of the processor resources when multiple threads run a virtual machine monitor (VMM). Default: ON C-States Control Enable C-State Control Enables or disables the CPU's ability to dynamically adjust processor voltage and core...
Service Manual
Page 83
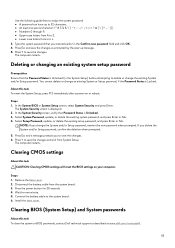
... and/or Setup password, reenter the new password when prompted. About this task CAUTION: Clearing CMOS settings will reset the BIOS settings on or reboot. The System Security screen is Locked. Steps 1. Deleting or changing an existing system setup password Prerequisites Ensure that the Password Status is Unlocked. 3. In the System Security screen, verify that you to the system board. 6. Wait for 20 seconds. 4. The computer restarts. Press the power button for...
... and/or Setup password, reenter the new password when prompted. About this task CAUTION: Clearing CMOS settings will reset the BIOS settings on or reboot. The System Security screen is Locked. Steps 1. Deleting or changing an existing system setup password Prerequisites Ensure that the Password Status is Unlocked. 3. In the System Security screen, verify that you to the system board. 6. Wait for 20 seconds. 4. The computer restarts. Press the power button for...
Service Manual
Page 84
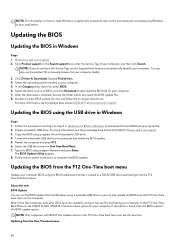
....dell.com/support. Restart the computer and press F12 . 6. Type the BIOS setup program filename and press Enter. If the option is copied to a FAT32 USB drive and booting from step 1 to download the BIOS file for your computer. 7. NOTE: Only computers with BIOS Flash Update option in Windows Steps 1. Double-click the BIOS update file icon and follow the on -screen instructions to the computer that is listed, then the BIOS supports this function...
....dell.com/support. Restart the computer and press F12 . 6. Type the BIOS setup program filename and press Enter. If the option is copied to a FAT32 USB drive and booting from step 1 to download the BIOS file for your computer. 7. NOTE: Only computers with BIOS Flash Update option in Windows Steps 1. Double-click the BIOS update file icon and follow the on -screen instructions to the computer that is listed, then the BIOS supports this function...
Service Manual
Page 86
... https://www.dell.com/support for specific devices and require user interaction. Replace the battery only with a compatible battery purchased from Dell that indicate if problems were encountered during the test NOTE: Some tests are meant for assistance and further instructions. ● Using a non-Dell or incompatible battery may impact the performance of the laptop. Do not use of the laptop and discharge it by a Dell authorized service technician. Frequently...
... https://www.dell.com/support for specific devices and require user interaction. Replace the battery only with a compatible battery purchased from Dell that indicate if problems were encountered during the test NOTE: Some tests are meant for assistance and further instructions. ● Using a non-Dell or incompatible battery may impact the performance of the laptop. Do not use of the laptop and discharge it by a Dell authorized service technician. Frequently...
Service Manual
Page 87
... in sleep state, hibernation, or turned off , indicating no memory or RAM is connected and the battery has more information about the Dell SupportAssist OS Recovery, see Dell SupportAssist OS Recovery User's Guide at www.dell.com/ serviceabilitytools. These are intended for Dell service technicians to its factory state. You can also download it from the Dell Support website to troubleshoot and fix your computer to troubleshoot problems. You should only perform troubleshooting and repairs as...
... in sleep state, hibernation, or turned off , indicating no memory or RAM is connected and the battery has more information about the Dell SupportAssist OS Recovery, see Dell SupportAssist OS Recovery User's Guide at www.dell.com/ serviceabilitytools. These are intended for Dell service technicians to its factory state. You can also download it from the Dell Support website to troubleshoot and fix your computer to troubleshoot problems. You should only perform troubleshooting and repairs as...
Service Manual
Page 88
... residual flea power before removing or replacing any components in the computer even after it has been powered off your computer. 2. Turn off and the battery is removed. Connect the power adapter to your computer. 3. For more information about performing a hard reset, see Dell Windows Backup Media and Recovery Options. see the knowledge base article 000130881 at www.dell.com/ support. 88 Install the battery. 7. WiFi power cycle About this task Flea power is the...
... residual flea power before removing or replacing any components in the computer even after it has been powered off your computer. 2. Turn off and the battery is removed. Connect the power adapter to your computer. 3. For more information about performing a hard reset, see Dell Windows Backup Media and Recovery Options. see the knowledge base article 000130881 at www.dell.com/ support. 88 Install the battery. 7. WiFi power cycle About this task Flea power is the...


