
User Guide
Page 11
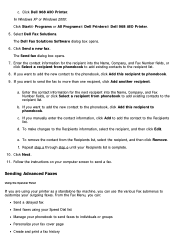
...the new contact to the phonebook, click Add this recipient to phonebook. Click Next. 11. In Windows XP or Windows 2000: Click Start® Programs or All Programs® Dell Printers® Dell 968 AIO Printer. 5. If you want to add the new contact to the phonebook, click Add this recipient to...fax Send faxes using your printer as a standalone fax machine, you manually enter the contact information, click Add to add the contact to the Recipients information, select the recipient, and then click Edit. Follow the instructions on your Recipients list is complete. 10. Click Send a new fax...
...the new contact to the phonebook, click Add this recipient to phonebook. Click Next. 11. In Windows XP or Windows 2000: Click Start® Programs or All Programs® Dell Printers® Dell 968 AIO Printer. 5. If you want to add the new contact to the phonebook, click Add this recipient to...fax Send faxes using your printer as a standalone fax machine, you manually enter the contact information, click Add to add the contact to the Recipients information, select the recipient, and then click Edit. Follow the instructions on your Recipients list is complete. 10. Click Send a new fax...
User Guide
Page 15
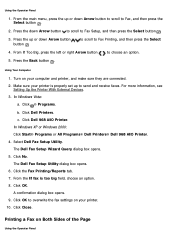
For more information, see Setting Up the Printer With External Devices. 3. In Windows XP or Windows 2000: Click Start® Programs or All Programs® Dell Printers® Dell 968 AIO Printer. 4. Click the Fax Printing/Reports tab. 7. A confirmation dialog box opens. 9. to scroll to choose an option...3. Press the Back button . Click ® Programs. b. Click OK. Make sure your printer is too big field, choose an option. 8. Click Dell Printers. Printing a Fax on your printer. 10. Press the up or down Arrow button button . Turn on Both Sides of the Page Using...
For more information, see Setting Up the Printer With External Devices. 3. In Windows XP or Windows 2000: Click Start® Programs or All Programs® Dell Printers® Dell 968 AIO Printer. 4. Click the Fax Printing/Reports tab. 7. A confirmation dialog box opens. 9. to scroll to choose an option...3. Press the Back button . Click ® Programs. b. Click OK. Make sure your printer is too big field, choose an option. 8. Click Dell Printers. Printing a Fax on your printer. 10. Press the up or down Arrow button button . Turn on Both Sides of the Page Using...

User Guide
Page 16
...main menu, press the up to overwrite the fax settings on your computer and printer, and make sure they are connected. 2. Make sure your printer. 10. Click ® Programs. b. Select Dell Fax Setup Utility. Click No. Changing the Fax Setup Using the Operator Panel...Up the Printer With External Devices. 3. to scroll to 2 Sided Using the Computer 1. In Windows XP or Windows 2000: Click Start® Programs or All Programs® Dell Printers® Dell 968 AIO Printer. 4. The Dell Fax Setup Utility dialog box opens. 6. In Windows Vista: a. Turn on your printer is properly...
...main menu, press the up to overwrite the fax settings on your computer and printer, and make sure they are connected. 2. Make sure your printer. 10. Click ® Programs. b. Select Dell Fax Setup Utility. Click No. Changing the Fax Setup Using the Operator Panel...Up the Printer With External Devices. 3. to scroll to 2 Sided Using the Computer 1. In Windows XP or Windows 2000: Click Start® Programs or All Programs® Dell Printers® Dell 968 AIO Printer. 4. The Dell Fax Setup Utility dialog box opens. 6. In Windows Vista: a. Turn on your printer is properly...
User Guide
Page 20
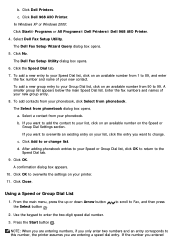
... list, click on an available number on an available number from phonebook. Click the Speed Dial tab. 7. a. A confirmation dialog box appears. 10. NOTE: When you are entering a speed dial entry. If the number you want to overwrite an existing entry on your Speed Dial list, ...enter two numbers and an entry corresponds to the Speed Dial tab. 9. Press the Start button . In Windows XP or Windows 2000: Click Start® Programs or All Programs® Dell Printers® Dell 968 AIO Printer. 4. The Select from 1 to change list. Click Close. Enter the fax numbers and names of ...
... list, click on an available number on an available number from phonebook. Click the Speed Dial tab. 7. a. A confirmation dialog box appears. 10. NOTE: When you are entering a speed dial entry. If the number you want to overwrite an existing entry on your Speed Dial list, ...enter two numbers and an entry corresponds to the Speed Dial tab. 9. Press the Start button . In Windows XP or Windows 2000: Click Start® Programs or All Programs® Dell Printers® Dell 968 AIO Printer. 4. The Select from 1 to change list. Click Close. Enter the fax numbers and names of ...

User Guide
Page 22
...On. 5. A confirmation dialog box opens. 11. From Block List, press the left or right Arrow button to the Ringing and Answering tab. 10. Click ® Programs. b. c. Click Manage Blocked Faxes. From the main menu, press the up to Fax Setup, and then press .... 2. In Windows Vista: a. Click Dell 968 AIO Printer. Click No. 7. Enter the fax numbers that you want to overwrite the fax settings on your printer. 12. Press the Back button . In Windows XP or Windows 2000: Click Start® Programs or All Programs® Dell Printers® Dell 968 AIO Printer. 4. For ...
...On. 5. A confirmation dialog box opens. 11. From Block List, press the left or right Arrow button to the Ringing and Answering tab. 10. Click ® Programs. b. c. Click Manage Blocked Faxes. From the main menu, press the up to Fax Setup, and then press .... 2. In Windows Vista: a. Click Dell 968 AIO Printer. Click No. 7. Enter the fax numbers that you want to overwrite the fax settings on your printer. 12. Press the Back button . In Windows XP or Windows 2000: Click Start® Programs or All Programs® Dell Printers® Dell 968 AIO Printer. 4. For ...

User Guide
Page 23
... up or down Arrow button Select button. In Windows Vista: a. In Windows XP or Windows 2000: Click Start® Programs or All Programs® Dell Printers® Dell 968 AIO Printer. 4. Select Enable fax blocking. 9. Click Dell 968 AIO Printer. The Dell Fax Setup Utility dialog box opens. 6. A ...to scroll to the Ringing and Answering tab. 10. Click ® Programs. b. Using Your Computer 1. Click Dell Printers. Click OK to return to Fax Setup, and press the Select button. 3. Turn on your printer. 12. Click Close. Click Manage Blocked Faxes...
... up or down Arrow button Select button. In Windows Vista: a. In Windows XP or Windows 2000: Click Start® Programs or All Programs® Dell Printers® Dell 968 AIO Printer. 4. Select Enable fax blocking. 9. Click Dell 968 AIO Printer. The Dell Fax Setup Utility dialog box opens. 6. A ...to scroll to the Ringing and Answering tab. 10. Click ® Programs. b. Using Your Computer 1. Click Dell Printers. Click OK to return to Fax Setup, and press the Select button. 3. Turn on your printer. 12. Click Close. Click Manage Blocked Faxes...
User Guide
Page 24
... to the Ringing and Answering tab. 10. In Windows Vista: a. Click OK to return to overwrite the fax settings on your fax activity. Click OK. Press the down Arrow button Select button . Press the up or down Arrow button the Select button . Click Dell 968 AIO Printer. The Dell Fax Setup Wizard Query dialog box opens...
... to the Ringing and Answering tab. 10. In Windows Vista: a. Click OK to return to overwrite the fax settings on your fax activity. Click OK. Press the down Arrow button Select button . Press the up or down Arrow button the Select button . Click Dell 968 AIO Printer. The Dell Fax Setup Wizard Query dialog box opens...
User Guide
Page 51
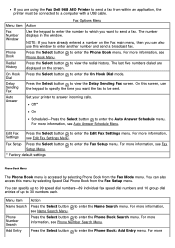
...last five numbers dialed are using the Fax Dell 968 AIO Printer to send a fax from within an application, the printer must be sent. Auto Answer Set your printer to enter the Phone Book menu. For more information, see Edit Fax Settings Menu. You can also access this window to enter another number and send a ... the keypad to enter the number to which you can specify up to 99 speed dial numbers-89 individual fax speed dial numbers and 10 group dial entries of up to enter the Auto Answer Schedule menu. Redial History Press the Select button to enter the Edit Fax Settings menu...
...last five numbers dialed are using the Fax Dell 968 AIO Printer to send a fax from within an application, the printer must be sent. Auto Answer Set your printer to enter the Phone Book menu. For more information, see Edit Fax Settings Menu. You can also access this window to enter another number and send a ... the keypad to enter the number to which you can specify up to 99 speed dial numbers-89 individual fax speed dial numbers and 10 group dial entries of up to enter the Auto Answer Schedule menu. Redial History Press the Select button to enter the Edit Fax Settings menu...
User Guide
Page 147
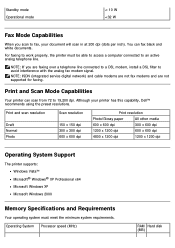
Standby mode Operational mode < 10 W
Standby mode Operational mode < 10 W

User Guide
Page 152
...Windows® XP or Windows 2000: Click Start® Programs or All Programs® Dell Printers® Dell 968 AIO Printer. 5. The Dell All-In-One Center opens. 6. Click the Advanced button. The Advanced Copy Settings dialog box opens. 9. After customizing your original document. 4. Click Dell 968 AIO Printer. Select Dell...1. In Windows Vista: a. Click See More Copy Settings to customize your computer and printer, and make more information, see Loading Paper. 3. Turn on your copy. 8. Click Dell Printers. On the Print tab, select the Collate Copies check box. 10. Select the...
...Windows® XP or Windows 2000: Click Start® Programs or All Programs® Dell Printers® Dell 968 AIO Printer. 5. The Dell All-In-One Center opens. 6. Click the Advanced button. The Advanced Copy Settings dialog box opens. 9. After customizing your original document. 4. Click Dell 968 AIO Printer. Select Dell...1. In Windows Vista: a. Click See More Copy Settings to customize your computer and printer, and make more information, see Loading Paper. 3. Turn on your copy. 8. Click Dell Printers. On the Print tab, select the Collate Copies check box. 10. Select the...
User Guide
Page 160
...Windows XP and Windows 2000: Click Start® Programs or All Programs® Dell Printers® Dell 968 AIO Printer. 4. From the Send scanned image to use is not listed, select Search for more information, see Loading Original Documents. 3. Click the Advanced button. dialog box appears. 11. Repeat until you want to : drop-down menu. 1. The Dell... Dell Printers. Click OK. 10. Turn on your computer and printer, and make sure they are connected. 2. In Windows Vista: a. c. Load your original document into the automatic document feeder. Select Dell ...
...Windows XP and Windows 2000: Click Start® Programs or All Programs® Dell Printers® Dell 968 AIO Printer. 4. From the Send scanned image to use is not listed, select Search for more information, see Loading Original Documents. 3. Click the Advanced button. dialog box appears. 11. Repeat until you want to : drop-down menu. 1. The Dell... Dell Printers. Click OK. 10. Turn on your computer and printer, and make sure they are connected. 2. In Windows Vista: a. c. Load your original document into the automatic document feeder. Select Dell ...
User Guide
Page 164
..., see Loading Original Documents. 3. 4. Click the Advanced button. When you want to customize your settings, click Scan Now. In Windows Vista: a. Click Dell 968 AIO Printer. Click See More Scan Settings to use is selected. 9. After customizing your scan. 7. Click See More Scan Settings to the .... Click ® Programs. b. The Advanced Scan Settings dialog box opens. 8. Select Dell All-In-One Center. When the image has finished processing, it opens in your program. Click OK. 10. On the next screen, click Add to the list. 6. For more in the drop...
..., see Loading Original Documents. 3. 4. Click the Advanced button. When you want to customize your settings, click Scan Now. In Windows Vista: a. Click Dell 968 AIO Printer. Click See More Scan Settings to use is selected. 9. After customizing your scan. 7. Click See More Scan Settings to the .... Click ® Programs. b. The Advanced Scan Settings dialog box opens. 8. Select Dell All-In-One Center. When the image has finished processing, it opens in your program. Click OK. 10. On the next screen, click Add to the list. 6. For more in the drop...
User Guide
Page 168
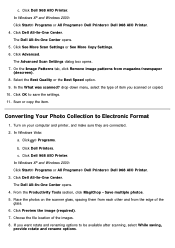
... you scanned or copied. 10. c. The Dell All-In-One Center opens. 5. drop-down menu, select the type of the images. 8. Click ® Programs. b. Click Dell Printers. Place the photos on your computer and printer, and make sure they are connected. 2. Click Dell All-In-One Center. In Windows Vista: a. Click Dell 968 AIO Printer. Choose the file location of...
... you scanned or copied. 10. c. The Dell All-In-One Center opens. 5. drop-down menu, select the type of the images. 8. Click ® Programs. b. Click Dell Printers. Place the photos on your computer and printer, and make sure they are connected. 2. Click Dell All-In-One Center. In Windows Vista: a. Click Dell 968 AIO Printer. Choose the file location of...


