
User Guide
Page 28
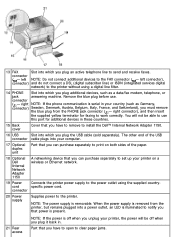
... will be off when you plug it back in your computer. 17 Optional duplex unit Part that you can purchase separately to print on a wireless or Ethernet network. 19 Power Connects the printer power supply to the power outlet using a digital line filter. 14 PHONE Slot into which you... plugs into your country (such as a data/fax modem, telephone, or jack answering machine. The other end of the paper. 18 Optional Dell Internal Network Adapter 1150 A networking device that you have to remove to send and receive faxes. When the power supply is removed from the PHONE jack connector...
... will be off when you plug it back in your computer. 17 Optional duplex unit Part that you can purchase separately to print on a wireless or Ethernet network. 19 Power Connects the printer power supply to the power outlet using a digital line filter. 14 PHONE Slot into which you... plugs into your country (such as a data/fax modem, telephone, or jack answering machine. The other end of the paper. 18 Optional Dell Internal Network Adapter 1150 A networking device that you have to remove to send and receive faxes. When the power supply is removed from the PHONE jack connector...
User Guide
Page 73
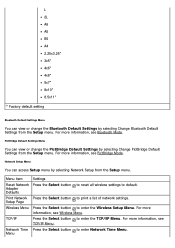
... button to enter Network Time Menu. Press the Select button to print a list of network settings. For more information, see Wireless Menu. For more information, see PictBridge Mode. PictBridge Default Settings Menu You can view or change the Bluetooth Default Settings by selecting...menu. For more information, see Bluetooth Mode. Menu item Reset Network Adapter Defaults Print Network Setup Page Wireless Menu TCP/IP Network Time Menu Settings Press the Select button to reset all wireless settings to enter the Wireless Setup Menu. Press the Select button to enter the TCP/IP ...
... button to enter Network Time Menu. Press the Select button to print a list of network settings. For more information, see Wireless Menu. For more information, see PictBridge Mode. PictBridge Default Settings Menu You can view or change the Bluetooth Default Settings by selecting...menu. For more information, see Bluetooth Mode. Menu item Reset Network Adapter Defaults Print Network Setup Page Wireless Menu TCP/IP Network Time Menu Settings Press the Select button to reset all wireless settings to enter the Wireless Setup Menu. Press the Select button to enter the TCP/IP ...

User Guide
Page 74
... if DHCP is powered on. From the Network Time Menu, press the left Arrow button to save the settings. Menu item Network Name Wireless Signal Quality * Factory default setting Settings Reflects the current SSID being used. Menu item Enable DHCP Settings Specify whether or not your network...Wireless Setup Menu by selecting TCP/IP from the Network Setup menu. From the Set IP Address menu, use . Press the Select button to enter the Set IP Netmask menu. Set IP Press the Select button to view the current signal quality. Active Network Specify which network connection the adapter...
... if DHCP is powered on. From the Network Time Menu, press the left Arrow button to save the settings. Menu item Network Name Wireless Signal Quality * Factory default setting Settings Reflects the current SSID being used. Menu item Enable DHCP Settings Specify whether or not your network...Wireless Setup Menu by selecting TCP/IP from the Network Setup menu. From the Set IP Address menu, use . Press the Select button to enter the Set IP Netmask menu. Set IP Press the Select button to view the current signal quality. Active Network Specify which network connection the adapter...

User Guide
Page 80
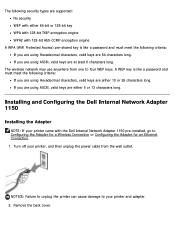
... settings that has been installed in all regions. Minimum Requirements for Setup Wireless Network Settings Wireless Encryption Installing and Configuring the Dell Internal Network Adapter 1150 Configuring the Adapter Using the Wireless Setup Utility The optional Dell™ Internal Network Adapter 1150 enables you use-Ad-Hoc or Infrastructure) Wireless Channel Number Network Authentication and encryption type Security Key...
... settings that has been installed in all regions. Minimum Requirements for Setup Wireless Network Settings Wireless Encryption Installing and Configuring the Dell Internal Network Adapter 1150 Configuring the Adapter Using the Wireless Setup Utility The optional Dell™ Internal Network Adapter 1150 enables you use-Ad-Hoc or Infrastructure) Wireless Channel Number Network Authentication and encryption type Security Key...
User Guide
Page 81
...can cause damage to your printer, and then unplug the power cable from one to Configuring the Adapter for a Wireless Connection or Configuring the Adapter for an Ethernet Connection. 1. The wireless network may use anywhere from the wall outlet. If you are using ASCII, valid keys are ... Hexadecimal characters, valid keys are either 10 or 26 characters long. Remove the back cover. Installing and Configuring the Dell Internal Network Adapter 1150 Installing the Adapter NOTE: If your printer came with 128-bit AES-CCMP encryption engine A WPA (WiFi Protected Access) pre-shared key...
...can cause damage to your printer, and then unplug the power cable from one to Configuring the Adapter for a Wireless Connection or Configuring the Adapter for an Ethernet Connection. 1. The wireless network may use anywhere from the wall outlet. If you are using ASCII, valid keys are ... Hexadecimal characters, valid keys are either 10 or 26 characters long. Remove the back cover. Installing and Configuring the Dell Internal Network Adapter 1150 Installing the Adapter NOTE: If your printer came with 128-bit AES-CCMP encryption engine A WPA (WiFi Protected Access) pre-shared key...
User Guide
Page 82
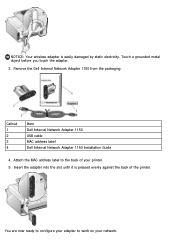
Remove the Dell Internal Network Adapter 1150 from the packaging. You are now ready to configure your adapter to the back of the printer. Attach the MAC address label to work on your printer. 5. Callout 1 2 3 4 Item Dell Internal Network Adapter 1150 USB cable MAC address label Dell Internal Network Adapter 1150 Installation Guide 4. NOTICE: Your wireless adapter is pressed evenly against the back of your network. Insert the adapter into the slot until it is easily damaged by static electricity. Touch a grounded metal object before you touch the adapter. 3.
Remove the Dell Internal Network Adapter 1150 from the packaging. You are now ready to configure your adapter to the back of the printer. Attach the MAC address label to work on your printer. 5. Callout 1 2 3 4 Item Dell Internal Network Adapter 1150 USB cable MAC address label Dell Internal Network Adapter 1150 Installation Guide 4. NOTICE: Your wireless adapter is pressed evenly against the back of your network. Insert the adapter into the slot until it is easily damaged by static electricity. Touch a grounded metal object before you touch the adapter. 3.

User Guide
Page 83
... with the terms of the printer and the port on the operator panel. 3. For more information, see Configuring the Adapter Using the Wireless Setup Utility. Select I Agree with a new Dell computer: Go to the next step. 4. Select Using a wireless network, and then click Next. 6. If you do not have your network documentation. Configuring the...
... with the terms of the printer and the port on the operator panel. 3. For more information, see Configuring the Adapter Using the Wireless Setup Utility. Select I Agree with a new Dell computer: Go to the next step. 4. Select Using a wireless network, and then click Next. 6. If you do not have your network documentation. Configuring the...
User Guide
Page 85
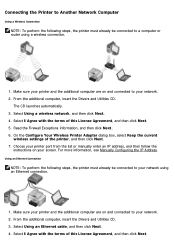
...Drivers and Utilities CD. Read the Firewall Exceptions information, and then click Next. 6. On the Configure Your Wireless Printer Adapter dialog box, select Keep the current wireless settings of this License Agreement, and then click Next. Choose your printer port from the list or manually ...additional computer are on your screen. Select I Agree with the terms of this License Agreement, and then click Next. 5. Select Using a wireless network, and then click Next. 4. Using an Ethernet Connection NOTE: To perform the following steps, the printer must already be connected to ...
...Drivers and Utilities CD. Read the Firewall Exceptions information, and then click Next. 6. On the Configure Your Wireless Printer Adapter dialog box, select Keep the current wireless settings of this License Agreement, and then click Next. Choose your printer port from the list or manually ...additional computer are on your screen. Select I Agree with the terms of this License Agreement, and then click Next. 5. Select Using a wireless network, and then click Next. 4. Using an Ethernet Connection NOTE: To perform the following steps, the printer must already be connected to ...
User Guide
Page 86
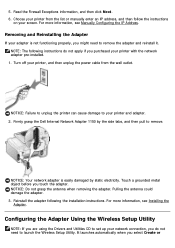
...your printer and adapter. 2. Reinstall the adapter following instructions do not need to remove the adapter and reinstall it. For more information, see Installing the Adapter. Configuring the Adapter Using the Wireless Setup Utility ...NOTE: If you might need to your screen. NOTICE: Do not grasp the antenna when removing the adapter. 5. Firmly grasp the Dell Internal Network Adapter...
...your printer and adapter. 2. Reinstall the adapter following instructions do not need to remove the adapter and reinstall it. For more information, see Installing the Adapter. Configuring the Adapter Using the Wireless Setup Utility ...NOTE: If you might need to your screen. NOTICE: Do not grasp the antenna when removing the adapter. 5. Firmly grasp the Dell Internal Network Adapter...
User Guide
Page 87
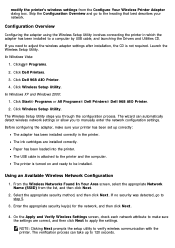
... been installed correctly in which the adapter has been installed to step 5. 3. Click Start® Programs or All Programs® Dell Printers® Dell 968 AIO Printer. 2. NOTE: Clicking Next prompts the setup utility to manually enter the network configuration settings. The verification process can automatically detect wireless network settings or allow you through the...
... been installed correctly in which the adapter has been installed to step 5. 3. Click Start® Programs or All Programs® Dell Printers® Dell 968 AIO Printer. 2. NOTE: Clicking Next prompts the setup utility to manually enter the network configuration settings. The verification process can automatically detect wireless network settings or allow you through the...
User Guide
Page 88
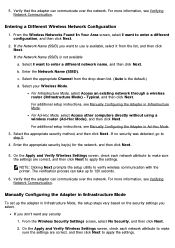
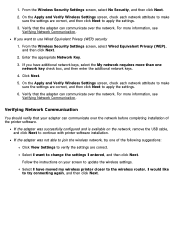
...For additional setup instructions, see Manually Configuring the Adapter in Infrastructure Mode. NOTE: Clicking Next prompts the setup utility to step 5. 4. From the Wireless Security Settings screen, select No Security, and then click Next. 2. Entering a Different Wireless Network Configuration 1. c. Enter the appropriate security... and then click Next to apply the settings. Verify that the adapter can take up the adapter in Ad-Hoc Mode. 3. If no security was detected, go to verify wireless communication with the printer. The verification process can communicate over the ...
...For additional setup instructions, see Manually Configuring the Adapter in Infrastructure Mode. NOTE: Clicking Next prompts the setup utility to step 5. 4. From the Wireless Security Settings screen, select No Security, and then click Next. 2. Entering a Different Wireless Network Configuration 1. c. Enter the appropriate security... and then click Next to apply the settings. Verify that the adapter can take up the adapter in Ad-Hoc Mode. 3. If no security was detected, go to verify wireless communication with the printer. The verification process can communicate over the ...
User Guide
Page 89
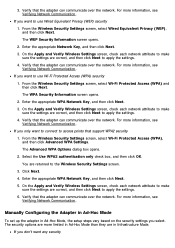
... Advanced WPA Settings. The Advanced WPA Options dialog box opens. 2. If you want to connect to the Wireless Security Settings screen. 3. Verify that the adapter can communicate over the network. The WPA Security Information screen opens. 2. Select the Use WPA2 authentication only check... Communication. Enter the appropriate WPA Network Key, and then click Next. 3. Click Next. 4. Verify that the adapter can communicate over the network. 3. From the Wireless Security Settings screen, select Wi-Fi Protected Access (WPA) and then click Next. Manually Configuring the...
... Advanced WPA Settings. The Advanced WPA Options dialog box opens. 2. If you want to connect to the Wireless Security Settings screen. 3. Verify that the adapter can communicate over the network. The WPA Security Information screen opens. 2. Select the Use WPA2 authentication only check... Communication. Enter the appropriate WPA Network Key, and then click Next. 3. Click Next. 4. Verify that the adapter can communicate over the network. 3. From the Wireless Security Settings screen, select Wi-Fi Protected Access (WPA) and then click Next. Manually Configuring the...
User Guide
Page 90
... Verifying Network Communication. Enter the appropriate Network Key. 3. Verifying Network Communication You should verify that the adapter can communicate over the network. From the Wireless Security Settings screen, select No Security, and then click Next. 2. From the Wireless Security Settings screen, select Wired Equivalent Privacy (WEP), and then click Next. 2. Verify that your...
... Verifying Network Communication. Enter the appropriate Network Key. 3. Verifying Network Communication You should verify that the adapter can communicate over the network. From the Wireless Security Settings screen, select No Security, and then click Next. 2. From the Wireless Security Settings screen, select Wired Equivalent Privacy (WEP), and then click Next. 2. Verify that your...


