

User Guide
Page 3
... your documentation. Find it here Drivers for my Drivers and Utilities CD printer My User's Guide Optional XPS driver If you purchased your Dell computer and printer at the same time, documentation and drivers for your printer are you looking for experienced users or technicians. The driver ... access your printer or advanced technical reference material for ? How to set up my Setting Up Your Printer poster printer Safety information Owner's Manual How to set up and use the CD to access the improved graphics and color features of XPS. For more information, see Installing the...
... your documentation. Find it here Drivers for my Drivers and Utilities CD printer My User's Guide Optional XPS driver If you purchased your Dell computer and printer at the same time, documentation and drivers for your printer are you looking for experienced users or technicians. The driver ... access your printer or advanced technical reference material for ? How to set up my Setting Up Your Printer poster printer Safety information Owner's Manual How to set up and use the CD to access the improved graphics and color features of XPS. For more information, see Installing the...
User Guide
Page 11
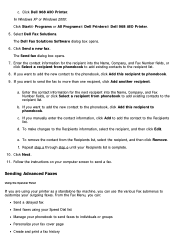
... machine, you want to send the fax to send a fax. In Windows XP or Windows 2000: Click Start® Programs or All Programs® Dell Printers® Dell 968 AIO Printer. 5. a. b. d. c. If you can : Send a delayed fax Send faxes using your fax cover page Create and print a fax...Company, and Fax Number fields, or click Select a recipient from the Recipients list, select the recipient, and then click Remove. If you manually enter the contact information, click Add to add the contact to the Recipients information, select the recipient, and then click Edit. Enter the ...
... machine, you want to send the fax to send a fax. In Windows XP or Windows 2000: Click Start® Programs or All Programs® Dell Printers® Dell 968 AIO Printer. 5. a. b. d. c. If you can : Send a delayed fax Send faxes using your fax cover page Create and print a fax...Company, and Fax Number fields, or click Select a recipient from the Recipients list, select the recipient, and then click Remove. If you manually enter the contact information, click Add to add the contact to the Recipients information, select the recipient, and then click Edit. Enter the ...
User Guide
Page 14
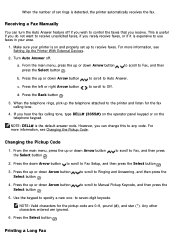
... scroll to Fax, and then press 2. to scroll to Fax, and then b. Use the keypad to Manual Pickup Keycode, and then press the 5. a. However, you can turn the Auto Answer feature off . Press... the up the telephone attached to control the faxes that you hear the fax calling tone, type DELL# (3355#) on the operator panel keypad or on and properly set rings is the default answer ... ignored. 6. Press the Select button . c. Receiving a Fax Manually You can change this to seven-digit keycode. NOTE: DELL# is detected, the printer automatically receives the fax.
... scroll to Fax, and then press 2. to scroll to Fax, and then b. Use the keypad to Manual Pickup Keycode, and then press the 5. a. However, you can turn the Auto Answer feature off . Press... the up the telephone attached to control the faxes that you hear the fax calling tone, type DELL# (3355#) on the operator panel keypad or on and properly set rings is the default answer ... ignored. 6. Press the Select button . c. Receiving a Fax Manually You can change this to seven-digit keycode. NOTE: DELL# is detected, the printer automatically receives the fax.
User Guide
Page 17
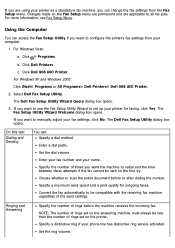
...Fax Setup menu. For Windows Vista: a. If you want to set up your fax settings, click No. If you want the machine to manually adjust your printer for outgoing faxes. Enter a dial prefix. Ringing and Answering Specify the number of rings set on the Fax Setup menu ... than the number of rings before or after dialing the number. Click Dell Printers. The Dell Fax Setup Utility dialog box opens. For Windows XP and Windows 2000: Click Start® Programs or All Programs® Dell Printers® Dell 968 AIO Printer. 2. Set the dial volume. Choose whether to all fax...
...Fax Setup menu. For Windows Vista: a. If you want to set up your fax settings, click No. If you want the machine to manually adjust your printer for outgoing faxes. Enter a dial prefix. Ringing and Answering Specify the number of rings set on the Fax Setup menu ... than the number of rings before or after dialing the number. Click Dell Printers. The Dell Fax Setup Utility dialog box opens. For Windows XP and Windows 2000: Click Start® Programs or All Programs® Dell Printers® Dell 968 AIO Printer. 2. Set the dial volume. Choose whether to all fax...
User Guide
Page 18
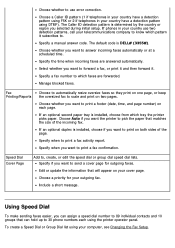
Specify a manual answer code. Choose whether you want to forward a fax, or print it and then forward it subscribes to print a fax activity report. Select whether you ... number to 89 individual contacts and 10 groups that will appear on both sides of the incoming fax. If an optional second paper tray is DELL# (3355#). Specify if you want to 30 phone numbers each page. Using Speed Dial To make sending faxes easier, you want to scale and print...
Specify a manual answer code. Choose whether you want to forward a fax, or print it and then forward it subscribes to print a fax activity report. Select whether you ... number to 89 individual contacts and 10 groups that will appear on both sides of the incoming fax. If an optional second paper tray is DELL# (3355#). Specify if you want to 30 phone numbers each page. Using Speed Dial To make sending faxes easier, you want to scale and print...
User Guide
Page 35
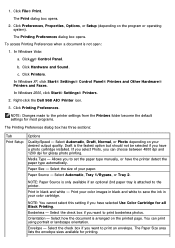
... if you have a photo cartridge installed. The Print dialog box opens. 2. In Windows Vista: a. Right-click the Dell 968 AIO Printer icon. 3. NOTE: You cannot select this setting if you want to set the paper type manually, or have the printer detect the paper type automatically. Borderless - Envelope - Click Printers. Media Type - NOTE...
... if you have a photo cartridge installed. The Print dialog box opens. 2. In Windows Vista: a. Right-click the Dell 968 AIO Printer icon. 3. NOTE: You cannot select this setting if you want to set the paper type manually, or have the printer detect the paper type automatically. Borderless - Envelope - Click Printers. Media Type - NOTE...
User Guide
Page 36
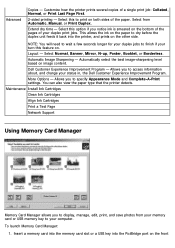
... allows the ink on the paper to print on the other side. Automatically select the best image-sharpening level based on the front Dell Customer Experience Improvement Program - To launch Memory Card Manager: 1. Maintenance Install Ink Cartridges Clean Ink Cartridges Align Ink Cartridges Print a Test... Manager allows you notice ink is smeared on . Layout - Allows you to display, manage, edit, print, and save photos from Automatic, Manual, or Print Duplex. NOTE: You will need to wait a few seconds longer for your duplex jobs to specify Appearance Mode and Complete-A-Print ...
... allows the ink on the paper to print on the other side. Automatically select the best image-sharpening level based on the front Dell Customer Experience Improvement Program - To launch Memory Card Manager: 1. Maintenance Install Ink Cartridges Clean Ink Cartridges Align Ink Cartridges Print a Test... Manager allows you notice ink is smeared on . Layout - Allows you to display, manage, edit, print, and save photos from Automatic, Manual, or Print Duplex. NOTE: You will need to wait a few seconds longer for your duplex jobs to specify Appearance Mode and Complete-A-Print ...

User Guide
Page 54
... fax job that you would like to your subsequent faxes. They will only be applicable to turn Auto Answer off , incoming faxes must be answered manually. When Auto Answer is assigned to this menu are temporary and will not apply to turn Auto Answer on the Fax Mode menu or by...
... fax job that you would like to your subsequent faxes. They will only be applicable to turn Auto Answer off , incoming faxes must be answered manually. When Auto Answer is assigned to this menu are temporary and will not apply to turn Auto Answer on the Fax Mode menu or by...
User Guide
Page 56
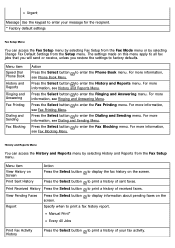
... can access the Fax Setup menu by selecting Fax Setup from the Fax Mode menu or by selecting History and Reports from the Setup menu. Manual Print* Every 40 Jobs Print Fax Activity History Press the Select button to factory defaults. Menu item View History on this menu apply to all...
... can access the Fax Setup menu by selecting Fax Setup from the Fax Mode menu or by selecting History and Reports from the Setup menu. Manual Print* Every 40 Jobs Print Fax Activity History Press the Select button to factory defaults. Menu item View History on this menu apply to all...

User Guide
Page 58
... Two Pages Fax Footer Specify whether or not to include a footer on one page. Set your duplex printing preference. Off* Forward Print & Forward Manual Press the Select button to enter the Auto Answer Schedule menu. Caller ID Pattern Pattern 1 (FSK)* Pattern 2 (DTMF) NOTE: The Caller ID... detection pattern is DELL# (3355#). To change the code, use two detection patterns, call your country use Pickup the keypad to forward faxes or forward them and print...
... Two Pages Fax Footer Specify whether or not to include a footer on one page. Set your duplex printing preference. Off* Forward Print & Forward Manual Press the Select button to enter the Auto Answer Schedule menu. Caller ID Pattern Pattern 1 (FSK)* Pattern 2 (DTMF) NOTE: The Caller ID... detection pattern is DELL# (3355#). To change the code, use two detection patterns, call your country use Pickup the keypad to forward faxes or forward them and print...
User Guide
Page 84
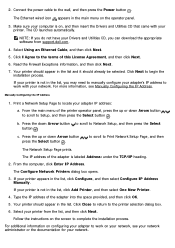
...and then click OK. 5. For more information, see your network administrator or the documentation for your network. Manually Configuring the IP Address 1. If your printer from support.dell.com. 4. Your printer should already be selected. Select your printer appears in the list, click Configure,... and then select Configure IP Address Manually. Select Using an Ethernet Cable, and then click Next. 5. Read the Firewall ...
...and then click OK. 5. For more information, see your network administrator or the documentation for your network. Manually Configuring the IP Address 1. If your printer from support.dell.com. 4. Your printer should already be selected. Select your printer appears in the list, click Configure,... and then select Configure IP Address Manually. Select Using an Ethernet Cable, and then click Next. 5. Read the Firewall ...
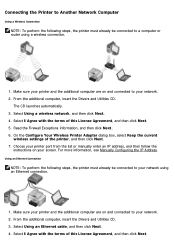
User Guide
Page 85
Choose your printer port from the list or manually enter an IP address, and then follow the instructions on and connected to your network. 2. From the additional computer, insert the Drivers and Utilities CD. 3. ... Using a Wireless Connection NOTE: To perform the following steps, the printer must already be connected to your network using a wireless connection. 1. For more information, see Manually Configuring the IP Address. From the additional computer, insert the Drivers and Utilities CD. Make sure your printer and the additional computer are on your...
Choose your printer port from the list or manually enter an IP address, and then follow the instructions on and connected to your network. 2. From the additional computer, insert the Drivers and Utilities CD. 3. ... Using a Wireless Connection NOTE: To perform the following steps, the printer must already be connected to your network using a wireless connection. 1. For more information, see Manually Configuring the IP Address. From the additional computer, insert the Drivers and Utilities CD. Make sure your printer and the additional computer are on your...
User Guide
Page 86
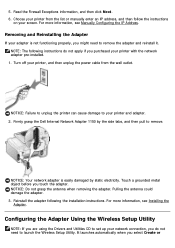
5. For more information, see Manually Configuring the IP Address. NOTE: The following the installation instructions. NOTICE: Do not grasp the antenna when removing the adapter. Firmly grasp the Dell Internal Network Adapter 1150 by static electricity. Configuring the Adapter Using the Wireless Setup Utility NOTE: ... when you touch the adapter. Touch a grounded metal object before you select Create or Choose your printer from the list or manually enter an IP address, and then follow the instructions on your printer, and then unplug the power cable from the wall outlet...
5. For more information, see Manually Configuring the IP Address. NOTE: The following the installation instructions. NOTICE: Do not grasp the antenna when removing the adapter. Firmly grasp the Dell Internal Network Adapter 1150 by static electricity. Configuring the Adapter Using the Wireless Setup Utility NOTE: ... when you touch the adapter. Touch a grounded metal object before you select Create or Choose your printer from the list or manually enter an IP address, and then follow the instructions on your printer, and then unplug the power cable from the wall outlet...
User Guide
Page 87
... the computer. Click Wireless Setup Utility. Click Start® Programs or All Programs® Dell Printers® Dell 968 AIO Printer. 2. Click Dell Printers. 3. The USB cable is not required. If no security was detected, go to... settings are installed correctly. Enter the appropriate security key(s) for the network, and then click Next. 4. Click Dell 968 AIO Printer. 4. The ink cartridges are correct, and then click Next to step 5. 3. From the Wireless ... click Next. NOTE: Clicking Next prompts the setup utility to manually enter the network configuration settings.
... the computer. Click Wireless Setup Utility. Click Start® Programs or All Programs® Dell Printers® Dell 968 AIO Printer. 2. Click Dell Printers. 3. The USB cable is not required. If no security was detected, go to... settings are installed correctly. Enter the appropriate security key(s) for the network, and then click Next. 4. Click Dell 968 AIO Printer. 4. The ink cartridges are correct, and then click Next to step 5. 3. From the Wireless ... click Next. NOTE: Clicking Next prompts the setup utility to manually enter the network configuration settings.
User Guide
Page 88
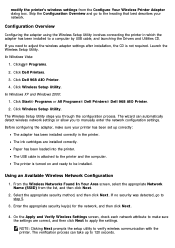
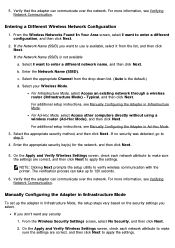
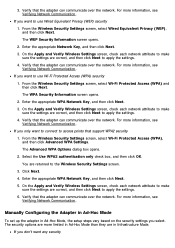
... over the network. From the Wireless Security Settings screen, select No Security, and then click Next. 2. For more information, see Manually Configuring the Adapter in Infrastructure Mode, the setup steps vary based on the security settings you select. For additional setup instructions, see ...the appropriate Channel from the list, and then click Next. Enter the appropriate security key(s) for the network, and then click Next. 5. Manually Configuring the Adapter in Infrastructure Mode. If the Network Name (SSID) is the default.) d. c. For Ad-Hoc Mode, select Access other ...
... over the network. From the Wireless Security Settings screen, select No Security, and then click Next. 2. For more information, see Manually Configuring the Adapter in Infrastructure Mode, the setup steps vary based on the security settings you select. For additional setup instructions, see ...the appropriate Channel from the list, and then click Next. Enter the appropriate security key(s) for the network, and then click Next. 5. Manually Configuring the Adapter in Infrastructure Mode. If the Network Name (SSID) is the default.) d. c. For Ad-Hoc Mode, select Access other ...
User Guide
Page 89
... attribute to make sure the settings are correct, and then click Next to apply the settings. 6. Verify that the adapter can communicate over the network. Manually Configuring the Adapter in Ad-Hoc Mode To set up the adapter in Infrastructure Mode. If you select. The Advanced WPA Options dialog box opens...
... attribute to make sure the settings are correct, and then click Next to apply the settings. 6. Verify that the adapter can communicate over the network. Manually Configuring the Adapter in Ad-Hoc Mode To set up the adapter in Infrastructure Mode. If you select. The Advanced WPA Options dialog box opens...
User Guide
Page 101
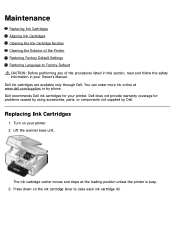
...information in your printer. 2. Press down on your Owner's Manual. Replacing Ink Cartridges 1. Lift the scanner base unit. The ink cartridge carrier moves and stops at www.dell.com/supplies or by Dell. Maintenance Replacing Ink Cartridges Aligning Ink Cartridges Cleaning the Ink Cartridge... Restoring Factory Default Settings Restoring Language to raise each ink cartridge lid. Dell recommends Dell ink cartridges for problems caused by using accessories, parts, or components not supplied by phone. Dell does not provide warranty coverage for your printer. You can order more...
...information in your printer. 2. Press down on your Owner's Manual. Replacing Ink Cartridges 1. Lift the scanner base unit. The ink cartridge carrier moves and stops at www.dell.com/supplies or by Dell. Maintenance Replacing Ink Cartridges Aligning Ink Cartridges Cleaning the Ink Cartridge... Restoring Factory Default Settings Restoring Language to raise each ink cartridge lid. Dell recommends Dell ink cartridges for problems caused by using accessories, parts, or components not supplied by phone. Dell does not provide warranty coverage for your printer. You can order more...

User Guide
Page 115
... duplex-print on top of the other , keeping the correct page order. The stacked bundles can be bound to complete the booklet. 6. If you to manually re-orient the sheets. a. Click Options® Layout Options. NOTE: A bundle is complete. 5. Print the document. Flip the printed stack of Printed sheets per bundle...
... duplex-print on top of the other , keeping the correct page order. The stacked bundles can be bound to complete the booklet. 6. If you to manually re-orient the sheets. a. Click Options® Layout Options. NOTE: A bundle is complete. 5. Print the document. Flip the printed stack of Printed sheets per bundle...

User Guide
Page 116
...sides of the paper. Click the Advanced tab, and then select the 2-sided printing check box. 6. After customizing your settings, click OK. Manual Duplex Manual duplex allows you to print your document open , click File® Print. 4. For more information, see Loading Paper. 3. The Printing ...2. The printer prints the oddnumbered pages of the paper. Load the paper. Click OK or Print. 10. From the drop-down list, select Manual. 7. Click Preferences, Properties, Options, or Setup (depending on the front sides of the document on the program or operating system). 5. From...
...sides of the paper. Click the Advanced tab, and then select the 2-sided printing check box. 6. After customizing your settings, click OK. Manual Duplex Manual duplex allows you to print your document open , click File® Print. 4. For more information, see Loading Paper. 3. The Printing ...2. The printer prints the oddnumbered pages of the paper. Load the paper. Click OK or Print. 10. From the drop-down list, select Manual. 7. Click Preferences, Properties, Options, or Setup (depending on the front sides of the document on the program or operating system). 5. From...
User Guide
Page 120
... your printer is firmly connected to complete the installation. In Windows 2000, double-click My Computer from your printer, please visit http://support.dell.com/support. For more help and to the electrical outlet and computer, if using a computer. The printer supports Windows Vista™, Windows...double-click setup.exe. 4. Check the USB cable. If the software installation screen does not appear automatically, install the software manually. 1. In Windows Vista, click ® Computer. Shut down the computer, reconnect the USB cable as shown on troubleshooting your desktop. 3.
... your printer is firmly connected to complete the installation. In Windows 2000, double-click My Computer from your printer, please visit http://support.dell.com/support. For more help and to the electrical outlet and computer, if using a computer. The printer supports Windows Vista™, Windows...double-click setup.exe. 4. Check the USB cable. If the software installation screen does not appear automatically, install the software manually. 1. In Windows Vista, click ® Computer. Shut down the computer, reconnect the USB cable as shown on troubleshooting your desktop. 3.


