
Owner's Manual
Page 13
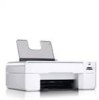
...7 8 9 10 11 12 13 Part: Paper exit tray Printer unit Ink cartridge carrier Scanner support USB connector Power connector Memory card slots PictBridge USB connector Scanner glass Operator panel Description: Tray that keeps the printer open while you change ink cartridges. NOTE: To close the printer for normal... operation, lift the printer unit, push the scanner support inward toward the back of the...
...7 8 9 10 11 12 13 Part: Paper exit tray Printer unit Ink cartridge carrier Scanner support USB connector Power connector Memory card slots PictBridge USB connector Scanner glass Operator panel Description: Tray that keeps the printer open while you change ink cartridges. NOTE: To close the printer for normal... operation, lift the printer unit, push the scanner support inward toward the back of the...

Owner's Manual
Page 71
To order by Dell. 1 Turn on your printer. Dell does not provide warranty coverage for your printer. 2 Lift the printer unit, and position the scanner support between the tabs to hold it open. Ink Cartridge Maintenance 71 You can order more ink online at the loading position unless the printer is busy. 7 Ink Cartridge Maintenance Replacing...
To order by Dell. 1 Turn on your printer. Dell does not provide warranty coverage for your printer. 2 Lift the printer unit, and position the scanner support between the tabs to hold it open. Ink Cartridge Maintenance 71 You can order more ink online at the loading position unless the printer is busy. 7 Ink Cartridge Maintenance Replacing...
Owner's Manual
Page 81
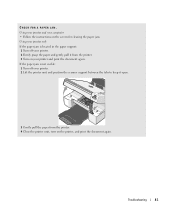
...the paper jam is located in the paper support: 1 Turn off your printer. 2 Lift the printer unit and position the scanner support between the tabs to keep it from the printer. 4 Close the printer unit, turn on the printer, and print the document again. Using your printer and your printer. 2 ...Firmly grasp the paper and gently pull it open. 3 Gently pull the paper from the printer. 3 Turn on ...
...the paper jam is located in the paper support: 1 Turn off your printer. 2 Lift the printer unit and position the scanner support between the tabs to keep it from the printer. 4 Close the printer unit, turn on the printer, and print the document again. Using your printer and your printer. 2 ...Firmly grasp the paper and gently pull it open. 3 Gently pull the paper from the printer. 3 Turn on ...


